








TL;DR
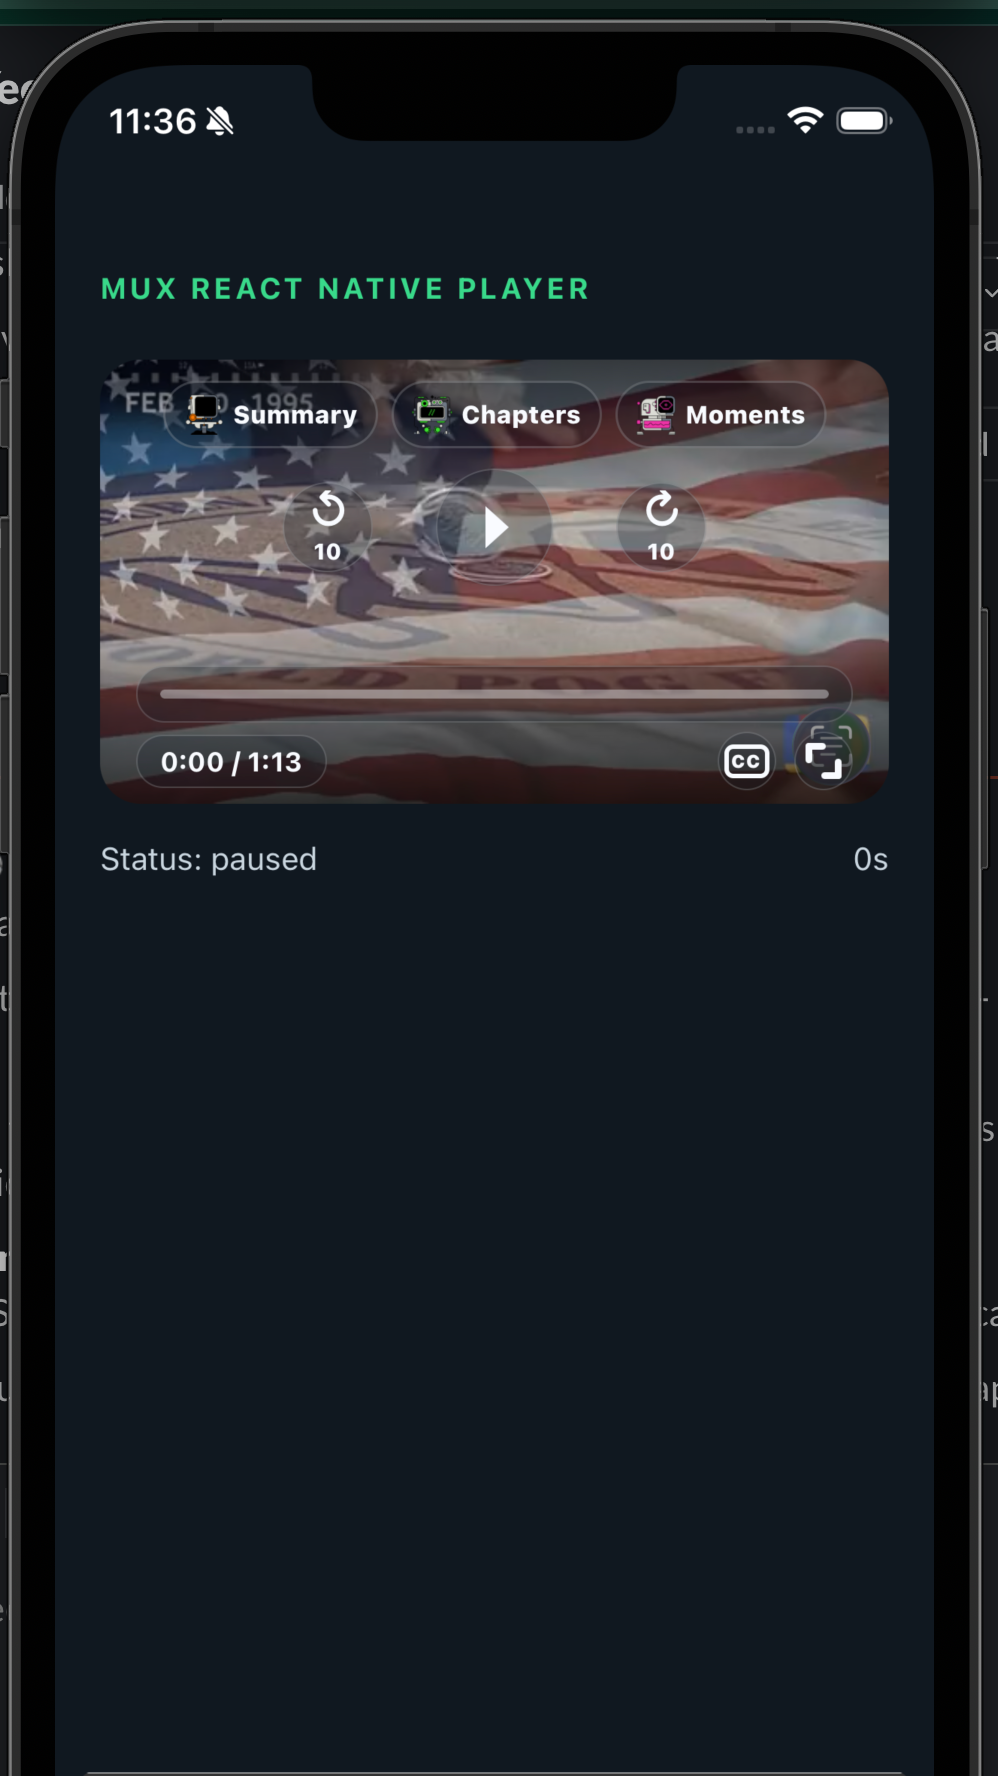
I created a new video player for React Native apps. This video player uses the existing Mux Swift and Android players, connects them to a React Native wrapper with an upgraded UI plus Mux Robots and Mux Data capabilities all packed into one video player.
Install via npm and check out the repo.
Back in 2018 I realized that cross platform frameworks for mobile devices were getting a lot more buzz. Some may say I was late to the party but honestly I still think even in 2026 we’re a bit early.
React Native launched in 2015 but didn’t get its polish till a few years after that. It's 2026 and React Native still hasn't hit 1.0 but its still extremely capable at the current version of 0.85.
I did go through a rough patch with React Native in the past so I turned to alternatives like Flutter. I thought Dart, the language used for Flutter UI development was pretty neat but when it came to debugging and looking up solutions on Stackoverflow (in the age before AI) it was not the best developer experience for me.
Flutter isn't dead. I just used it for a while and eventually realized that React Native was better for the types of apps I was creating. Flutter is actually still more popular than React Native till this day 🤷🏾♂️. This fact surprises me because with React Native you get the ability to use Expo which totally changes the experience of building mobile apps with one language. Trust me that makes a huge difference when it comes to giving your apps a more native feel and also helps a ton with testing and deployment.
In the past some of the big players like Airbnb and Udacity were using React Native to build their mobile apps. That didn’t really last too long. Airbnb eventually switched to native development and went all in on Swift and Kotlin. The main reasons were things like React Native’s immaturity at the time, friction around maintaining their own fork, tooling pain, JavaScriptCore inconsistencies, and the overhead of running parallel native and React Native infrastructure at their scale. They figured it wasn’t worth the long‑term complexity at their size. Just because Airbnb made this switch does not mean you have to.
React Native is still great for teams that want to ship on multiple platforms with a familiar developer experience with JS or TS. A lot has changed since Airbnb’s switch to native. Expo entered the scene and basically took over how we develop apps with React Native. It’s so official that the React Native docs suggest using Expo off the bat. I like to think of Expo as the Vercel for React Native. You can deploy apps, manage builds and even use a ton of built in modules that Expo provides like the popular expo-video.
expo-video is a great cross-platform video component that works out of the box with Expo. It’s performant and is one of the go-to video players for React Native project alongside react-native-video-player. I usually go for expo-video myself. I used it in one of my mobile apps called Robotube which is an open source video streaming app built with Mux Robots, React Native and Convex
expo-video was also used in Slop Social, the TikTok style feed example we released at the end of last year.
React Native video playback is deceptively hard. A polished player needs to do more than render an HLS stream. It needs native performance, lifecycle-safe controls, status events, captions and screen size changes. Take a look at VideoJS. It's fully loaded and has gone through quite the evolution and it's one of the main inspirations for this video player.
Expo-video is great but I wanted some extra features that the native players didn't have. Expo-video by default uses a native bridge to combine AVPlayer (iOS) and Exoplayer (Android). This way you can install one expo module and have the appropriate native video player component/view appear depending on the type of phone it's on. So basically you’re getting the same native player, no UI changes or anything extra like analytics/data capabilities or DRM built in.
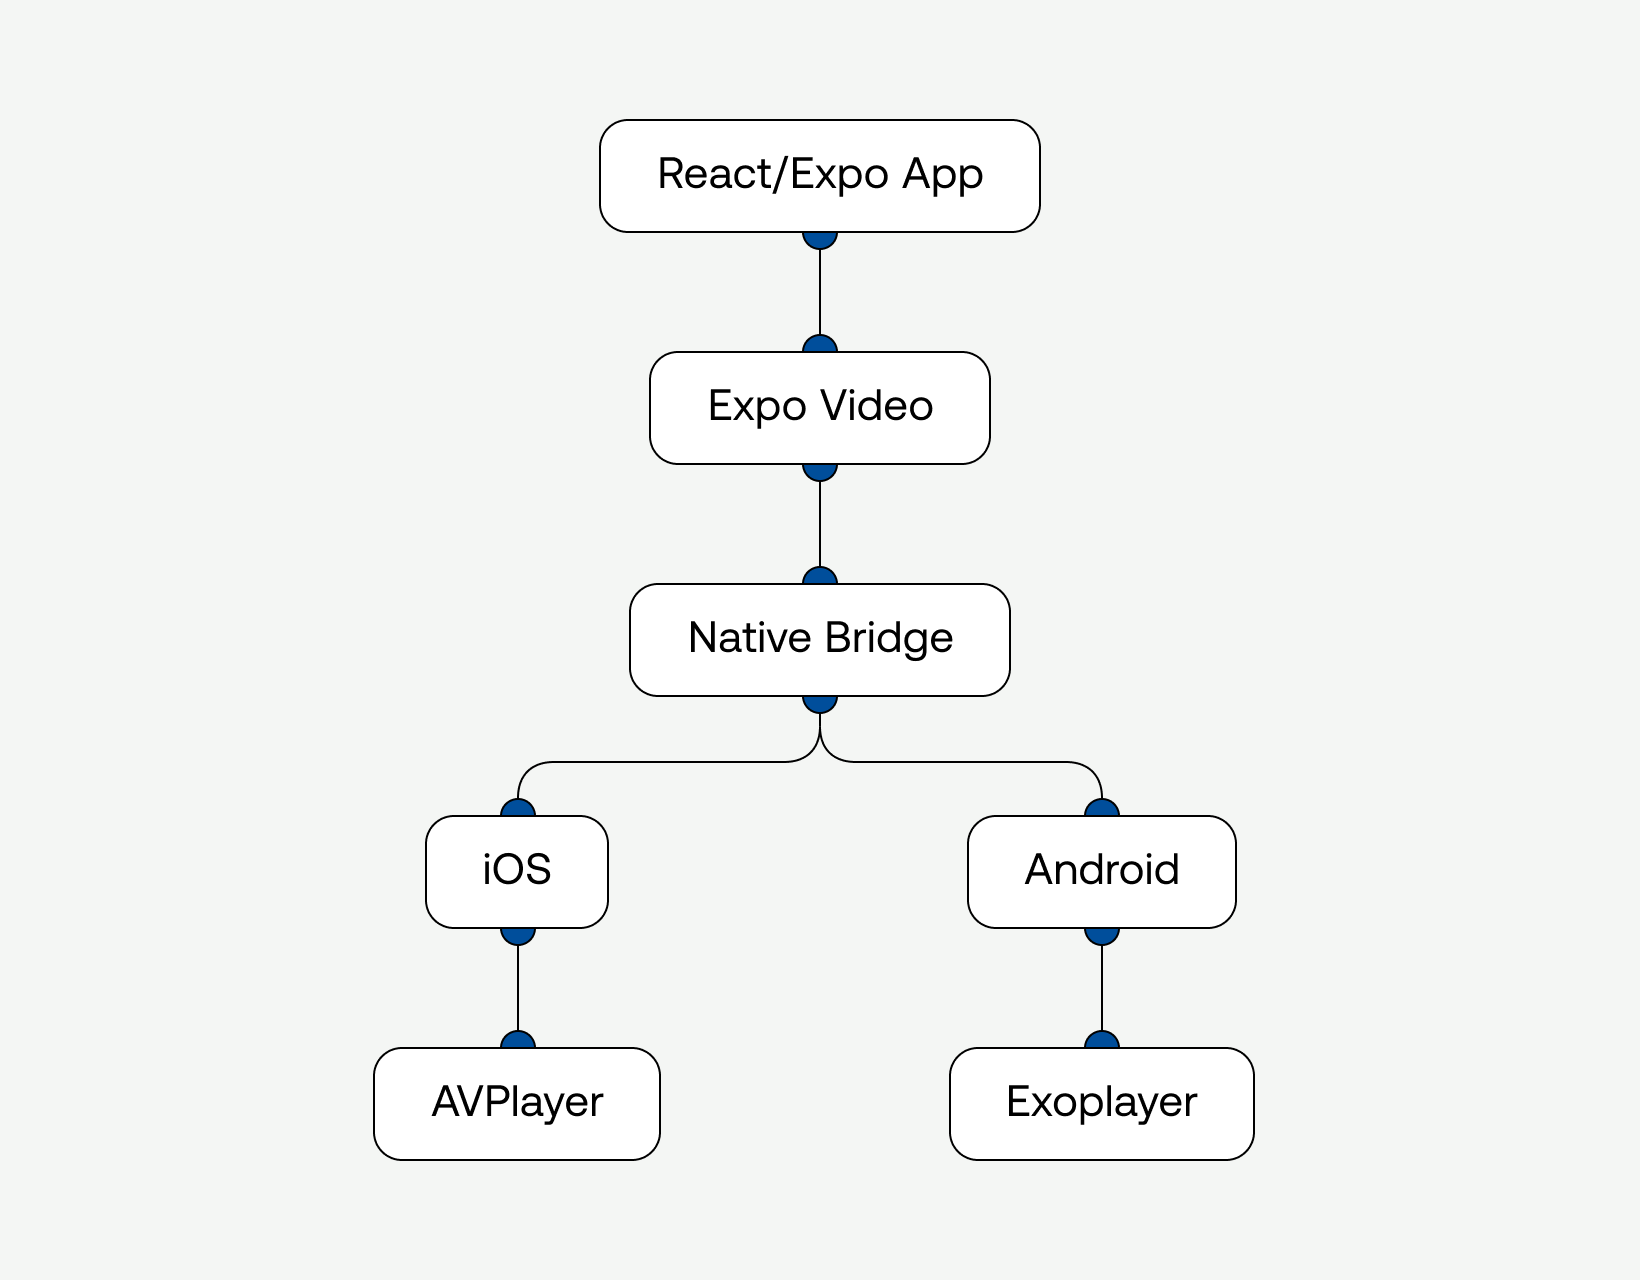
The diagram above is an oversimplified version of how expo-video works under the hood. I just think this philosophy needs a little refresh. It’s just 2026, so where's all the AI?

There are also no React Native video players with Mux Data capabilities and that had to change so I made it my mission to make it happen.
Luckily the Mux team has already created two native players for iOS and Android. All I needed to do was create a good developer experience for React Native so writing the code to use the player felt natural and ergonomic.
So here's the new architecture I made:
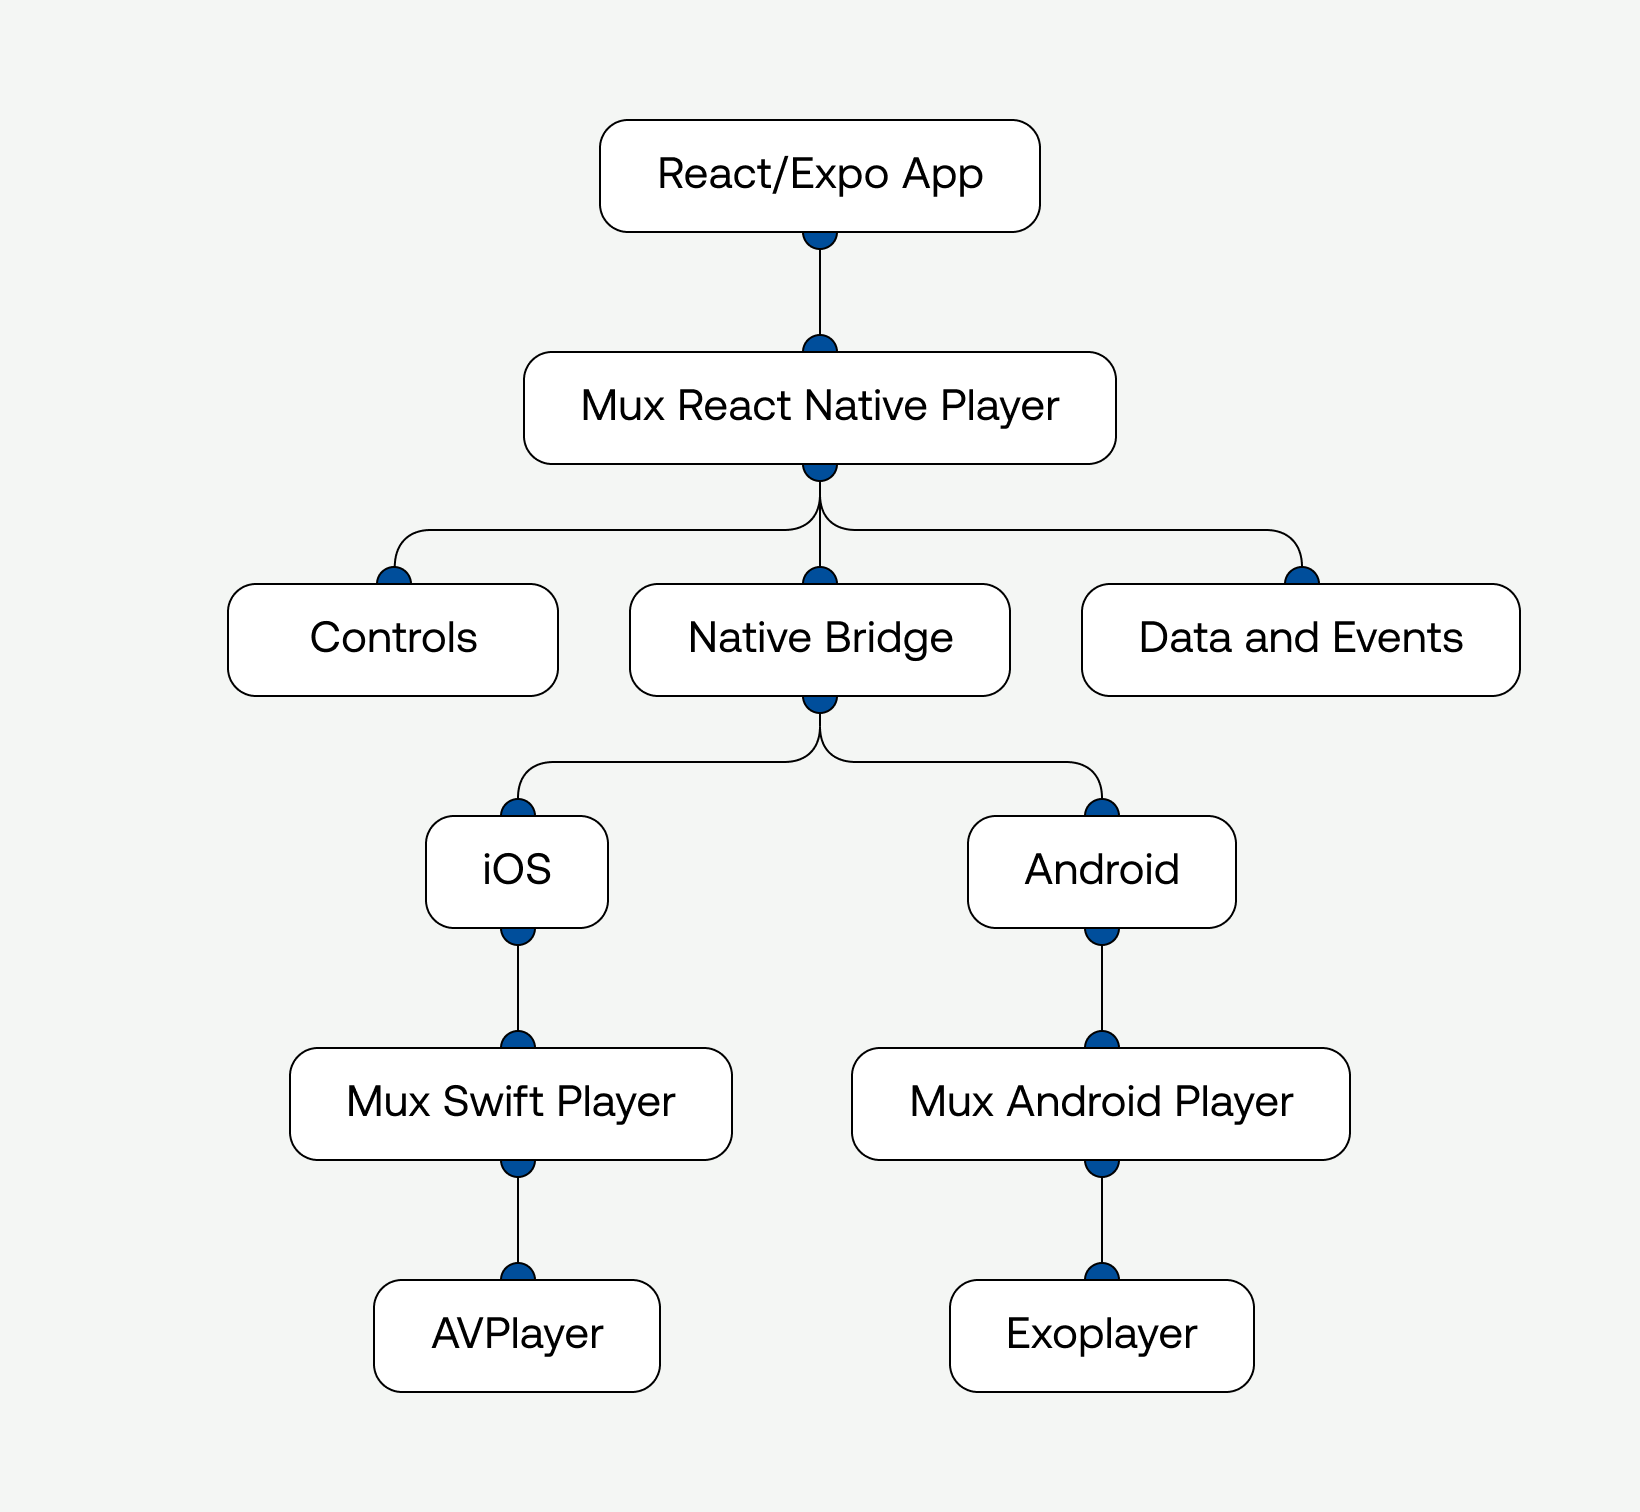
Yea there are some extra steps that may seem more complex but all this really shows is that I added a React Native wrapper on top of the two existing Swift and Android players from Mux by combining them with the native bridge step just like expo-video.
This way we can write React Native code like this:
typescript
import { MuxVideoView, useMuxVideoPlayer } from '@mux/mux-react-native-player';

export default function Player() {
  const player = useMuxVideoPlayer({
    playbackId: 's3luwAd1z1zqJKSGPz5Dspp5vibl5mkJXldS3WwSjhM',
    assetId: 'DYLMNoGSFGT201AH89016qZukCLXcHTemmM26wLNARgFc',
    metadata: {
      playerName: 'MuxReactNativePlayerExample',
      videoTitle: 'Mux Robots Example Video',
      customData: {
        customData1: 'example-app',
      },
    },
  });

  return (
    <MuxVideoView
      player={player}
      controls="custom"
      contentFit="contain"
      style={{ width: '100%', aspectRatio: 16 / 9, backgroundColor: 'black' }}
    />
  );
}
The goal is to make the React Native API feel simple while keeping the actual playback path native.
So I put together these three layers:
1. TypeScript player state — a MuxVideoPlayer class tracks source, playback intent, status, volume, captions, and pending commands.
2. React view wrapper — MuxVideoView subscribes to the player, forwards props to native, and optionally renders custom controls.
3. Native views — Swift and Kotlin views delegate playback to Mux-native SDKs.
That separation keeps the app-facing API declarative while still supporting player commands like play, pause, seekTo, and setCaptionTrack.
Here's a snippet from my types.ts file. You can see that the Mux video type is more than a URL. It carries everything Mux can do that a plain HLS string does not.
typescript
export type MuxVideoSourceObject = {
  playbackId: string;
  assetId?: string;
  playbackToken?: string;
  drmToken?: string;
  customDomain?: string;
  minResolution?: MuxMinResolution;
  maxResolution?: MuxMaxResolution;
  renditionOrder?: MuxRenditionOrder;
  clipping?: MuxVideoClipping;
  metadata?: MuxVideoMetadata;
};

export type MuxVideoSource = string | MuxVideoSourceObject;Signed playback and DRM - playbackToken for signed URLs, drmToken for FairPlay/Widevine. expo-video doesn't have a first-class story for this.
Bandwidth control - minResolution, maxResolution, and renditionOrder let you cap quality on cellular or force descending rendition order without writing platform code.
Clipping - pass assetStartTime/assetEndTime and the player handles the trim natively.
Custom domains - for video.yoursite.com-style setups.
Mux Data — set your Mux Access toke and Secret Key in your .env and you're done. Views, rebuffer ratio, startup time, geography, device, error tracking — all flowing into your Mux dashboard with no extra wiring.
MuxVideoPLayer is used to handle both the state and commands of the video player:
typescript
export class MuxVideoPlayer {
  private source?: NormalizedMuxVideoSource;
  private nativeRef?: MuxNativeViewRef | null;
  private listeners = new Set<Listener>();
  private pendingCommands: Array<() => Promise<void>> = [];
  private statusState: MuxPlayerStatus = { ...idleStatus };
  private snapshot: MuxVideoPlayerSnapshot = this.createSnapshot();
  private shouldPlay = false;

  play(): Promise<void> {
    this.shouldPlay = true;
    this.updateSnapshot();
    this.emitChange();
    return this.runNativeCommand('play');
  }

  pause(): Promise<void> {
    this.shouldPlay = false;
    this.updateSnapshot();
    this.emitChange();
    return this.runNativeCommand('pause');
  }

  seekTo(seconds: number): Promise<void> {
    return this.runNativeCommand('seekTo', seconds);
  }
}
For example Calling play() immediately updates the JS state and records playback intent, even if the native view is not attached yet. Once native attaches, queued commands can be used safely.
MuxVideoView subscribes to the player with useSyncExternalStore, then forwards the state into the native view. Native events come back through event handlers and update the player snapshot:
typescript
const snapshot = React.useSyncExternalStore(
  player._subscribe,
  player._getSnapshot,
  player._getSnapshot
);

const sharedNativeProps = {
  source: snapshot.source,
  playWhenReady: snapshot.shouldPlay,
  muted: snapshot.muted,
  volume: snapshot.volume,
  loop: snapshot.loop,
  playbackRate: snapshot.playbackRate,
  contentFit,
  allowsFullscreen,
  allowsPictureInPicture,
  timeUpdateEventInterval,
  onStatusChange: (event: { nativeEvent: any }) => {
    player._handleStatusChange(event.nativeEvent);
    onStatusChange?.(event.nativeEvent);
  },
  onTimeUpdate: (event: { nativeEvent: any }) => {
    player._handleTimeUpdate(event.nativeEvent);
    onTimeUpdate?.(event.nativeEvent);
  },
} as const;
The native player is the source of truth for playback progress, buffering, duration, and captions, while JS remains the source of truth for user intent and UI state.
On iOS, the native view uses AVPlayerViewController and Mux Player Swift. When a source changes, the view prepares a Mux playback ID with playback and monitoring options.
swift
func setSource(_ source: MuxVideoSourceRecord?) {
  guard let source else {
    release()
    return
  }

  guard source.fingerprint != sourceFingerprint else {
    return
  }

  releasePlayer()
  sourceFingerprint = source.fingerprint
  currentPlaybackId = source.playbackId
  didEmitSourceLoad = false
  didLoadLegibleGroup = false
  didReachEnd = false
  sendStatusChange(status: "loading")

  playerViewController.prepare(
    playbackID: source.playbackId,
    playbackOptions: source.toPlaybackOptions(),
    monitoringOptions: source.toMonitoringOptions()
  )

  observePlayer()
  applyPlayerConfiguration()
  startTimeUpdates()

  if shouldPlay {
    playerViewController.player?.play()
  }
}
The React layer does not need to know about AVPlayerViewController, KVO, or media selection groups. It gets typed events and commands instead.
On Android, the view uses the Mux Android player and Media3 UI components. Mux Data configuration flows through the same source metadata object.
java
fun setSource(source: MuxVideoSourceRecord?) {
  if (source == null) {
    release()
    return
  }

  if (source.fingerprint == sourceFingerprint) {
    return
  }

  releasePlayer()
  sourceFingerprint = source.fingerprint
  currentPlaybackId = source.playbackId
  didEmitSourceLoad = false
  sendStatusChange("loading")

  val builder = MuxPlayer.Builder(context)
    .addMonitoringData(source.toCustomerData())

  source.metadata?.envKey?.takeIf { it.isNotBlank() }?.let {
    builder.setMuxDataEnv(it)
  }

  val nextPlayer = builder.build()
  nextPlayer.addListener(listener)
  nextPlayer.setMediaItem(source.toMediaItem())
  nextPlayer.playWhenReady = shouldPlay
  nextPlayer.prepare()

  player = nextPlayer
  playerView.player = nextPlayer
  applyPlayerConfiguration()
}
This gives Android the same public API as iOS while letting each platform use the player primitives that make sense natively.
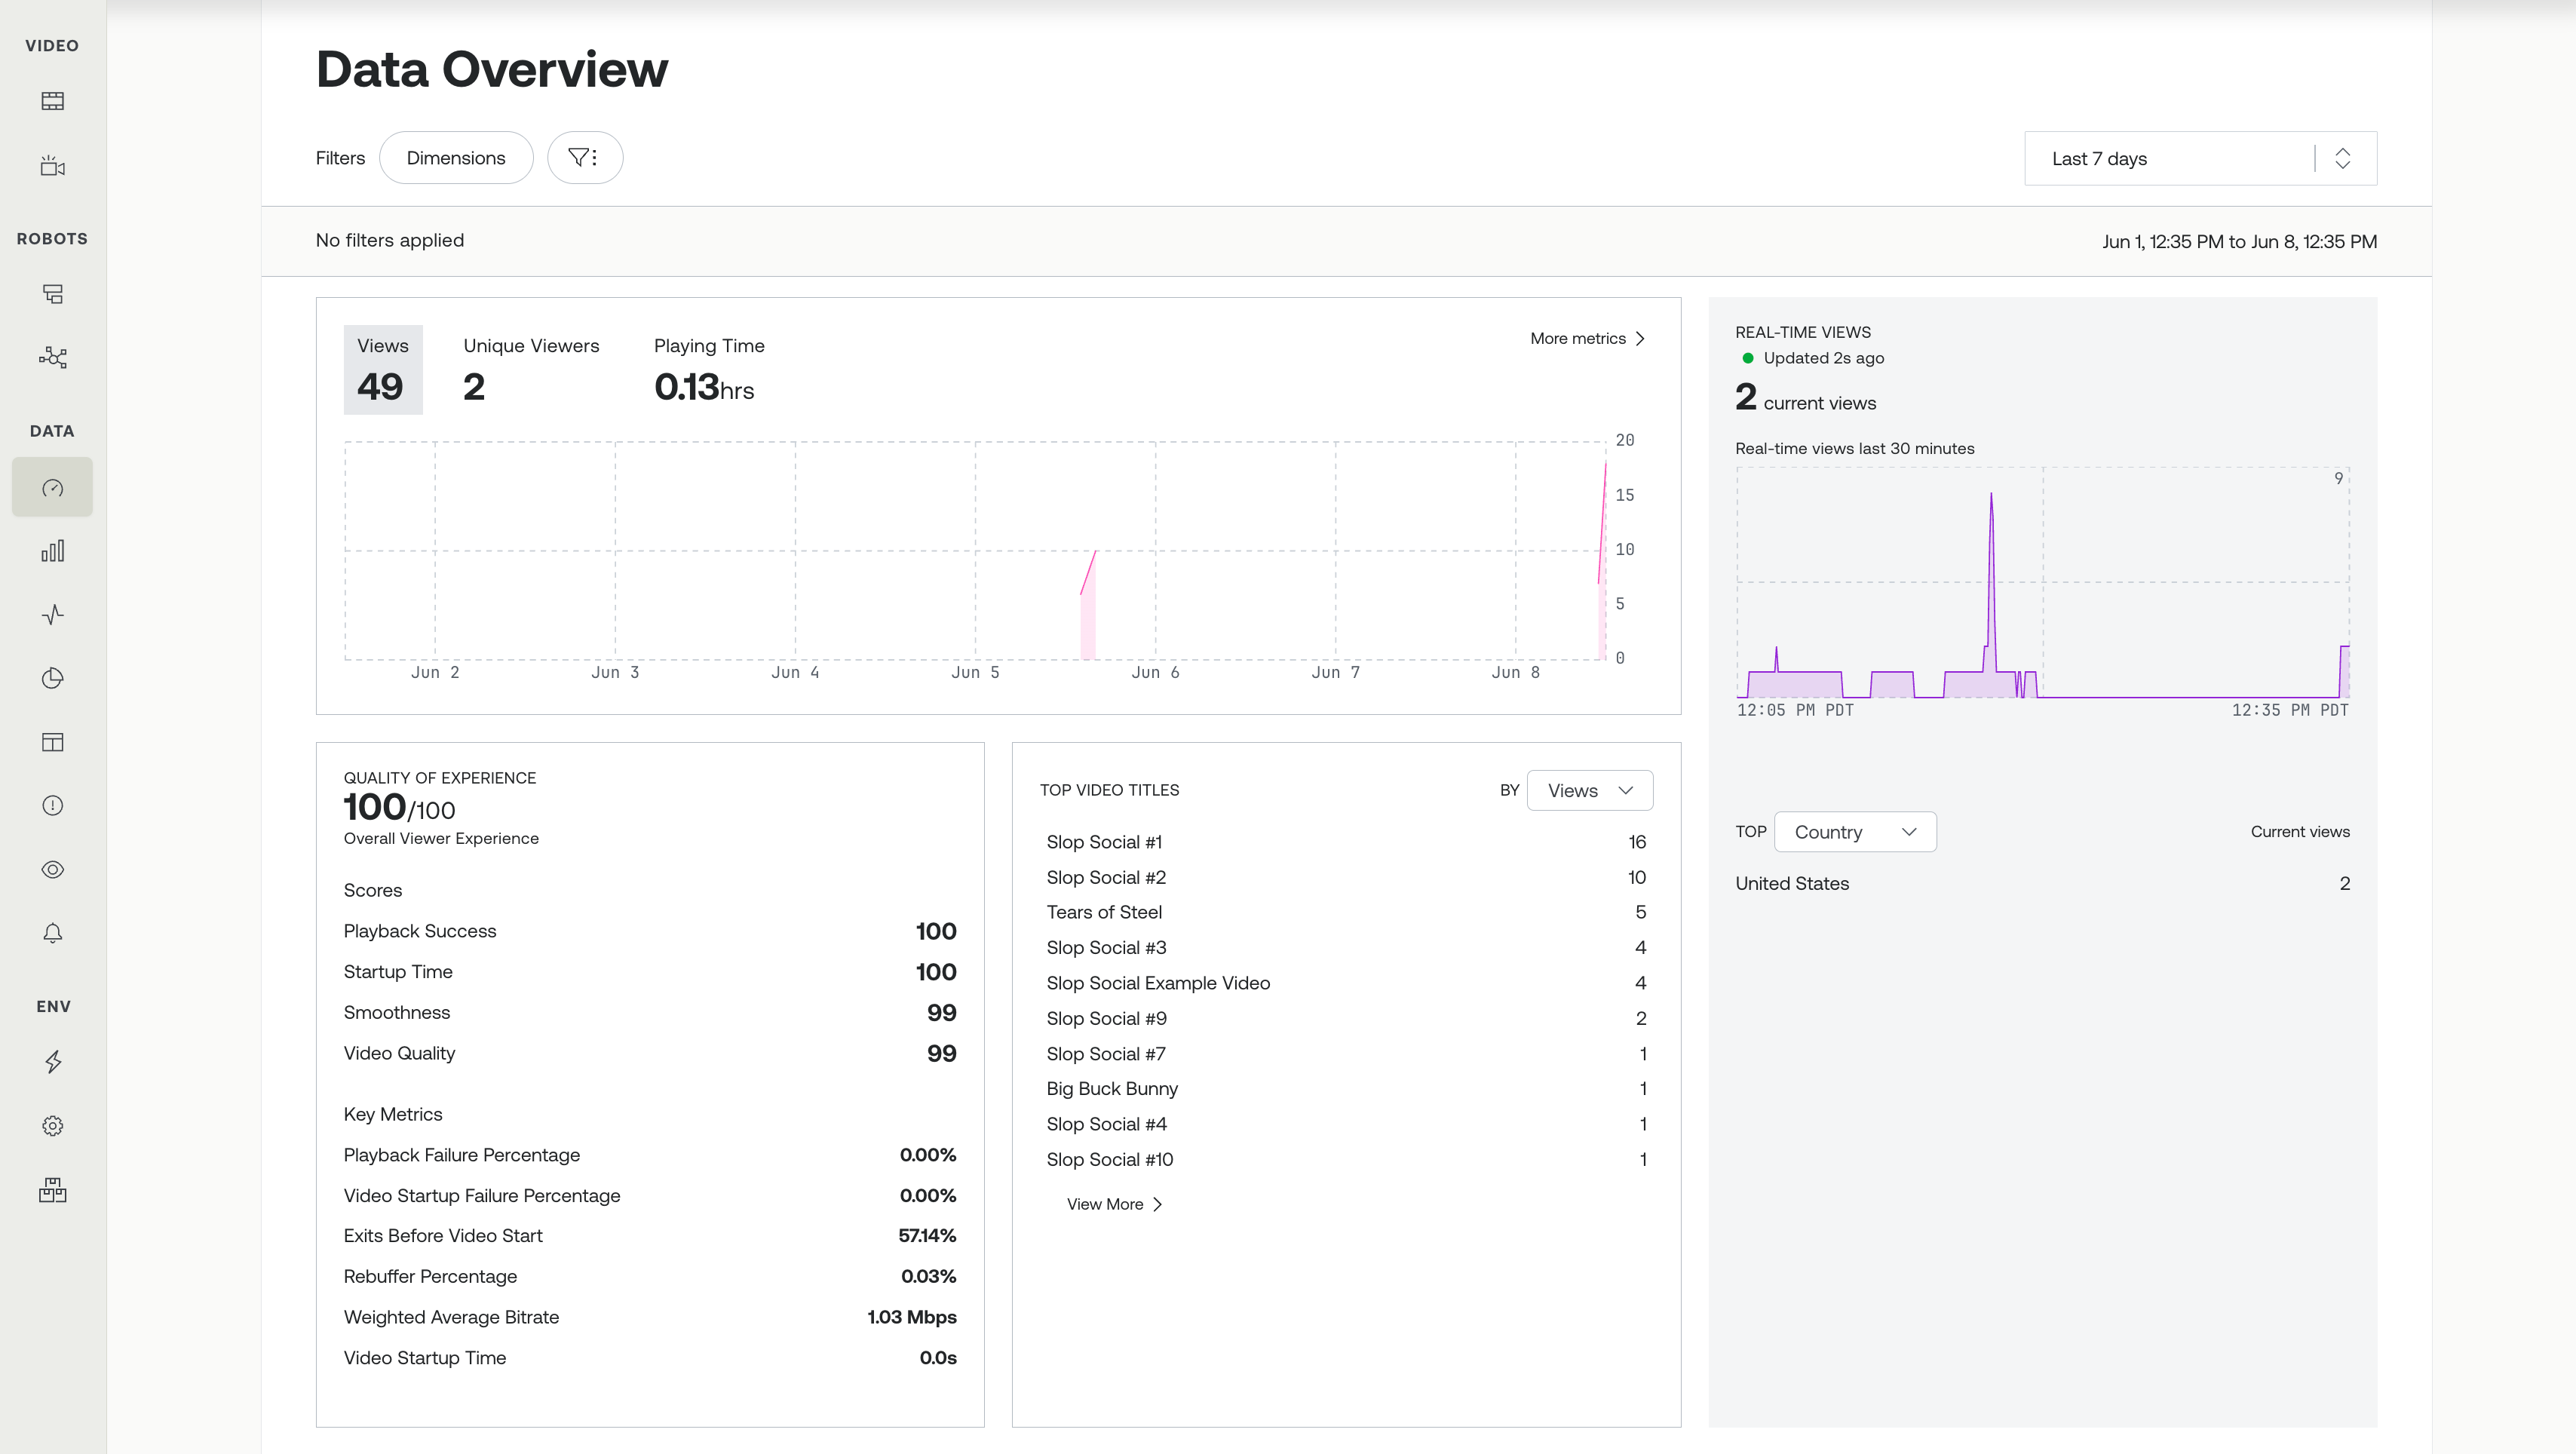
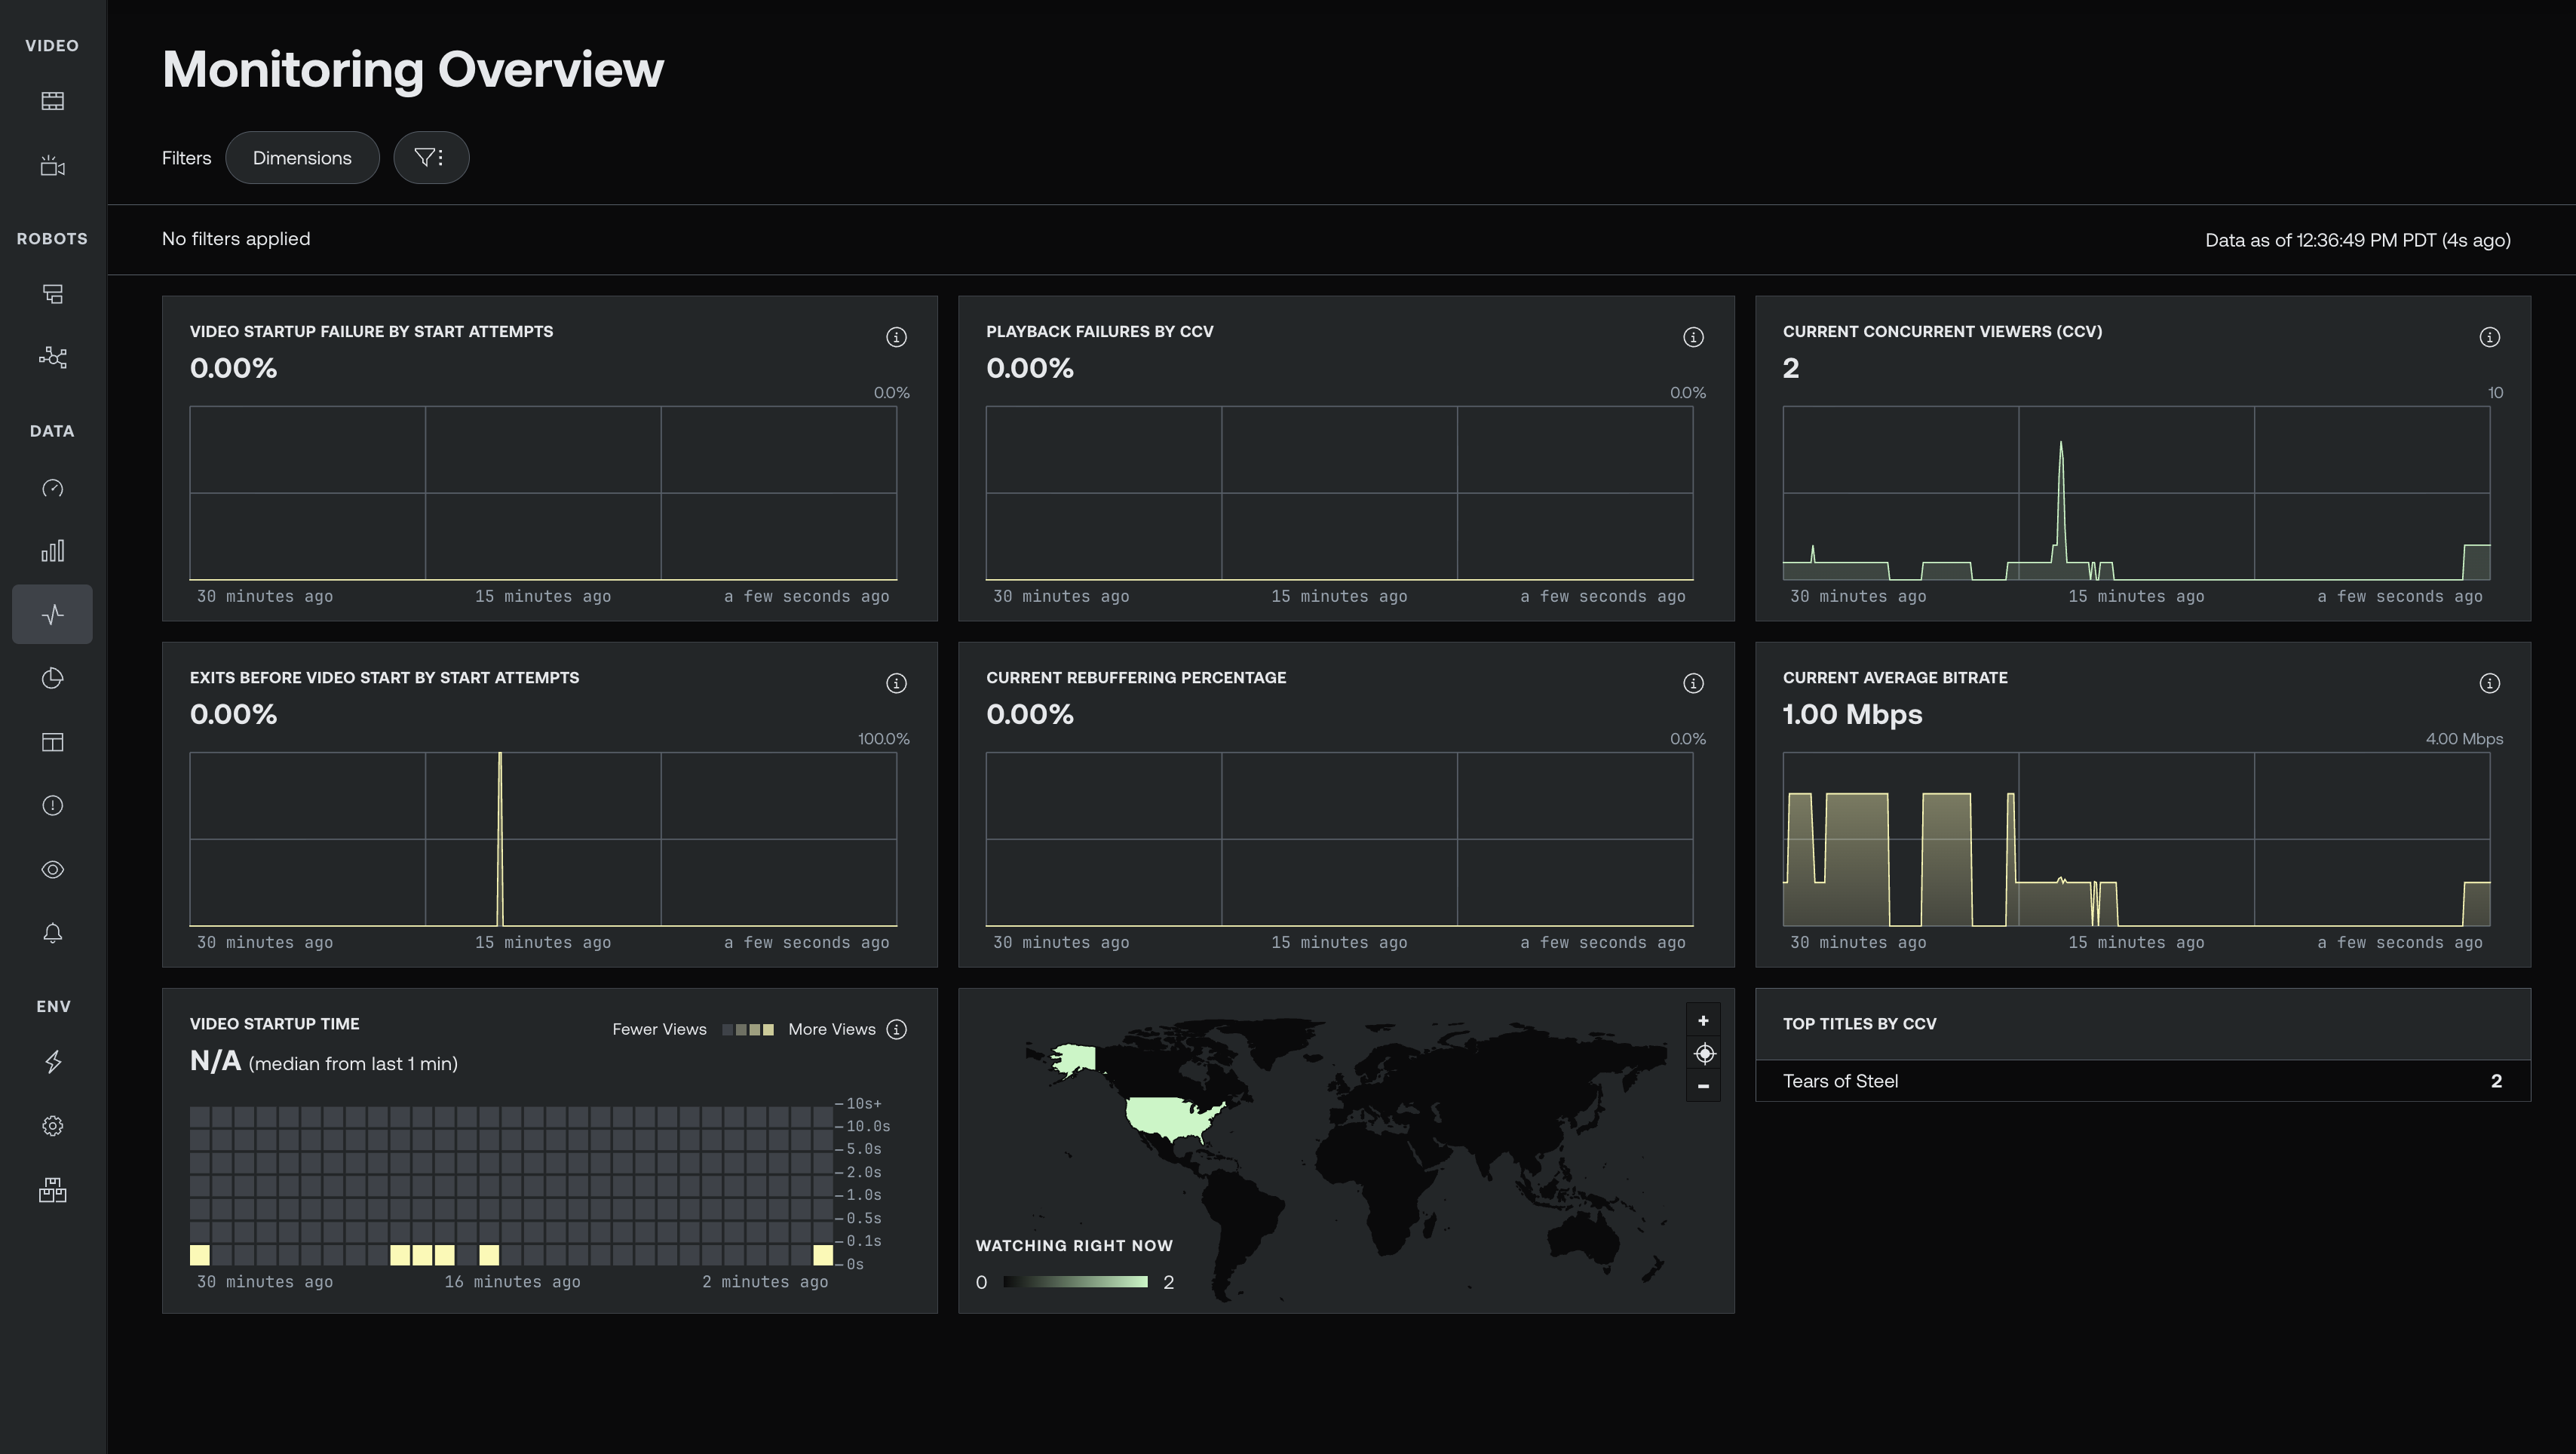
Other than the new UI and Mux Robots, Mux Data was a big reason why I wanted to make this video player. There hasn’t been a React Native player out there that has Mux Data support until now. With the Mux React Native Player you can get all the metrics and engagement data you need from videos played in the player. You can view this data in the Mux dashboard or sign in with the Mux CLI to get metrics in your terminal as well.
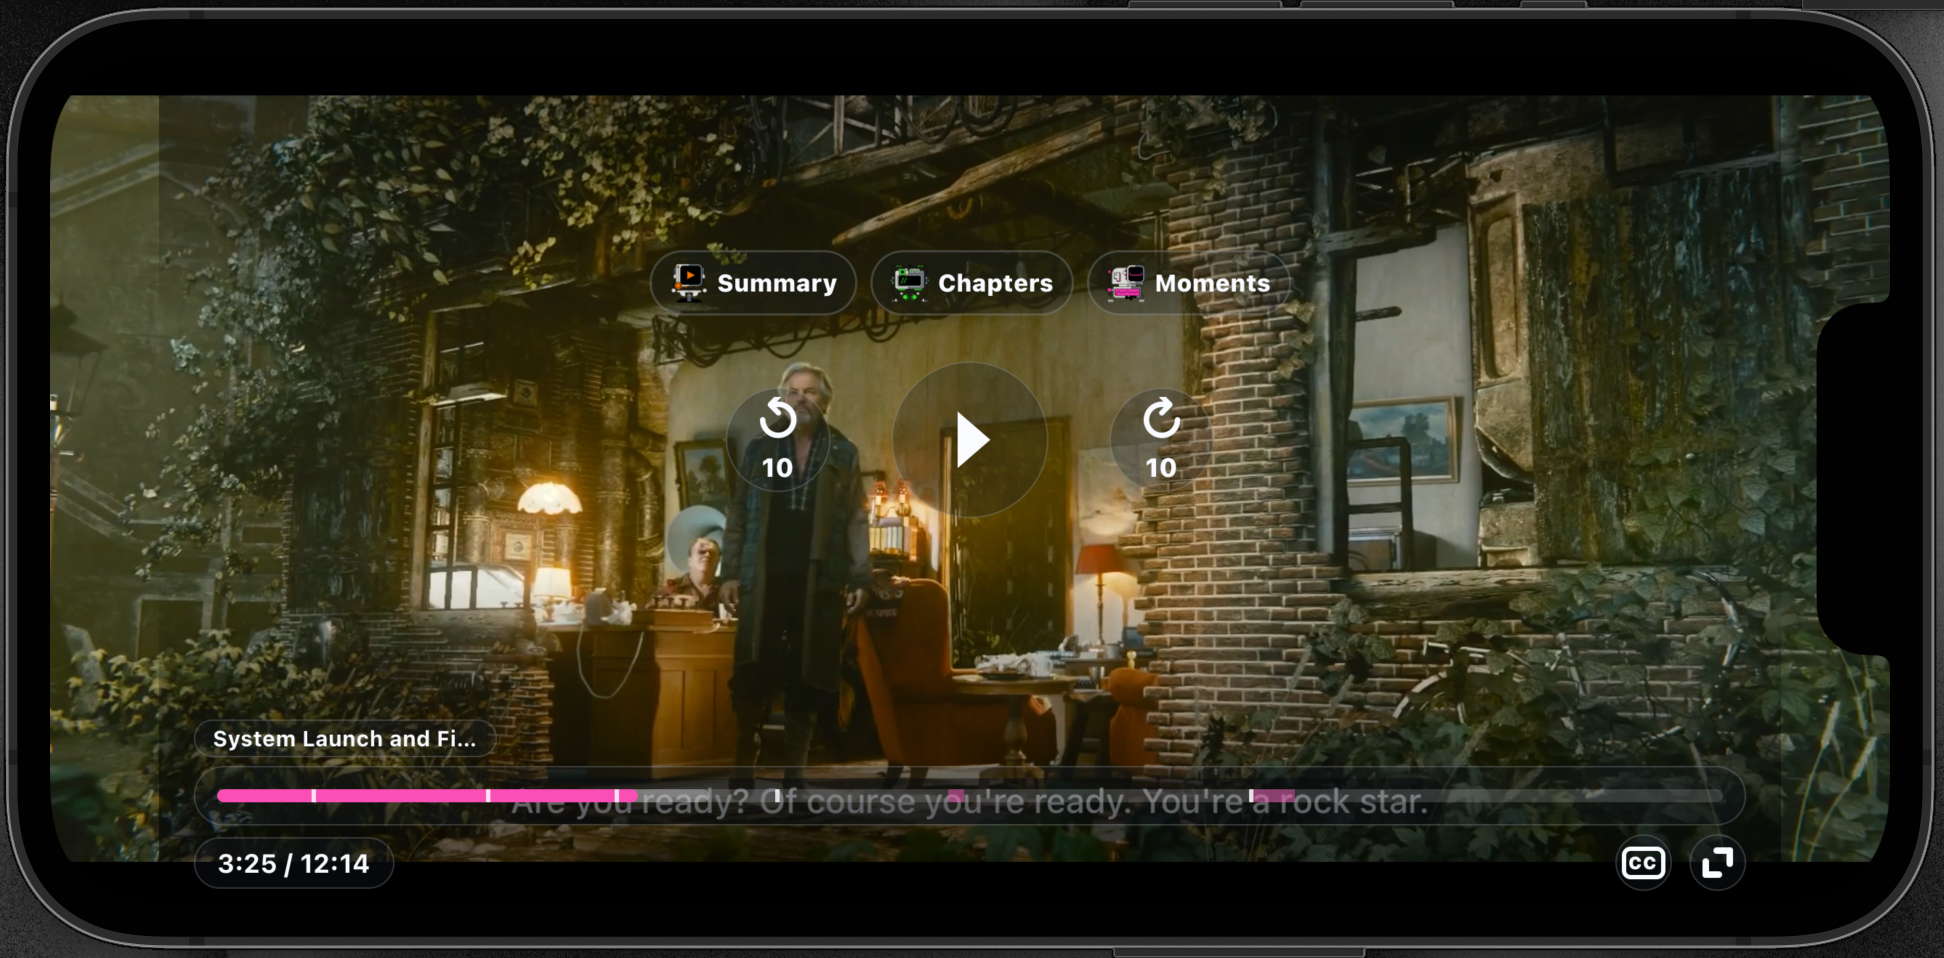
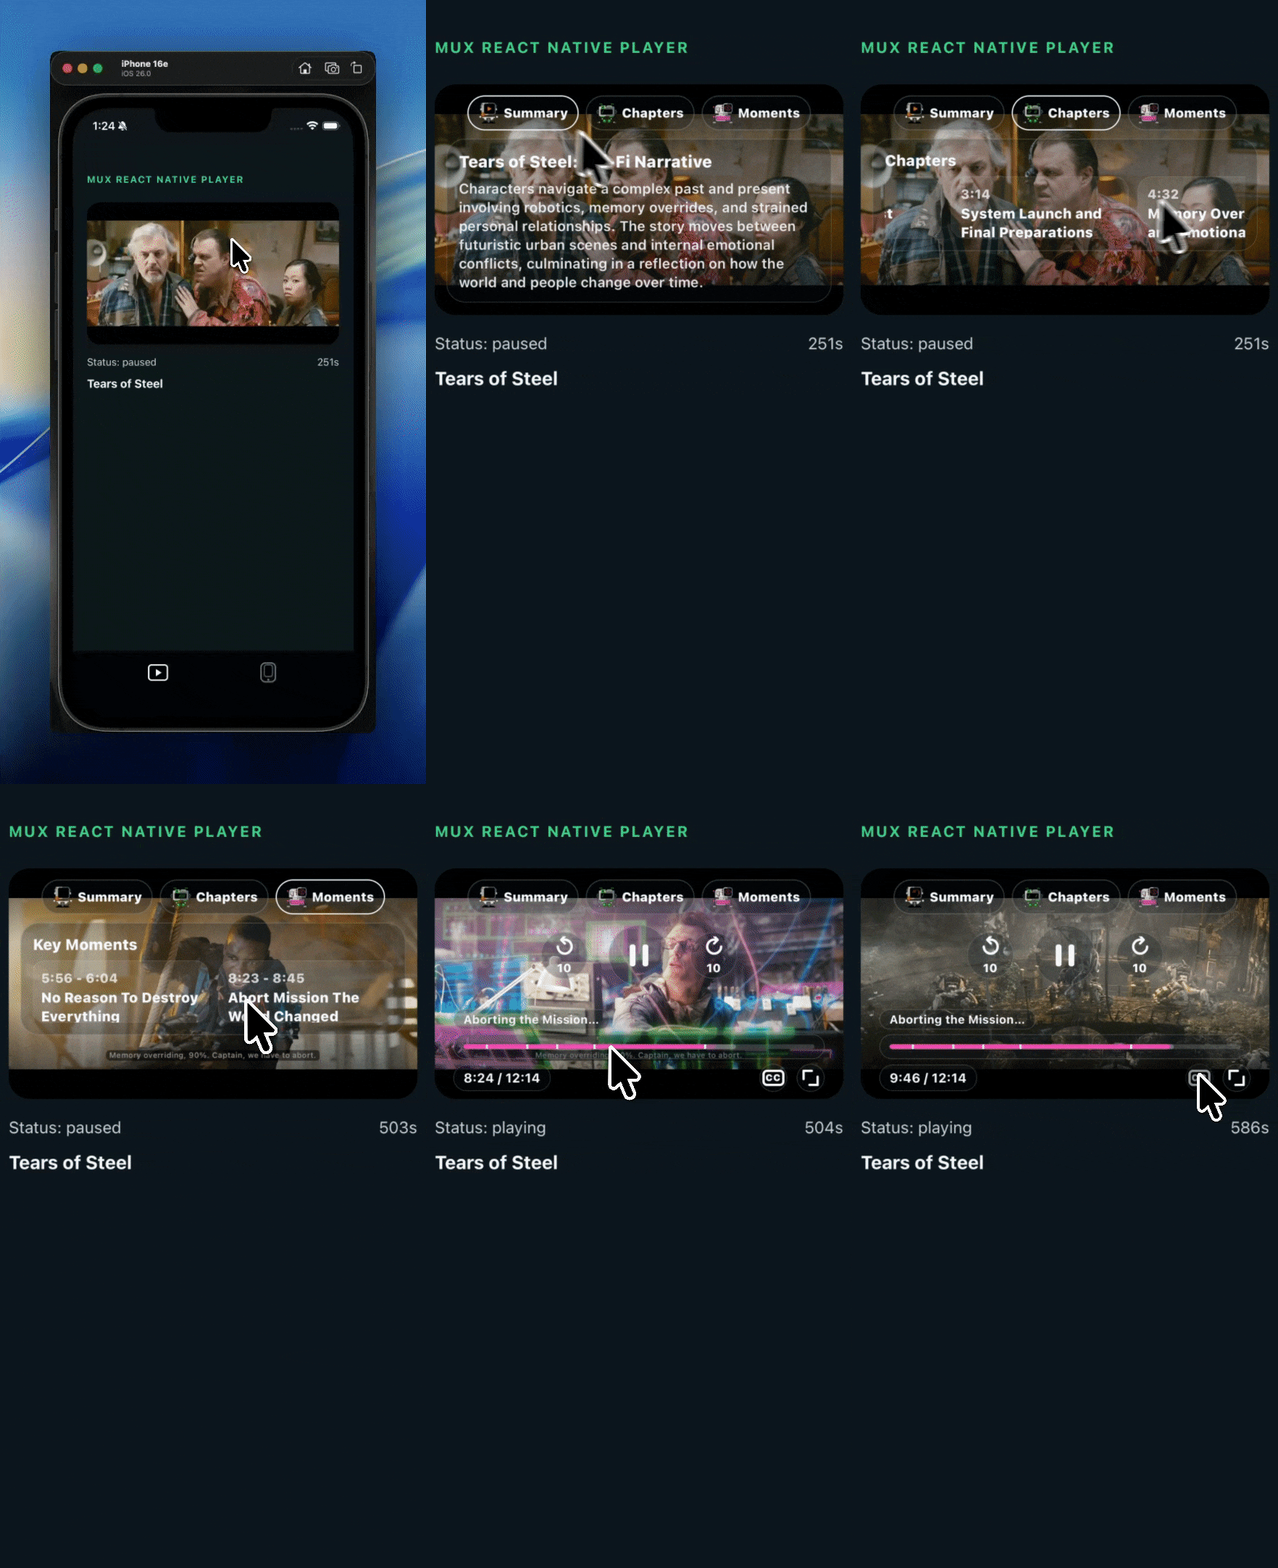
Mux Robots has become a real gamechanger for video intelligence. I’ve been building web and mobile apps with Robots but never a React Native component so I decided to add an extra layer to MuxVideoView that lets you attach a prop for Mux Robots jobs like summarization, chapters and key moments. This way you can summarize videos, skip to different chapters and jump to key moments straight from the video player itself as long as the video assets are stored in your Mux asset library.
typescript
<MuxVideoView
  player={player}
  controls="custom"
  robots={{
    onSummarize: ({ assetId }) => requestRobots(assetId, '/summarize'),
    onGenerateChapters: ({ assetId }) => requestRobots(assetId, '/chapters'),
    onFindKeyMoments: ({ assetId }) => requestRobots(assetId, '/key-moments'),
  }}
/>
Just add MUX_TOKEN_ID and MUX_TOKEN_SECRET to your .env or wherever your store/use your keys, add the prop and the Mux Robots UI appears.
Here's the context the player hands your callback:
typescript
xport type MuxVideoRobotsContext = {
  assetId: string;
  duration: number;
  currentTime: number;
};

export type MuxVideoRobotsConfig = {
  enabled?: boolean;
  assetId?: string;
  summary?: MuxVideoSummary;
  chapters?: MuxVideoChapter[];
  keyMoments?: MuxVideoKeyMoment[];
  onSummarize?: (context: MuxVideoRobotsContext) => Promise<MuxVideoSummary>;
  onGenerateChapters?: (context: MuxVideoRobotsContext) => Promise<MuxVideoChapter[]>;
  onFindKeyMoments?: (context: MuxVideoRobotsContext) => Promise<MuxVideoKeyMoment[]>;
};
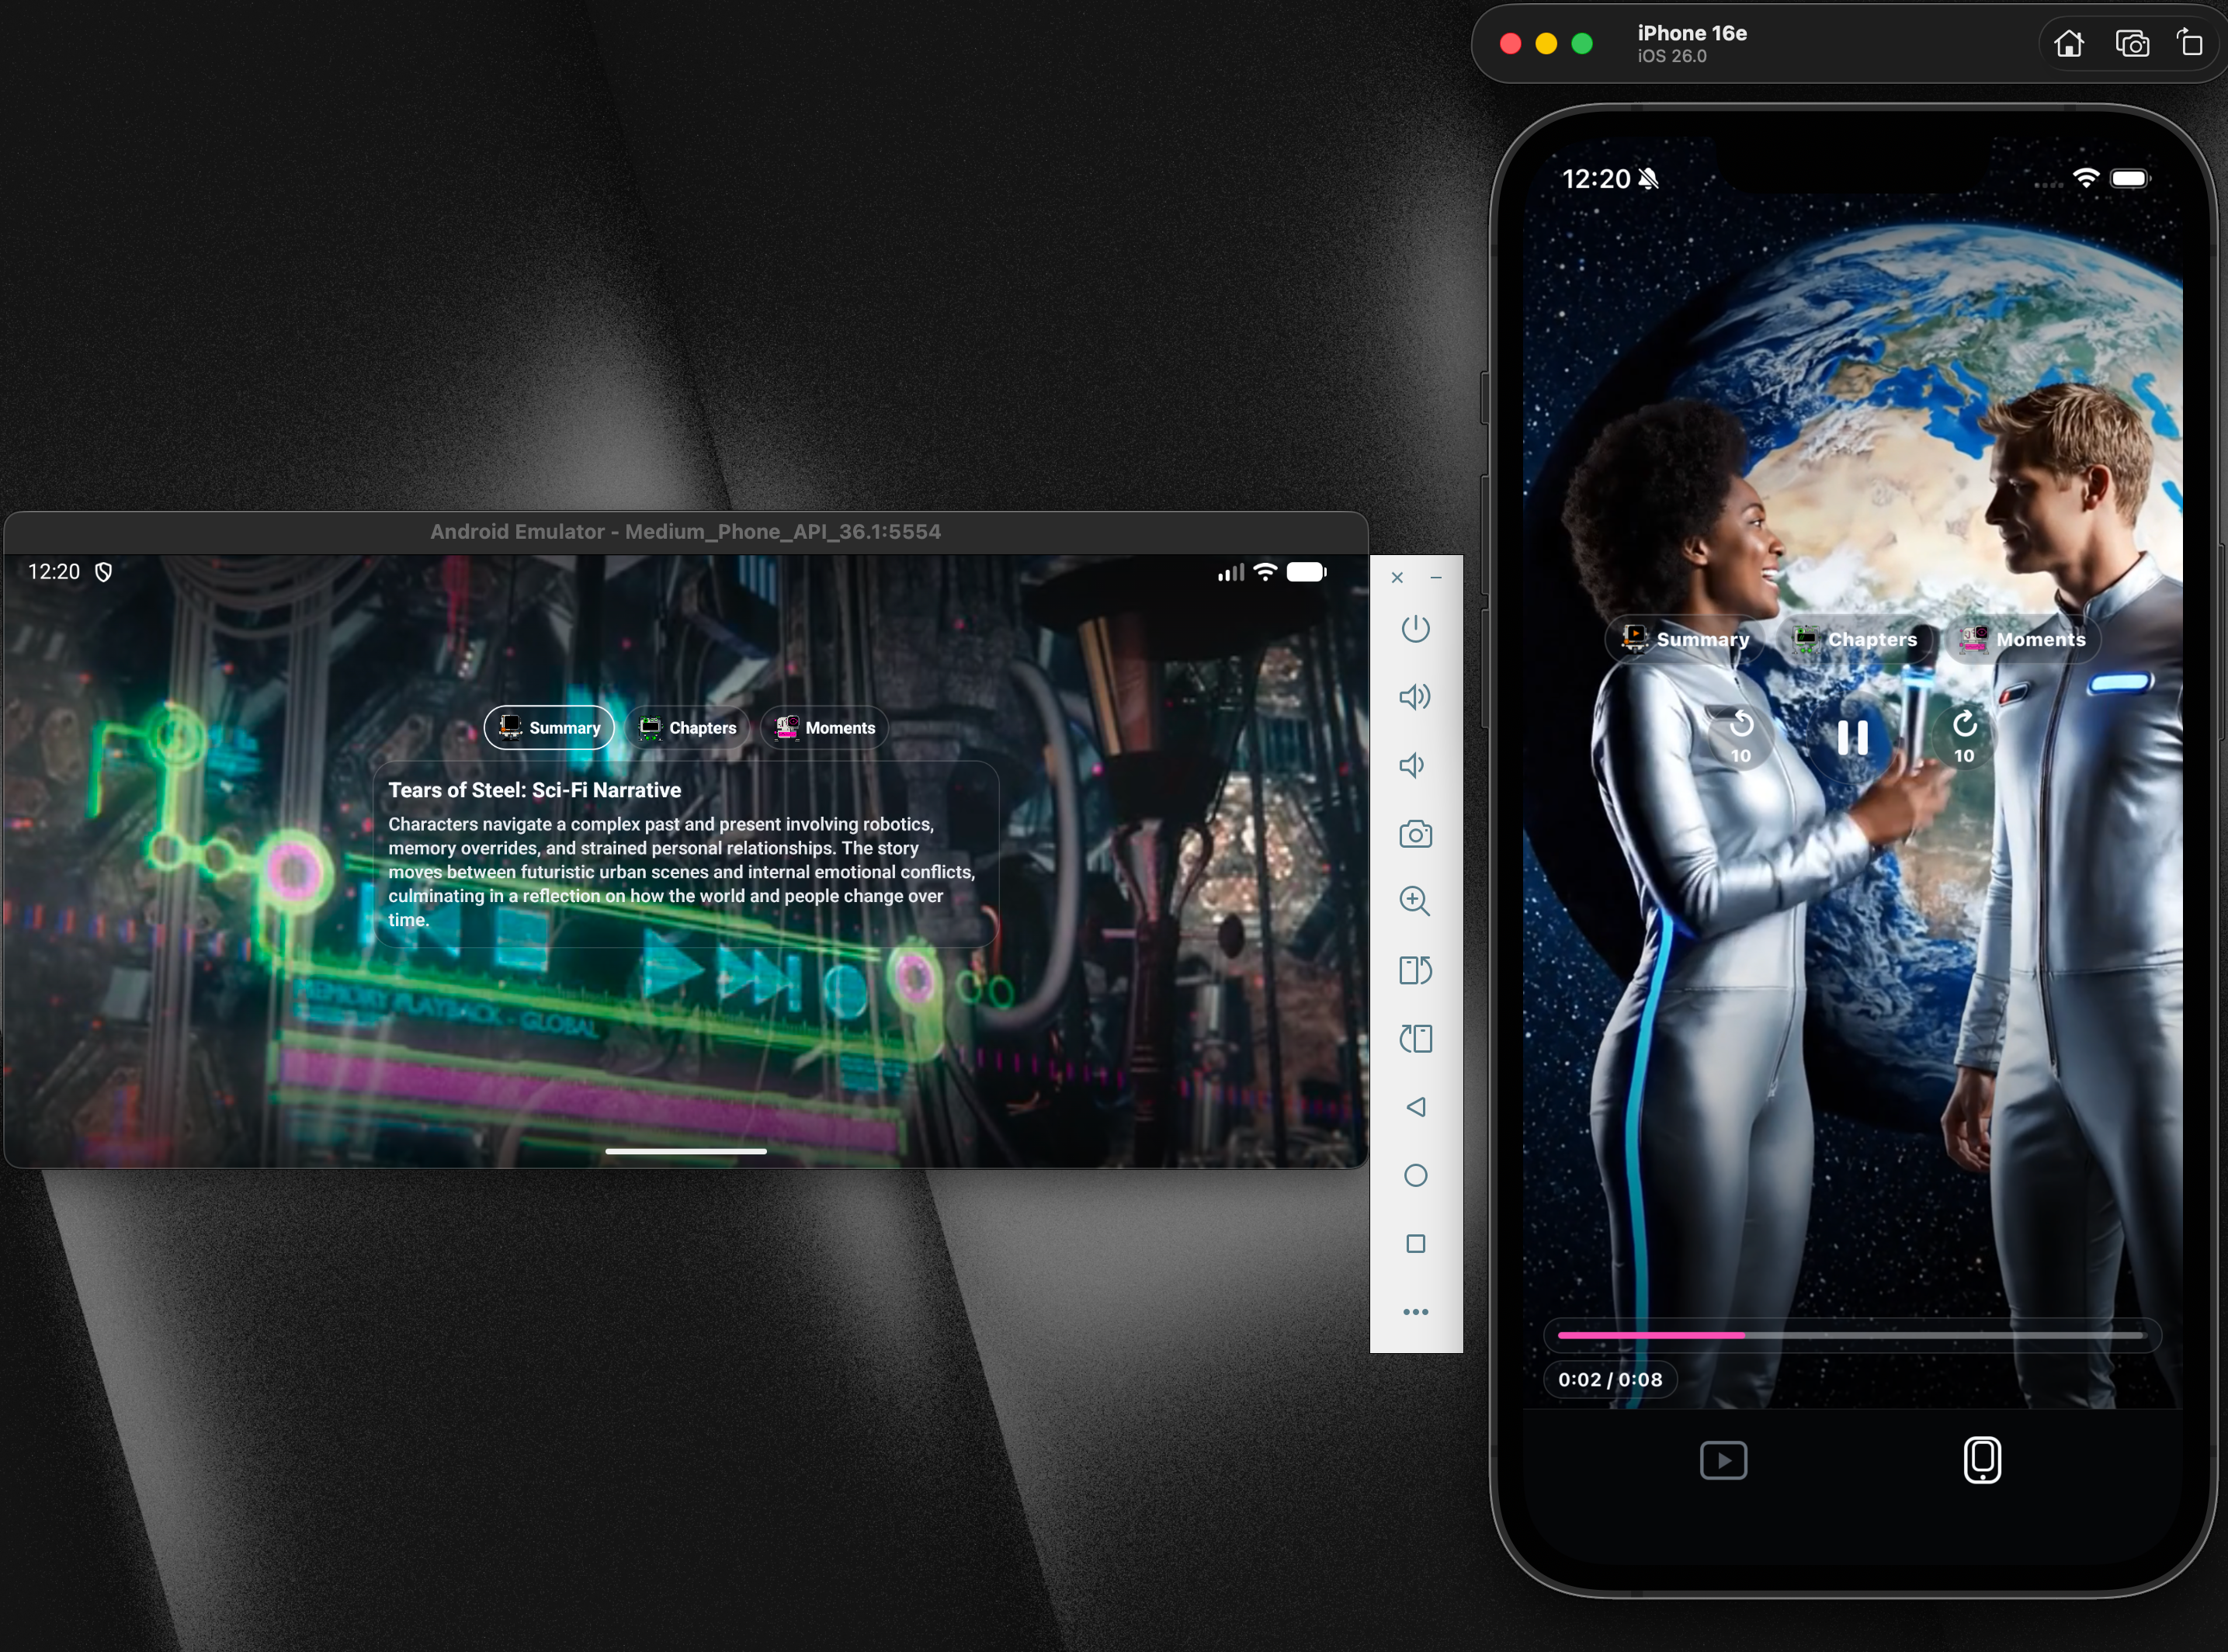
The Mux Robots buttons only appear for actions with a callback. Chapters render as timeline markers; key moments render as highlighted ranges. Selecting either seeks to its start time. This way you can just swap the props in an out easily and add Mux Robots features when necessary. If you just want the default player with out the extra Robots UI, just remove the props and you’re good to go. You can also use the Robots UI in different orientations like landscape, and TikTok style
One last thing: you can also add Picture-in-Picture support through the Expo config like this:
json
{
  "expo": {
    "plugins": [
      [
        "@mux/mux-react-native-player/plugin",
        { "enablePictureInPicture": true }
      ]
    ]
  }
}bash
npm i @mux/mux-react-native-player
Install the player with npm or you can also clone or fork the repo here.
Take a look at the example/directory and you’ll see the example app I made for you to test out on your own. It's wired up with React Native, Expo, The Mux React Native player and a few different screen orientations to test out. All you need to do is add in your own asset IDs and env keys and then you’re off to the races.
此内容由惯性聚合(RSS阅读器)自动聚合整理,仅供阅读参考。 原文来自 — 版权归原作者所有。