





WireGuard 隧道一旦建立后,域名就不再重新解析了,一旦服务端的 IP 发生改变,这隧道就断了。
截止文章最后修订,WireGuard 官方始终没有提供 Windows 下的动态 DNS 解析(DDNS)客户端脚本,所以说你想实现,如果你想在 Windows 下使用 WireGuard 配合经常改变 IP 的域名,你就必须要自己写一个动态 DNS 解析脚本。
我基于网上的脚本进行了一番魔改,增加了以下特性:
WireGuard-Reresolve.ps1# Copyright (C) 2021 Max Schulze. All Rights Reserved.
# Modified by Kenvix <i@kenvix.com> @ 2023/9/15
#
# near-literal Translation of the linux version by Jason A. Donenfeld
# to decrypt the dpapi Credentials, you have to be the same user as the wireguard tunnel service, i.e. "nt authority\system", check with "whoami"
# this script might be called by task scheduler as
# powershell -NoProfile -NoLogo -NonInteractive -ExecutionPolicy Bypass -Command ./WireGuard-Reresolve.ps1 -LoopRunAsCron -DelaySeconds 600
# if you want to try it in cmd, remember to elevate the user, i.e. with psexec from sysutils
# psexec -s -i powershell -NoPr...
#Requires -RunAsAdministrator
param(
[switch]$LoopRunAsCron = $false,
[int]$DelaySeconds = 600
)
Set-StrictMode -Version 3
Add-Type -AssemblyName System.Security
function WireGuard-Reresolve {
param(
[Parameter(Mandatory=$true)]
[string]$File
)
Set-Variable CONFIG_FILE -Value $File.ToString().Trim('"')
if (-not (Test-Path -Path $CONFIG_FILE)) {
throw New-Object System.IO.FileNotFoundException("Wireguard Config $CONFIG_FILE File not found.", $CONFIG_FILE)
}
$byteCrypted = ((Get-Content -LiteralPath $CONFIG_FILE -Encoding Byte -ReadCount 0))
$config = [System.Security.Cryptography.ProtectedData]::Unprotect($byteCrypted,$null,[System.Security.Cryptography.DataProtectionScope]::LocalMachine)
$config = [System.Text.UTF8Encoding]::UTF8.GetString($config)
Set-Variable Interface -Option Constant -Value $(if ($CONFIG_FILE -match '.?([a-zA-Z0-9_=+.-]{1,64})\.conf.dpapi$') { $matches[1] } else { $null })
function process_peer () {
if (-not $PEER_SECTION -or ($PUBLIC_KEY -eq $null) -or ($ENDPOINT -eq $null)) { return }
if (-not ((& wg show "$INTERFACE" latest-handshakes) -replace $PUBLIC_KEY -match ('[0-9]+'))) { return }
if (((Get-Date) - (New-Object -Type DateTime -ArgumentList 1970,1,1,0,0,0,0).AddSeconds($matches[0]).ToLocalTime()).TotalSeconds -le 135) { return }
(& wg set "$INTERFACE" peer "$PUBLIC_KEY" endpoint "$ENDPOINT")
reset_peer_section
}
function reset_peer_section () {
Set-Variable PEER_SECTION -Value $null
Set-Variable PUBLIC_KEY -Value $null
Set-Variable ENDPOINT -Value $null
}
reset_peer_section
Set-Variable PEER_SECTION -Value $null
foreach ($line in $config.Split([Environment]::NewLine,[StringSplitOptions]::RemoveEmptyEntries))
{
if ($line.Trim().length -gt 0) {
$stripped = $line.Trim() -ireplace '\#.*'
$key = $stripped -ireplace '=.*'; $key = $key.Trim()
$val = $stripped -ireplace '^.*?='; $val = $val.Trim()
if ($key -match '\[.*') { process_peer; reset_peer_section; }
if ($key -eq '[Peer]') { $PEER_SECTION = $true }
if ($PEER_SECTION) {
switch ($key) {
"PublicKey" { $PUBLIC_KEY = $val; continue; }
"Endpoint" { $ENDPOINT = $val; continue; }
}
}
}
}
process_peer
}
function WireGuard-Reresolve-All-Active {
Get-Service -Name "WireGuardTunnel$*" `
| Where-Object {$_.Status -eq "Running"} `
| ForEach-Object { $_.Name.Substring(16) } `
| ForEach-Object { Get-ChildItem -File "$env:programfiles\wireguard\data\configurations\$_.conf.dpapi" } `
| ForEach-Object { WireGuard-Reresolve $_.FullName}
}
if ($LoopRunAsCron) {
echo "Running as Cron DelaySeconds=$DelaySeconds"
while ($true) {
WireGuard-Reresolve-All-Active
Start-Sleep -Seconds $DelaySeconds
}
}
Set-ExecutionPolicy unrestricted
虽然你可以把这个脚本放在计划任务里面定时执行,但是这样做的话,每次执行脚本都会初始化一个新的 Powershell 实例。不像 Linux Bash,Powershell 的初始化代价是很高的,所以说,像这种需要频繁执行的脚本,应该把它作为一个服务来运行,反正内存占用差不多才 25MB。
首先需要 shawl 来包装服务,如果有 winget 的话,直接在 管理员 Powershell 执行以下命令安装 shawl(必须全局安装):
winget install --scope=machine shawl
没有 winget 的话点上面的链接下载,然后解压到 Windows 文件夹。
【注意:如果是首次使用 winget 安装命令行软件,必须刷新环境变量或重启后才能生效】
然后,执行以下代码安装服务:
shawl add --name WireGuard-Reresolve -- powershell -NoProfile -NoLogo -NonInteractive -ExecutionPolicy Bypass -Command "C:\Work-Station\Scripts\Powershell\WireGuard-Reresolve.ps1" -LoopRunAsCron -DelaySeconds 250
其中,C:\Work-Station\Scripts\Powershell\WireGuard-Reresolve.ps1 是你的脚本存放的路径,-DelaySeconds 250 是 DDNS 解析间隔,单位是秒。
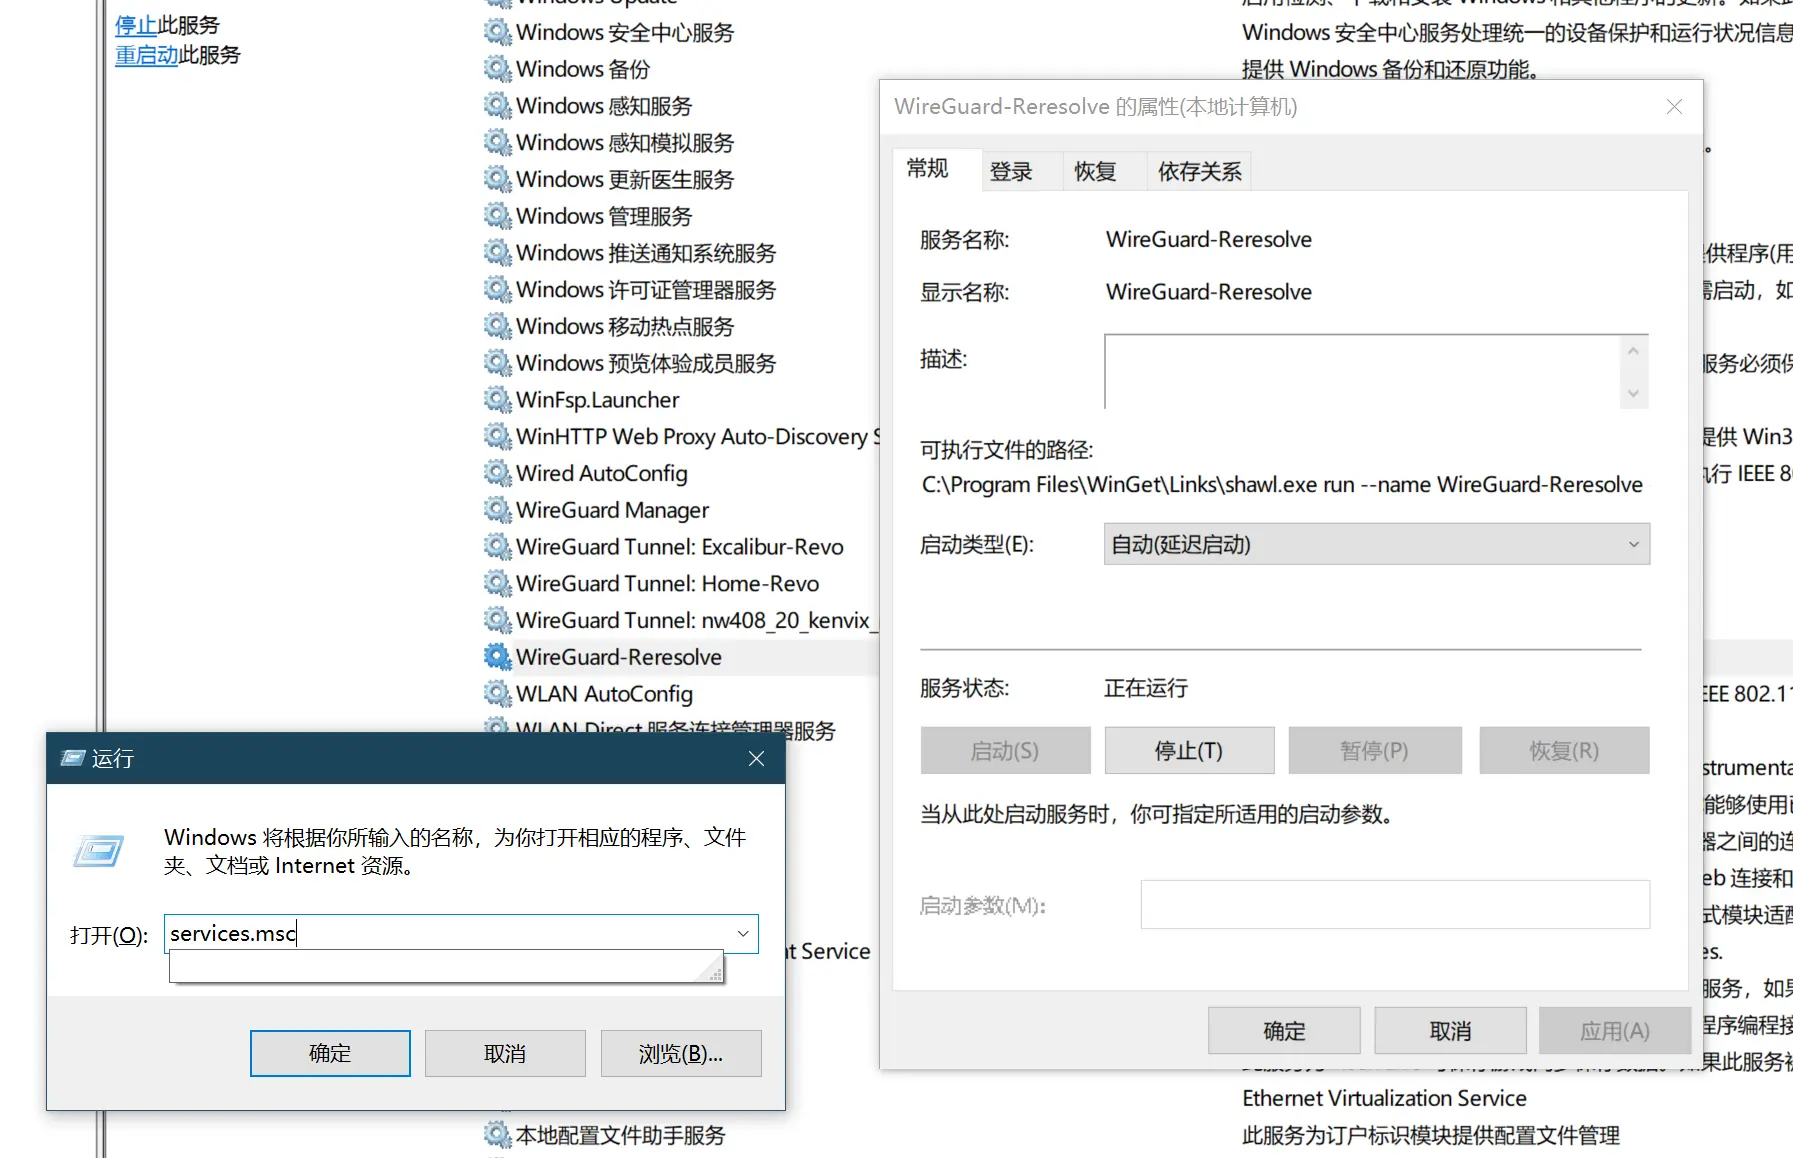
Win+R 输入 services.msc 找到 WireGuard-Reresolve 服务,右键启动,然后右键属性,设置为自动启动。
sc.exe delete WireGuard-Reresolve
标准 Linux(Ubuntu, CentOS 等,不含 OpenWRT):参见此文章
对于 OpenWRT 有专用的脚本,直接在 luci 面板的计划任务里面添加:
* * * * * /usr/bin/wireguard_watchdog
并为 WireGuard 隧道的 [Peer] 字段增加一行 PersistentKeepalive = 30 即可
此内容由惯性聚合(RSS阅读器)自动聚合整理,仅供阅读参考。 原文来自 — 版权归原作者所有。