








In the previous post, Understanding networking in Kubernetes, I discussed how networking in Kubernetes is set up. Kube-proxy is one of the components running on each node in the cluster, and it connects to the API server to watch for changes in the service and endpoint objects and updates iptables rules and IPVS (if you use the ipvs mode) to configure routing.
In this post, I will talk about Cilium, a popular CNI plugin that provides networking and security services for Kubernetes. I will also talk about how Cilium implements network policies.
The CNI project is a collection of specs and libraries for developing plugins to configure network interfaces in Linux containers. The CNI plugins are called by the container runtime whenever a container is created or removed. The CNI plugin connects the container's network namespace to the host network namespace, assigns the IP address to the container (doing the IP address management - IPAM), and sets up routes.
The CNI spec is a contract between the container runtime interface (CRI) and the CNI plugin.
The network configuration contains the information for the container runtime and the plugins to invoke. The runtime will interpret the networking configuration and then pass that to configured plugins whenever one of the commands below is invoked.
| Command | Description |
|---|---|
| ADD | Connects the container network namespace to the host network namespace, assigns the IP address to the container (doing the IP address management - IPAM), and sets up routes. |
| DEL | Removes the container network namespace from the host network namespace, removes the IP address from the container, and removes the routes. |
| CHECK | Checks if the container network namespace is connected to the host network namespace. |
| VERSION | Returns the version of the CNI plugin. |
The CNI spec has a great example that explains how chained plugins get called and how the output from the previous plugin gets included as an input to the next plugin in the chain.
Here's an example of how kindnet plugin that's used by kind is configured:
{
  "cniVersion": "0.3.1",
  "name": "kindnet",
  "plugins": [
    {
      "type": "ptp",
      "ipMasq": false,

      // IP Address Management (IPAM) plugin - i.e. assigns IP addresses
      "ipam": {
        "type": "host-local",
        "dataDir": "/run/cni-ipam-state",
        "routes": [{ "dst": "0.0.0.0/0" }],
        "ranges": [[{ "subnet": "10.244.2.0/24" }]]
      },
      "mtu": 1500
    },

    // Sets up traffic forward from one (or more) ports on the host to the container.
    // Intended to be run as part of the chain
    {
      "type": "portmap",
      "capabilities": {
        "portMappings": true
      }
    }
  ]
}
When the kindnet plugin is invoked, it will first invoke the ptp plugin to set up the network interface and assign the IP address to the container. Then it will invoke the portmap plugin to set up traffic forwarding from one (or more) ports on the host to the container.
Cilium is a popular CNI plugin that provides networking and security services for Kubernetes. It uses eBPF to implement networking and security services. Cilium can be used as a drop-in replacement for kube-proxy, and it can also be used to enforce network policies. The diagram below shows how the different parts of Cilium work together.
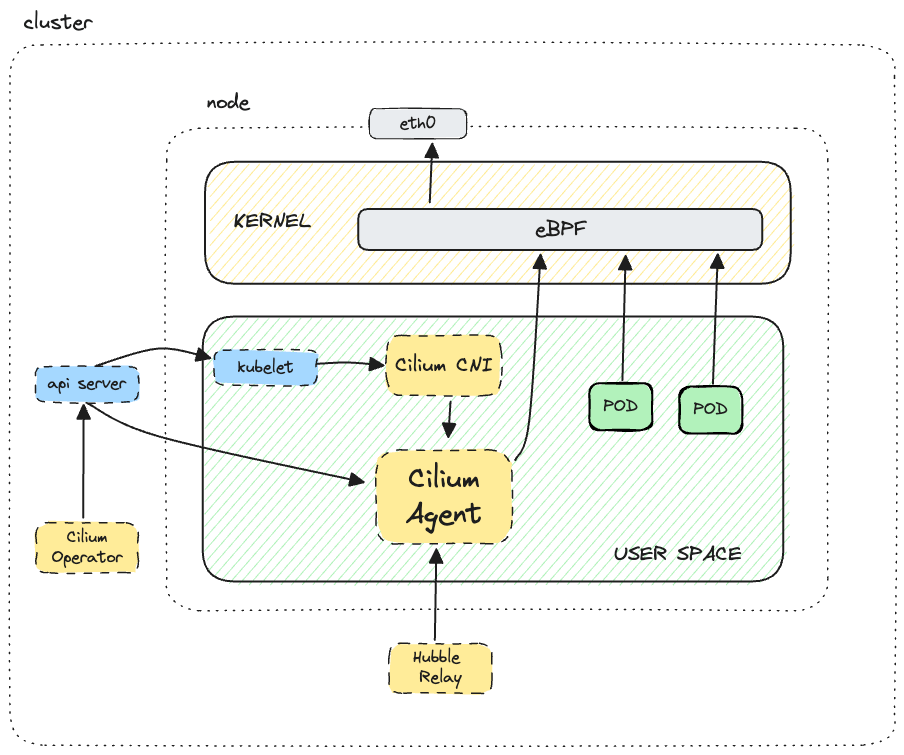
The Cilium Agent is deployed as a DaemonSet, meaning there's one agent instance per cluster node. The agent pod talks to the API service and interacts with the Linux kernel to load the eBPF programs and update eBPF maps. It also connects and talks to the Cilium CNI plugin, so it gets notified whenever new workloads gets scheduled. It also starts the Envoy proxy instance when the CiliumNetworkPolicy uses L7 rules. The agent also provides gRPC services to which the Hubble relay can connect for cluster-wide observability.
A Cilium endpoint gets created whenever a pod is started. An endpoint is a collection of containers or applications that share the same IP address - it's a Pod. By default, Cilium assigns an ipv4 and ipv6 address to all endpoints, and either of the addresses can be used to reach the endpoint.
The endpoints also get an internal ID that’s unique within the cluster node and a set of labels that are derived either from the pod:
k8s:app=httpbin
k8s:io.cilium.k8s.namespace.labels.kubernetes.io/metadata.name=default
k8s:io.cilium.k8s.policy.cluster=default
k8s:io.cilium.k8s.policy.serviceaccount=httpbin
k8s:io.kubernetes.pod.namespace=default
Each endpoint gets assigned an identity that's used for enforcing basic connectivity between endpoints. The identity of an endpoint gets derived from the labels assigned to the pod. If the labels are changed, the identity of endpoints gets updated accordingly.
Since pods can have diverse labels, not all of them are relevant for identity. For example, labels that contain time stamps or hashes. For that reason, Cilium automatically excludes labels that aren’t relevant for identity. Excluding (or including) labels for identity purposes is customizable, so you can provide your patterns for inclusion/exclusion.
The NetworkPolicy CRD is part of Kubernetes; however, it doesn't have an implementation.
The NetworkPolicy resource allows you to control traffic at L3 and L4 – for example, you can use selector labels and select pods and ports in your network policies. Note that there’s no L7 support - so with a NetworkPolicy, you can’t use any HTTP methods, headers, or paths in your policies.
At a high level, we can break down the resource into three parts:
Using the pod selector, we select the pods in the namespace where the NetworkPolicy is deployed, and we apply the policies to those pods.
The ingress policies allow us to control the traffic coming into the pods selected by the pod selector, while the egress policies allow us to control the traffic leaving those pods. Consider the following NetworkPolicy:
apiVersion: networking.k8s.io/v1
kind: NetworkPolicy
metadata:
  name: test-network-policy
  namespace: default
spec:
  podSelector:
    matchLabels:
      role: db
  policyTypes:
    - Ingress
    - Egress
  ingress:
    - from:
        - ipBlock:
            cidr: 172.17.0.0/16
            except:
              - 172.17.1.0/24
        - namespaceSelector:
            matchLabels:
              project: myproject
        - podSelector:
            matchLabels:
              role: frontend
      ports:
        - protocol: TCP
          port: 6379
  egress:
    - to:
        - ipBlock:
            cidr: 10.0.0.0/24
      ports:
        - protocol: TCP
          port: 5978
The NetworkPolicy above selects all pods in the default namespace with the label role=db set. It then applies the ingress and egress policies to those pods.
The ingress policy allows traffic from the following sources:
172.17.0.0/16, excluding the IP block 172.17.1.0/24project=myprojectrole=frontendNote
Note the use of
-in thefromsection. This means that the traffic can come from any of the three sources - the OR semantics is used.
Additionally, the ports section of the ingress policy allows traffic on port 6379 using the TCP protocol. So, if any of the three sources above tries to connect to the pods selected by the pod selector, the connection will be allowed only if it’s using the TCP protocol and it’s connecting to port 6379.
We can interpret the egress policy in a similar way. It allows traffic to the IP block 10.0.0.0/24 on port 5978 using the TCP protocol.
There are a couple of things you can't do with the NetworkPolicy resource:
You can find a complete list here.
Cilium implements the NetworkPolicy, allowing us to use it for L3 and L4 policies. On top of that, it also adds two new CRDs:
Let's look at the resource's selectors, ingress, and egress sections. The first difference between the NetworkPolicy and the CiliumNetworkPolicy is in the selector portion. While NetworkPolicy uses a podSelector, the selector in CiliumNetworkPolicy uses the concept of Cilium endpoints, hence the name endpointSelector. Note that it still uses the matchLabels, which isn't that much different from the pod selector in the NetworkPolicy.
On the other hand, ingress and egress sections bring a bunch of new functionality. Instead of a single from and to fields, there are multiple dedicated fields in the CiliumNetworkPolicy, as shown in the table below:
| Ingress | Egress | Description |
|---|---|---|
| fromCIDR | toCIDR | Allows you to specify a single IP address |
| fromCIDRSet | toCIDRSet | Allows you to specify multiple IP addresses |
| fromEndpoints | toEndpoints | Allows you to specify endpoints using a label selector |
| fromRequires | toRequires | Allows you to specify basic requirements (in terms of labels) for endpoints (see explanation below) |
| fromEntities | toEntities | Allows us to describe entities allowed to connect to the endpoints. Cilium defines multiple entities such as host (includes the local host), cluster (logical group of all endpoints inside a cluster), world (all endpoints outside of the cluster), and others |
| n/a | toFQDNs | Allows you to specify fully qualified domain names (FQDNs) |
| n/a | toServices | Allows you to specify Kubernetes services either using a name or a label selector |
The fromRequires allows us to set basic requirements (in terms of labels) for endpoints that are allowed to connect to the selected endpoints. The fromRequires doesn't stand alone, and it has to be combined with one of the other from fields.
For example:
apiVersion: cilium.io/v2
kind: CiliumNetworkPolicy
description: "Allow traffic from endpoints in the same region and with the app label set to hello-world"
metadata:
  name: requires-policy
specs:
  - endpointSelector:
      matchLabels:
        region: us-west
    ingress:
    - fromRequires:
      - matchLabels:
          region: us-west
      fromEndpoints:
        - matchLabels:
            app: hello-world
The above policy allows traffic to us-west endpoints from endpoints in the same region (us-west) and with the app label set to hello-world. If the fromRequires field is omitted, the policy will allow traffic from any endpoint with the app: hello-world label.
In addition to (default) allow policies, the CiliumNetworkPolicy will enable us to use deny policies with ingressDeny and egressDeny fields (instead of ingress and egress). Note that you should check some known issues before using deny policies.
Note
The limitations around the deny policies were removed in Cilium v1.14.0.
Another big thing that CiliumNetworkPolicy brings is the support of L7 policies. The L7 policies are defined using the rules field inside the toPorts section. Consider the following example:
apiVersion: cilium.io/v2
kind: CiliumNetworkPolicy
metadata:
  name: l7-policy
spec:
  endpointSelector:
    matchLabels:
      app: hello-world
  ingress:
  - toPorts:
    - ports:
      - port: 80
        protocol: TCP
      rules:
        http:
        - method: "GET"
          path: "/api"
        - method: "PUT"
          path: "/version"
          headers:
          - "X-some-header": "hello"
The above policy is saying that any endpoint with the label app: hello-world can receive packets on port 80 using TCP, and the only methods allowed are GET on /api and PUT on /version when X-some-header is set to hello.
Lastly, the CiliumClusterwideNetworkPolicy is a cluster-wide version of the CiliumNetworkPolicy. It's similar to the CiliumNetworkPolicy, but it allows us to apply policies at the cluster level (not just the namespace level, like Network and CiliumNetworkPolicy).
Free Newsletter
Get hands-on Kubernetes, Istio, and cloud-native tutorials like this one in your inbox a couple of times a month. No spam, unsubscribe anytime.
Let's look at the policies in action. I'll be creating a kind cluster without any CNI. You can do that by using the following configuration:
kind: Cluster
apiVersion: kind.x-k8s.io/v1alpha4
nodes:
- role: control-plane
- role: worker
- role: worker
networking:
  disableDefaultCNI: true
  kubeProxyMode: none
If you save the above YAML to config.yaml, you can create the cluster like this:
kind create cluster --config=config.yaml
Note
If you'd list the nodes (
kubectl get nodes) or pods (kubectl get pods -A), you'd see that the nodes are NotReady and pods are pending. That's because we disabled the default CNI, and the cluster lacks networking capabilities.
To install Cilium on the cluster, we'll use Helm. Check the official documentation on how to add the Helm repository and other requirements. Once you've installed Helm and added the repository, you can install Cilium:
helm install cilium cilium/cilium --version 1.14.2 --namespace kube-system --set kubeProxyReplacement=strict --set k8sServiceHost=kind-control-plane --set k8sServicePort=6443 --set hubble.relay.enabled=true --set hubble.ui.enabled=true
Once the cluster is up and running, we'll install Cilium CLI to check the installation status as well as use it later to interact with Cilium in the cluster;
You can check the status of Cilium using the following command:
   /¯¯\
 /¯¯\__/¯¯\    Cilium:          OK
 \__/¯¯\__/    Operator:        OK
 /¯¯\__/¯¯\    Hubble Relay:    OK
 \__/¯¯\__/    ClusterMesh:     disabled
    \__/

Deployment        hubble-ui          Desired: 1, Ready: 1/1, Available: 1/1
Deployment        cilium-operator    Desired: 2, Ready: 2/2, Available: 2/2
Deployment        hubble-relay       Desired: 1, Ready: 1/1, Available: 1/1
DaemonSet         cilium             Desired: 3, Ready: 3/3, Available: 3/3
Containers:       hubble-ui          Running: 1
                  cilium-operator    Running: 2
                  hubble-relay       Running: 1
                  cilium             Running: 3
Cluster Pods:     10/10 managed by Cilium
Image versions    cilium-operator    quay.io/cilium/operator-generic:v1.14.2@sha256:a1982c0a22297aaac3563e428c330e17668305a41865a842dec53d241c5490ab: 2
                  hubble-relay       quay.io/cilium/hubble-relay:v1.14.2@sha256:51b772cab0724511583c3da3286439791dc67d7c35077fa30eaba3b5d555f8f4: 1
                  cilium             quay.io/cilium/cilium:v1.14.2@sha256:85708b11d45647c35b9288e0de0706d24a5ce8a378166cadc700f756cc1a38d6: 3
                  hubble-ui          quay.io/cilium/hubble-ui-backend:v0.11.0@sha256:14c04d11f78da5c363f88592abae8d2ecee3cbe009f443ef11df6ac5f692d839: 1
                  hubble-ui          quay.io/cilium/hubble-ui:v0.11.0@sha256:bcb369c47cada2d4257d63d3749f7f87c91dde32e010b223597306de95d1ecc8: 1
To demonstrate the policies I'll use the httpbin and sleep workloads:
kubectl apply -f https://github.com/istio/istio/blob/master/samples/sleep/sleep.yaml
kubectl apply -f https://raw.githubusercontent.com/istio/istio/master/samples/httpbin/httpbin.yaml
Once the pods are running, let's send a request from the sleep pod to the httpbin service to make sure there's connectivity between the two:
kubectl exec -it deploy/sleep -- curl httpbin:8000/headers
{
  "headers": {
    "Accept": "*/*",
    "Host": "httpbin:8000",
    "User-Agent": "curl/8.1.1-DEV",
    "X-Envoy-Expected-Rq-Timeout-Ms": "3600000"
  }
}
With pods up and running, we'll start creating our first network policy. We'll start with a policy that denies all traffic between the pods in the default namespace:
apiVersion: networking.k8s.io/v1
kind: NetworkPolicy
metadata:
  name: default-deny-ingress
spec:
  podSelector: {}
  policyTypes:
  - Ingress
Note
The empty pod selector (
{}) means that the policy applies to all pods in the namespace (in this case, thedefaultnamespace).
If we try to send a request this time, it's not going to work, and the request will eventually time out:
kubectl exec -it deploy/sleep -- curl httpbin:8000/headers
curl: (28) Failed to connect to httpbin port 8000 after 129674 ms: Couldn't connect to server
command terminated with exit code 28
As part of our installation, we enabled Hubble, which is a fully distributed networking and security observability platform for cloud-native workloads. It uses eBPF to capture network traffic, and it sends it to the Hubble Relay (installed in the cluster). To observe the collected traffic, we can use the Hubble CLI or inspect the flows directly from the Hubble UI.
Let's use the cilium CLI first to establish a connection to the Hubble inside the cluster, and then we can use hubble observe command to look at the traces from the command line:
# port forward to the Hubble relay running in the cluster
cilium hubble port-forward &


# then use hubble observe
hubble observe --to-namespace default -f
Jun 14 18:04:42.902: default/sleep-6d68f49858-8hjzc:55276 (ID:15320) <- kube-system/coredns-565d847f94-2mbrp:53 (ID:21043) to-overlay FORWARDED (UDP)
Jun 14 18:04:42.902: kube-system/coredns-565d847f94-2mbrp:53 (ID:21043) <> default/sleep-6d68f49858-8hjzc (ID:15320) pre-xlate-rev TRACED (UDP)
Jun 14 18:04:42.902: kube-system/kube-dns:53 (world) <> default/sleep-6d68f49858-8hjzc (ID:15320) post-xlate-rev TRANSLATED (UDP)
Jun 14 18:04:42.902: kube-system/coredns-565d847f94-2mbrp:53 (ID:21043) <> default/sleep-6d68f49858-8hjzc (ID:15320) pre-xlate-rev TRACED (UDP)
Jun 14 18:04:42.902: default/sleep-6d68f49858-8hjzc:55276 (ID:15320) <- kube-system/coredns-565d847f94-2mbrp:53 (ID:21043) to-endpoint FORWARDED (UDP)
Jun 14 18:04:42.902: kube-system/kube-dns:53 (world) <> default/sleep-6d68f49858-8hjzc (ID:15320) post-xlate-rev TRANSLATED (UDP)
Jun 14 18:04:42.902: default/sleep-6d68f49858-8hjzc:46279 (ID:15320) <- kube-system/coredns-565d847f94-2mbrp:53 (ID:21043) to-overlay FORWARDED (UDP)
Jun 14 18:04:42.902: default/sleep-6d68f49858-8hjzc:46279 (ID:15320) <- kube-system/coredns-565d847f94-2mbrp:53 (ID:21043) to-endpoint FORWARDED (UDP)
Jun 14 18:04:42.902: kube-system/coredns-565d847f94-2mbrp:53 (ID:21043) <> default/sleep-6d68f49858-8hjzc (ID:15320) pre-xlate-rev TRACED (UDP)
Jun 14 18:04:42.902: kube-system/kube-dns:53 (world) <> default/sleep-6d68f49858-8hjzc (ID:15320) post-xlate-rev TRANSLATED (UDP)
Jun 14 18:04:42.902: kube-system/coredns-565d847f94-2mbrp:53 (ID:21043) <> default/sleep-6d68f49858-8hjzc (ID:15320) pre-xlate-rev TRACED (UDP)
Jun 14 18:04:42.902: kube-system/kube-dns:53 (world) <> default/sleep-6d68f49858-8hjzc (ID:15320) post-xlate-rev TRANSLATED (UDP)
Jun 14 18:04:42.903: default/sleep-6d68f49858-8hjzc (ID:15320) <> default/httpbin-797587ddc5-kshhb:80 (ID:61151) post-xlate-fwd TRANSLATED (TCP)
Jun 14 18:04:42.903: default/sleep-6d68f49858-8hjzc:42068 (ID:15320) <> default/httpbin-797587ddc5-kshhb:80 (ID:61151) policy-verdict:none INGRESS DENIED (TCP Flags: SYN)
Jun 14 18:04:42.903: default/sleep-6d68f49858-8hjzc:42068 (ID:15320) <> default/httpbin-797587ddc5-kshhb:80 (ID:61151) Policy denied DROPPED (TCP Flags: SYN)
Jun 14 18:04:43.908: default/sleep-6d68f49858-8hjzc:42068 (ID:15320) <> default/httpbin-797587ddc5-kshhb:80 (ID:61151) policy-verdict:none INGRESS DENIED (TCP Flags: SYN)
Jun 14 18:04:43.908: default/sleep-6d68f49858-8hjzc:42068 (ID:15320) <> default/httpbin-797587ddc5-kshhb:80 (ID:61151) Policy denied DROPPED (TCP Flags: SYN)
...
Notice in the above output the flows between different endpoints - sleep, coredns, httpbin. The flows get captured in both directions (ingress and egress), and we can see the additional context collected for each flow. The flows are also annotated with the policy verdict - in this case, the flows are denied by the policy we deployed.
The observe command has many options to filter and change the output format. For example, we can use the -o flag to specify the output format as JSON and the --from-label and --to-label flags to only show the flows from sleep to httpbin endpoints:
hubble observe -o json --from-label "app=sleep" --to-label "app=httpbin"
{
  "flow": {
    "time": "2023-06-14T18:04:43.908158337Z",
    "verdict": "DROPPED",
    "drop_reason": 133,
    "ethernet": {
      "source": "8e:b1:6e:2a:54:04",
      "destination": "9a:b4:25:34:03:fc"
    },
    "IP": {
      "source": "10.0.1.226",
      "destination": "10.0.1.137",
      "ipVersion": "IPv4"
    },
    "l4": {
      "TCP": {
        "source_port": 42068,
        "destination_port": 80,
        "flags": {
          "SYN": true
        }
      }
    },
    "source": {
      "ID": 2535,
      "identity": 15320,
      "namespace": "default",
      "labels": [
        "k8s:app=sleep",
        "k8s:io.cilium.k8s.namespace.labels.kubernetes.io/metadata.name=default",
        "k8s:io.cilium.k8s.policy.cluster=default",
        "k8s:io.cilium.k8s.policy.serviceaccount=sleep",
        "k8s:io.kubernetes.pod.namespace=default"
      ],
      "pod_name": "sleep-6d68f49858-8hjzc",
      "workloads": [
        {
          "name": "sleep",
          "kind": "Deployment"
        }
      ]
    },
    "destination": {
      "ID": 786,
      "identity": 61151,
      "namespace": "default",
      "labels": [
        "k8s:app=httpbin",
        "k8s:io.cilium.k8s.namespace.labels.kubernetes.io/metadata.name=default",
        "k8s:io.cilium.k8s.policy.cluster=default",
        "k8s:io.cilium.k8s.policy.serviceaccount=httpbin",
        "k8s:io.kubernetes.pod.namespace=default",
        "k8s:version=v1"
      ],
      "pod_name": "httpbin-797587ddc5-kshhb",
      "workloads": [
        {
          "name": "httpbin",
          "kind": "Deployment"
        }
      ]
    },
    "Type": "L3_L4",
    "node_name": "kind-worker",
    "event_type": {
      "type": 1,
      "sub_type": 133
    },
    "traffic_direction": "INGRESS",
    "drop_reason_desc": "POLICY_DENIED",
    "Summary": "TCP Flags: SYN"
  },
  "node_name": "kind-worker",
  "time": "2023-06-14T18:04:43.908158337Z"
}
You'll notice the JSON output is more verbose, and it contains a lot of information and context around a single flow. We can export data Cilium captures as part of the network flow to Prometheus and then visualize in Grafana. You can check out the video below to see how to configure Cilium to export to Prometheus and how to install Prometheus and Grafana.
There's also a UI portion of Hubble that allows you to visualize the network flows. You can access the UI by running the following command:
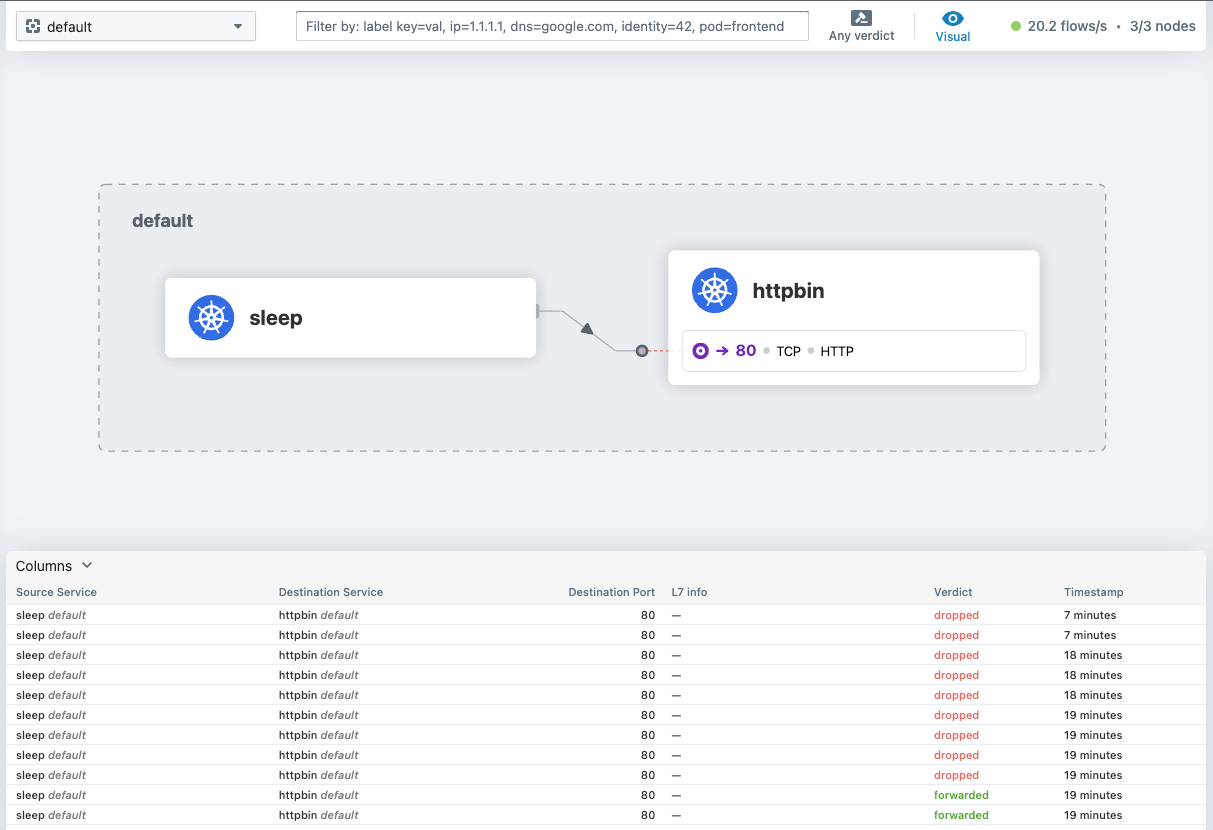
The UI allows you to filter the flows by source and destination endpoints, namespace, policy verdict, and TCP flags. You can also see the flows in real-time as Cilium captures them.
Let's create another policy that explicitly allows traffic from the sleep pod to the httpbin pod:
apiVersion: networking.k8s.io/v1
kind: NetworkPolicy
metadata:
  name: allow-ingress-to-httpbin
  namespace: default
spec:
  podSelector:
    matchLabels:
      app: httpbin
  policyTypes:
  - Ingress
  ingress:
    - from:
      - podSelector:
          matchLabels:
            app: sleep
Note that we aren't removing the previous policy, we're "layering" the new one on top of it to allow traffic from sleep to httpbin. If you apply the policy and then try to access httpbin from sleep again, it will work.
Let's have another workload from a different namespace. We'll create a new namespace (sleep) and deploy a sleep workload:
kubectl create ns sleep
kubectl apply -f https://github.com/istio/istio/blob/master/samples/sleep/sleep.yaml -n sleep
If we try to access httpbin from sleep in the sleep namespace, it will fail. This is because the policy we created only allows traffic from sleep in the default namespace to httpbin in the default namespace.
We can create a new policy to allow traffic from sleep in the sleep namespace to httpbin in the default namespace using the namespace selector:
apiVersion: networking.k8s.io/v1
kind: NetworkPolicy
metadata:
  name: allow-ingress-from-sleep
  namespace: default
spec:
  podSelector:
    matchLabels:
      app: httpbin
  policyTypes:
  - Ingress
  ingress:
    - from:
      - namespaceSelector:
          matchLabels:
            kubernetes.io/metadata.name: sleep
If we send a request from the sleep namespace, we'll be able to access the httpbin workload in the default namespace:
kubectl exec -it deploy/sleep -n sleep -- curl httpbin.default:8000/headers
However, if you look at this policy closer, it's not very restrictive as it allows any pod in the sleep namespace to access the httpbin workload.
To improve this, we can combine the namespaceSelector with the podSelector and make the policy more restrictive. The below policy now only allows the sleep pods (pods with app: sleep label) from the sleep namespace to access the httpbin pods:
apiVersion: networking.k8s.io/v1
kind: NetworkPolicy
metadata:
  name: allow-ingress-from-sleep
spec:
  podSelector:
    matchLabels:
      app: httpbin
  policyTypes:
  - Ingress
  ingress:
    - from:
      - namespaceSelector:
          matchLabels:
            kubernetes.io/metadata.name: sleep
        podSelector:
          matchLabels:
            app: sleep
This won't change anything for the requests made from the sleep pods, but it will restrict any other pods from making them. Before continuing, let's delete the policies we have created so far using the command below:
kubectl delete netpol --all
A better starting point from the "deny all ingress traffic" would be to allow all traffic within a namespace but deny all traffic from other namespaces. We could do that using the following policy:
apiVersion: networking.k8s.io/v1
kind: NetworkPolicy
metadata:
  name: allow-ns-ingress
spec:
  podSelector: {}
  ingress:
    - from:
      - podSelector: {}
We've seen the empty selector in one of the previous policies. This time we're also using an empty selector in the ingress policy. The above policy translates to "apply this policy to all pods in the namespace" and "allow all traffic from all pods in the namespace". With the above policy in place, we can make requests within the default namespace; however, requests from the sleep namespace will be dropped.
So far, we have also looked at ingress policies that apply to traffic entering the selected pods. We can also create egress policies that apply to traffic that's leaving the selected pods. Let's create a policy that denies all egress traffic from the sleep pods:
kind: NetworkPolicy
apiVersion: networking.k8s.io/v1
metadata:
  name: deny-sleep-egress
spec:
  podSelector:
    matchLabels:
      app: sleep
  policyTypes:
  - Egress
If we try sending a request from the sleep pod to httpbin, it will fail because the policy denies any egress traffic from the sleep pods.
kubectl exec -it deploy/sleep -- curl httpbin.default:8000/headers
curl: (6) Could not resolve host: httpbin.default
command terminated with exit code 6
Notice how the error is different this time? It says the host httpbin.default couldn't be resolved. This specific error is because the sleep pod is trying to resolve the hostname httpbin.default to an IP address, but since all requests going out of the sleep pod are denied, the DNS request is also being blocked.
You can re-try the same request, but instead of using the service name (httpbin.default), use the IP address of the httpbin service. You'll get an error saying that the connection failed:
curl: (28) Failed to connect to httpbin port 8000 after 129674 ms: Couldn't connect to server
command terminated with exit code 28
To fix the DNS issue, we have to explicitly allow egress to the kube-dns running in the kube-system namespace like this:
kind: NetworkPolicy
apiVersion: networking.k8s.io/v1
metadata:
  name: allow-dns-egress
spec:
  podSelector: {}
  policyTypes:
  - Egress
  egress:
    - to:
      - namespaceSelector:
          matchLabels:
            kubernetes.io/metadata.name: kube-system
        podSelector:
          matchLabels:
            k8s-app: kube-dns
With the above policy applied, the DNS requests will work; however, we're still denying all egress, so the request will fail. We can explicitly allow egress to the httpbin using the following policy:
kind: NetworkPolicy
apiVersion: networking.k8s.io/v1
metadata:
  name: allow-sleep-to-httpbin-egress
spec:
  podSelector:
    matchLabels:
      app: sleep
  policyTypes:
  - Egress
  egress:
    - to:
      - podSelector:
          matchLabels:
            app: httpbin
With the above policy in place, we can now make requests from the sleep pod to httpbin. Let's clean up the policies again (kubectl delete netpol --all), before we look at the L7 policies.
We'll keep using the httpbin and sleep workloads, but let's say we want to allow traffic to the httpbin endpoint on the /headers path and only using the GET method. We know we can't use NetworkPolicy for that, but we can use CiliumNetworkPolicy.
Before we apply any policies, let try sending a POST request and a request to /ip path just ensure everything works fine (make sure we don't have any left-over policies from before):
kubectl exec -it deploy/sleep -n default -- curl -X POST httpbin.default:8000/post
kubectl exec -it deploy/sleep -n default -- curl httpbin.default:8000/ip
{
  "args": {},
  "data": "",
  "files": {},
  "form": {},
  "headers": {
    "Accept": "*/*",
    "Host": "httpbin.default:8000",
    "User-Agent": "curl/8.1.1-DEV"
  },
  "json": null,
  "origin": "10.0.1.226",
  "url": "http://httpbin.default:8000/post"
}
{
  "origin": "10.0.1.226"
}
Now let's create a policy that allows traffic to the /headers path and only using the GET method - this means after we apply the policy the POST request or the request to /ip path will fail:
apiVersion: cilium.io/v2
kind: CiliumNetworkPolicy
metadata:
  name: allow-get-headers
spec:
  endpointSelector:
    matchLabels:
      app: httpbin
  ingress:
  - fromEndpoints:
    - matchLabels:
        app: sleep
    toPorts:
    - ports:
      # Note port 80 here! We aren't talking about the service port, but the "endpoint" port, which is 80.
      - port: "80"
        protocol: TCP
      rules:
        http:
        - method: GET
          path: /headers
If we repeat the above requests, we'll see that the POST request fails and the request to /ip path fails as well:
Access denied
Access denied
However, a GET request to /headers works fine:
kubectl exec -it deploy/sleep -n default -- curl httpbin.default:8000/headers
{
  "headers": {
    "Accept": "*/*",
    "Host": "httpbin.default:8000",
    "User-Agent": "curl/8.1.1-DEV",
    "X-Envoy-Expected-Rq-Timeout-Ms": "3600000"
  }
}
Notice the extra header in the output - X-Envoy-Expected-Rq-Timeout-Ms - this is set by the Envoy proxy that is spun up inside the Cilium agent pod and handles the L7 policies.
Here are a couple of frequently asked questions and answers that come up when talking about NetworkPolicy, CiliumNetworkPolicy, and CiliumClusterwideNetworkPolicy.
A NetworkPolicy in Kubernetes is a specification that defines how groups of pods are allowed to communicate with each other. The NetworkPolicy provides a way to control network traffic in (ingress) and out (egress) of your pods. The NetworkPolicy is implemented by a network plugin, such as Cilium.
Cilium is an open-source project that provides networking, load balancing, and network policy enforcement for Kubernetes. It implements the NetworkPolicy functionality and extends it through CiliumNetworkPolicy and CiliumClusterwideNetworkPolicy resources.
Hubble is Cilium's fully distributed networking and security observability platform. It provides deep visibility into the communication and behavior of services as well as the networking infrastructure in a completely transparent manner.
A NetworkPolicy is defined in YAML (just like anything else Kubernetes) and applied to your Kubernetes cluster. It contains specifications for podSelectors, policyTypes, and ingress/egress rules. It tells Kubernetes which pods the policy applies to and what the inbound and outbound traffic rules are.
Ingress policies control the incoming network traffic to your pods, while Egress policies control the outgoing network traffic from your pods. By defining these policies, you can manage which traffic is allowed to and from your pods.
Yes, you can apply multiple policies to a pod. Kubernetes will allow a connection if at least one policy allows it.
CiliumNetworkPolicy is a CRD implemented by Cilium and, compared to NetworkPolicy, includes additional features. It offers more granular options to define policies, including allowing you to control traffic at the Layer 7 (HTTP/HTTPS) level (implemented by Envoy proxy).
By default, network policies are expressed as allow policies. To write an explicit deny policy, you have to use the CiliumNetworkPolicy resource and use the ingressDeny/egressDeny fields.
Network policies are a powerful tool that allow Kubernetes administrators to define ingress and egress policies for cluster workloads.
In this article, we explored how Cilium implements the NetworkPolicy API and brings additional two CRDS - the CiliumNetworkPolicy and CiliumClusterwideNetworkPolicy to fill out the gaps in the NetworkPolicy spec.
We've explained the different options we have for defining ingress and egress policies, and we've shown how we can use CiliumNetworkPolicy to define L7 policies.
Related reading:
此内容由惯性聚合(RSS阅读器)自动聚合整理,仅供阅读参考。 原文来自 — 版权归原作者所有。