








Updated article using Istio 1.7!
When installing Istio, you have an option to pick the installation profile to use. In Istio 1.7, there are four installation profiles: default, demo, minimal, sds, and remote.
Each of the profiles contains a different combination of core components and add-ons. For example, if you pick the default profile, Grafana and Kiali won't be installed, and neither will the egress gateway. You can read more about the configuration profiles and check components that are part of the profiles on Istio's docs page.
You can additionally customize your Istio installation, regardless of the profile, by using the istioctl manifest command and customizing the configuration with --set <key>=<value> key/value pairs. For example, you could use the minimal configuration profile and enable mTLS and control plane security features like this:
istioctl manifest apply --set values.global.mtls.enabled=true --set values.global.controlPlaneSecurityEnabled=true
All these features are great if you want to customize the installation by enabling or disabling individual components or tweaking configuration values for those components.
A while ago, I received a question on one of my videos where I talk about Istio Ingress Gateway. Mark asked: "How does one go about creating a second ingress load balancer (with a different external IP)?"
I decided I should probably write a quick article as it might be attractive to others as well. So, if your scenario requires you to run one or more ingress gateways (i.e., you need multiple load balancers with different external IPs), read on!
Now before you go and create multiple ingress gateways (and multiple load balancers with your cloud provider), make sure you need it - note that it costs money to run load balancers :). A lot of the scenarios can be covered with a single load balancer. The scenario with a single load balancer would look similar to the figure below.
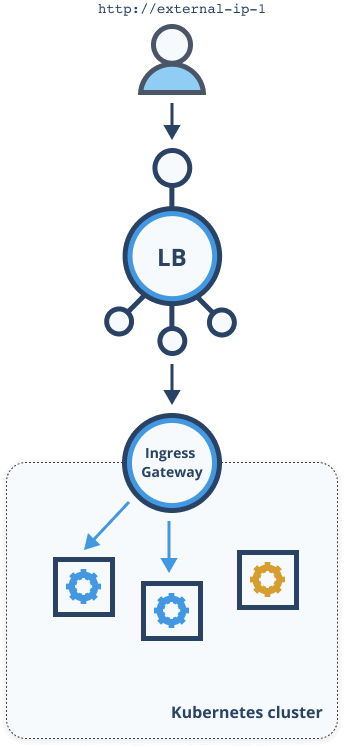
You have a single ingress gateway - a service with LoadBalancer type and a pod running Envoy. The fact that service is of LoadBalancer type causes the creation of an actual load balancer instance and gives you an external IP address.
Together with the Gateway resource, the host key in the configuration and attaching a gateway to a virtual service, you can expose multiple different services in your cluster on different domain names or sub-domains. For example, check out the Istio Ingress Gateway video that shows you how to do that.
Now consider a different scenario where you want two separate load balancer instances running - shown in the figure below.
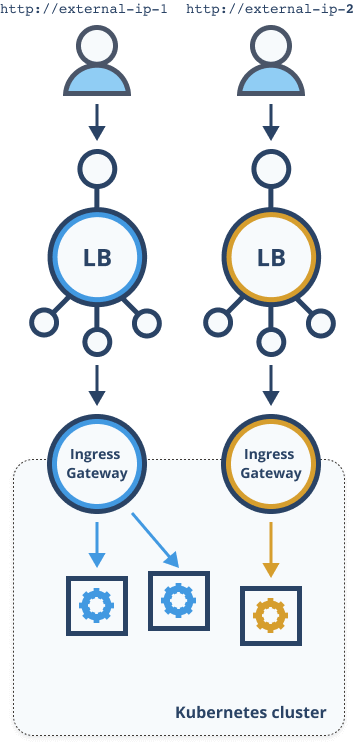
In this scenario, you have two different external IPs that point to two different ingress gateways that run inside the same Kubernetes cluster. Let's look at how to achieve this.
I am going to start with a clean Kubernetes cluster (i.e., no Istio installed yet). However, you could extract all ingress gateway components and install them on a cluster that already has Istio running as well.
The first thing I did is to dump the default manifest and see different components that Istio ingress gateway uses.
istioctl manifest generate > manifest.yaml
The above command will generate the set of Kubernetes resources for the default profile. It's a huge file with more than 10000 lines of YAML... Luckily we are only interested in one component.
If you search for name: istio-ingressgateway in the manifest.yaml you will get all components that are related to the ingress gateway component.
Here are the different resources that make up the ingress gateway component in Istio:
At a high level, you need to make a copy of the above resources, update the names, and you are good to go.
You will be deploying the second instance of the ingress gateway into the same namespace (istio-system), and therefore you will need to:
second-istio-ingressgateway sounds clear enough.second-istio-ingressgateway and update other resources accordingly (e.g., the Kubernetes service)Changing the name allows you to run the second instance in the same namespace, and when you label the ingress gateway with a different label, you can correctly select it from the Gateway resource.
Note
Note that you don't have to change the other ingress's gateway name if you don't deploy it to the
istio-systemnamespace. However, you need to make sure to update the namespace name.
Here's a snippet of the Gateway resource and how you can pick a different ingress gateway:
kind: Gateway
metadata:
  name: gateway
spec:
  selector:
    istio: second-istio-ingressgateway
Note
Note that I am using the same label notation as default ingress does:
istio: second-istio-ingressgateway. You could change that as well and use any other combination of labels if you wish.
Let's copy the YAML for those five resources and put it into a separate file, so it's easier to manage. I am calling that file second-ingress.yaml.
In each resource, you have to change at least the resource name and labels - you will simply be pre-pending second to any istio-ingressgateway or ingressgateway value. Note that some resources might also refer to other resources - e.g., HorizontalPodAutoscaler references the deployment, so you have to change the name there as well.
| Key | Original value | Changed value |
|---|---|---|
| metadata.name | istio-ingressgateway | second-istio-ingressgateway |
| metadata.labels | app: istio-ingressgateway | app: second-istio-ingressgateway |
| metadata.labels | istio: ingressgateway | istio: second-ingressgateway |
| spec.scaleTargetRef.name | name: istio-ingressgateway | name: second-istio-ingressgateway |
| Key | Original value | Changed value |
|---|---|---|
| name | istio-ingressgateway | second-istio-ingressgateway |
| labels | app: istio-ingressgateway | app: second-istio-ingressgateway |
| istio: ingressgateway | istio: second-ingressgateway | |
| matchLabels | app: istio-ingressgateway | app: second-istio-ingressgateway |
| istio: ingressgateway | istio: second-ingressgateway | |
| containers.args | - istio-ingressgateway | - second-istio-ingressgateway |
| template.metadata.labels | app: istio-ingressgateway | app: second-istio-ingressgateway |
| istio: istio-ingressgateway | istio: second-istio-ingressgateway |
In addition to above values, there are also three environment variables that are referencing istio-ingressgateway and ingressgateway that all need to changed:
ISTIO_META_WORKLOAD_NAME - update to: second-istio-ingressgatewayISTIO_META_OWNER - update to: kubernetes://.../second-istio-ingressgatewayThere are also a couple of secrets (certificate) that the deployment is referencing. However, since we are not using the cert manager, I won't be changing those. You could change them, but beware that you will also need to change the ConfigMap (istio-sidecar-injector) that contains the configuration for cert manager and certificates - you will need to add another object that represents the new ingress gateway. I am not going to do that in this article. If you decide to try it or get it to work - let me know!
| Key | Original value | Changed value |
|---|---|---|
| metadata.name | ingressgateway | second-ingressgateway |
| metadata.labels | app: istio-ingressgateway | app: second-istio-ingressgateway |
| istio: ingressgateway | istio: second-ingressgateway | |
| spec.selector.matchLabels | app: istio-ingressgateway | app: second-istio-ingressgateway |
| istio: ingressgateway | istio: second-ingressgateway |
| Key | Original value | Changed value |
|---|---|---|
| metadata.name | istio-ingressgateway | second-istio-ingressgateway |
| metadata.labels | app: istio-ingressgateway | app: second-istio-ingressgateway |
| istio: ingressgateway | istio: second-ingressgateway | |
| spec.selector | app: istio-ingressgateway | app: second-istio-ingressgateway |
| istio: ingressgateway | app: second-ingressgateway |
You can copy the changes back to the original manifest.yaml - I copied them right after the original ingress gateway definition - make sure you separate the items with ---.
I was trying to run this on Minikube - the first time I deployed the manifest with above changes, I got an error because by default Minikube doesn't support third party JWT tokens for authentication (you can read more about the difference between the 1st and 3rd party tokens here). The error you will get in the Pods looks like this:
Warning FailedMount 7s (x5 over 14s) kubelet, minikube MountVolume.SetUp failed for volume "istio-token" : failed to fetch token: the API server does not have TokenRequest endpoints enabled
For that reason, I have started Minikube with the following extra configuration:
minikube start --extra-config=apiserver.service-account-issuer=api --extra-config=apiserver.service-account-signing-key-file=/var/lib/minikube/certs/apiserver.key --extra-config=apiserver.service-account-api-audiences=api
Even with this, I wasn't able to get neither of the ingress gateways to start running. So I change the JWT policy from third-party-jwt to first-party-jwt in the manifest YAML. The value is in 3 places: the istiod deployment and two ingress deployments, so make sure you only change it there.
Once this was changed, the both gateways started running!
Before you deploy the manfiest, make sure you create the istio-system namespace first (kubectl create ns istio-system). Then, apply the manifest:
kubectl apply -f manifest.yaml
This creates a default Istio installation with an extra ingress gateway. After a couple of minutes, if you run kubectl get pods -n istio-system you should be able to see the second ingress gateway:
$ kubectl get po -n istio-system
NAME                                           READY   STATUS    RESTARTS   AGE
istio-ingressgateway-56f77dfbbc-6vdzn          1/1     Running   0          83s
istiod-75547bdd67-qzwrz                        1/1     Running   0          83s
second-istio-ingressgateway-5bd7f9c8fc-t7bct   1/1     Running   0          82s
A quick note on this - first time I deployed the manifest neither of the gateways started - the error in the ingress gateway the logs was:
info Envoy proxy is NOT ready: config not received from Pilot (is Pilot running?): cds updates: 0 successful, 0 rejected; lds updates: 0 successful, 0 rejected
I was not expecting an error like that, especially since the pilot was running. There weren't any errors in pilot containers either. Luckily, simply restarting (i.e. kubectl delete pod) both ingress pods fixed the issue, and both gateways started.
Let's check to ensure we have two separate gateways running. First, check that the pod with istio-ingressgateway is the first or default gateway that gets installed with Istio:
$ kubectl get po -A -l=istio=ingressgateway
NAMESPACE      NAME                                    READY   STATUS    RESTARTS   AGE
istio-system   istio-ingressgateway-56f77dfbbc-6vdzn   1/1     Running   0          10m
If you see two pods here, you probably missed a label somewhere - you should go back and double-check the configuration of the second ingress gateway.
Similarly, check that the ingress gateway labeled with istio: second-ingressgateway returns the second gateway pod:
$ kubectl get po -A -l=istio=second-ingressgateway
NAMESPACE      NAME                                           READY   STATUS    RESTARTS   AGE
istio-system   second-istio-ingressgateway-5bd7f9c8fc-t7bct   1/1     Running   0          10m
Finally, if you're running this on a cloud-based Kubernetes cluster, you can check that you have two Kubernetes services running with LoadBalancer type and two external IP addresses - you should see a istio-ingressgateway and second-istio-ingressgateway services, both with different external IPs:
$ kubectl get svc -n istio-system
NAME                          TYPE           CLUSTER-IP      EXTERNAL-IP       PORT(S)
istio-ingressgateway          LoadBalancer   10.96.52.106    129.XXX.XXX.1   15020:30587...
second-istio-ingressgateway   LoadBalancer   10.96.155.217   129.XXX.XXX.2    15020:30568...
....
Let's try it out and make sure that it works. Use the YAML below to create a service, deployment, gateway, and virtual service. As a first test, gateway will use the original istio-ingressgateway, so making a request to the first external IP should return you the default Nginx page while accessing the second IP will give you a 404.
Deploy the follow snippet:
cat << EOF | kubectl apply -f -
apiVersion: v1
kind: Service
metadata:
  name: nginx
  labels:
    app: nginx
spec:
  ports:
  - port: 80
    name: http
  selector:
    app: nginx
---
apiVersion: apps/v1
kind: Deployment
metadata:
  name: nginx
  labels:
    app: nginx
spec:
  replicas: 1
  selector:
    matchLabels:
      app: nginx
  template:
    metadata:
      labels:
        app: nginx
    spec:
      containers:
      - name: nginx
        image: nginx:alpine
        imagePullPolicy: IfNotPresent
        ports:
        - containerPort: 80
---
apiVersion: networking.istio.io/v1alpha3
kind: Gateway
metadata:
  name: gateway
spec:
  selector:
    istio: ingressgateway
  servers:
  - port:
      number: 80
      name: http
      protocol: HTTP
    hosts:
    - '*'
---
apiVersion: networking.istio.io/v1alpha3
kind: VirtualService
metadata:
  name: nginx-1
spec:
  hosts:
  - "*"
  gateways:
  - gateway
  http:
  - route:
    - destination:
        host: nginx
        port:
          number: 80
EOF
Wait for the pod to start and make a request to the first IP (or open it in your browser):
$ curl 129.XXX.XXX.1
<html>
<head>
<title>Welcome to nginx!</title>
<style>
    body {
        width: 35em;
        margin: 0 auto;
        font-family: Tahoma, Verdana, Arial, sans-serif;
    }
</style>
</head>
<body>
<h1>Welcome to nginx!</h1>
<p>If you see this page, the nginx web server is successfully installed and
working. Further configuration is required.</p>

<p>For online documentation and support please refer to
<a href="http://nginx.org/">nginx.org</a>.<br/>
Commercial support is available at
<a href="http://nginx.com/">nginx.com</a>.</p>

<p><em>Thank you for using nginx.</em></p>
</body>
</html>
Perfect! Now make the request to the second external IP and you will get back a 404:
$ curl -v 129.XXX.XXX.2
* Rebuilt URL to: 129.XXX.XXX.2/
*   Trying 129.XXX.XXX.2...
* TCP_NODELAY set
* Connected to 129.XXX.XXX.2 (129.XXX.XXX.2) port 80 (#0)
> GET / HTTP/1.1
> Host: 129.XXX.XXX.2
> User-Agent: curl/7.54.0
> Accept: */*
>
< HTTP/1.1 404 Not Found
< location: http://129.XXX.XXX.2/
< date: Thu, 09 Jan 2020 20:56:37 GMT
< server: istio-envoy
< content-length: 0
<
* Connection #0 to host 129.XXX.XXX.2 left intact
Let's change the selector on the Gateway to use the second ingress gateway and deploy it:
cat <<EOF | kubectl apply -f -
apiVersion: networking.istio.io/v1alpha3
kind: Gateway
metadata:
  name: gateway
spec:
  selector:
    istio: second-ingressgateway
  servers:
  - port:
      number: 80
      name: http
      protocol: HTTP
    hosts:
    - '*'
EOF
If you repeat the same test as you did before, you will notice that accessing the first external IP will now return a 404, and when you open the second external IP, you will get the default Nginx page.
此内容由惯性聚合(RSS阅读器)自动聚合整理,仅供阅读参考。 原文来自 — 版权归原作者所有。