



Kubernetes relies on Container Network Interface (CNI) plugins to assign IP addresses to pods and manage routes between all pods. Kubernetes doesn't ship with a default CNI plugin, however, managed Kubernetes offerings come with a pre-configured CNI.
In this article, we'll look into how networking works in Kubernetes and explain how the pods can communicate with each other and the outside world.
I also did a live stream recently where I explained the concepts and walked through the demos in this article:
In Kubernetes, there are 4 networking problems to solve:
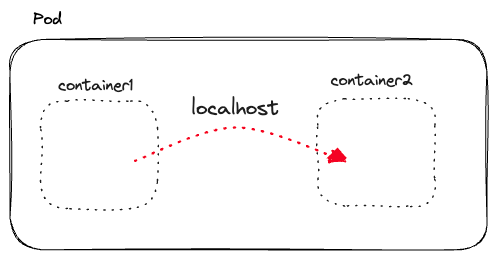
Pods solve container-to-container communication in Kubernetes through the network namespaces. Every pod has its network namespace, IP address, and port space.
The containers within the pod (the network namespace) can communicate through localhost and share the same IP address and ports. The "network namespaces" in Linux allow us to have separate network interfaces and routing tables from the rest of the system.
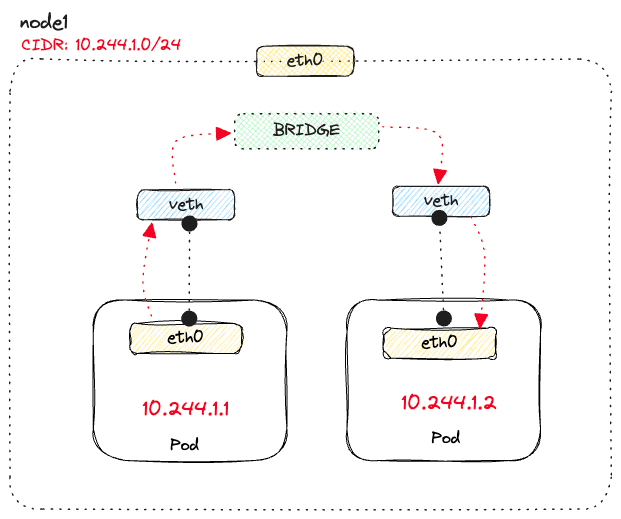
The nodes in the cluster have their IP address and a CIDR range from where they can assign IP addresses to the pods. A unique CIDR range per node guarantees a unique IP address for every pod in the cluster. The pod-to-pod communication happens through these IP addresses.
Note
Classless Inter-Domain Routing (CIDR) is a method for allocating IP addresses and for IP routing. The Internet Engineering Task Force introduced CIDR in 1993 to replace the previous classful network addressing architecture on the Internet. Its goal was to slow the growth of routing tables on routers across the Internet, and to help slow the rapid exhaustion of IPv4 addresses.
Virtual ethernet devices (veth) connect the two veths across network namespaces. Each pod that runs on the node has a veth pair connecting the pod namespace to the nodes' network namespace. In this case, one virtual interface connects to the network namespace in the pod (eth0), and the other virtual interface connects to the root network namespace on the node.
Note
eth0is a naming convention used in computer networking to refer to the first Ethernet network interface on a device. It is commonly used in Linux-based operating systems to identify the primary wired Ethernet interface.
The traffic goes from the eth0 interface in the pod to the veth interface on the node side, and then through the virtual bridge to another virtual interface that's connected to eth0 of the destination pod.
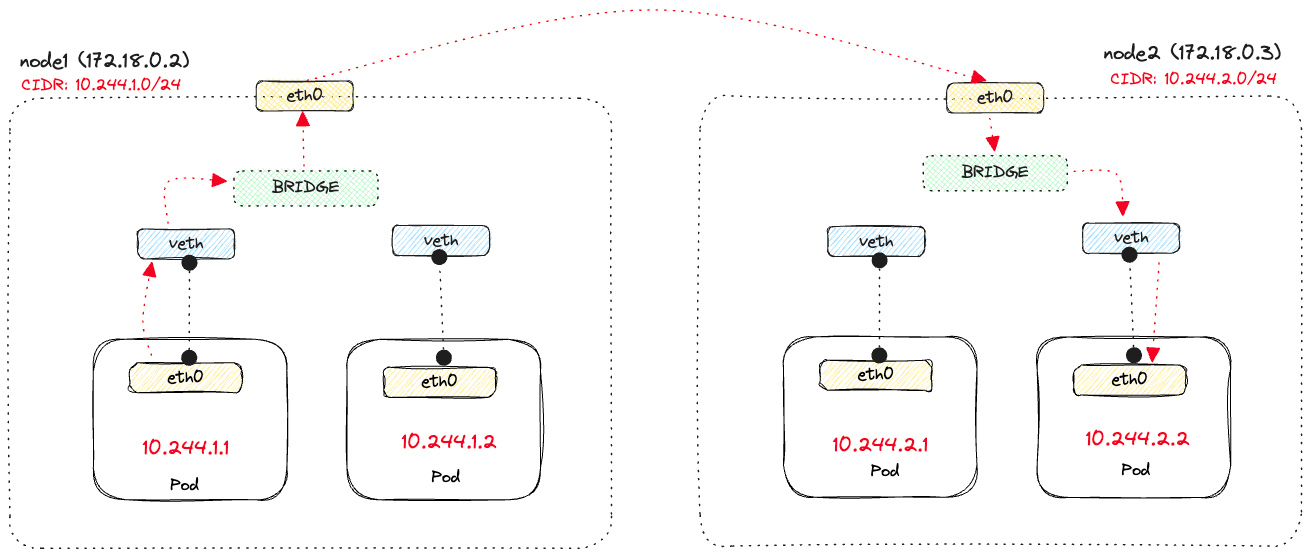
One of the requirements of Kubernetes is that pods must be reachable by their IP address across nodes. However, Kubernetes doesn't specify and dictate how this should be achieved.
Assuming each node knows how to route the packets within the node, the problem that needs to be solved here is getting the traffic from eth0 on node1 to eth0 on node2.
This is where the Container Network Interface (CNI) comes into play. Amongst other things, the CNI knows how to set up this cross-node communication for pods.
If we use kind cluster as an example - kind uses a CNI plugin called kindnet that runs as a DaemonSet and is responsible for setting up the bridge between nodes and allows one pod to call another pod using an IP address.
Note
DaemonSet resource in Kubernetes ensures that all nodes run a copy of a Pod.
If we look at the routing table on one of the nodes, we'll see that it specifies where to send the packets. For example, here's an entry from the routing table on node1 (IP 172.18.0.2) that defines, amongst other things, where the packets should be sent for pods running on node2 (IP 172.18.0.3).
default via 172.18.0.1 dev eth0
10.244.0.0/24 via 172.18.0.4 dev eth0
10.244.2.0/24 via 172.18.0.3 dev eth0
10.244.1.1 dev veth2609878b scope host
10.244.1.1 dev veth23974a9d scope host
172.18.0.0/16 dev eth0 proto kernel scope link src 172.18.0.2
The line 10.244.2.0/24 via 172.18.0.3 dev eth0 says that any packets destined to IP's in that CIDR range, which are the pods running on node2, should be sent to 172.18.0.3 via the eth0 interface. The diagram below shows the flow of sending a request from 10.244.1.1 on node1 to pod 10.244.2.2 on node2.
While pod IP addresses are unique, they will change whenever the pods get re-created. The transient nature of pods means we can't rely on the pod IPs and need a durable IP address. Kubernetes solves this problem using a concept of a Kubernetes service.
When created, a service in Kubernetes gives us a virtual IP (cluster IP) backed by one or more pods. When we send traffic to the service IP, it gets routed to one of the backing pod IPs.
For this to work, we need to answer the following questions:
The first question is easy to answer. We can use the same approach as with pods - assign an IP from the CIDR range; typically, the CIDR range for service differs from the pods.
The second and third are solved by the component called kube-proxy using iptables or IPVS (IP virtual server).
Note
iptables is a user-space utility program that allows a system administrator to configure the IP packet filter rules of the Linux kernel firewall, implemented as different Netfilter modules. The filters are organized in different tables, which contain chains of rules for how to treat network traffic packets.
Kube-proxy controller connects to the Kubernetes API server and watches for changes to services and pods. As pods get created and destroyed, kube-proxy updates the iptables rules to reflect the changes. Whenever a service/pod gets updated, kube-proxy updates the iptables rules so traffic sent to the service IP gets correctly routed to one of the backing pods.
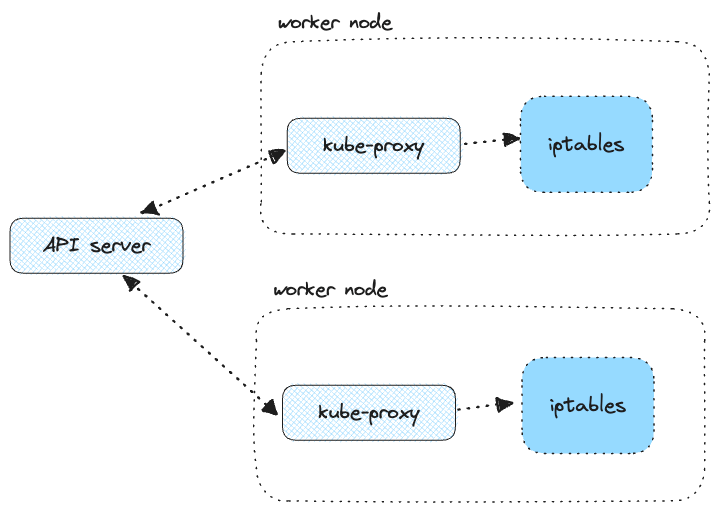
When we send packets from a pod to the service IP, they get filtered through the iptables rules, where the destination IP (service IP) gets changed to one of the backing pod IPs.
On the way back (from the destination pod to the source pod), the destination pod IP gets changed back to the service IP, so the source pod thinks it's receiving the response from the service IP.
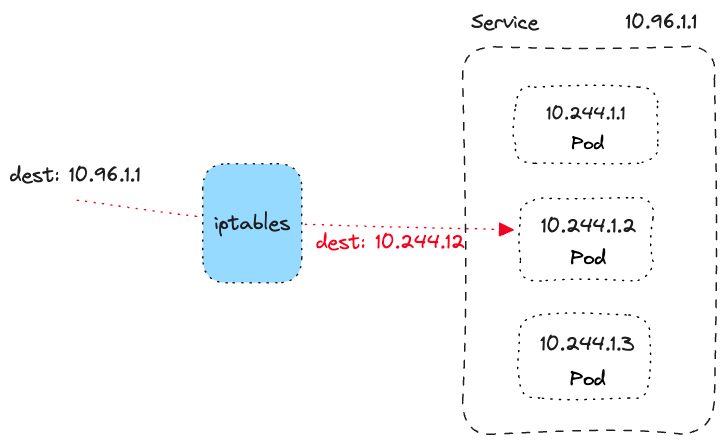
The last question is how we deal with communication exiting the cluster (e.g., pod/service to the internet) and communication entering the cluster (e.g., internet to service).
On the way out of the cluster, the iptables ensure the source IP of the pod gets modified to the internal IP address of the node (VM). Typically, when running a cloud-hosted cluster, the nodes have private IPs and run inside a virtual private cloud network (VPC).
We need to attach an internet gateway to the VPC network to allow the nodes access to the internet. The gateway performs network address translation (NAT) and changes the internal node IP to the public node IP. NAT allows the response from the internet to be routed back to the node and eventually to the original caller. On the way back, identical translations happen, but in the reverse order.
We need a public IP address to get the outside traffic inside the cluster. A Kubernetes LoadBalancer service allows us to get an external IP address. Behind the scenes, a cloud provider specific controller creates an actual load balancer instance in the cloud. The LB has an external IP address to send traffic to or hook up your custom domain.
When the traffic arrives at the LB, it gets routed to one of the nodes in the cluster. Then, the iptables rules on the chosen node kick in, do the necessary NAT, and direct the packets to one of the pods that's part of the service.
However, we don't want to create a LoadBalancer instance of every service we want to expose. Ideally, we'd have a single external IP address and the ability to serve multiple Kubernetes services behind that.
We can use the ingress resource and a backing ingress controller. The ingress controller is a pod that runs in the cluster and watches for changes to the ingress resource.
When we create a new ingress resource, the ingress controller creates the necessary rules to route the traffic to the correct service. The traffic goes from the LB to the ingress controller, which then routes the traffic to the proper service.
Free Newsletter
Get hands-on Kubernetes, Istio, and cloud-native tutorials like this one in your inbox a couple of times a month. No spam, unsubscribe anytime.
Kubelet is a component that runs on every node in a cluster and is responsible for managing pods scheduled to the node and providing status about the node and pod status updates. It manages the container networking implementation (via the CNI) and container runtime (via the CRI).
The kubelet watches for pods scheduled by the Kubernetes scheduler on the node. Once it sees the pod doesn't exist on the node, it creates it and then calls the ADD command on the CNI. A call to the ADD command tells the CNI to create the pod network.
The kube-proxy is a network proxy that runs on each node in the cluster. It's connected to the API server and is responsible for keeping the services and the backing endpoints (pod IPs) up to date. It also configures and manages the routing rules on the nodes. The kube-proxy supports in four different modes:
Note
All
kube-proxymodes rely on iptables.
userspace
kube-proxy runs a web server and routes all service IP addresses to the web server using iptables. The web server is responsible for proxying to the pods. You shouldn't use this mode anymore.
kernelspace
It's a Windows-only only, an alternative to userspace mode for k8s on Windows.
iptables
This mode solely relies on iptables. It's the default mode. Note that iptables can become slow when there are a lot of rules (e.g., a 5000 node cluster with 2000 services and ten pods each causes at least 20k iptables rules on each worker) and offers a limited load balancing. IPVS is a more performant alternative.
IPVS
IPVS supports multiple load balancing modes (round-robin, least connection, destination/source hashing, ...) compared to iptables. Which means the loads is spread more evenly and effectively.
Let's set up a Kubernetes cluster with kind. This first cluster uses the default kube-proxy mode, which is iptables.
Here are the contents of the kind-iptables.yaml file:
kind: Cluster
apiVersion: kind.x-k8s.io/v1alpha4
nodes:
  - role: control-plane
  - role: worker
  - role: worker
You can use the above config to create a cluster with the following:
kind create cluster --config=kind-iptables.yaml
Next, we'll deploy httpbin and scale it up to 3 replicas:
kubectl apply -f https://raw.githubusercontent.com/istio/istio/master/samples/httpbin/httpbin.yaml
kubectl scale deployment httpbin -n default --replicas=3
The above command deployed httpbin workload (3 replicas) and a corresponding Kubernetes service. Let's look at the iptables rules that get set up on one of the cluster nodes:
Note
Since we're using
kind, we can look at the Docker container (representing our node) and then usedocker execto run the iptables command inside that node.
iptables -L -t nat > iptables.txt
If we start at the PREROUTING chain, the traffic gets routed to the KUBE-SERVICES chain. The KUBE-SERVICES chain contains rules for each service in the cluster. For example:
Chain KUBE-SERVICES (2 references)
target                     prot opt source               destination
KUBE-SVC-FREKB6WNWYJLKTHC  tcp  --  anywhere             10.96.120.233        /* default/httpbin:http cluster IP */ tcp dpt:8000
KUBE-SVC-NPX46M4PTMTKRN6Y  tcp  --  anywhere             10.96.0.1            /* default/kubernetes:https cluster IP */ tcp dpt:https
KUBE-SVC-ERIFXISQEP7F7OF4  tcp  --  anywhere             10.96.0.10           /* kube-system/kube-dns:dns-tcp cluster IP */ tcp dpt:domain
KUBE-SVC-JD5MR3NA4I4DYORP  tcp  --  anywhere             10.96.0.10           /* kube-system/kube-dns:metrics cluster IP */ tcp dpt:9153
KUBE-SVC-TCOU7JCQXEZGVUNU  udp  --  anywhere             10.96.0.10           /* kube-system/kube-dns:dns cluster IP */ udp dpt:domain
KUBE-NODEPORTS             all  --  anywhere             anywhere             /* kubernetes service nodeports; NOTE: this must be the last rule in this chain */ ADDRTYPE match dst-type LOCAL
The rule applies to any incoming source IP address - i.e., we don't care where the traffic coming from. The destination IP 10.96.120.233 is the IP address of the Kubernetes service (in this case, httpbin the default namespace). The last portion, tcp dpt:8000 specifies that this rule applies to TCP traffic destined for port 8000.
In short, the rule says that traffic going to the httpbin.default service must be processed by the KUBE-SVC-FREKB6WNWYJLKTHC chain.
Let's look at that chain:
Chain KUBE-SVC-FREKB6WNWYJLKTHC (1 references)
target                     prot opt source               destination
KUBE-MARK-MASQ             tcp  --  !10.244.0.0/16       10.96.120.233        /* default/httpbin:http cluster IP */ tcp dpt:8000
KUBE-SEP-PFKDKMHHACIMKSSX  all  --  anywhere             anywhere             /* default/httpbin:http -> 10.244.1.2:80 */ statistic mode random probability 0.25000000000
KUBE-SEP-Q7UD3MC3WPZFKDWM  all  --  anywhere             anywhere             /* default/httpbin:http -> 10.244.1.3:80 */ statistic mode random probability 0.33333333349
KUBE-SEP-66R3JWVSZK6BYGSL  all  --  anywhere             anywhere             /* default/httpbin:http -> 10.244.2.2:80 */ statistic mode random probability 0.50000000000
KUBE-SEP-XIWLPFJKMVHRQV3W  all  --  anywhere             anywhere             /* default/httpbin:http -> 10.244.2.3:80 */
The first rule in the chain marks all packets that are not from the 10.244.0.0/16 source subnet (i.e., they aren't originating from within the cluster) going to the httpbin service, for masquerading (KUBE-MARK-MASQ chain). The KUBE-MARK-MASQ chain is responsible for marking packets that need to be masqueraded - the chain marks all packets with 0x4000:
Chain KUBE-MARK-MASQ (16 references)
target     prot opt source               destination
MARK       all  --  anywhere             anywhere             MARK or 0x4000
Note
What is masquerading? Masquerading is a form of SNAT (Source Network Address Translation) used when the source address for the outbound packets should be changed to the address of the outgoing networking interface. For example, when the packets leave the node, we should use an external IP instead of an internal one.
The other targets in the KUBE-SVC chain correspond to the pods backing the service. For example, here's one of the chains for the httpbin pods:
Chain KUBE-SEP-PFKDKMHHACIMKSSX (1 references)
target          prot opt source               destination
KUBE-MARK-MASQ  all  --  10.244.1.2           anywhere             /* default/httpbin:http */
DNAT            tcp  --  anywhere             anywhere             /* default/httpbin:http */ tcp to:10.244.1.2:80
We've seen the first rule already - the KUBE-MARK-MASQ rule applies to packets going out of the pod (source 10.244.1.2) and marks the outgoing packets with 0x4000.
The second rule does the Destination Network Address Translation (DNAT). This rule translates the original destination IP address (IP of the httpbin service) to the IP address of the pod (tcp to:10.244.1.2:80). This is the rule that redirects to the actual pod IP.
For the second example, we'll create another kind cluster, but this time we'll use the ipvs mode:
kind: Cluster
apiVersion: kind.x-k8s.io/v1alpha4
networking:
  kubeProxyMode: 'ipvs'
nodes:
  - role: control-plane
  - role: worker
  - role: worker
Using the above YAML, you can create the cluster with:
kind create cluster --config=kind-ipvs.yaml
Just like before, we'll deploy httpbin and scale it up to 3 replicas:
kubectl apply -f https://raw.githubusercontent.com/istio/istio/master/samples/httpbin/httpbin.yaml
kubectl scale deployment httpbin -n default --replicas=3
Let's look at the iptables rules this time:
Note
Ensure you run
kubectl get pods -o wideand note the Kubernetes node where thehttpbinpods are running. Then, you can rundocker psto get the ID of that same node (or use the node name) and usedocker execto run theiptablescommand on that node.
iptables -L -t nat > iptables-ipvs.txt
When using the ipvs here's how the KUBE-SERVICES chain looks like:
Chain KUBE-SERVICES (2 references)
target          prot opt source               destination
KUBE-MARK-MASQ  all  --  !10.244.0.0/16       anywhere             /* Kubernetes service cluster ip + port for masquerade purpose */ match-set KUBE-CLUSTER-IP dst,dst
KUBE-NODE-PORT  all  --  anywhere             anywhere             ADDRTYPE match dst-type LOCAL
ACCEPT          all  --  anywhere             anywhere             match-set KUBE-CLUSTER-IP dst,dst
Note that previously, the chain contained a target for each service in the cluster. This time, the difference is in using the KUBE-CLUSTER-IP IP set.
IP set is an extension to the iptables, allowing us to match multiple IP addresses simultaneously (i.e., match against a group). The IP set KUBE-CLUSTER-IP contains the Kubernetes service IP addresses. We can use the ipset tool to list the contents of the set:
apt-get update -y
apt-install -y ipset
ipset list KUBE-CLUSTER-IP
Name: KUBE-CLUSTER-IP
Type: hash:ip,port
Revision: 6
Header: family inet hashsize 1024 maxelem 65536 bucketsize 12 initval 0xa3af5d2d
Size in memory: 440
References: 2
Number of entries: 5
Members:
10.96.0.10,tcp:9153
10.96.0.10,udp:53
10.96.0.1,tcp:443
10.96.0.10,tcp:53
10.96.54.116,tcp:8000
Note the last IP (and port) corresponds to the httpbin Kubernetes service. While IPs were stored inside the iptables rules in the previous mode when using ipvs, the IPs are stored in the ipset, and the iptables rules now only reference the ipset. Storing IPs outside allows us to only modify the ipsets, instead of traversing the iptables chains and modifying the rules.
Let's install the ipvsadm tool so that we can look at the configuration of the IPVS proxy:
apt-get install -y ipvsadm
If we run ipvsadm -L -n we get the following output:
IP Virtual Server version 1.2.1 (size=4096)
Prot LocalAddress:Port Scheduler Flags
  -> RemoteAddress:Port           Forward Weight ActiveConn InActConn
TCP  10.96.0.1:443 rr
  -> 172.18.0.4:6443              Masq    1      0          0
TCP  10.96.0.10:53 rr
  -> 10.244.0.2:53                Masq    1      0          0
  -> 10.244.0.4:53                Masq    1      0          0
TCP  10.96.0.10:9153 rr
  -> 10.244.0.2:9153              Masq    1      0          0
  -> 10.244.0.4:9153              Masq    1      0          0
TCP  10.96.54.116:8000 rr
  -> 10.244.1.2:80                Masq    1      0          0
  -> 10.244.1.3:80                Masq    1      0          0
  -> 10.244.2.2:80                Masq    1      0          0
  -> 10.244.2.3:80                Masq    1      0          0
UDP  10.96.0.10:53 rr
  -> 10.244.0.2:53                Masq    1      0          0
  -> 10.244.0.4:53                Masq    1      0          0
Note the IP 10.96.54.116:8000 corresponding to the httpbin service, and the lines that follow are the IP addresses of the backing pods.
One advantage of ipvs over specifying the individual iptables rules is that it can do proper load balancing - the rr in the output stands for round-robin. In contrast, iptables can't do load balancing, and they uses probabilities to distribute the traffic.
Also, when we scale up/down the deployments in the pure iptables mode, the rules get added to the chain and must be processed sequentially. When using IPVS, the iptables rules and chains stay the same, and the IPVS proxy is updated with the new IP addresses of the pods. This is much more efficient and allows us to scale up/down the deployments without modifying the iptables rules.
Here are a couple of frequently asked questions and answers that come up when talking about networking in Kubernetes.
A Container Network Interface (CNI) is a standard specification for managing network interfaces for containers. In Kubernetes, CNIs are used to assign IP addresses to pods and manage routes between all pods.
Kubernetes addresses four key networking problems: container-to-container communication, pod-to-pod communication, pod-to-service communication, and ingress and egress communication.
Kubernetes manages container-to-container communication through network namespaces. Every pod has its own network namespace, IP address, and port space, allowing containers within a pod to communicate through localhost.
Each node in a Kubernetes cluster has an IP address and a unique CIDR range, from which it assigns IP addresses to the pods. Communication between pods occurs through these IP addresses, facilitated by virtual ethernet devices or veth pairs.
The CNI sets up cross-node communication for pods, allowing pods to reach each other across nodes using their IP addresses.
kube-proxy and what is its role in Kubernetes?kube-proxy is a network proxy that runs on each node in a Kubernetes cluster. It keeps the services and their backing endpoints (pod IPs) up-to-date and manages the routing rules on the nodes.
For egress communication, Kubernetes uses iptables to change the source IP of the pod to the internal IP address of the node (VM). For ingress communication, a Kubernetes LoadBalancer service provides an external IP address, allowing traffic from the internet to reach the cluster.
kubelet and what role does it play in Kubernetes?Kubelet is a component that runs on every node in a Kubernetes cluster. It manages the pods scheduled on the node, provides status updates about the node and pods, and manages container networking implementation through the CNI.
iptables and IPVS modes in kube-proxy?Both iptables and IPVS are modes supported by kube-proxy. The iptables mode, which is the default, relies solely on iptables for traffic routing and can become slow with many rules. IPVS, on the other hand, supports multiple load balancing modes, making it a more performant alternative.
A Kubernetes service provides a durable IP address that doesn't change even if pods get re-created, solving the issue of transient pod IPs. It helps to route traffic to one or more backing pod IPs, making it easier for applications to communicate within the cluster.
In this article, we delved deep into the networking aspects of Kubernetes, including the role of various components such as kube-proxy, kubelet, and CNI plugins. We discussed how the iptables and IPVS modes of kube-proxy work and how they manage service routing and load balancing in the Kubernetes cluster.
Related reading:
此内容由惯性聚合(RSS阅读器)自动聚合整理,仅供阅读参考。 原文来自 — 版权归原作者所有。