


惯性聚合 高效追踪和阅读你感兴趣的博客、新闻、科技资讯
阅读原文 在惯性聚合中打开

推荐订阅源

aimingoo的专栏
aimingoo的专栏
宝玉的分享
宝玉的分享
freeCodeCamp Programming Tutorials: Python, JavaScript, Git & More
WordPress大学
WordPress大学
V
V2EX
Apple Machine Learning Research
J
Java Code Geeks
腾讯CDC
奇客Solidot–传递最新科技情报
奇客Solidot–传递最新科技情报
Engineering at Meta
Engineering at Meta
L
LangChain Blog
Jina AI
Jina AI
博客园 - 叶小钗
B
Blog RSS Feed
Recent Announcements
H
Help Net Security
小众软件
小众软件
大猫的无限游戏
大猫的无限游戏
B
Blog
云风的 BLOG
云风的 BLOG
Blog — PlanetScale
Blog — PlanetScale
D
DataBreaches.Net
钛媒体:引领未来商业与生活新知
钛媒体:引领未来商业与生活新知
罗磊的独立博客

Danb Blog

August 2026: What I've Been Working On · Danb Blog Great Tech: Intel 2500k CPU · Danb Blog July 2026: What I've Been Working On · Danb Blog My Experience with Ubuntu Desktop 26.04 · Danb Blog Thumbnails for Orca 3MF in GNOME Files · Danb Blog Cheaper Sodastream Gas with a Big Tank · Danb Blog June 2026: What I've Been Working On · Danb Blog Running Snyk On Forgejo/Codeberg Actions · Danb Blog Tuta & Proton: An Open Source Client Does Not Result in an Open Source Service · Danb Blog May 2026: What I've Been Working On · Danb Blog 3D Printing Parts for my Greenhouse, Round 2 · Danb Blog Great Devices: Nexus 7 2013 · Danb Blog R36S Console RetroArch Stuck Menu Issue · Danb Blog April 2026: What I've Been Working On · Danb Blog Basic OpenCode Sandboxing with Docker · Danb Blog Games Played in 2025 · Danb Blog March 2026: What I've Been Working On · Danb Blog Shivam Mathur's "node-docker" Images are Awesome for PHP CI · Danb Blog February 2026: What I've Been Working On · Danb Blog Your BookStackApp project was assigned as a project for my Software Architecture course · Danb Blog My Sovol SV08 3D Printer Setup in 2026 · Danb Blog January 2026: What I've Been Working On · Danb Blog Epson Printer: The administrator password you entered was not recognized · Danb Blog Pressure to Follow Process · Danb Blog Online Shopping Email Notifications · Danb Blog My HomeLab Setup in 2026 · Danb Blog Linux Label Printing with the Phomemo D30 · Danb Blog Reporting to the CMA: Google Android Developer Verification · Danb Blog An Impromptu Introduction to ZFS Drive Replacement at 1am · Danb Blog Experience with UK Medical Cannabis for Ankylosing Spondylitis · Danb Blog
OPNsense & Dnsmasq: Responding with specific DNS servers ...
2025-09-16 · via Danb Blog

Recently I replaced my router with an OPNsense mini-PC. One little thing I had trouble with was how DNS was provided to connecting devices. In my environment I have a local Pi-hole system to handle DNS, so I wanted clients to use this, and therefore have DHCP tell devices to use a specific IP for DNS.

Default Scenario

On recent installs of OPNsense, it seems to use Dnsmasq by default for DHCP and DNS. From what I could tell, this looks like a recent change, meaning documentation and guides are somewhat slim for this option. By default, I think this is used as a relay, so DNS goes through OPNsense and is sent to the DNS servers configured for OPNsense. While this should work fine in most cases, I found it could result in some issues for DNS responses resolving to a local IP, which would just get blocked. This extra relay could also make it harder to understand what DNS server a client was using.

Instead I wanted to just advertise specific DNS IPs for devices to use directly, instead of acting like a relay. It took a while, but I eventually found that this was possible via DNSmasq, using options:

Config Steps

In OPNsense, go to Services > Dnsmasq DNS & DHCP > DHCP Options. Click on the plus to create a new entry, then use settings like so:

  • Option: dns-server [6]
  • Value: <your-DNS-server-ips>
    • You can add multiple by seperating with commas.

You can tweak any other options to your prefence, like interface if you only want this set for devices on a specific interface.

Here’s an example:
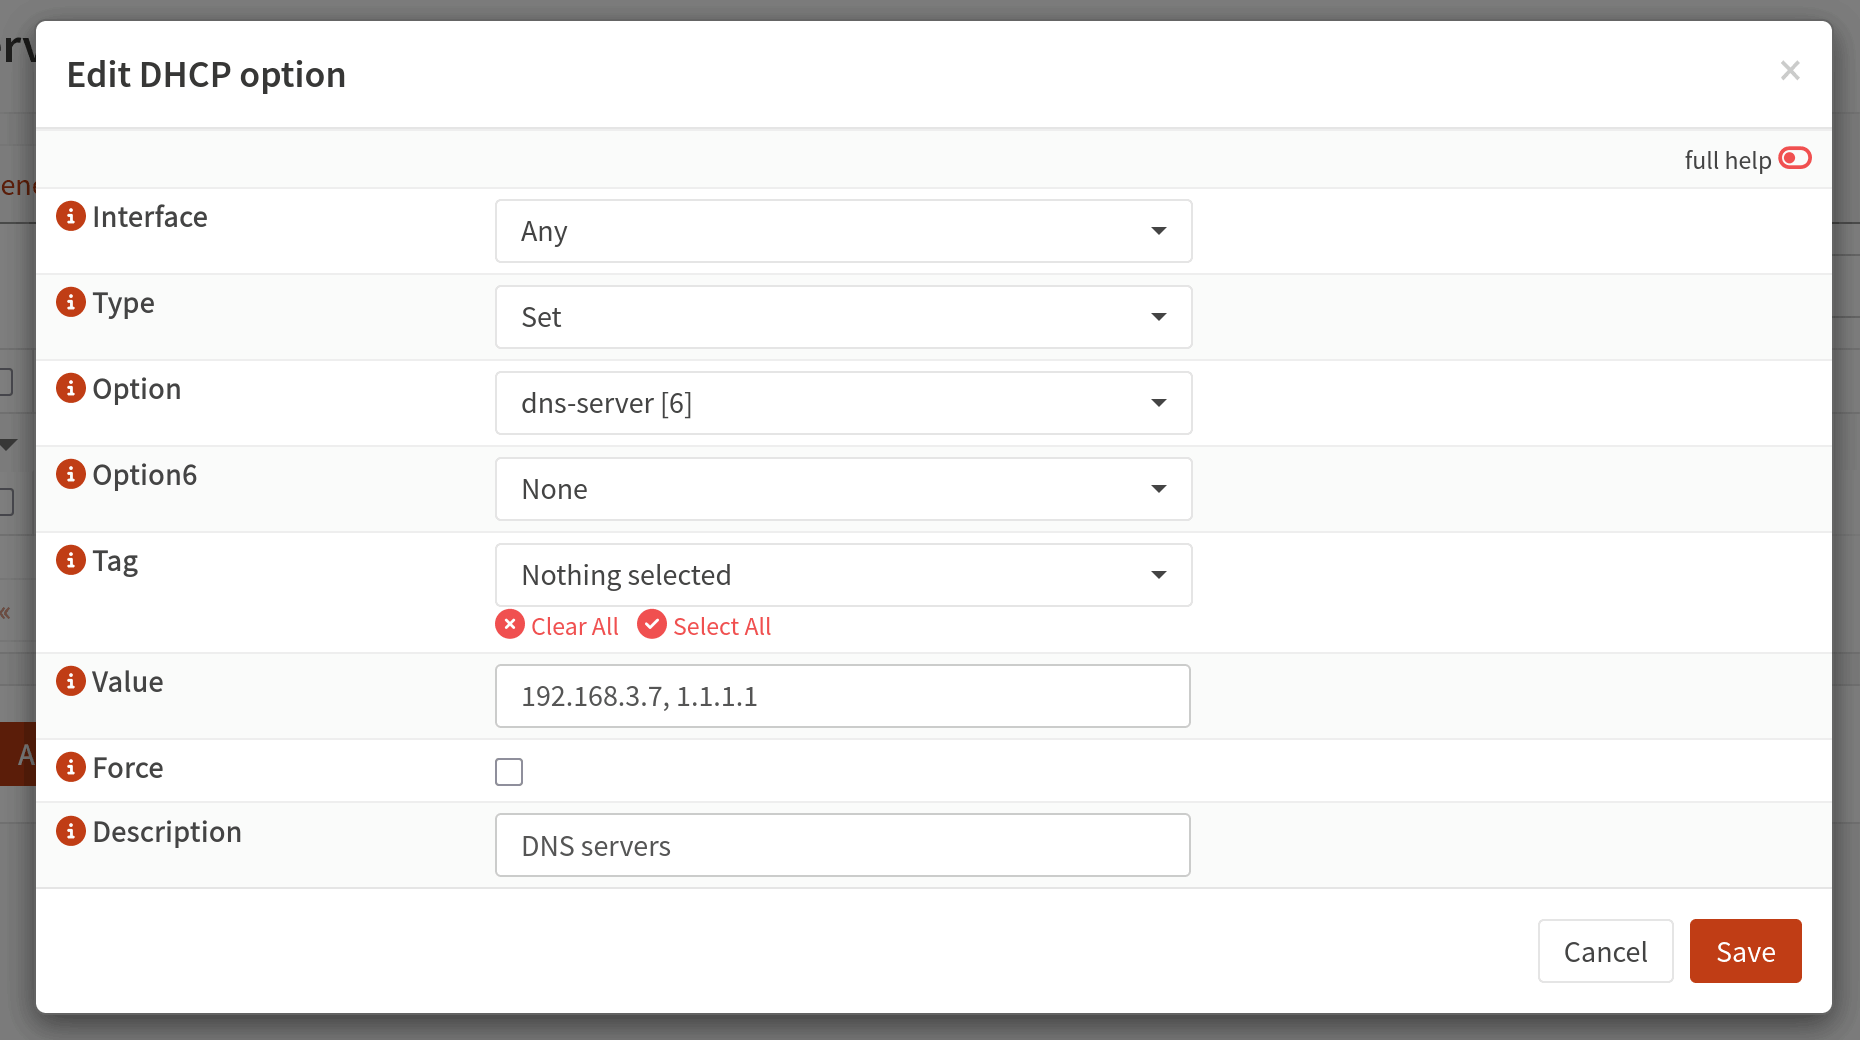
OPNsense “Edit DHCP Option” dialog showing the “dns-server” option value selected, with the value field containing “192.168.3.7, 1.1.1.1”. There’s also a description field set with text “DNS Servers”

After setting, press Save, then Apply. The configured DNS IPs should now be sent to clients.