


Posted on mandag, januar 12, 2026 in Hal9k, Planet Ubuntu-DK, Planets
Modern TVs are very poorly suited for kids. They require using complicated remotes or mobile phones, and navigating apps that continually try to lure you into watching something else than you intended to. The usual scenario ends up with the kid feeling disempowered and asking an adult to put something on. That something ends up on auto-play because then the adult is free to do other things and the kid ends up stranded powerless and comatose in front of the TV.
Instead I wanted to build something for my 3-year old son that he could understand and use independently. It should empower him to make his own choices. It should be physical and tangible, i.e. it should be something he could touch and feel. It should also have some illusion that the actual media content was stored physically and not un-understandably in “the cloud”, meaning it should e.g. be destroyable — if you break the media there should be consequences. And there should be no auto-play: interact once and get one video.
And then I remembered the sound of a floppy disk. The mechanical click as you insert it, the whirr of the disk spinning, and the sound of the read-head moving. Floppy disks are the best storage media ever invented! Why else would the “save-icon” still be a floppy disk? Who hasn’t turned in a paper on a broken floppy disk, with the excuse ready that the floppy must have broken when the teacher asks a few days later? But kids these days have never used nor even seen a floppy disk, and I believe they deserve this experience!
Building on the experience from the Big Red Fantus-Button, I already had a framework for controlling a Chromecast, and because of the netcat | bash shenanigans it was easily extendable.
My first idea for datastorage was to use the shell of a floppy disk and floppy drive, and put in an RFID tag; this has been done a couple of times on the internet, such as RFIDisk or this RaspberryPi based RFID reader or this video covering how to embed an RFID tag in a floppy disk. But getting the floppy disk apart to put in an RFID tag and getting it back together was kinda wonky.
When working on the project in Hal9k someone remarked: “Datastorage? The floppy disk can store data!”, and a quick prototype later this worked really, really, well. Formatting the disk and storing a single small file, “autoexec.sh”, means that all the data ends up in track 0 and is read more or less immediately. It also has the benefit that everything can be checked and edited with a USB floppy disk drive; and the major benefit that all the sounds are completely authentic: click, whirrr, brrr brrr.
The next problem to tackle was how to detect that a disk is inserted. The concept of AutoRun from Windows 95 was a beauty: insert a CD-ROM and it would automatically start whatever was on the media. Great for convenience, quite questionably for security. While in theory floppy disks are supported for AutoRun, it turns out that floppy drives basically don’t know if a disk is inserted until the operating system tries to access it! There is a pin 34 “Disk Change” that is supposed to give this information, but this is basically a lie. None of the drives in my possession had that pin connected to anything, and the internet mostly concurs. In the end I slightly modified the drive and added a simple rolling switch, that would engage when a disk was inserted.
The next challenge was to read the data on a microcontroller. Helpfully, there is the Arduino FDC Floppy library by dhansel, which I must say is most excellent. Overall, this meant that the part of the project that involved reading a file from the floppy disk FAT filesystem was basically the easiest part of all!
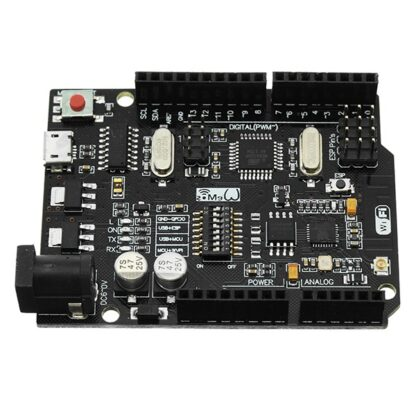
However, the Arduino FDC Floppy library is only compatible with the AVR-based Arduinos, not the ESP-based ones, because it needs to control the timing very precisely and therefore uses a healthy amount of inline assembler. This meant that I would need one AVR-based Arduino to control the floppy disk, but another ESP-based one to do the WiFi communication. Such combined boards do exist, and I ended up using such a board, but I’m not sure I would recommend it: the usage is really finagly, as you need to set the jumpers differently for programming the ATmega, or programming the ESP, or connecting the two boards serial ports together.
A remote control should be portable, and this means battery-powered. Driving a floppy disk of of lithium batteries was interesting. There is a large spike in current draw when the disk needs to spin up of several amperes, while the power draw afterwards is more modest, a couple of hundred milliamperes. I wanted the batteries to be 18650s, because I have those in abundance. This meant a battery voltage of 3.7V nominally, up to 4.2V for a fully charged battery; 5V is needed to spin the floppy around, so a boost DC-DC converter was needed. I used an off the shelf XL6009 step-up converter board. At this point a lot of head-scratching occurred: that initial spin-up power draw would cause the microcontroller to reset. In the end a 1000uF capacitor at the microcontroller side seemed to help but not eliminate the problem.
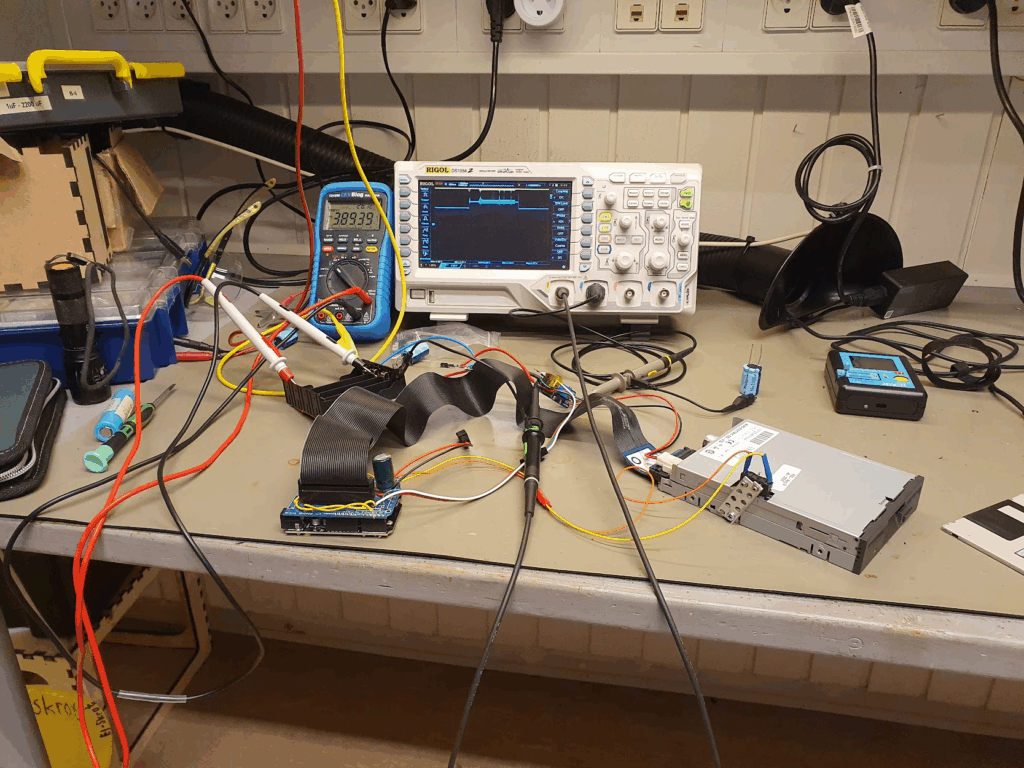
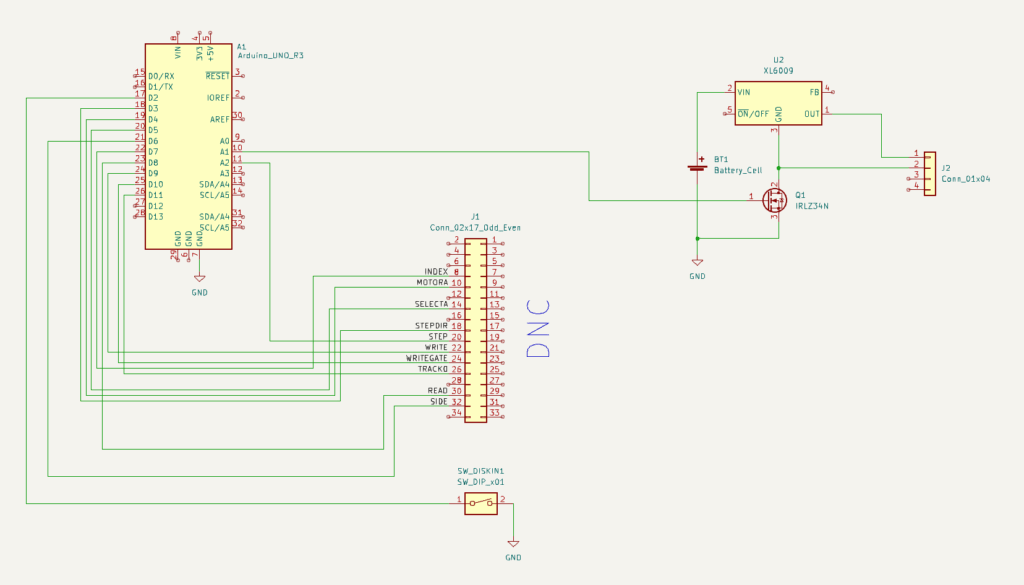
One crucial finding was that the ground side of the interface cable should absolutely not be connected to any grounds on the microcontroller side. I was using a relatively simple logic-level MOSFET, the IRLZ34N, to turn off the drive by disconnecting the ground side. If any ground is connected, the disk won’t turn off. But also: if any logic pin was being pulled to ground by the ATmega, that would also provide a path to ground. But since the ATmega cannot sink that much current this would lead to spurious resets! Obvious after the fact, but this took quite some headscratching. Setting all the logic pins to input, and thus high impedance, finally fixed the stability issues.
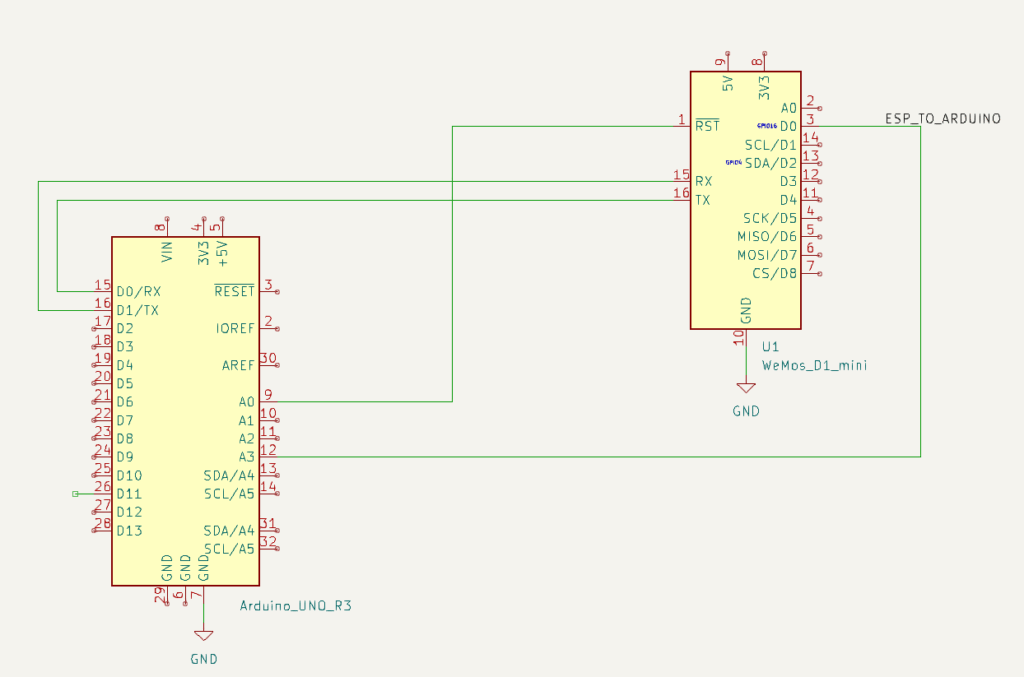
After fixing the stability, the next challenge was how to make both of the microcontrollers sleep. Because the ATmega sleep modes are quite a lot easier to deal with, and because the initial trigger would be the floppy inserting, I decided to make the ATmega in charge overall. Then the ESP has a very simple function: when awoken, read serial in, when a newline is found then send off that complete line via WiFi, and after 30 seconds signal to the ATmega that we’re sleeping, and go back to sleep.
The overall flow for the ATmega is then:
The box itself is just lasercut from MDF-board. For full details see the FloppyDiskCast Git repository.
Responding to those commands is still the netcat | bash from the Big Red Fantus-Button, which was simply extended with a few more commands and capabilities.
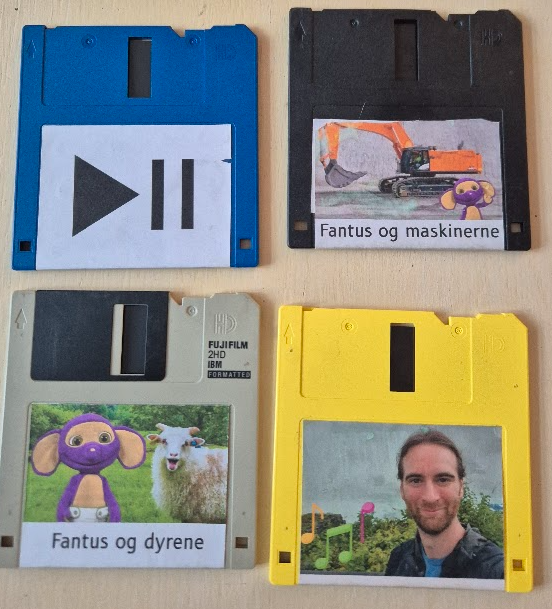
diskin always sends a “play” command to the Chromecast.diskout always sends a “pause” command to the Chromecast.
Other commands like dad-music are handled in one of two ways:
dad-music will randomly play one of dad’s music tracks – gotta influence the youth!fantus-maskinerne will play the next episode, and only the next episode.Common for both is that they should be idempotent actions, and the diskin shortcut will make the media resume without having to wait for the disk contents itself to be read and processed. This means that the “play/pause” disk just contains an empty file to work.
The little guy quickly caught on to the idea! Much fun was had just pausing and resuming music and his Fantus TV shows. He explored and prodded, and some disks were harmed in the process. One problem that I did solve was that the read head stayed on track 0 after having read everything: this means that when the remote with disk inside it is tumbled around, the disk gets damaged at track 0. To compensate for this, I move the head to track 20 after reading has finished: any damage is then done there, where we don’t store any data. As a bonus it also plays a little more mechanic melody.
此内容由惯性聚合(RSS阅读器)自动聚合整理,仅供阅读参考。 原文来自 — 版权归原作者所有。