


惯性聚合 高效追踪和阅读你感兴趣的博客、新闻、科技资讯
阅读原文 在惯性聚合中打开

推荐订阅源

V
Vulnerabilities – Threatpost
Know Your Adversary
Know Your Adversary
C
Cyber Attacks, Cyber Crime and Cyber Security
S
Secure Thoughts
让小产品的独立变现更简单 - ezindie.com
宝玉的分享
宝玉的分享
Spread Privacy
Spread Privacy
AWS News Blog
AWS News Blog
D
Docker
Threat Intelligence Blog | Flashpoint
OSCHINA 社区最新新闻
OSCHINA 社区最新新闻
TaoSecurity Blog
TaoSecurity Blog
博客园 - 三生石上(FineUI控件)
Apple Machine Learning Research
Cyberwarzone
Cyberwarzone
V
V2EX
Exploit-DB.com RSS Feed
WordPress大学
WordPress大学
P
Palo Alto Networks Blog
H
Heimdal Security Blog
奇客Solidot–传递最新科技情报
奇客Solidot–传递最新科技情报
博客园 - 叶小钗
N
News and Events Feed by Topic
cs.CL updates on arXiv.org
Simon Willison's Weblog
Project Zero
Project Zero
Martin Fowler
Martin Fowler
大猫的无限游戏
大猫的无限游戏
D
DataBreaches.Net
Engineering at Meta
Engineering at Meta
S
Schneier on Security
Google DeepMind News
cs.CV updates on arXiv.org
Hugging Face - Blog
Hugging Face - Blog
P
Proofpoint News Feed
S
SegmentFault 最新的问题
Hacker News: Ask HN
Hacker News: Ask HN
小众软件
小众软件
博客园 - 聂微东
S
Security Affairs
T
Tor Project blog
www.infosecurity-magazine.com
T
Threat Research - Cisco Blogs
T
Threatpost
博客园 - 【当耐特】
L
LINUX DO - 热门话题
G
Google Developers Blog
P
Privacy & Cybersecurity Law Blog
A
About on SuperTechFans
F
Fortinet All Blogs

Comments for TrueNAS – Open Enterprise Storage

How to Set Up and Install TrueNAS CORE Yes, You Can (Still) Virtualize TrueNAS TrueNAS enables Container Storage and Kubernetes | TrueNAS - Open Enterprise Storage TrueNAS 12.0-U2 is Released | TrueNAS - Open Enterprise Storage OpenZFS 2.0 Ships First on TrueNAS | TrueNAS - Open Enterprise Storage TrueNAS 12.0-U1 is Scheduled for early December | TrueNAS - Open Enterprise Storage iXsystems TrueNAS M60 Recognized as SDC Awards Storage Hardware Innovation of the Year Finalist | TrueNAS - TrueNAS 12.0 is Released! The TrueNAS Mini X and Mini X+ are here! Cross-Site Disaster Recovery with TrueNAS TrueNAS SCALE Release Plan | TrueNAS - Open Enterprise Storage iXsystems Unveils Industry's Fastest OpenZFS Storage System with Launch of TrueNAS M60 | TrueNAS - Open TrueNAS 12.0 BETA2 Showcases Performance Improvements | TrueNAS - Open Enterprise Storage Be One of the First to Test Drive TrueNAS 12.0 BETA | TrueNAS - Open Enterprise Storage TrueNAS is Multi-OS New-New TrueNAS Logo Unveiled | TrueNAS - Open Enterprise Storage Recession Proof Storage | FreeNAS 11.3-U3.1 Now Available - Issue #80 | TrueNAS - Open Enterprise Storage Open Source Infrastructure is Recession-Proof | TrueNAS - Open Enterprise Storage Understanding How OpenZFS Keeps Your Data Safe | TrueNAS - Open Enterprise Storage You Can Influence the TrueNAS CORE Roadmap! | TrueNAS - Open Enterprise Storage TrueNAS CORE is the new FreeNAS Setting Up Users, Permissions, and ACLs on FreeNAS | TrueNAS - Open Enterprise Storage TrueNAS Updates for VMware vSphere 7 | TrueNAS - Open Enterprise Storage How to Set Up Windows SMB Shares on FreeNAS | TrueNAS - Open Enterprise Storage FreeNAS and TrueNAS are Unifying Introducing the FreeNAS Mini E+ and All-Flash Minis | TrueNAS - Open Enterprise Storage Plex Permissions in FreeNAS 11.3 | TrueNAS - Open Enterprise Storage Latest TrueNAS and FreeNAS Release Delivers Wizards, Plugins, and Accelerated Replication | TrueNAS - Open How To Back Up Google Drive to FreeNAS | TrueNAS How To Enable Wireguard on FreeNAS 11.3 | TrueNAS - Open Enterprise Storage The Official FreeNAS Hardware Guide | TrueNAS - Open Enterprise Storage December 11 Plugins Update: ClamAV Fix & CloudStack FreeNAS Mini Black Friday Sale Starts Now! - Issue #73 | TrueNAS - Open Enterprise Storage Breaking Down the FreeNAS Mini E! | TrueNAS TrueCommand Shifts to Prime Time | TrueNAS - Open Enterprise Storage AMD EPYC 7002 Powers Scalable TrueNAS Solutions FreeNAS and TrueNAS 11.3 make their Debuts October 30 Plugins Update | TrueNAS - Open Enterprise Storage September 13 Plugins Update | TrueNAS - Open Enterprise Storage August 27 Plugin Updates: Security & Version Fixes July 24 Plugins Update | TrueNAS - Open Enterprise Storage Mount a TrueNAS or FreeNAS Share to a Docker Host | TrueNAS - Open Enterprise Storage TrueNAS Updates for VMware vSphere | TrueNAS - Open Enterprise Storage July 10 Plugins Update | TrueNAS - Open Enterprise Storage June 26 Plugins Update | TrueNAS - Open Enterprise Storage Open ZFS vs. Btrfs | and other file systems | TrueNAS - Open Enterprise Storage ZFS vs. OpenZFS Backup Evolved: Asigra Plugin for FreeNAS Back Up Plugins and Jails on FreeNAS | TrueNAS Take Command of Your NAS Fleet with TrueCommand™ | TrueNAS - Open Enterprise Storage Next Batch of Updated Plugins and How to Recover from Failed Plugin Updates | TrueNAS - Open Enterprise Run S3 Object Storage on FreeNAS and TrueNAS | TrueNAS - Open Enterprise Storage Sync Files to Dropbox with TrueNAS or FreeNAS February Plugin Updates & New Plugins for Testing Why SATA-DOMs Are Better than USB Drives for Booting Up Your FreeNAS System | TrueNAS - Open Enterprise Six Metrics for Measuring ZFS Pool Performance Part 2 | TrueNAS - Open Enterprise Storage Six Metrics for Measuring ZFS Pool Performance Part 1 | TrueNAS - Open Enterprise Storage TrueNAS M-Series Certified for Veeam Backup FreeNAS 11.1 is Now Available for Download! | TrueNAS FreeNAS 11.0 Released with VM & S3 Storage Support To SLOG or not to SLOG: How to best configure your ZFS Intent Log | TrueNAS - Open Enterprise Storage vCenter Web Client Plug-in for TrueNAS Now Available | TrueNAS - Open Enterprise Storage The ZFS ZIL and SLOG Demystified | TrueNAS - Open Enterprise Storage FreeNAS: A Worst Practices Guide | TrueNAS - Open Enterprise Storage FreeNAS Hardware Guide III: Pools, Performance & Cache FreeNAS vs TrueNAS FreeNAS 8.0.1‑RELEASE & Official Documentation Released
Overview of Datasets and Snapshots in FreeNAS | TrueNAS - Open Enterprise Storage
iX Team · 2019-10-02 · via Comments for TrueNAS – Open Enterprise Storage

In this blog, we are going to cover creating datasets and configuring snapshots after you’ve already set up pools on FreeNAS.
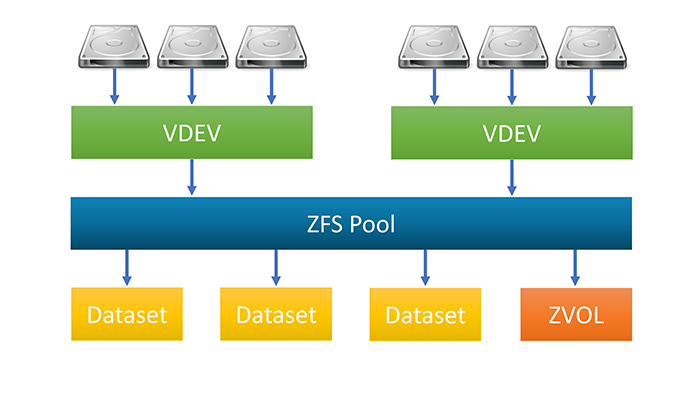
A dataset is like a directory or a folder in your storage pool. When a user or application accesses the dataset, they will only be able to view or modify files that are in that dataset. Users can view or edit files depending on the permissions of the dataset and of the files and folders therein. We will talk about dataset permissions in the next section.
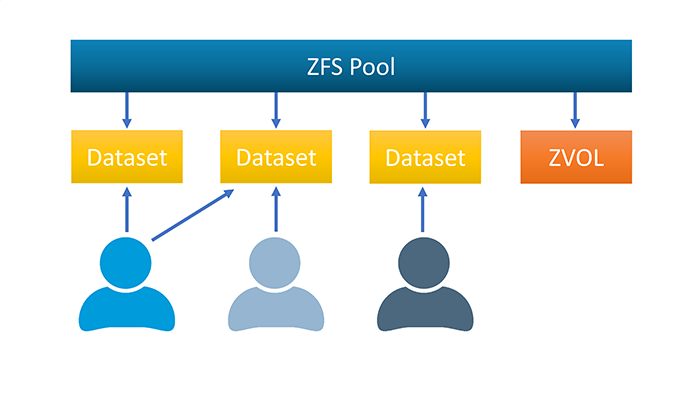
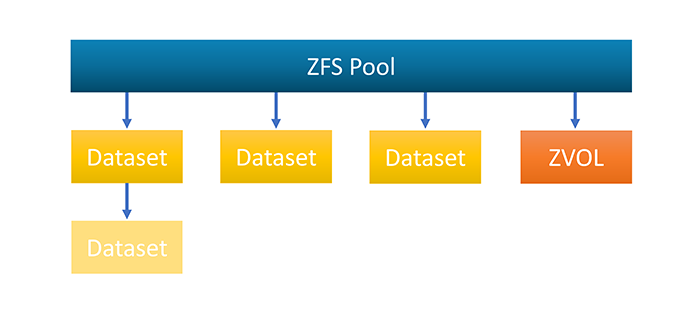
A dataset gives you a bit more control over how its data is stored than a traditional folder would. For example, each dataset can have different compression, deduplication, or quota settings. These settings can be applied separately from the rest of the file systems. Just like with folders, datasets can be nested within one another. Nested datasets can either inherit properties from their “parent” dataset or be set with their own, unique properties.
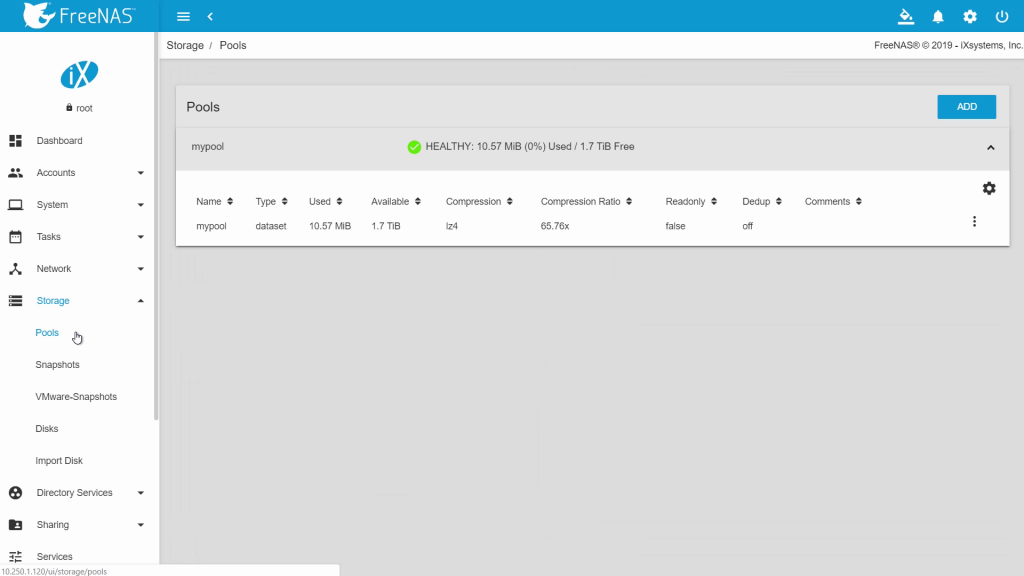
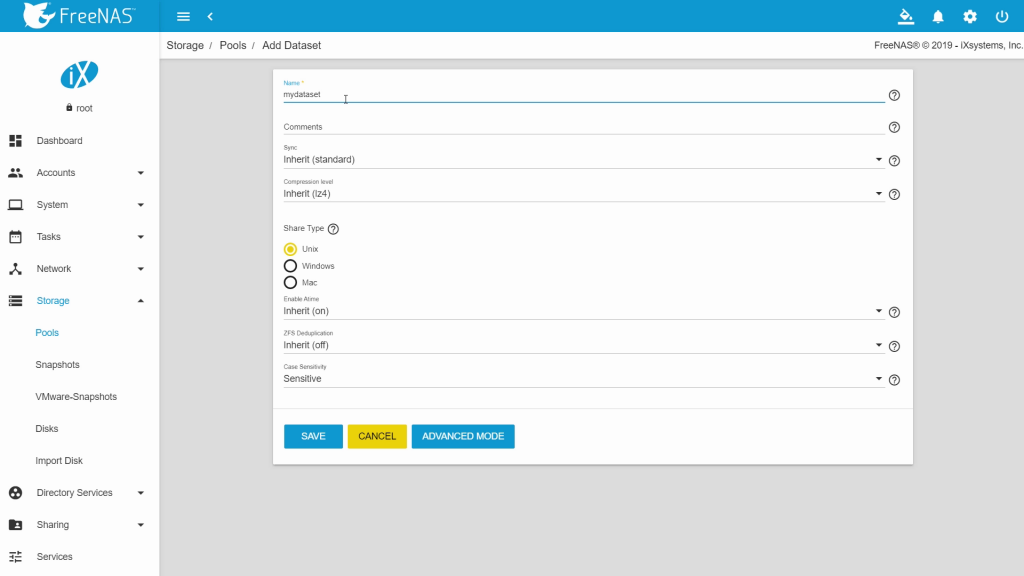
First, go to “Storage” then “Pools”. Click the arrow to expand the pool. This will show a list of datasets on that pool. It will also show any ZVOLs that you may have created for iSCSI shares. Both zvols and iSCSI will be covered in a later video. Click the three dots on the right then click “Add Dataset”. Give the dataset a name; we will call it “mydataset”. We recommend that you leave the compression level as lz4, which is both capacity efficient and performs well. Choose the Share Type that matches the type of system you will access the share from. If you click “ADVANCED MODE”, you can define a quota for this specific dataset. When you are done, click “SAVE”.
Next, we are going to make a ZFS snapshot. A snapshot preserves your data exactly as it was the instant it was created.
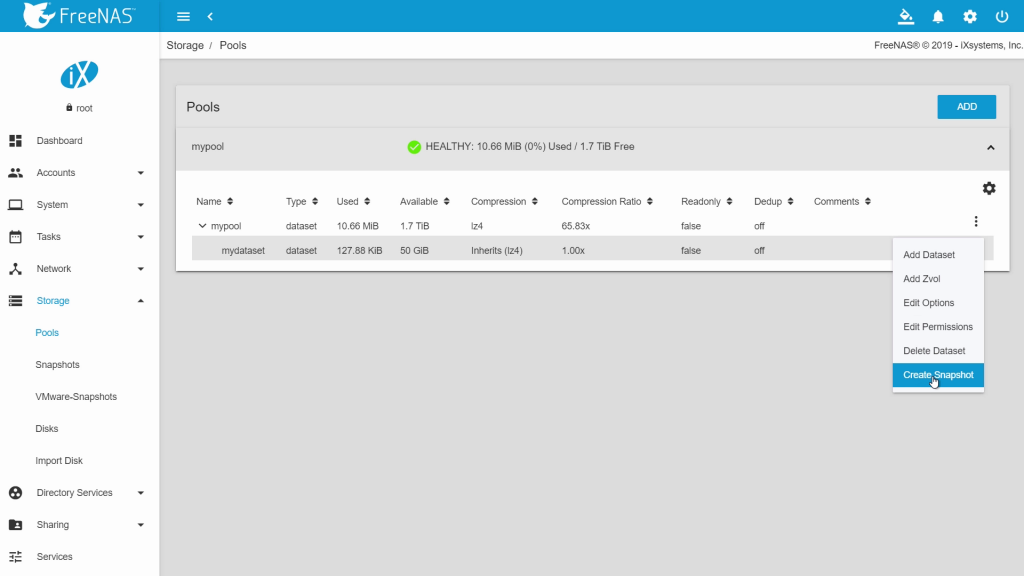
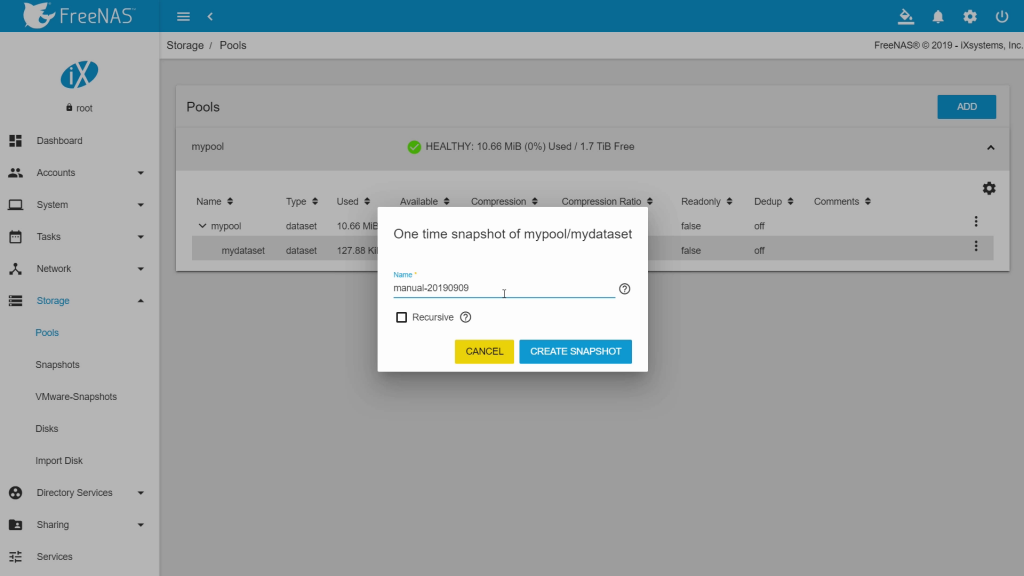
Go back to “Storage”, then “Pools”. Expand the pool to show a list of the datasets. Click the three dots on the right for the pool or dataset you want to create a snapshot for, then click “Create Snapshot”. Give it a name. Checking the Recursive box will set it to include child datasets of the chosen dataset. Then click “Create Snapshot”.
Once the snapshot is created, the filesystem state at that time is preserved. As the live filesystem data is changed, the snapshot will remain static. The snapshot will only consume disk space equal to the amount of data that has changed since the snapshot was taken. For example, if you snapshot a dataset with 100TB of data, the snapshot initially takes up only a few kilobytes for its metadata. If you then change 1GB of data from the live dataset by deleting it or modifying it, the snapshot will take up 1GB of disk space.
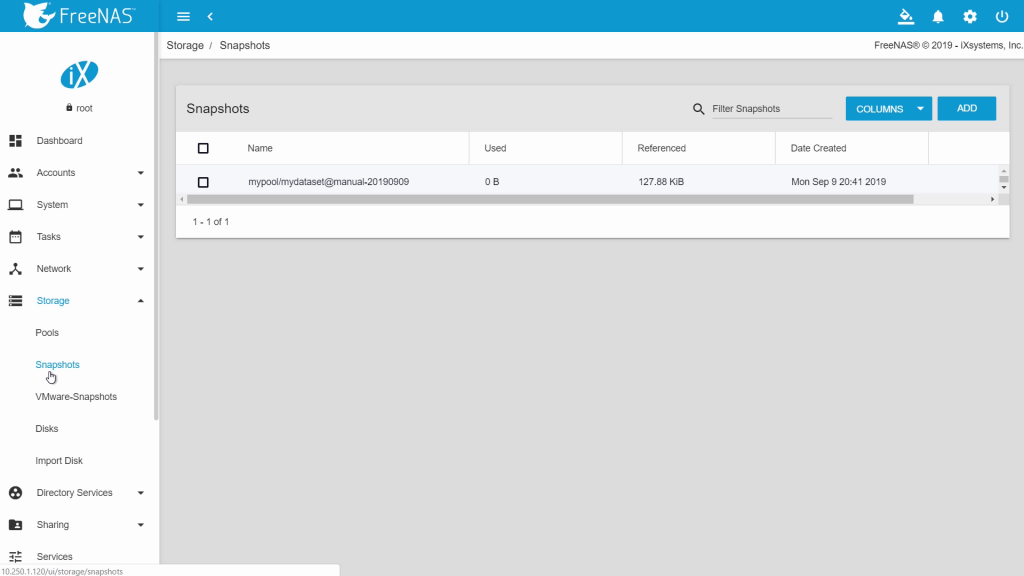
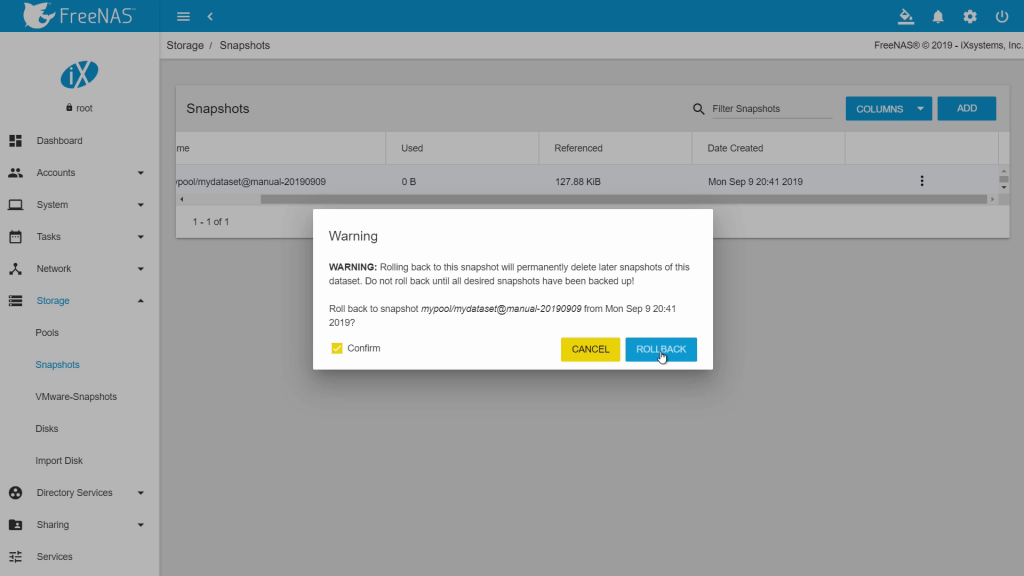
Now let’s look at how to restore your volume to that snapshot. Before performing this step, note that doing so permanently deletes all data added after that snapshot. Go to “Storage”, then “Snapshots”. Here you will see a list of the manual and automatic snapshots. Select the snapshot you want to rollback to and click the three dots, then click “Rollback”. It will ask you if you want to continue with the rollback. Click “Yes”.
Cloning a Snapshot
An alternative to rolling back to a previous snapshot is to clone the snapshot. You might do this if you need to retrieve old data, but do not want to undo all changes since the snapshot. The cloned dataset can be deleted once you are done retrieving data.
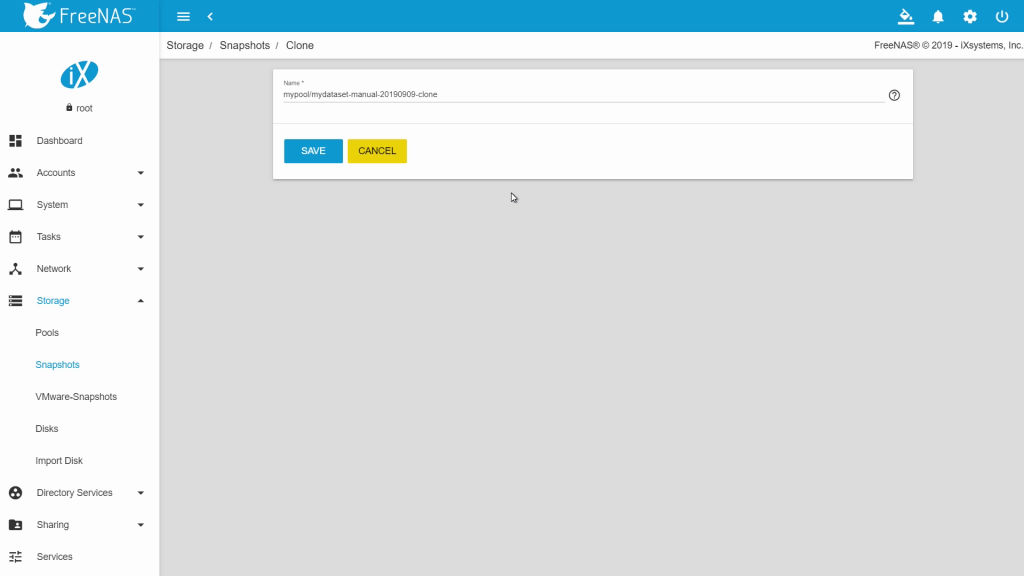
Select the snapshot you want to clone and click the three dots, then click “Clone”. It will generate the name of the original snapshot with “clone” added. Click “Save” to continue. You’ll now be taken to the “Pools” window. When you clone the snapshot, it creates a dataset with a copy of what the snapshot of the dataset contained. Note that this clone is writable, too! Cloned snapshots are also a great way to create test environments with existing data.

Periodic Snapshot Tasks
If you don’t want to manually create snapshots every time you want to preserve your dataset’s state, you can take snapshots automatically. Go to “Tasks” then “Periodic Snapshot Tasks”. Click “Add”. You can choose a Pool or Dataset from the drop-down list that you want to create an automatic snapshot for. Choose the lifetime and frequency of the snapshots.
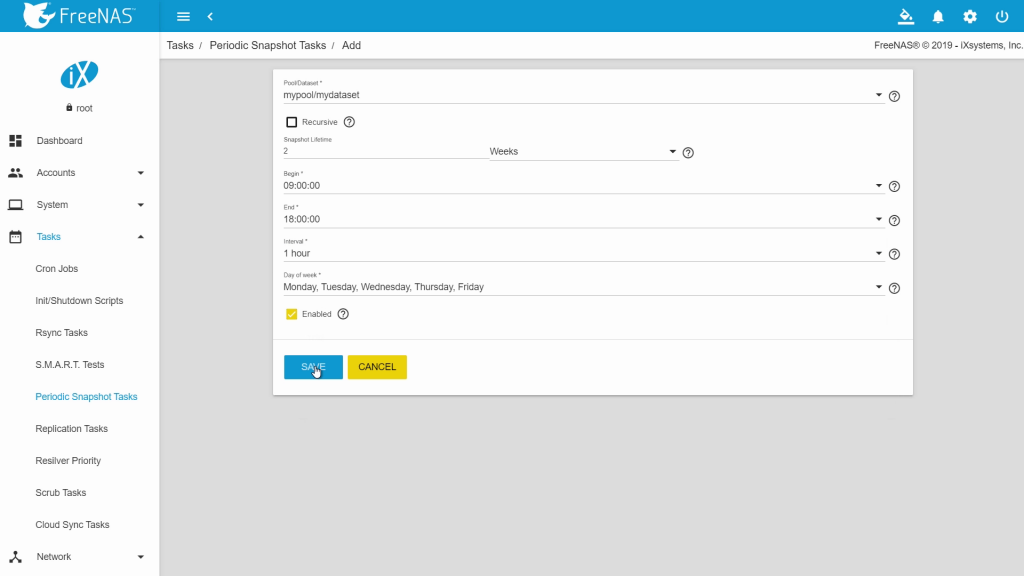
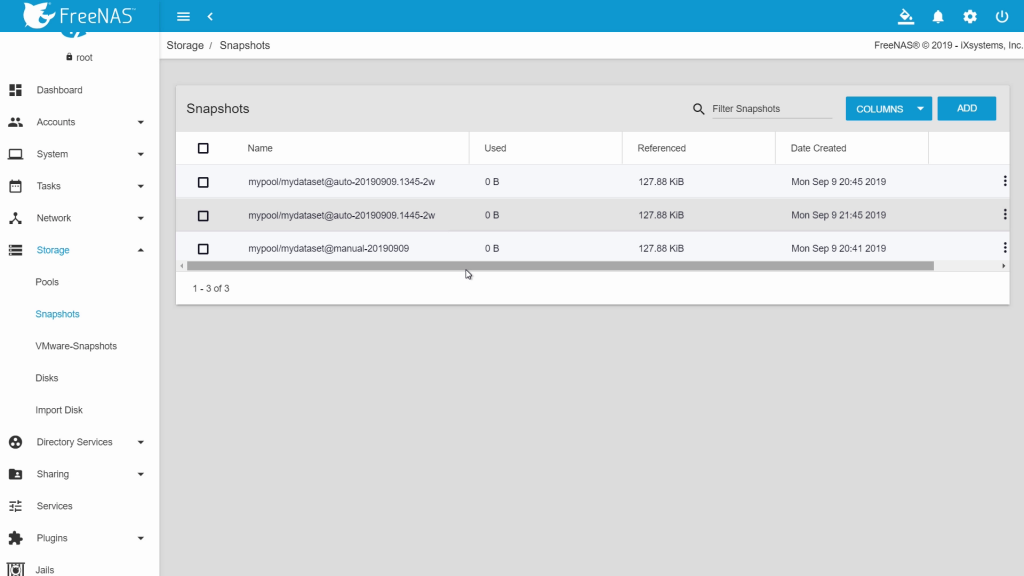
Make sure the “Enabled” box is checked. When you are done click “SAVE”. You should now see an entry under the Periodic Snapshot Tasks. In this example, they will be created every hour from 9AM to 6PM Monday through Friday. They have a lifetime of 2 weeks before they are deleted automatically.
Thank you for reading this tutorial! Be sure to check out our other tutorial videos on our YouTube channel.