惯性聚合 高效追踪和阅读你感兴趣的博客、新闻、科技资讯
阅读原文 在惯性聚合中打开

推荐订阅源

罗磊的独立博客
Forbes - Security
Forbes - Security
Blog — PlanetScale
Blog — PlanetScale
P
Proofpoint News Feed
Apple Machine Learning Research
Google DeepMind News
MyScale Blog
MyScale Blog
GbyAI
GbyAI
B
Blog RSS Feed
S
SegmentFault 最新的问题
freeCodeCamp Programming Tutorials: Python, JavaScript, Git & More
cs.AI updates on arXiv.org
CTFtime.org: upcoming CTF events
小众软件
小众软件
The Last Watchdog
The Last Watchdog
W
WeLiveSecurity
Webroot Blog
Webroot Blog
S
Security @ Cisco Blogs
Hugging Face - Blog
Hugging Face - Blog
Microsoft Security Blog
月光博客
月光博客
博客园 - 聂微东
F
Fortinet All Blogs
H
Hacker News: Front Page
A
About on SuperTechFans
Application and Cybersecurity Blog
C
Check Point Blog
V
V2EX
Threat Intelligence Blog | Flashpoint
Y
Y Combinator Blog
酷 壳 – CoolShell
酷 壳 – CoolShell
N
News | PayPal Newsroom
Cisco Talos Blog
Cisco Talos Blog
Exploit-DB.com RSS Feed
The Cloudflare Blog
P
Privacy & Cybersecurity Law Blog
N
Netflix TechBlog - Medium
C
CXSECURITY Database RSS Feed - CXSecurity.com
Recorded Future
Recorded Future
Cyber Security Advisories - MS-ISAC
Google DeepMind News
大猫的无限游戏
大猫的无限游戏
美团技术团队
Security Latest
Security Latest
钛媒体:引领未来商业与生活新知
钛媒体:引领未来商业与生活新知
I
InfoQ
Recent Announcements
The GitHub Blog
The GitHub Blog
Google Online Security Blog
T
The Exploit Database - CXSecurity.com

博客园 - chinese_submarine

QT项目性能调优小记 svn+tp-link+花生壳搭建外网服务器 udev介绍 极大极小博弈树的简洁(附Tic-Tac-Toe源码) 程序优化小记 Beating the Average------为什么要学习Lisp[转] 巧用qmake工具生成专业的makefile QT中拖拽的实现(附示例代码) 从QDataStream向QByteArray中写入数据时的注意点(QT) 如何保持GUI的响应流畅(QT平台) 也谈线程同步变量 windows7到期的问题 简述FPS的计算方法 QT中的View Model模型系列一 从农夫养牛问题推广到斐波那契数列 TimeZoneChange事件的捕获 浏览器扩展系列————透明浏览器窗口的实现 浏览器扩展系列————异步可插入协议(pluggable protocol)的实现 浏览器扩展系列————给MSTHML添加内置脚本对象【包括自定义事件】
Windows下HG服务器的搭建
chinese_submarine · 2015-08-28 · via 博客园 - chinese_submarine

1.环境和所需工具安装

1. 安装python-2.7.9.exe

2. 安装mercurial-3.2.3.win32-py2.7.exe

3. 安装mercurial-3.2.3-x86.msi

4. 安装tortoisehg-3.3.2-x64或者tortoisehg-3.3.2-x86

5. 安装windows iis

2.操作步骤

1. 搭建网站,新建文件夹D:/hgweb

2. 在 IIS 中新建一个网站,名称是 hgweb,物理路径指向上一步的D:/hgweb

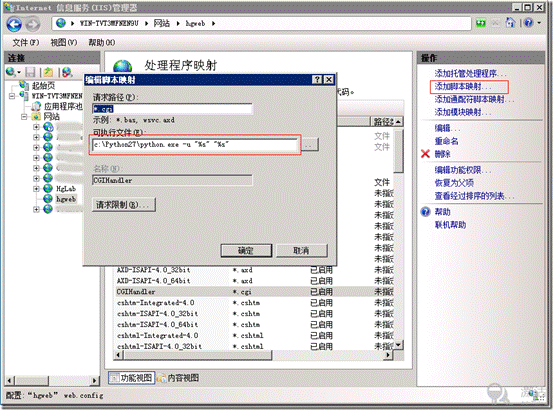
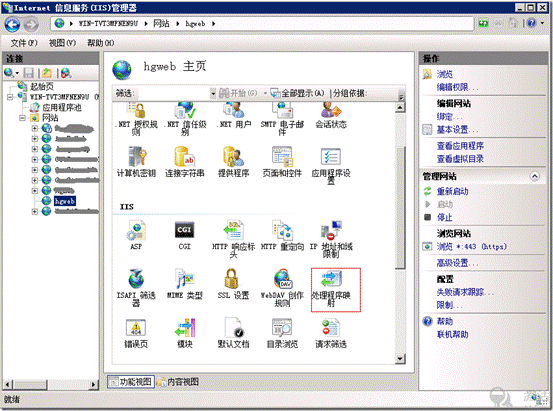
3. 在 IIS 中选择刚才新建的网站,右侧的功能视图中选择 “处理程序映射”,如下图
clip_image002

clip_image004

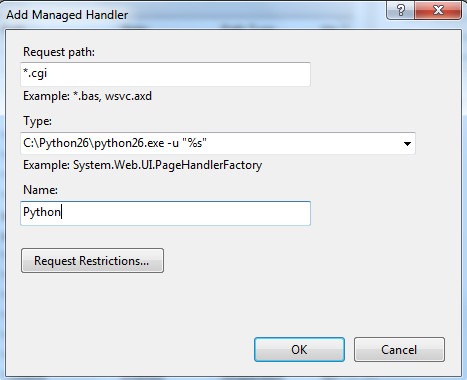
IIS 7.0以上的写法

clip_image005

IIS 6.0的写法

4. 在D:\hgweb下新建一个文本文件, 重命名为test.cgi (注意连同扩展名一起修改) , 编辑其内容如下:

print 'Status: 200 OK'

print 'Content-Type: text/html'

print

print '<html><body><h1>It Works!</h1></body></html>'

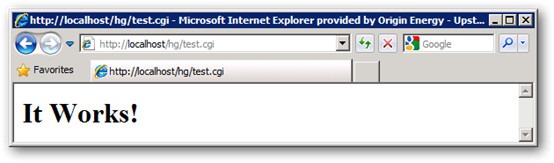
保存, 然后在IIS中浏览test.cgi:

url: http://localhost/hg/test.cgi

界面:
clip_image006

如果能看到上述界面, 说明初期配置成功,继续.

如果提示HTTP 错误 404.2 - Not Found

由于 Web 服务器上的“ISAPI 和 CGI 限制”列表设置,无法提供您请求的页面

打开IIS管理器, 定位到服务器级别, 在其功能列表中找到ISAPI and CGI restrictions, 如图:
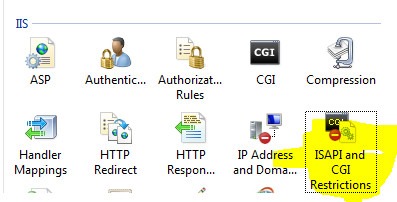
clip_image007

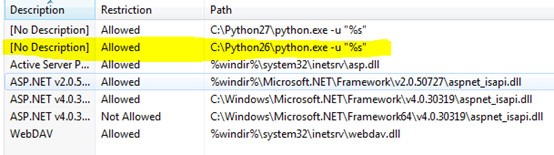
双击打开, 里面必须存在如下图所示的行:

clip_image008

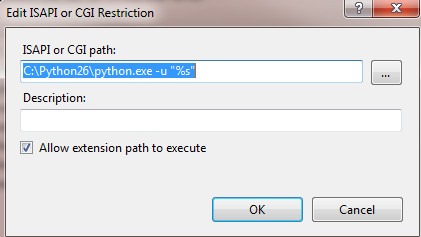
如果不存在则按点击右侧的”add”, 按下图填写:

clip_image009

如果已存在, 但是被禁用, 将其启用即可.

完成后重试打开test.cgi, 应该可以看到it works字样.

5. 在D:\hgweb目录下新建一个文本文件, 重命名为hgweb.cgi, 编辑其内容为以下几句话:

#!/usr/bin/env python

#

# An example hgweb CGI script, edit as necessary

# See also http://mercurial.selenic.com/wiki/PublishingRepositories

# Path to repo or hgweb config to serve (see 'hg help hgweb')

config = "D:/hgweb/hgweb.config"

# Uncomment and adjust if Mercurial is not installed system-wide:

#import sys; sys.path.insert(0, "/path/to/python/lib")

# Uncomment to send python tracebacks to the browser if an error occurs:

#import cgitb; cgitb.enable()

from mercurial import demandimport; demandimport.enable()

from mercurial.hgweb import hgweb, wsgicgi

application = hgweb(config)

wsgicgi.launch(application)

然后再在D:\Mercurial下新建一个文本文件, 重命名为hgweb.config, 不需要写入任何内容, 即可尝试浏览http://localhost:8080 /hgweb.cgi . 应该能看到如下界面:
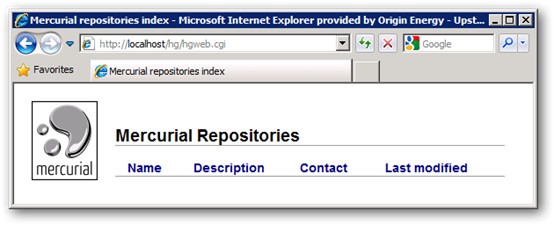
clip_image010

6. 修改hgweb.config

[paths]

/Repositories/ = E:/myweb/*

[web]

baseurl = /hgweb.cgi

allow_push = *

push_ssl = false

7. 创建代码仓库

在D:/hgweb下面创建test文件夹,在文件夹中执行创建hg create
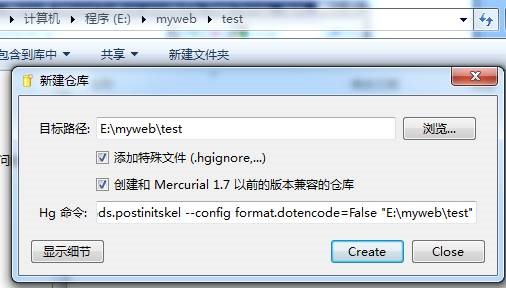
clip_image012

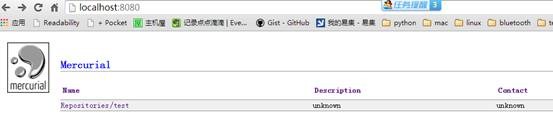
再次访问hgweb.cgi,可以看到如下图的画面:

clip_image014

8. 同步

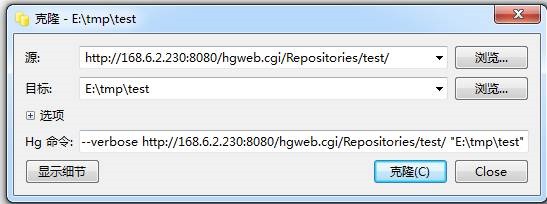
在要同步的电脑上输入hg clone

clip_image016

9. 提交代码

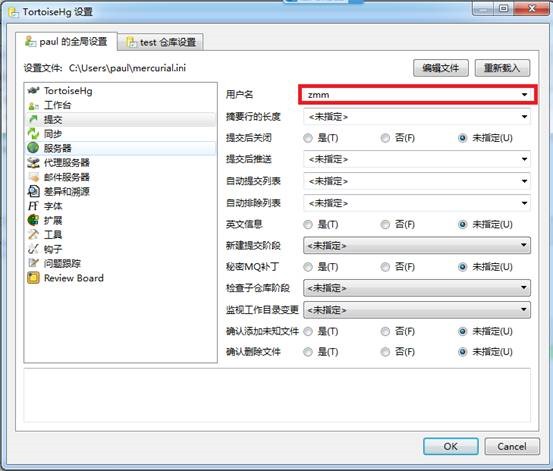
修改文件后,在设置中将用户名设置为提交用户名

clip_image018

posted on 2015-08-28 23:41  chinese_submarine  阅读(2948)  评论()    收藏  举报