








已成功用极光通道收到推送,为了能在app被杀的情况下继续收推送,需要接入厂家通道,接华为的时候踩了一顿坑
新建Flutter项目,使用官方jpush_flutter包,版本2.1.4
第一步:生成jks签名文件
见 Flutter中生成Android的jks签名文件并使用
获取SHA256签名指纹 
第二步:在华为AGC上对应的项目下配置签名信息并下载agconnect-services.json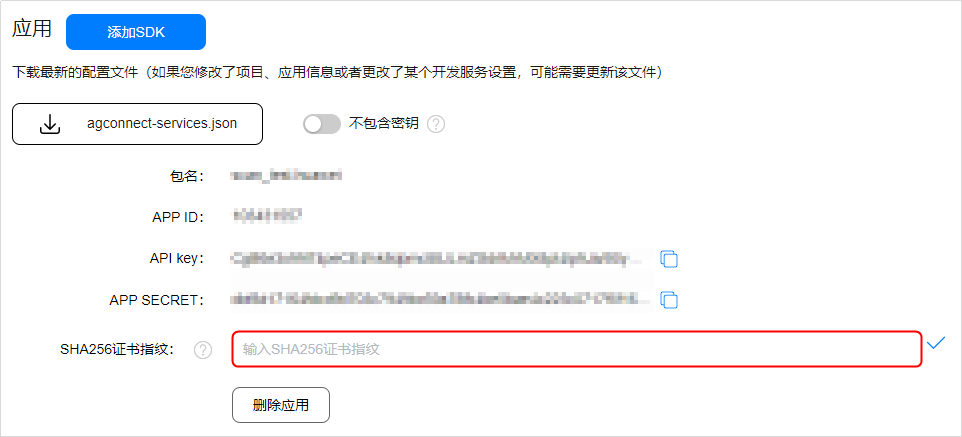
指纹填完后记得点勾保存,再下载文件,很重要,不然拿不到token
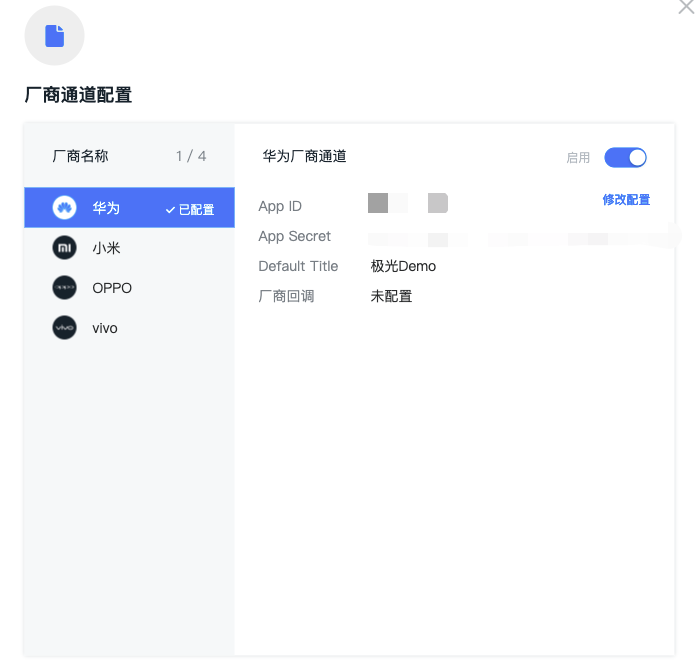
第三步 在极光后台配置华为通道的app资料
第四步 修改项目gradle,加入华为库maven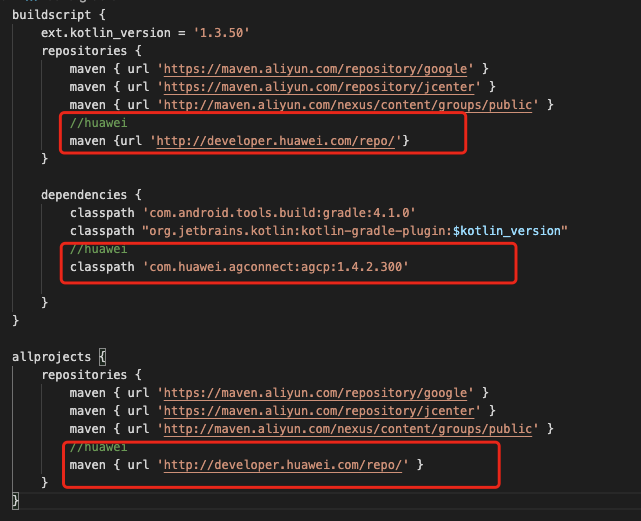
第五步 修改模块gradle
加入插件代码
apply plugin: 'com.huawei.agconnect'
配置极光参数,接入华为通道minSdkVersion要17以上
    defaultConfig {
        applicationId "com.xxx.jpush.demo"
        ndk {
	      //选择要添加的对应 cpu 类型的 .so 库。
	      abiFilters 'armeabi', 'armeabi-v7a', 'x86', 'x86_64', 'mips', 'mips64', 'arm64-v8a'
        }
        manifestPlaceholders = [
            JPUSH_PKGNAME : applicationId,
            JPUSH_APPKEY : "xxxxxxxxxxxxxxxx", //JPush 上注册的包名对应的 Appkey.
            JPUSH_CHANNEL : "developer-default", //暂时填写默认值即可.
        ]
        minSdkVersion 17
        targetSdkVersion 30
        versionCode flutterVersionCode.toInteger()
        versionName flutterVersionName
    }
加入华为依赖包
dependencies {
    implementation "org.jetbrains.kotlin:kotlin-stdlib-jdk7:$kotlin_version"
    // // 接入华为厂商
    implementation 'com.huawei.hms:push:5.3.0.301'
    implementation 'cn.jiguang.sdk.plugin:huawei:4.0.9'// 极光厂商插件版本与接入 JPush 版本保持一致,下同
}
jpush_flutter我用的2.1.4,翻源码SDK版本是 cn.jiguang.sdk:jpush:4.0.9
修改AndroidManifest.xml
<manifest xmlns:android="http://schemas.android.com/apk/res/android"
  package="com.example.jpush_demo"
  xmlns:tools="http://schemas.android.com/tools">
  <permission android:name="${applicationId}.permission.JPUSH_MESSAGE"
    android:protectionLevel="signature"/>
  <uses-permission android:name="${applicationId}.permission.JPUSH_MESSAGE" />
  <uses-permission android:name="android.permission.RECEIVE_USER_PRESENT" />
  <uses-permission android:name="android.permission.INTERNET" />
  <uses-permission android:name="android.permission.READ_PHONE_STATE" />
  <uses-permission android:name="android.permission.WRITE_EXTERNAL_STORAGE" />
  <uses-permission android:name="android.permission.READ_EXTERNAL_STORAGE" />
  <uses-permission android:name="android.permission.ACCESS_NETWORK_STATE" />
  <uses-permission android:name="android.permission.ACCESS_WIFI_STATE" />
  <application android:name="io.flutter.app.FlutterApplication"
    android:label="jpush_demo"
    android:icon="@mipmap/ic_launcher"
    android:usesCleartextTraffic="true"
    tools:replace="android:label">
    <activity android:name=".MainActivity"
      android:launchMode="singleTop"
      android:theme="@style/LaunchTheme"
      android:configChanges="orientation|keyboardHidden|keyboard|screenSize|smallestScreenSize|locale|layoutDirection|fontScale|screenLayout|density|uiMode"
      android:hardwareAccelerated="true"
      android:windowSoftInputMode="adjustResize">
      <!-- Specifies an Android theme to apply to this Activity as soon as
                 the Android process has started. This theme is visible to the user
                 while the Flutter UI initializes. After that, this theme continues
                 to determine the Window background behind the Flutter UI. -->
      <meta-data android:name="io.flutter.embedding.android.NormalTheme"
        android:resource="@style/NormalTheme" />
      <!-- Displays an Android View that continues showing the launch screen
                 Drawable until Flutter paints its first frame, then this splash
                 screen fades out. A splash screen is useful to avoid any visual
                 gap between the end of Android's launch screen and the painting of
                 Flutter's first frame. -->
      <meta-data android:name="io.flutter.embedding.android.SplashScreenDrawable"
        android:resource="@drawable/launch_background" />
      <intent-filter>
        <action android:name="android.intent.action.MAIN"/>
        <category android:name="android.intent.category.LAUNCHER"/>
      </intent-filter>
    </activity>
    <service android:name="cn.jpush.android.service.DaemonService"
      android:enabled="true"
      android:exported="true">
      <intent-filter >
        <action android:name="cn.jpush.android.intent.DaemonService" />
        <category android:name="${applicationId}"/>
      </intent-filter>
    </service>
    <service android:name=".services.HmsService"
      android:exported="false">
      <intent-filter>
        <action android:name="com.huawei.push.action.MESSAGING_EVENT" />
      </intent-filter>
    </service>
    <!-- Don't delete the meta-data below. This is used by the Flutter tool to generate GeneratedPluginRegistrant.java -->
    <meta-data android:name="flutterEmbedding"
      android:value="2" />
  </application>
</manifest>
根节点加入命名空间属性 xmlns:tools="http://schemas.android.com/tools" application节点加入属性 tools:replace="android:label"
加入两个Service
运行程序,成功连接华为日志出现以下文字
成功后在极光后台检测集成,就会出现华为通道已集成
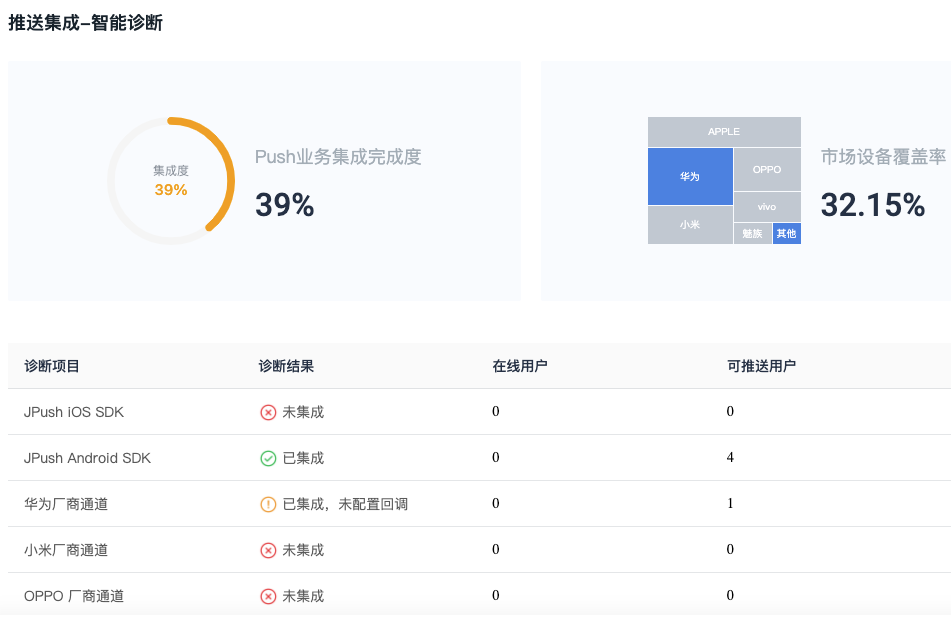
测试下发时选择厂商优先
此内容由惯性聚合(RSS阅读器)自动聚合整理,仅供阅读参考。 原文来自 — 版权归原作者所有。