






在我们的案例中,我们是用户通过Web应用程序进行身份识别。

上面的图示说明了如下的一些概念
l Azure AD 是标识提供程序,负责对组织的目录中存在的用户和应用程序的标识进行验证,并最终在那些用户和应用程序成功通过身份验证时颁发安全令牌。
l 希望将身份验证外包给 Azure AD 的应用程序必须在 Azure AD 中进行注册,Azure AD 将在目录中注册并唯一地标识该应用程序。
l 在用户通过身份验证后,应用程序必须对用户的安全令牌进行验证以确保身份验证对于目标方是成功的。
l 身份验证过程的请求和响应流是由所使用的身份验证协议(例如 OAuth 2.0、OpenID Connect、WS-Federation 或 SAML 2.0)决定的
这章我们将简单的对Azure AD的开发进行入门性的尝试,包括身份验证登录、基本身份信息的存储。要完成Azure AD的应用开发需要在Azure门户和开发环境中各自完成一些工作。
Azure AD开发部分
首先我们需要引入以下组件库
Microsoft.IdentityModel.Clients.ActiveDirectory
Microsoft.IdentityModel.Protocol.Extensions
Microsoft.Owin
Microsoft.Owin.Host.SystemWeb
Microsoft.Owin.Security
Microsoft.Owin.Security.Cookies
Microsoft.Owin.Security.OpenIdConnect
Microsoft.Web.Infrastructure
Microsoft.WindowsAzure.ConfigurationManager.
System.IdentityModel.Tokens.Jwt
其次我们需要在Web.config文件的appSettings节添加如下配置节点
<ADD KEY="IDA:CLIENTID" VALUE=" " />
<ADD KEY="IDA:TENANT" VALUE=" " />
<ADD KEY="IDA:TENANTID" VALUE="" />
<ADD KEY="IDA:AADINSTANCE" VALUE="HTTPS://LOGIN.CHINACLOUDAPI.CN/{0}" />
<ADD KEY="IDA:POSTLOGOUTREDIRECTURI" VALUE=" " />
<ADD KEY="IDA:GRAPHURL" VALUE="HTTPS://GRAPH.CHINACLOUDAPI.CN" />
<ADD KEY="IDA:APPKEY" VALUE="" />
注意,由于我们使用的是世纪互联的版本,所以ida:AADInstance、ida:GraphUrl的Url将固定为https://login.chinacloudapi.cn/{0}和https://graph.chinacloudapi.cn。关于其他的配置值将在Azure AD门户部分讲解。
然后我们需要编写AuthenticationHelper类来辅助我们处理有关授权的基本处理,AuthenticationHelper有两大部分,第一部分是通过静态字段来读取在Web.config文件的appSettings节配置的有关Azure AD的信息。
public static readonly string Tenant = CloudConfigurationManager.GetSetting("ida:Tenant");
public static readonly string TenantId = CloudConfigurationManager.GetSetting("ida:TenantId");
public static readonly string LoginUrl = CloudConfigurationManager.GetSetting("ida:AADInstance");
public static readonly string GraphUrl = CloudConfigurationManager.GetSetting("ida:GraphUrl");
public static readonly string AppKey = CloudConfigurationManager.GetSetting("ida:AppKey");
public static readonly string AuthorityUrl = String.Format(CultureInfo.InvariantCulture, LoginUrl, TenantId);
public static readonly string AuthString = CloudConfigurationManager.GetSetting("ida:Auth") + CloudConfigurationManager.GetSetting("ida:Tenant");
public static readonly string ClaimsSchemas = "http://schemas.microsoft.com/identity/claims/objectidentifier";
public static readonly string ClientId = CloudConfigurationManager.GetSetting("ida:ClientId");
public static readonly string ClientSecret = CloudConfigurationManager.GetSetting("ida:ClientSecret");
public static readonly string PostLogoutRedirectUri = CloudConfigurationManager.GetSetting("ida:PostLogoutRedirectUri");
你已经注意到了,上面的代码在读取配置的时候没有使用我们传统的WebConfigurationManager类,而是采用了Azure新加入的CloudConfigurationManager类,该类是用于访问 Microsoft Azure 配置设置的静态类,可以从运行应用程序的平台的相应配置存储中读取配置设置。Microsoft Azure 外部环境中运行的 .NET 应用程序通常在 web.config 或 app.config 文件中存储配置设置。不管在哪个环境中运行代码,都可以使用CloudConfigurationManager 类从适当的配置文件中读取设置。
然后在AuthenticationHelper中添加一个方法AcquireTokenAsync,这个方法用于返回当前的用户凭证,如果没有凭证则抛出异常。
public static string Token;

public static async Task<string> AcquireTokenAsync()
{
    if (Token == null || Token.IsEmpty())
    {
        throw new Exception("Authorization Required.");
    }
    return Token;
}
然后我们再添加GetActiveDirectoryClient方法来获取对Azure AD的客户端对象引用。
public static ActiveDirectoryClient GetActiveDirectoryClient()
{
    Uri baseServiceUri = new Uri(GraphUrl);
    ActiveDirectoryClient activeDirectoryClient = new ActiveDirectoryClient(new Uri(baseServiceUri, TenantId), async () => await AcquireTokenAsync());
    return activeDirectoryClient;
}
AuthenticationHelper到此就完成了,我们建立一个控制器AzureActiveDirectoryController,这个控制器将包含以下方法来使用AuthenticationHelper类。
SignIn登录
代码非常简单,在当前上下文的采用OpenID进行身份询问获取
public void SignIn()
{
    if (!Request.IsAuthenticated)
    {
        HttpContext.GetOwinContext()
            .Authentication.Challenge(new AuthenticationProperties { RedirectUri = "/" },
                OpenIdConnectAuthenticationDefaults.AuthenticationType);
    }
}
SignOut登出
同样代码简单明确
public void SignOut()
{
    string userObjectID = ClaimsPrincipal.Current.FindFirst(AuthenticationHelper.ClaimsSchemas).Value;
    var authContext = new AuthenticationContext(AuthenticationHelper.AuthorityUrl, new NaiveSessionCache(userObjectID));
    authContext.TokenCache.Clear();
    AuthenticationHelper.Token = null;
    HttpContext.GetOwinContext().Authentication.SignOut(OpenIdConnectAuthenticationDefaults.AuthenticationType, CookieAuthenticationDefaults.AuthenticationType);
}
好了,现在登入登出的代码已经完成了,我们可以尝试下载我们的MVC Web APP中执行体验下。在MVC自己建立的架构中我们可以循着View\ Shared\ _LoginPartial.cshtml找到通用的登入登出的View界面,然后修改代码为
@if (Request.IsAuthenticated)
{
    <text>
        <ul class="nav navbar-nav navbar-right">
            <li class="navbar-text">
                Hello, @User.Identity.Name!
            </li>
            <li>
                @Html.ActionLink("Sign out", "SignOut", "AzureActiveDirectory")
            </li>
        </ul>
    </text>
}
else
{
    <ul class="nav navbar-nav navbar-right">
        <li>@Html.ActionLink("Sign in", "SignIn", "AzureActiveDirectory", routeValues: null, htmlAttributes: new { id = "loginLink" })</li>
    </ul>
}
上面的代码通过一个if完成登陆后出现Sign out链接和登出状态为Sign in链接。然后在View\ Shared\ _LoginPartial.cshtml加入这个_LoginPartial.cshtml我们就在主模板拥有了登录登出的链接功能。我对_LoginPartial.cshtml此处的修改如下
<div class="navbar-collapse collapse">
    <ul class="nav navbar-nav">
        <li>@Html.ActionLink("主页", "Index", "Home")</li>
        <li>@Html.ActionLink("关于", "About", "Home")</li>
        <li>@Html.ActionLink("联系方式", "Contact", "Home")</li>
    </ul>
    @Html.Partial("_LoginPartial")
</div>
现在我们执行代码后,我们看到的默认页面是
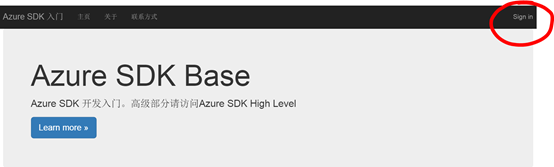
点击Sign in链接后将跳转到微软的登录界面

点击账号后
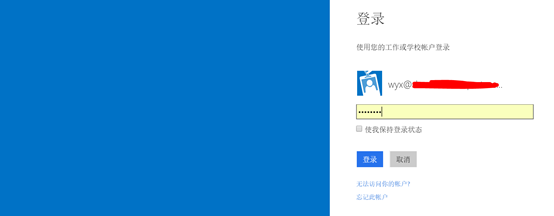
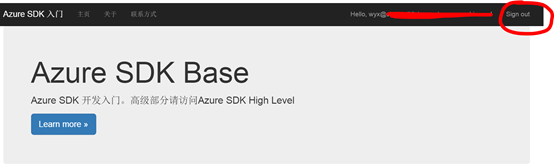
输入正确的密码后,将跳回我们应用的默认首页,并且明显的发现我们已经使用了正确的身份登入了。
此内容由惯性聚合(RSS阅读器)自动聚合整理,仅供阅读参考。 原文来自 — 版权归原作者所有。