Masonry写的Autolayout示例又来了,仍然是三个小例子,分别是变高度的UITableViewCell、topLayoutGuide与bottomLayoutGuide,还有自定义的baseline,外加两个基本的知识点讲解,说不上“有趣”=。=,比较基础,写了很多,各位随意看看吧~
Github地址:
https://github.com/zekunyan/AutolayoutExampleWithMasonry
先讲讲两个知识点,很基础,但是很容易被忽略。
先看看Masonry的Github主页的示例代码:
1 | UIEdgeInsets padding = UIEdgeInsetsMake(10, 10, 10, 10); |
代码的意思很简单,就是view1的上下左右边距为padding对应的值。
但是,为什么bottom、right的offset是负数呢?
其实无论是Autolayout还是直接写frame,最终的结果都是要把我们的控件按照正确的位置绘制在屏幕上,也就是说,在一个统一的坐标系下,如下:
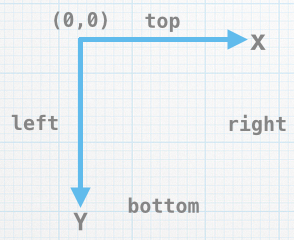
而在Masonry里面,offset只是做了“加法”运算,举个例,上面的:
1 | make.top.equalTo(superview.mas_top).with.offset(padding.top); |
其实等于下面的式子:
1 | view1.top = superview.top + padding.top; |
转换到坐标系里面,即是:
1 | view1顶部的y坐标 = superview顶部的y坐标 + padding.top; |
所以,如果我们想view1的bottom距底部间距为10,按照offset的“加法运算”,应该是下面这样:
1 | view1底部的y坐标 = superview底部的y坐标 + (-10); |
所以,代码里面的bottom的offset是负数。right也是一个道理。
总的来说,就是布局的时候,始终要在坐标系下考虑。
语文不好,还是用公式说明吧=。=
先看看Autolayout的基本公式:
1 | viewA-attribute = viewB-attribute * multiplier + constant |
这个公式,跟下面的是等价的:
1 | viewB-attribute = (viewA-attribute - constant) / multiplier |
这个转换是如此的简单,小学生都会=。=,只是为了说明,我们在设置约束的时候,既可以从ViewA的角度考虑,也可以从ViewB的角度,两者完全等价!。
说白了就是:“ViewA跟ViewB相距10”和“ViewB跟ViewA相距10”是一样的,如下两段代码,效果是一样的(注意正负数):
1 |
|
更进一步说,就是约束只是两个View之间的关系,对于系统来说,ViewA和ViewB的地位是平等的,我们设置约束的时候,没有主次之分。
所以,我们在设置约束的时候,要从“整体”、“宏观”上考虑,更好地把握布局,避免重复约束。
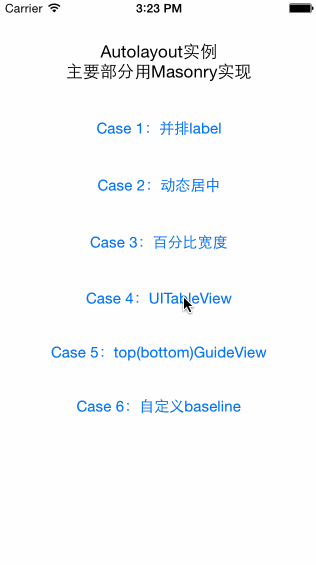
变高的UITableViewCell,这是个永恒的话题=。=
不用Autolayout的话,计算Cell的高度的时候,就只能用sizeThatFits等方法,加上各种“魔鬼”数据的margin、padding来手动拼凑出Cell的高度。这种方法非常耗时,并且难以调试。
有了Autolayout,就再也不用手动算高度了~
先看看Cell的约束。
既然要能让系统自己计算出Cell的高度,我们在设置约束的时候,就要让约束整体是“完整”、“自我约束”的。(这个很难用语言描述。。。)Cell里面的每一个View的大小、位置,都可以从约束中得到体现,而Cell的整体大小,也是从子View的约束综合计算得出的。
如下面的Cell:
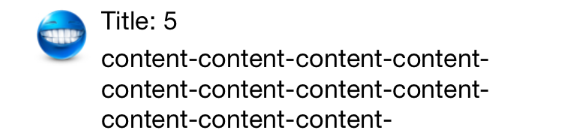
约束的设定如下:
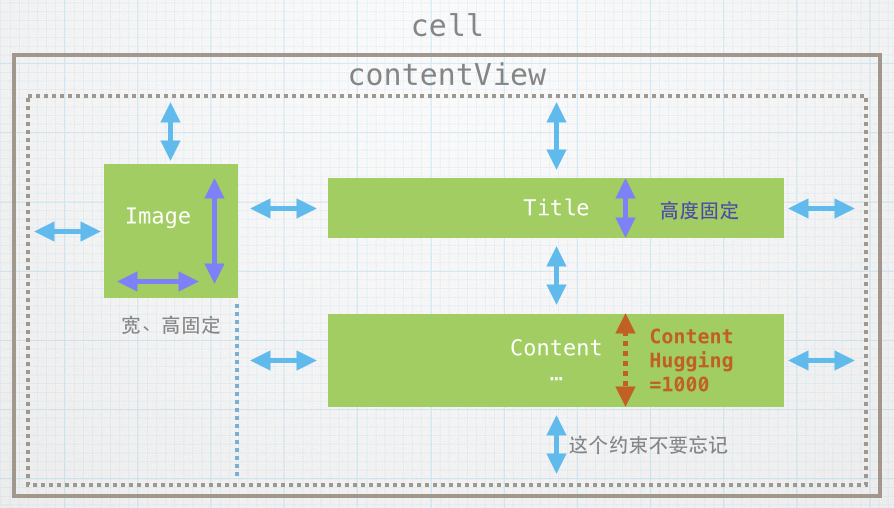
关键点:
Autolayout下,UILabel在多行显示时,有个很“坑”的属性需要设定,就是preferredMaxLayoutWidth。
定义如下:
This property affects the size of the label when layout constraints are applied to it. During layout, if the text extends beyond the width specified by this property, the additional text is flowed to one or more new lines, thereby increasing the height of the label.
如果我们要使用Autolayout自动计算多行UILabel的高度,这个属性就必须在运行时指定,要不然系统计算不出UILabel的宽度,例如:
1 |
|
手动计算宽度,感觉回到了没有Autolayout的时代=。=
1 |
|
再看看UITableView。
在设定好Cell的约束以后,就可以用systemLayoutSizeFittingSize:方法获取Cell的实际高度,它的参数可以设定为两个系统常量,如下:
为了在- (CGFloat)tableView:(UITableView *)tableView heightForRowAtIndexPath:(NSIndexPath *)indexPath方法中计算Cell的高度,我们需要一个专门用于计算高度的Cell实例,可以说算是Cell的“模板”。一般来说,这个实例可以设置成函数的static变量,并只在第一次使用时初始化一次。
为了避免每次滑动时计算高度,可以将Cell的高度缓存下来。如,保存在每一行对应的数据Model(Entity)中,例如:
1 | @interface Entity : NSObject |
每次要获取高度时,就可以先检查一下是否有缓存,减少计算量。
默认情况下,首次显示之前,系统都会一次性全部计算出所有Cell的高度,这简直不能忍啊!要是有10000行,那岂不是要卡死=。=
所以iOS 7以后,UITableView有了一个新的属性:estimatedRowHeight。
从属性名上就可以看出,这个属性可以为Cell预先指定一个“估计”的高度值,这样的话,系统就可以先按照估计值布局,然后只获取显示范围内的Cell的高度,这样就不会一次性计算全部的了。
1 | - (CGFloat)tableView:(UITableView *)tableView heightForRowAtIndexPath:(NSIndexPath *)indexPath { |
iOS 8大大简化了Cell的高度计算,只要设置好Cell的约束,添加下面几行代码:
1 | tableView.rowHeight = UITableViewAutomaticDimension |
然后:
1 | - (CGFloat)tableView:(UITableView *)tableView heightForRowAtIndexPath:(NSIndexPath *)indexPath { |
对!就只用这么几行代码就行!
topLayoutGuide和bottomLayoutGuide都是iOS 7以后,UIViewController的属性。
在文档、头文件中,topLayoutGuide和bottomLayoutGuide的定义如下:
1 | @property(nonatomic,readonly,retain) id<UILayoutSupport> topLayoutGuide NS_AVAILABLE_IOS(7_0); |
而UILayoutSupport的定义更是简单:
1 | @protocol UILayoutSupport <NSObject> |
以topLayoutGuide为例:
The topLayoutGuide property comes into play when a view controller is frontmost onscreen. It indicates the highest vertical extent for content that you don’t want to appear behind a translucent or transparent UIKit bar (such as a status or navigation bar). This property implements the UILayoutSupport protocol and you can employ it as a constraint item when using the NSLayoutConstraint class.
简单来说,topLayoutGuide表示当前页面的上方被status bar、navigation bar遮挡的部分。同理,bottomLayoutGuide表示下方被遮挡的部分。
如下图:
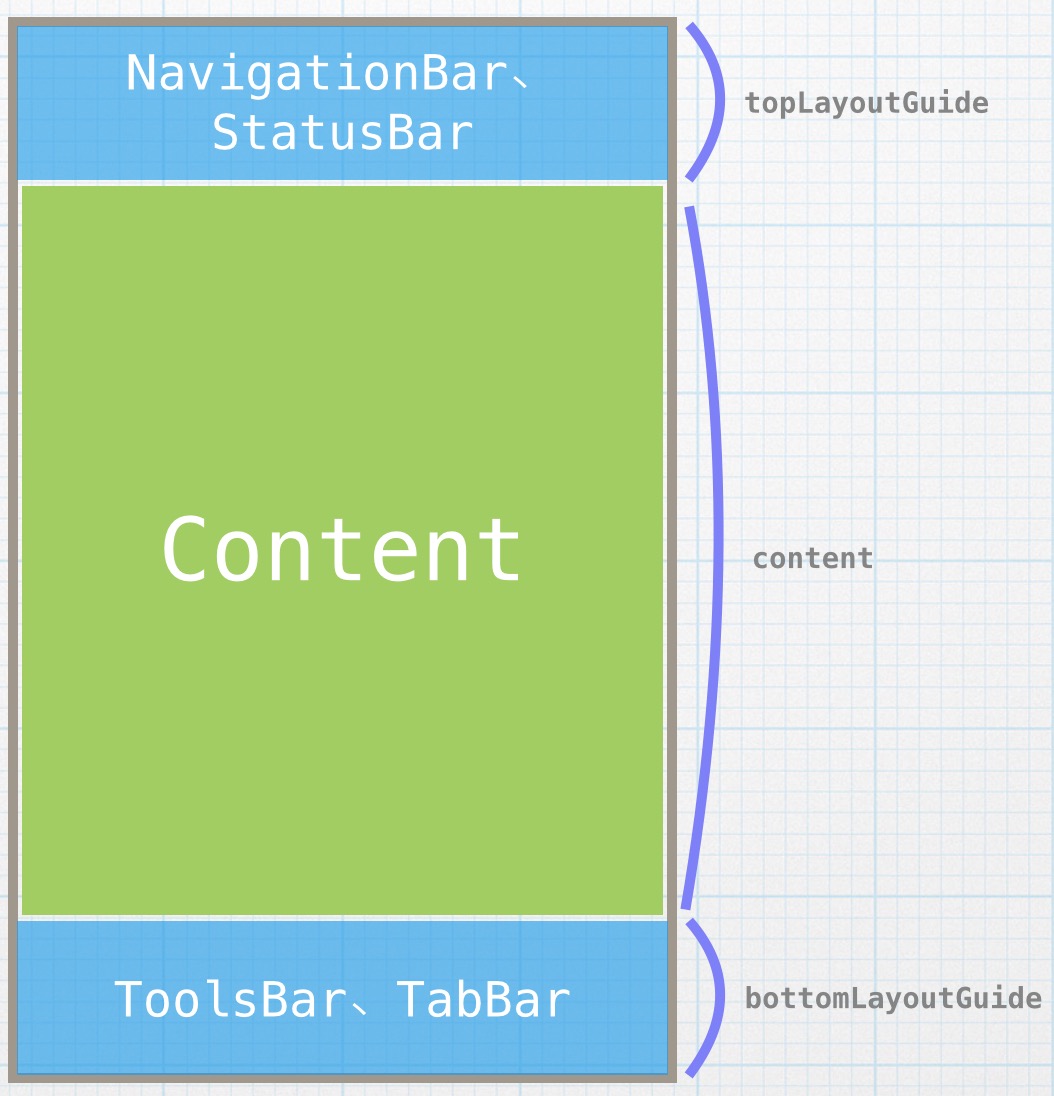
有些时候,一个ViewController可能单独显示出来,也可能内嵌在UINavigationController里面显示出来。在这两种情况下,页面的“可视范围”是不一样的,很明显,NavigationBar会遮挡住一部分,用了UITabBarController时,tabBar也会遮挡住下方一部分。再加上各种Bar都可以隐藏,情况会变得更复杂。
难道要为每种情况去写一份布局代码?
为了解决上面的问题,就需要在设置约束时,加进topLayoutGuide和bottomLayoutGuide。
定义上,topLayoutGuide和bottomLayoutGuide都是id,但是实际中是什么呢?跟UIView有什么关系?
看看如下代码的运行结果:
1 | NSLog(@"%d", [self.topLayoutGuide isKindOfClass:[UIView class]]); |
结果是:”1”
也就是说,在运行期间,topLayoutGuide和bottomLayoutGuide就是UIView的子类。
所以,第一种方法就是强制转换成UIView,直接运用在Masonry的约束里面,正如较旧的Masonry官方示例中的一样:
1 | [topView makeConstraints:^(MASConstraintMaker *make) { |
但是这样存在着风险,万一哪天苹果改变了topLayoutGuide和bottomLayoutGuide的实现方法,这么用就Crash了=。=
第二种方法,就是直接使用UILayoutSupport定义的length属性。
这个时候就有个地方要特别注意,在运行到viewDidLoad的时候,length的值是0,因为这个时候界面还没有被绘制,所以一个解决方法就是在ViewController的updateViewConstraints方法里面去使用length值添加约束。如下:
1 | - (void)updateViewConstraints { |
在Masonry的新版中,为UIViewController增加了一个新的Category: MASAdditions,增加了mas_topLayoutGuide和mas_bottomLayoutGuide两个方法,这样的话,我们就可以优雅的使用topLayoutGuide和bottomLayoutGuide了~
1 | [_topView mas_makeConstraints:^(MASConstraintMaker *make) { |
直接看Demo吧,比较简单。
最后一个Case,讲讲baseline。
baseline,翻译过来就是“基线”,在Autolayout里面对应着NSLayoutFormatAlignAllBaseline,也是一种对齐的标准。例如,UIButton的baseline就是内部的文字,如果一排button按照baseline对齐的话,就是下面这样:
对于自定义的View来说,baseline默认就是整个view的底部,如果想改变baseline的话,可以重写UIView的viewForBaselineLayout,返回当成baseline的view即可。
如下面的自定义view:
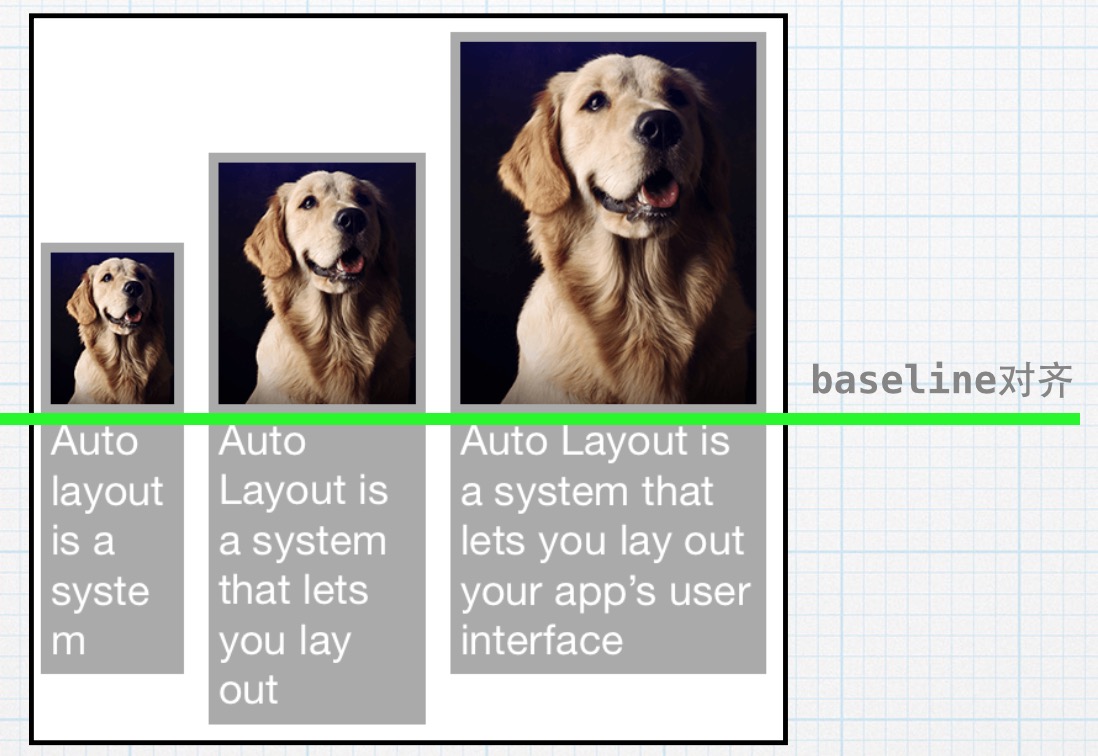
很明显,baseline就是显示图片的UIImageView,代码也很简单:
1 |
|
灵活的使用baseline,可以更加方便的进行布局。
写了好长,能全部看完的朋友,嗯,你是个优秀的程序员=。=
后面打算用Swift的SnapKit把所有的Case全部实现一次。
此内容由惯性聚合(RSS阅读器)自动聚合整理,仅供阅读参考。 原文来自 — 版权归原作者所有。