


In this tutorial, we’ll tackle one of the amazing new features of CSS: Custom Properties. You may also have heard them referred to as CSS Variables.
This feature gives us some of the features of a preprocessor with all the additional power of the browser. You can set values in your variables, change in your CSS to add scoped values and also update them in JavaScript to create powerful, themeable components.
To show off their power, we’ll make use of the styles to create a humble button-styled <a> tag.
Just want the code? Checkout this CodePen with all the code from the blog post with some context.
We’ll start by defining out our basic styles for our anchor tag. In this example, anything with the class button will be styled as a “button” with a light red background and rounded corners.
.button {
    background-color:#ff6347;
    color: #ffffff;
    display: inline-block;
    padding: .5rem 1rem;
    border-radius: 3px;
    text-decoration: none;
    text-align: center;
}
From here, we need to take the values we want to make easily editable and convert them to Custom Properties.
Let’s get this button flexible!
First we need to define out our variables. With Custom Properties, we can define them at any scope, but to make it globally accessible to all our CSS, we need to attach it to the :root element. The :root pseudo-class is synonymous with the html selector, but creates a higher level of specifity, making it a strong place to attach your variables.
To declare a variable, you need to be inside a declaration block. Then you use the syntax --variable-name. Your variable name can be any string with no spaces (dashes and underscores are acceptible). In our button example, our variable declarations look like this:
:root {
    --button-background:#ff6347;
    --button-foreground:#ffffff;
    --button-display: inline-block;
    --button-padding: .5rem 1rem;
    --button-corners: 3px;
}
Mostly, we’re isolating the properties we’ll want to change later, like colors.
Next up, we need to access these variables in our .button declaration.
.button {
    background-color: var(--button-background);
    color: var(--button-foreground);
    display: var(--button-display);
    padding: var(--button-padding);
    border-radius: var(--button-corners);
    text-decoration: none;
    text-align: center;
}
And we’re done! This class now uses CSS Custom Properties!
But wait! What was the point of that? I hear you, let’s talk about some use cases.
Let’s say we want to change our button in various ways for special use cases. That’s fine, we could do that before Custom Properties. Custom Properties will just make our code neater!
The old way of handling this would be to have our .special class and then also have a .special .button selector.
.special {
   /* Code for our special area */
}

.special .button {
    display: block; /* make it full width */
    background-color: lightblue;
    color: #333;
}
Nothing wrong with this, but we’re adding to our selector bloat. We could also make a completely new class for our special button, such as .button--special and change our HTML.
Instead, we can now create a new scope for our variables and change their values directly in our .special declaration.
.special {
   /* Code for our special area */
    --button-background: lightblue;
    --button-foreground: #333;
    --button-display: block;
}
The element that has class="special" is actually the parent of our button. By setting the variables on this selector, it filters down to our button without having to declare the button class. This is handy for managing specificity and setting up component-based styles a little bit easier.
So, updating our values in CSS is easier. Next, let’s take a look at access and modifying these values in JavaScript.
Dark mode is all the rage these days. Every website is beginning to implement this sort of feature.
With CSS Variables, it becomes a bit more painless.
We’ll start by creating two new Custom Properties on our :root element.
:root {
    --color:#333333;
    --bg-color:#ffffff;

    /* Button variables */
    --button-background:#ff6347;
    --button-foreground:#ffffff;
    --button-display: inline-block;
    --button-padding: .5rem 1rem;
    --button-corners: 3px;
}
These two new variables will give us control over our text color and our main background color.
Then we have two options for setting up our dark mode.
First let’s look at setting these properties in JavaScript.
   document.documentElement.style.setProperty('--color', '#fff');
   document.documentElement.style.setProperty('--bg-color', '#333');
   document.documentElement.style.setProperty('--button-background', '#7d483e');
   document.documentElement.style.setProperty('--button-foreground', '#eee');`
Let’s break that down a bit. Each line is setting a CSS property by using the setProperty() method. setProperty() takes two arguments: a CSS property and a value. In this case, we’re treating our Custom Properties as any other property and we can set them.
To get to the style object — what’s now being built as the “CSS Object Model” — we look at any element’s style block. But we need to make changes to the :root element. So instead of using something like document.querySelector to find it, we can use the document.documentElement property to select the document root.
For dark mode, this would get tedious pretty fast, though. So, let’s take a look at option number two: CSS with a class toggle.
.darkMode {
    --button-background: #7d483e;
    --button-foreground: #eee;
    --color: #fff;
    --bg-color: #333;
}
Now, in our JavaScript, we can toggle the class darkMode on our <body> element to activate dark mode. This will change the global scope of those variables, so that anything accessing them will get updated.
After that, we can set up a toggle in JS.
let darkModeToggle = document.querySelectorAll('.darkModeToggle');
let body = document.querySelector('body');

darkModeToggle.forEach(toggler => toggler.addEventListener('click', e => {
    e.preventDefault();
    body.classList.toggle('darkMode')
}));
If setting these variables in JS seems tedious in that example, why would we want to use it in any scenario?
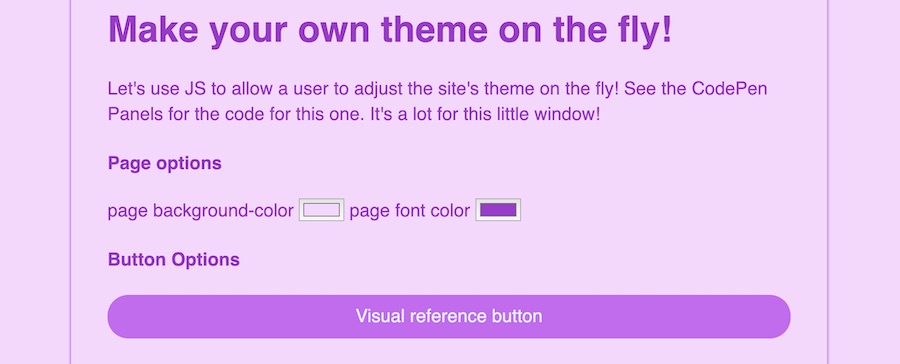
Before we start writing JavaScript, let’s figure out what we want to expose for users to change on the site.
In our current example, we’ll take background color, text color, button colors, button border radius and whether the button is full width or not.
With these in mind, we’ll create an HTML form with IDs that match our Custom Property names for each type of change. To add extra spice, let’s use HTML inputs like color pickers and range sliders!
    <form action="" class="theme-change">
        <h4>Page options</h4>
        <label for="" >page background-color</label>
        <input type="color" id="bg-color" name="bg-color" class="text">
        <label for="">page font color</label>
        <input type="color" name="color"  id="color" class="text">
        <h4>Button Options</h4>
        <a href="#" class="button-withvars">Visual reference button</a> <br><br>
        <label for="button-display">Full width?</label>
        <select name="button-display" id="button-display">
            <option value="inline-block">No</option>
            <option value="block">Yes</option>
        </select>
        <br>
        <label for="button-background" >button background-color</label>
        <input type="color" id="button-background" name="button-background" class="text">
        <label for="button-foreground" >button foreground-color</label>
        <input type="color" id="button-foreground" name="button-foreground" class="text">
        <br>
        <label>Border Radius:</label>
        <input data-suffix="true" type="range" id="button-corners" min="0" max="25" value="10">
    </form>
From there, we need to find our form fields and apply event handlers.
const inputs = Array.from(document.querySelectorAll('.theme-change input, .theme-change select')); // Create an array of form fields

inputs.forEach(input => {
    setInitialValues(input);
    input.addEventListener('change', handleUpdate);
    input.addEventListener('mousemove', handleUpdate);
});
We add a change event listener for handling most of the form interactions, but if we want live changes from our range inputs, we need to also have a mousemove event listener.
Our first minor protection is to deal with units. In this simple example, we only have to worry about a px suffix, but it would also make sense to offer more protections in this situation.
After we get the new value from our form input, we need to set the property. Much like our dark mode example, we’ll use document.documentElement.style.setProperty. In this case, we’ll dynamically find the right property by pulling the ID of our field and prepending -- to the beginning.
function handleUpdate(e) {
    let newValue = this.dataset.suffix ? `${this.value}px` : this.value; // Add px to input values that have a data-suffix attribute
    document.documentElement.style.setProperty(`--${this.id}`, newValue);
}
That function handles updating the theme. Having default values in our form would also make sense. We can set those values, as well, based on our Custom Properties! You may have noticed the setInitialValues(input); line in our inputs.forEach.
The first step is to grab the proper property. To do that, we have to run the getComputedStyle method. It takes an argument that is a DOM element and returns the CSSOM for that element. We can then use the getPropertyValue() method to return the value of any given CSS property on that object. In this case, we use a template literal to prepend the -- to our input’s ID.
We then need to add px to any of the suffixed input values and then update our input’s value.
function setInitialValues(input) {
    let cssProperty = getComputedStyle(document.documentElement).getPropertyValue(`--${input.id}`);
    let updatedValue = input.dataset.suffix ? cssProperty.replace("px", "") : cssProperty;
    input.value = updatedValue;
}
All this JavaScript works with the Custom Properties we’ve already written in this post.
One “gotcha” in this process is the HTML5 color picker inputs. They require a hex value with all six digits. When you run .getPropertyValue on a Custom Property it will return a space at the beginning of the string if you’re like me and like your CSS declarations to have a space after the colon. So, if you want to run a form and set your form inputs from Custom Properties, you’ll need to trim the values or style your CSS.
Every month there are new and amazing takes on things we can do with this new power in CSS. Here are a few that have caught my eye in researching for this post.
Where will you take Custom Properties?
I presented most of this code at the Memphis Web Workers in August 2019. You can see the video below.
{% youtube “-ugZb-o0l0s” %}
此内容由惯性聚合(RSS阅读器)自动聚合整理,仅供阅读参考。 原文来自 — 版权归原作者所有。