


In the previous article we parsed .OBJ files. In this article lets parse their complementary .MTL material files.
Disclaimer: This .MTL parser is not meant to be exhaustive or flawless or handle every .MTL file. Rather it's meant as an exercise to walk through handling what we run into on the way. That said, if you run into big issues and solutions a comment at the bottom might be helpful for others if they choose to use this code.
We loaded this CC-BY 4.0 chair by haytonm I found on Sketchfab
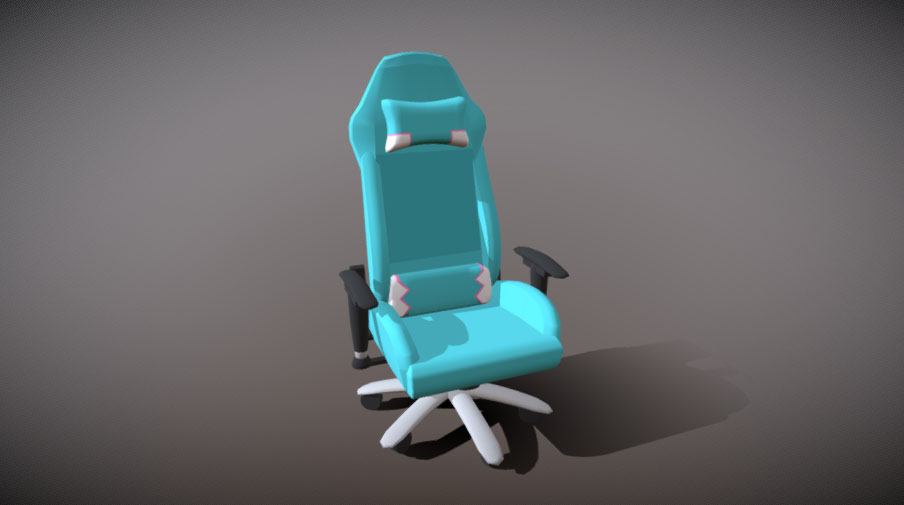
It has a corresponding .MTL file that looks like this
# Blender MTL File: 'None'
# Material Count: 11

newmtl D1blinn1SG
Ns 323.999994
Ka 1.000000 1.000000 1.000000
Kd 0.500000 0.500000 0.500000
Ks 0.500000 0.500000 0.500000
Ke 0.0 0.0 0.0
Ni 1.000000
d 1.000000
illum 2

newmtl D1lambert2SG
Ns 323.999994
Ka 1.000000 1.000000 1.000000
Kd 0.020000 0.020000 0.020000
Ks 0.500000 0.500000 0.500000
Ke 0.0 0.0 0.0
Ni 1.000000
d 1.000000
illum 2

newmtl D1lambert3SG
Ns 323.999994
Ka 1.000000 1.000000 1.000000
Kd 1.000000 1.000000 1.000000
Ks 0.500000 0.500000 0.500000
Ke 0.0 0.0 0.0
Ni 1.000000
d 1.000000
illum 2

... similar for 8 more materials
Checking a description of the .MTL file format
We can see the keyword newmtl starts a new material by the given name and below
that are all the settings for that material. Each line starts with a keyword similar
to the .OBJ file so we can start with a similar framework
function parseMTL(text) {
  const materials = {};
  let material;

  const keywords = {
    newmtl(parts, unparsedArgs) {
      material = {};
      materials[unparsedArgs] = material;
    },
  };

  const keywordRE = /(\w*)(?: )*(.*)/;
  const lines = text.split('\n');
  for (let lineNo = 0; lineNo < lines.length; ++lineNo) {
    const line = lines[lineNo].trim();
    if (line === '' || line.startsWith('#')) {
      continue;
    }
    const m = keywordRE.exec(line);
    if (!m) {
      continue;
    }
    const [, keyword, unparsedArgs] = m;
    const parts = line.split(/\s+/).slice(1);
    const handler = keywords[keyword];
    if (!handler) {
      console.warn('unhandled keyword:', keyword);
      continue;
    }
    handler(parts, unparsedArgs);
  }

  return materials;
}
Then we just need to add functions for each keyword. The docs say that
Ns is the specular shininess setting from the article on point lightsKa is the ambient color of the materialKd is the diffuse color which was our color in the article on point lightsKs is the specular colorKe is the emissive colorNi is the optical density. We won't use thisd stands for "dissolve" which is the opacityillum specifies the kind of illumination. The document lists 11 kinds. We'll ignore this for now.I debated on whether or not to keep those names just as they are. I suppose a math person loves short names. Most code style guides prefer descriptive names so I decided to do that.
function parseMTL(text) {
  const materials = {};
  let material;

  const keywords = {
    newmtl(parts, unparsedArgs) {
      material = {};
      materials[unparsedArgs] = material;
    },
+    Ns(parts)     { material.shininess      = parseFloat(parts[0]); },
+    Ka(parts)     { material.ambient        = parts.map(parseFloat); },
+    Kd(parts)     { material.diffuse        = parts.map(parseFloat); },
+    Ks(parts)     { material.specular       = parts.map(parseFloat); },
+    Ke(parts)     { material.emissive       = parts.map(parseFloat); },
+    Ni(parts)     { material.opticalDensity = parseFloat(parts[0]); },
+    d(parts)      { material.opacity        = parseFloat(parts[0]); },
+    illum(parts)  { material.illum          = parseInt(parts[0]); },
  };

  ...

  return materials;
}
I also debated on whether or not to try to guess the path to each .MTL file or manually specify it. In other words we could do this
// pseudo code - manually specify the path for both the .OBJ and .MTL files
const obj = downloadAndParseObj(pathToOBJFile);
const materials = downloadAndParseMtl(pathToMTLFile);
Or we can do this
// pseudo code - guess the path to the .MTL file based on the .OBJ file
const obj = downloadAndParseObj(pathToOBJFile);
const materials = downloadAndParseMtl(pathToOBJFile, obj);
I chose the latter which I'm not totally sure is a good or bad idea. According to the docs an .OBJ file can contain references to multiple .MTL files. I've never seen an example of that but I'm guessing the author of the docs did.
Further, I've never seen the .MTL file named anything different than the
.OBJ file. In other words if the .OBJ file is bananas.obj the .MTL file
seems to almost always bee bananas.mtl.
That said, the spec says the .MTL files are specified in the .OBJ file
so I decided to try to compute the paths of the .MTL files
Starting with the code from the previous article we separate out the URL for the .OBJ file, then build new URLs for the .MTL files relative to the .OBJ file. Finally we load all of them, concatenate them since they are just text files, and pass them to our parser.
-const response = await fetch('resources/models/chair/chair.obj');
+const objHref = 'resources/models/chair/chair.obj';
+const response = await fetch(objHref);
const text = await response.text();
const obj = parseOBJ(text);
+const baseHref = new URL(objHref, window.location.href);
+const matTexts = await Promise.all(obj.materialLibs.map(async filename => {
+  const matHref = new URL(filename, baseHref).href;
+  const response = await fetch(matHref);
+  return await response.text();
+}));
+const materials = parseMTL(matTexts.join('\n'));
Now we need to use the materials. First when we setup the parts we'll use the name of the material we pulled out of the .OBJ file and use it to look up a material from the materials we just loaded.
-const parts = obj.geometries.map(({data}) => {
+const parts = obj.geometries.map(({material, data}) => {

  ...

  // create a buffer for each array by calling
  // gl.createBuffer, gl.bindBuffer, gl.bufferData
  const bufferInfo = webglUtils.createBufferInfoFromArrays(gl, data);
  return {
-    material: {
-      u_diffuse: [1, 1, 1, 1],
-    },
+    material: materials[material],
    bufferInfo,
  };
});
When we render our helper lets us pass more than one set of uniform values.
function render(time) {

  ...

  for (const {bufferInfo, material} of parts) {
    // calls gl.bindBuffer, gl.enableVertexAttribArray, gl.vertexAttribPointer
    webglUtils.setBuffersAndAttributes(gl, meshProgramInfo, bufferInfo);
    // calls gl.uniform
    webglUtils.setUniforms(meshProgramInfo, {
      u_world,
-      u_diffuse: material.u_diffuse,
-    });
+    }, material);
    // calls gl.drawArrays or gl.drawElements
    webglUtils.drawBufferInfo(gl, bufferInfo);
  }

  requestAnimationFrame(render);
}
Then we need to change the shaders. Because the materials have specular settings we'll add in the specular calculation from the article on point lighting except with one difference, we'll compute specular lighting from a directional light instead of a point light.
ambient and emissive might need an explanation. ambient is the color
of the material from light with no direction. We can multiply that by an
u_ambientLight color and set that light color to something more than black
if we want to see it. This tends to wash thing out.
emissive is the color the of the material separate from all lights so
we just add it on. emissive might be used if you have an area that glows.
Here's the new shader.
const vs = `
attribute vec4 a_position;
attribute vec3 a_normal;
attribute vec4 a_color;

uniform mat4 u_projection;
uniform mat4 u_view;
uniform mat4 u_world;
+uniform vec3 u_viewWorldPosition;

varying vec3 v_normal;
+varying vec3 v_surfaceToView;
varying vec4 v_color;

void main() {
-  gl_Position = u_projection * u_view * a_position;
+  vec4 worldPosition = u_world * a_position;
+  gl_Position = u_projection * u_view * worldPosition;
+  v_surfaceToView = u_viewWorldPosition - worldPosition.xyz;
  v_normal = mat3(u_world) * a_normal;
  v_color = a_color;
}
`;

const fs = `
precision highp float;

varying vec3 v_normal;
+varying vec3 v_surfaceToView;
varying vec4 v_color;

-uniform vec4 u_diffuse;
+uniform vec3 diffuse;
+uniform vec3 ambient;
+uniform vec3 emissive;
+uniform vec3 specular;
+uniform float shininess;
+uniform float opacity;
uniform vec3 u_lightDirection;
+uniform vec3 u_ambientLight;

void main () {
  vec3 normal = normalize(v_normal);

+  vec3 surfaceToViewDirection = normalize(v_surfaceToView);
+  vec3 halfVector = normalize(u_lightDirection + surfaceToViewDirection);

  float fakeLight = dot(u_lightDirection, normal) * .5 + .5;
+  float specularLight = clamp(dot(normal, halfVector), 0.0, 1.0);

-  vec4 diffuse = u_diffuse * v_color;
+  vec3 effectiveDiffuse = diffuse * v_color.rgb;
+  float effectiveOpacity = opacity * v_color.a;

-  gl_FragColor = vec4(diffuse.rgb * fakeLight, diffuse.a);
+  gl_FragColor = vec4(
+      emissive +
+      ambient * u_ambientLight +
+      effectiveDiffuse * fakeLight +
+      specular * pow(specularLight, shininess),
+      effectiveOpacity);
}
`;
And with that we get something that looks pretty similar to the image above
Let's try to load an .OBJ file that has a .MTL that references textures
I found this CC-BY-NC 3.0 windmill 3D model by ahedov.
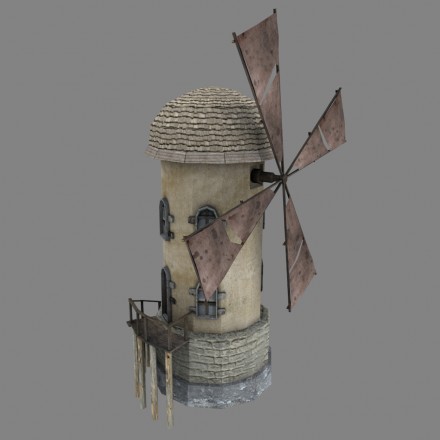
Its .MTL file looks like this
# Blender MTL File: 'windmill_001.blend'
# Material Count: 2

newmtl Material
Ns 0.000000
Ka 1.000000 1.000000 1.000000
Kd 0.800000 0.800000 0.800000
Ks 0.000000 0.000000 0.000000
Ke 0.000000 0.000000 0.000000
Ni 1.000000
d 1.000000
illum 1
map_Kd windmill_001_lopatky_COL.jpg
map_Bump windmill_001_lopatky_NOR.jpg

newmtl windmill
Ns 0.000000
Ka 1.000000 1.000000 1.000000
Kd 0.800000 0.800000 0.800000
Ks 0.000000 0.000000 0.000000
Ke 0.000000 0.000000 0.000000
Ni 1.000000
d 1.000000
illum 1
map_Kd windmill_001_base_COL.jpg
map_Bump windmill_001_base_NOR.jpg
map_Ns windmill_001_base_SPEC.jpg
We can see map_Kd, map_Bump, and map_Ns all specify image files.
Let's add them to our .MTL parser
function parseMapArgs(unparsedArgs) {
  // TODO: handle options
  return unparsedArgs;
}

function parseMTL(text) {
  const materials = {};
  let material;

  const keywords = {
    newmtl(parts, unparsedArgs) {
      material = {};
      materials[unparsedArgs] = material;
    },
    Ns(parts)       { material.shininess      = parseFloat(parts[0]); },
    Ka(parts)       { material.ambient        = parts.map(parseFloat); },
    Kd(parts)       { material.diffuse        = parts.map(parseFloat); },
    Ks(parts)       { material.specular       = parts.map(parseFloat); },
    Ke(parts)       { material.emissive       = parts.map(parseFloat); },
+    map_Kd(parts, unparsedArgs)   { material.diffuseMap = parseMapArgs(unparsedArgs); },
+    map_Ns(parts, unparsedArgs)   { material.specularMap = parseMapArgs(unparsedArgs); },
+    map_Bump(parts, unparsedArgs) { material.normalMap = parseMapArgs(unparsedArgs); },
    Ni(parts)       { material.opticalDensity = parseFloat(parts[0]); },
    d(parts)        { material.opacity        = parseFloat(parts[0]); },
    illum(parts)    { material.illum          = parseInt(parts[0]); },
  };

  ...
Note: I made parseMapArgs because according to the spec there are a bunch of extra options we don't see in this file. We'd need some major refactoring to use them but for now I to hopefully handle filenames with space and no options.
To load all these textures we'll use the code from the article on textures slightly modified.
function create1PixelTexture(gl, pixel) {
  const texture = gl.createTexture();
  gl.bindTexture(gl.TEXTURE_2D, texture);
  gl.texImage2D(gl.TEXTURE_2D, 0, gl.RGBA, 1, 1, 0, gl.RGBA, gl.UNSIGNED_BYTE,
                new Uint8Array(pixel));
  return texture;
}

function createTexture(gl, url) {
  const texture = create1PixelTexture(gl, [128, 192, 255, 255]);
  // Asynchronously load an image
  const image = new Image();
  image.src = url;
  image.addEventListener('load', function() {
    // Now that the image has loaded make copy it to the texture.
    gl.bindTexture(gl.TEXTURE_2D, texture);
    gl.pixelStorei(gl.UNPACK_FLIP_Y_WEBGL, true);
    gl.texImage2D(gl.TEXTURE_2D, 0, gl.RGBA, gl.RGBA,gl.UNSIGNED_BYTE, image);

    // Check if the image is a power of 2 in both dimensions.
    if (isPowerOf2(image.width) && isPowerOf2(image.height)) {
       // Yes, it's a power of 2. Generate mips.
       gl.generateMipmap(gl.TEXTURE_2D);
    } else {
       // No, it's not a power of 2. Turn of mips and set wrapping to clamp to edge
       gl.texParameteri(gl.TEXTURE_2D, gl.TEXTURE_WRAP_S, gl.CLAMP_TO_EDGE);
       gl.texParameteri(gl.TEXTURE_2D, gl.TEXTURE_WRAP_T, gl.CLAMP_TO_EDGE);
       gl.texParameteri(gl.TEXTURE_2D, gl.TEXTURE_MIN_FILTER, gl.LINEAR);
    }
  });
  return texture;
}
Two materials might reference the same image so let's keep all the textures in an object by filename so we don't load any twice.
const textures = {};

// load texture for materials
for (const material of Object.values(materials)) {
  Object.entries(material)
    .filter(([key]) => key.endsWith('Map'))
    .forEach(([key, filename]) => {
      let texture = textures[filename];
      if (!texture) {
        const textureHref = new URL(filename, baseHref).href;
        texture = createTexture(gl, textureHref);
        textures[filename] = texture;
      }
      material[key] = texture;
    });
}
The code above goes through each property of each material. If the property ends
in "Map" it creates a relative URL, creates a texture and assigns it back to
the material. We will asynchronously load the image into the texture.
We'll also put in a single white pixel texture we can use for any material that doesn't reference a texture. This way we can use the same shader. Otherwise we'd need different shaders, one for materials with a texture and a different one for materials without.
-const textures = {};
+const textures = {
+  defaultWhite: create1PixelTexture(gl, [255, 255, 255, 255]),
+};
Let's also assign defaults for any material parameters that are missing.
+const defaultMaterial = {
+  diffuse: [1, 1, 1],
+  diffuseMap: textures.defaultWhite,
+  ambient: [0, 0, 0],
+  specular: [1, 1, 1],
+  shininess: 400,
+  opacity: 1,
+};

const parts = obj.geometries.map(({material, data}) => {

  ...

  // create a buffer for each array by calling
  // gl.createBuffer, gl.bindBuffer, gl.bufferData
  const bufferInfo = webglUtils.createBufferInfoFromArrays(gl, data);
  return {
-    material: materials[material],
+    material: {
+      ...defaultMaterial,
+      ...materials[material],
+    },
    bufferInfo,
  };
});
To use the textures we need to change the shader. Let's use them one at a time. We'll first use the diffuse map.
const vs = `
attribute vec4 a_position;
attribute vec3 a_normal;
+attribute vec2 a_texcoord;
attribute vec4 a_color;

uniform mat4 u_projection;
uniform mat4 u_view;
uniform mat4 u_world;
uniform vec3 u_viewWorldPosition;

varying vec3 v_normal;
varying vec3 v_surfaceToView;
+varying vec2 v_texcoord;
varying vec4 v_color;

void main() {
  vec4 worldPosition = u_world * a_position;
  gl_Position = u_projection * u_view * worldPosition;
  v_surfaceToView = u_viewWorldPosition - worldPosition.xyz;
  v_normal = mat3(u_world) * a_normal;
+  v_texcoord = a_texcoord;
  v_color = a_color;
}
`;

const fs = `#version 300 es
precision highp float;

varying vec3 v_normal;
varying vec3 v_surfaceToView;
+varying vec2 v_texcoord;
varying vec4 v_color;

uniform vec3 diffuse;
+uniform sampler2D diffuseMap;
uniform vec3 ambient;
uniform vec3 emissive;
uniform vec3 specular;
uniform float shininess;
uniform float opacity;
uniform vec3 u_lightDirection;
uniform vec3 u_ambientLight;

void main () {
  vec3 normal = normalize(v_normal);

  vec3 surfaceToViewDirection = normalize(v_surfaceToView);
  vec3 halfVector = normalize(u_lightDirection + surfaceToViewDirection);

  float fakeLight = dot(u_lightDirection, normal) * .5 + .5;
  float specularLight = clamp(dot(normal, halfVector), 0.0, 1.0);

-  vec3 effectiveDiffuse = diffuse.rgb * v_color.rgb;
-  float effectiveOpacity = v_color.a * opacity;
+  vec4 diffuseMapColor = texture2D(diffuseMap, v_texcoord);
+  vec3 effectiveDiffuse = diffuse * diffuseMapColor.rgb * v_color.rgb;
+  float effectiveOpacity = opacity * diffuseMapColor.a * v_color.a;

  gl_FragColor = vec4(
      emissive +
      ambient * u_ambientLight +
      effectiveDiffuse * fakeLight +
      specular * pow(specularLight, shininess),
      effectiveOpacity);
}
`;
And we get textures!
Looking back in the .MTL file we can see a map_Ks which is basically
a black and white texture that specifies how shiny a particular surface
is or another way to think of it is how much of the specular reflection is used.
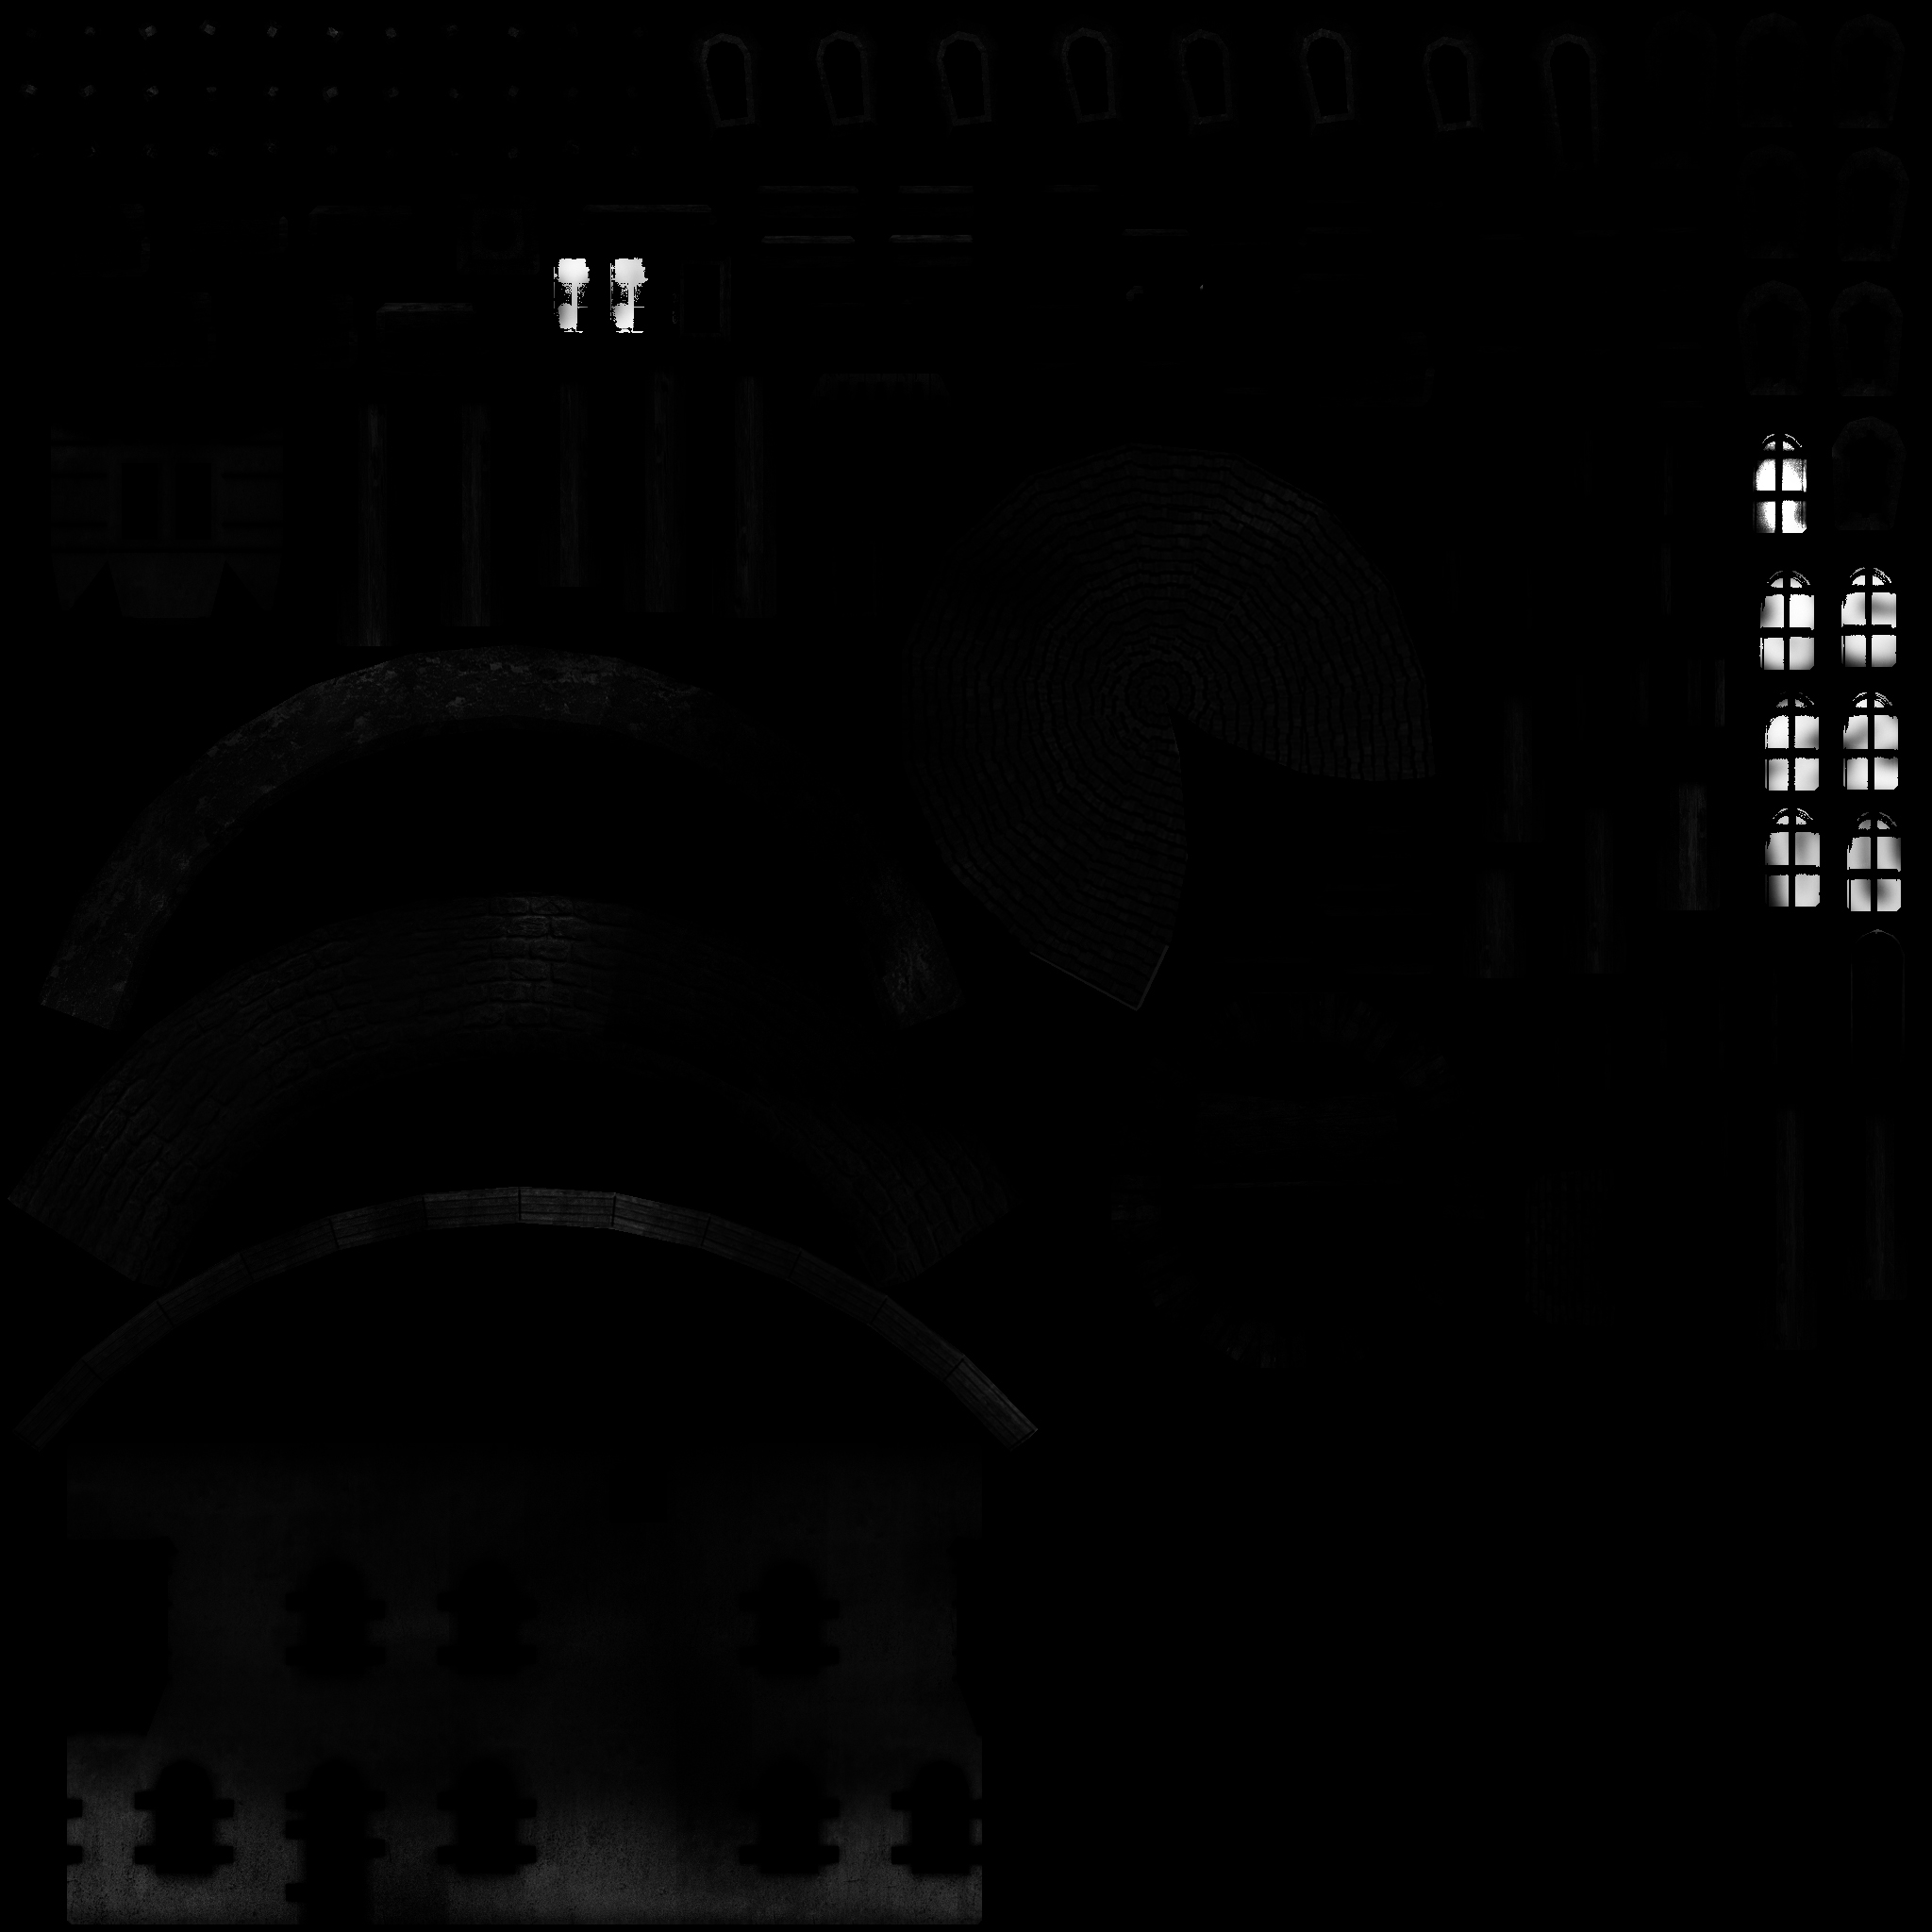
To use it we just need to update the shader since we're already loading all the textures.
const fs = `
precision highp float;

varying vec3 v_normal;
varying vec3 v_surfaceToView;
varying vec2 v_texcoord;
varying vec4 v_color;

uniform vec3 diffuse;
uniform sampler2D diffuseMap;
uniform vec3 ambient;
uniform vec3 emissive;
uniform vec3 specular;
+uniform sampler2D specularMap;
uniform float shininess;
uniform float opacity;
uniform vec3 u_lightDirection;
uniform vec3 u_ambientLight;

void main () {
  vec3 normal = normalize(v_normal);

  vec3 surfaceToViewDirection = normalize(v_surfaceToView);
  vec3 halfVector = normalize(u_lightDirection + surfaceToViewDirection);

  float fakeLight = dot(u_lightDirection, normal) * .5 + .5;
  float specularLight = clamp(dot(normal, halfVector), 0.0, 1.0);
+  vec4 specularMapColor = texture2D(specularMap, v_texcoord);
+  vec3 effectiveSpecular = specular * specularMapColor.rgb;

  vec4 diffuseMapColor = texture2D(diffuseMap, v_texcoord);
  vec3 effectiveDiffuse = diffuse * diffuseMapColor.rgb * v_color.rgb;
  float effectiveOpacity = opacity * diffuseMapColor.a * v_color.a;

  gl_FragColor = vec4(
      emissive +
      ambient * u_ambientLight +
      effectiveDiffuse * fakeLight +
-      specular * pow(specularLight, shininess),
+      effectiveSpecular * pow(specularLight, shininess),
      effectiveOpacity);
}
`;
We should also add a default for any material that doesn't have a specular map
const defaultMaterial = {
  diffuse: [1, 1, 1],
  diffuseMap: textures.defaultWhite,
  ambient: [0, 0, 0],
  specular: [1, 1, 1],
+  specularMap: textures.defaultWhite,
  shininess: 400,
  opacity: 1,
};
It would be hard to see what this does with the material settings as they are in the .MTL file so let's hack the specular settings so they're more pleasing.
// hack the materials so we can see the specular map
Object.values(materials).forEach(m => {
  m.shininess = 25;
  m.specular = [3, 2, 1];
});
And with that we can see only the windows and blades are set to show specular highlights.
I'm actually surprised the blades are set to reflect. If you look back up at the
.MTL file you'll see shininess Ns is set to 0.0 which means the specular highlights
would be extremely blown out. But, also illum is specified as 1 for both materials.
According to the docs illum 1 means
color = KaIa + Kd { SUM j=1..ls, (N * Lj)Ij }
Which translated into something more readable is
color = ambientColor * lightAmbient + diffuseColor * sumOfLightCalculations
As you can see there nothing about using specular whatsoever and yet the file has a specular map! ¯_(ツ)_/¯. Specular highlights require illum 2 or higher. This is my experience with .OBJ/.MTL files, that there is always some manual tweaking required for the materials. How you fix it is up to you. You can edit the .MTL file or you can add code. For now we'll go the "add code" direction.
The last map this .MTL file uses is a map_Bump bump map.
This is another place where the .OBJ/.MTL files show there age.
The file referenced is clearly a normal map, not a bump map.
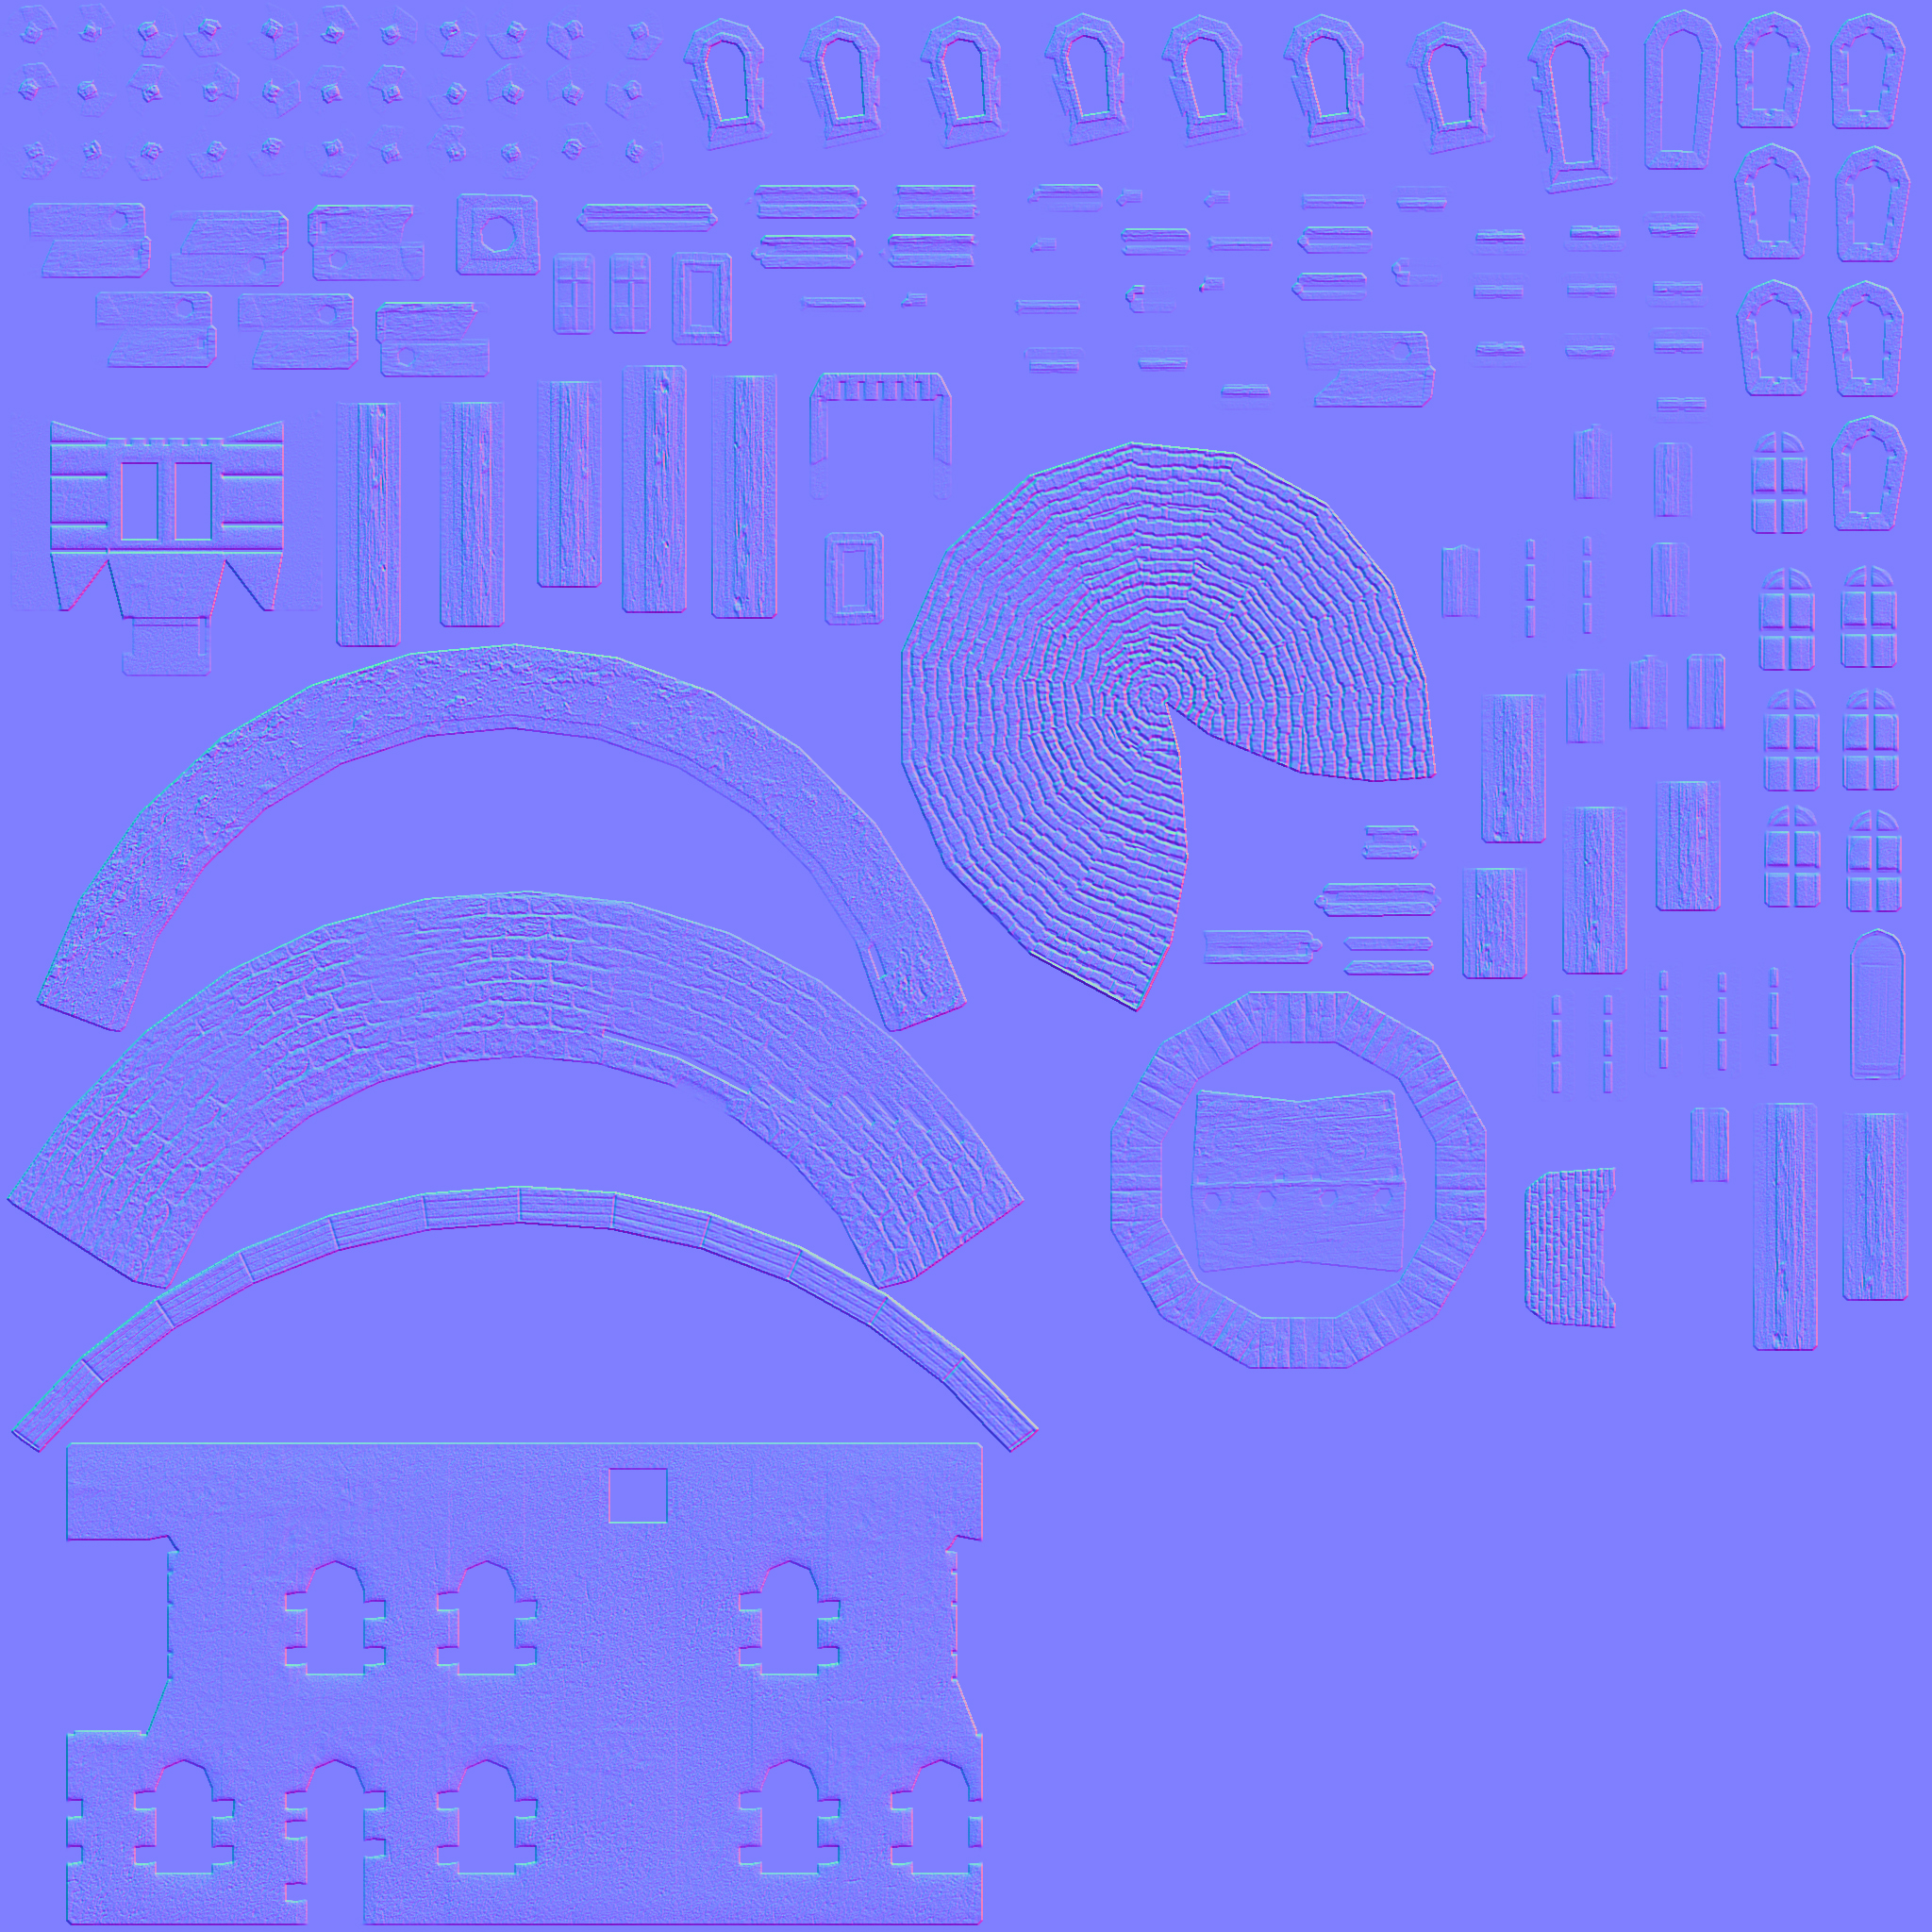
There is no option in the .MTL file to specify normal maps or that bump maps
should be used as normal maps. We could use some heuristic like maybe if the
filename has 'nor' in it? Or, maybe we could just assume all files referenced by
map_Bump are normal maps in 2020 and beyond since I'm not sure I've seen an
.OBJ file with an actual bump map in over a decade. Let's go that route for now.
We'll grab the code for generating tangents from the article on normal mapping.
const parts = obj.geometries.map(({material, data}) => {
  ...

+  // generate tangents if we have the data to do so.
+  if (data.texcoord && data.normal) {
+    data.tangent = generateTangents(data.position, data.texcoord);
+  } else {
+    // There are no tangents
+    data.tangent = { value: [1, 0, 0] };
+  }

  // create a buffer for each array by calling
  // gl.createBuffer, gl.bindBuffer, gl.bufferData

  const bufferInfo = twgl.createBufferInfoFromArrays(gl, data);
  const vao = twgl.createVAOFromBufferInfo(gl, meshProgramInfo, bufferInfo);
  return {
    material: {
      ...defaultMaterial,
      ...materials[material],
    },
    bufferInfo,
    vao,
  };
});
We also need to add a default normal map for materials that don't have one
const textures = {
  defaultWhite: create1PixelTexture(gl, [255, 255, 255, 255]),
+  defaultNormal: create1PixelTexture(gl, [127, 127, 255, 0]),
};

...

const defaultMaterial = {
  diffuse: [1, 1, 1],
  diffuseMap: textures.defaultWhite,
+  normalMap: textures.defaultNormal,
  ambient: [0, 0, 0],
  specular: [1, 1, 1],
  specularMap: textures.defaultWhite,
  shininess: 400,
  opacity: 1,
};
...
And then we need to incorporate the shader changes from the article on normal mapping.
const vs = `
attribute vec4 a_position;
attribute vec3 a_normal;
+attribute vec3 a_tangent;
attribute vec2 a_texcoord;
attribute vec4 a_color;

uniform mat4 u_projection;
uniform mat4 u_view;
uniform mat4 u_world;
uniform vec3 u_viewWorldPosition;

varying vec3 v_normal;
+varying vec3 v_tangent;
varying vec3 v_surfaceToView;
varying vec2 v_texcoord;
varying vec4 v_color;

void main() {
  vec4 worldPosition = u_world * a_position;
  gl_Position = u_projection * u_view * worldPosition;
  v_surfaceToView = u_viewWorldPosition - worldPosition.xyz;

-  v_normal = mat3(u_world) * a_normal;
+  mat3 normalMat = mat3(u_world);
+  v_normal = normalize(normalMat * a_normal);
+  v_tangent = normalize(normalMat * a_tangent);

  v_texcoord = a_texcoord;
  v_color = a_color;
}
`;

const fs = `
precision highp float;

varying vec3 v_normal;
+varying vec3 v_tangent;
varying vec3 v_surfaceToView;
varying vec2 v_texcoord;
varying vec4 v_color;

uniform vec3 diffuse;
uniform sampler2D diffuseMap;
uniform vec3 ambient;
uniform vec3 emissive;
uniform vec3 specular;
uniform sampler2D specularMap;
uniform float shininess;
uniform sampler2D normalMap;
uniform float opacity;
uniform vec3 u_lightDirection;
uniform vec3 u_ambientLight;

void main () {
  vec3 normal = normalize(v_normal);
+  vec3 tangent = normalize(v_tangent);
+  vec3 bitangent = normalize(cross(normal, tangent));
+
+  mat3 tbn = mat3(tangent, bitangent, normal);
+  normal = texture2D(normalMap, v_texcoord).rgb * 2. - 1.;
+  normal = normalize(tbn * normal);

  vec3 surfaceToViewDirection = normalize(v_surfaceToView);
  vec3 halfVector = normalize(u_lightDirection + surfaceToViewDirection);

  float fakeLight = dot(u_lightDirection, normal) * .5 + .5;
  float specularLight = clamp(dot(normal, halfVector), 0.0, 1.0);
  vec4 specularMapColor = texture2D(specularMap, v_texcoord);
  vec3 effectiveSpecular = specular * specularMapColor.rgb;

  vec4 diffuseMapColor = texture2D(diffuseMap, v_texcoord);
  vec3 effectiveDiffuse = diffuse * diffuseMapColor.rgb * v_color.rgb;
  float effectiveOpacity = opacity * diffuseMapColor.a * v_color.a;

  gl_FragColor = vec4(
      emissive +
      ambient * u_ambientLight +
      effectiveDiffuse * fakeLight +
      effectiveSpecular * pow(specularLight, shininess),
      effectiveOpacity);// * 0.0 + vec4(normal * 0.5 + 0.5 + effectiveSpecular * pow(specularLight, shininess), 1);
}
`;
And we that we get normal maps. Note: I moved the camera closer so they are easier to see.
I'm sure there are way more features of the .MTL file we could try to support.
For example the refl keyword specifies reflection maps which is another word
for environment map. They also show the various
map_ keywords take a bunch of optional arguments. A few are:
-clamp on | off specifies whether the texture repeats-mm base gain specifies an offset and multiplier for texture values-o u v w specifies an offset for texture coordinates. You'd apply those using a texture matrix similar to what we did in the article on drawImage-s u v w specifies a scale for texture coordinates. As above you'd put those in a texture matrixI have no idea how many .MTL files are out there that use those settings or how
far to take it. For example if we add support for -o and -s do we want
to add that support for every texture under the assumption they might be different
for the diffuseMap vs the normalMap vs the specularMap etc..? That then requires
that we pass in a separate texture matrix for each texture which would then
require either passing a different set of texture coordinates per texture from
the vertex shader to the fragment shader or else doing the texture matrix
multiplication in the fragment shader instead of the traditional way of doing it
in the vertex shader.
A bigger point to take home is that adding support for every feature makes
the shaders bigger and more complicated. Above we have a form of uber shader,
a shader that tries to handle all cases. To make it work we passed in various
defaults. For example we set the diffuseMap to a white texture so if we
load something without textures it will still display. The diffuse color will
be multiplied by white which is 1.0 so we'll just get the diffuse color.
Similarly we passed in a white default vertex color in case there are no
vertex colors.
This is a common way to get things working and if it works fast enough for your
needs then there is no reason to change it. But, it's more common to generate
shaders that turn these features on/off. If there are no vertex colors then
generate a shader, as in manipulate the shader strings, so they don't have an
a_color attribute nor all the related code. Similarly if a material doesn't
have a diffuse map then generate a shader that doesn't have a uniform sampler2D
diffuseMap and removes all related code. If it doesn't have any maps then we
don't need texture coordinates so we'd leave those out as well.
When you add up all the combinations there can be 1000s of shader variations. With just what we have above there is
Just those represent 64 combinations. If we add in say 1 to 4 lights, and those lights can be spot, or point, or, directional we end up with 8192 possible shader feature combinations.
Managing all of that is a lot of work. This is one reason why many people chose a 3D engine like three.js instead of doing this all themselves. But least hopefully this article gives some idea of the types of things involved in displaying arbitrary 3D content.
The traditional advice is to avoid conditionals in shaders. As an example we could have done something like this
uniform bool hasDiffuseMap;
uniform vec4 diffuse;
uniform sampler2D
diffuseMap
...
vec4 effectiveDiffuse = diffuse;
if (hasDiffuseMap) {
effectiveDiffuse *= texture2D(diffuseMap, texcoord);
}
...
Conditionals like that are generally discouraged because depending on the GPU/driver they are often not very performant.
Either do like we did above and try to make the code have no conditionals. We used a single 1x1 white pixel texture when there is no texture so our math would work without a conditional.
Or, use different shaders. One that doesn't have the feature and one the does and choose the correct one for each situation.
此内容由惯性聚合(RSS阅读器)自动聚合整理,仅供阅读参考。 原文来自 — 版权归原作者所有。