


An important realization in WebGL is that textures are not just things applied directly to triangles as we covered in the article on textures. Textures are arrays of random access data, usually 2D arrays of data. So, any solution where we could use a random access array of data is a place we can probably use a texture.
In the article on directional lights we covered how we can use the dot product to compute the angle between 2 vectors. In that one we computed the dot product of the direction of the light to the normal of the surface of our model. This provided the cosine of the angle between the 2 vectors. The cosine is a value from -1 to +1 and we used it as a direct multiplier to our color.
float light = dot(normal, u_reverseLightDirection);

gl_FragColor = u_color;
gl_FragColor.rgb *= light;
This darkens the color to more it faces away from the light.
What if instead of using that dot product directly we used it to look up a value from a 1 dimensional texture?
precision mediump float;

// Passed in from the vertex shader.
varying vec3 v_normal;

uniform vec3 u_reverseLightDirection;
uniform vec4 u_color;
+uniform sampler2D u_ramp;

void main() {
  // because v_normal is a varying it's interpolated
  // so it will not be a unit vector. Normalizing it
  // will make it a unit vector again
  vec3 normal = normalize(v_normal);

-  float light = dot(normal, u_reverseLightDirection);
+  float cosAngle = dot(normal, u_reverseLightDirection);
+
+  // convert from -1 <-> 1 to 0 <-> 1
+  float u = cosAngle * 0.5 + 0.5;
+
+  // make a texture coordinate
+  vec2 uv = vec2(u, 0.5);
+
+  // lookup a value from a 1d texture
+  vec4 rampColor = texture2D(u_ramp, uv);
+
  gl_FragColor = u_color;
-  gl_FragColor.rgb *= light;
+  gl_FragColor *= rampColor;
}
We need to make a texture. Let's start with a 2x1 texture. We'll use the LUMINANCE
format which gives us a monochrome texture using only 1 byte per texel.
var tex = gl.createTexture();
gl.bindTexture(gl.TEXTURE_2D, tex);
gl.texImage2D(
    gl.TEXTURE_2D,     // target
    0,                 // mip level
    gl.LUMINANCE,      // internal format
    2,                 // width
    1,                 // height
    0,                 // border
    gl.LUMINANCE,      // format
    gl.UNSIGNED_BYTE,  // type
    new Uint8Array([90, 255]));
gl.texParameteri(gl.TEXTURE_2D, gl.TEXTURE_WRAP_S, gl.CLAMP_TO_EDGE);
gl.texParameteri(gl.TEXTURE_2D, gl.TEXTURE_WRAP_T, gl.CLAMP_TO_EDGE);
gl.texParameteri(gl.TEXTURE_2D, gl.TEXTURE_MIN_FILTER, gl.NEAREST);
gl.texParameteri(gl.TEXTURE_2D, gl.TEXTURE_MAG_FILTER, gl.NEAREST);
The colors of the 2 pixels above are dark gray (90) and white (255). We also set the texture parameters so there will be no filtering.
Modifying the sample for the new texture we need to lookup the u_ramp
uniform
var worldViewProjectionLocation = gl.getUniformLocation(program, "u_worldViewProjection");
var worldInverseTransposeLocation = gl.getUniformLocation(program, "u_worldInverseTranspose");
var colorLocation = gl.getUniformLocation(program, "u_color");
+var rampLocation = gl.getUniformLocation(program, "u_ramp");
var reverseLightDirectionLocation =
    gl.getUniformLocation(program, "u_reverseLightDirection");
and we need to set up the texture when rendering
// bind the texture to active texture unit 0
gl.activeTexture(gl.TEXTURE0 + 0);
gl.bindTexture(gl.TEXTURE_2D, tex);
// tell the shader that u_ramp should use the texture on texture unit 0
gl.uniform1i(rampLocation, 0);
I swapped out the data for a 3D F from the light sample with data
for a low-polygon head. Running it we get this
If you rotate the model you'll see it looks similar to toon shading
In the example above we set the texture filtering to NEAREST which means
we just pick the nearest texel from the texture for our color. There are only
2 texels so if the surface is facing away from the light we get the first color
(dark gray) and if the surface is facing the toward the light we get the second
color (white). That color is multiplied with gl_FragColor just like light used
to be.
Thinking about it if we switch to LINEAR filtering we should get the same
result as before using the texture. Let's try it.
-gl.texParameteri(gl.TEXTURE_2D, gl.TEXTURE_MIN_FILTER, gl.NEAREST);
-gl.texParameteri(gl.TEXTURE_2D, gl.TEXTURE_MAG_FILTER, gl.NEAREST);
+gl.texParameteri(gl.TEXTURE_2D, gl.TEXTURE_MIN_FILTER, gl.LINEAR);
+gl.texParameteri(gl.TEXTURE_2D, gl.TEXTURE_MAG_FILTER, gl.LINEAR);
That looks similar but if we actually compare them side by side...
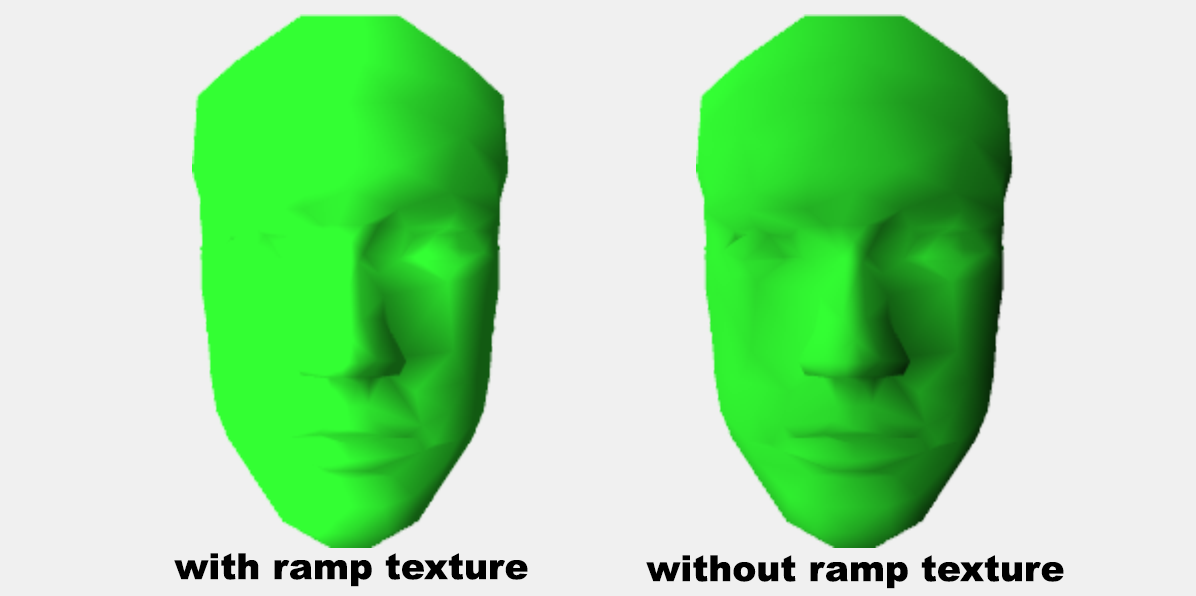
We can see they are not the same. What's up?
LINEAR filtering blends between pixels. If we zoom in on a 2 pixel texture
with linear filtering we'll see the issue
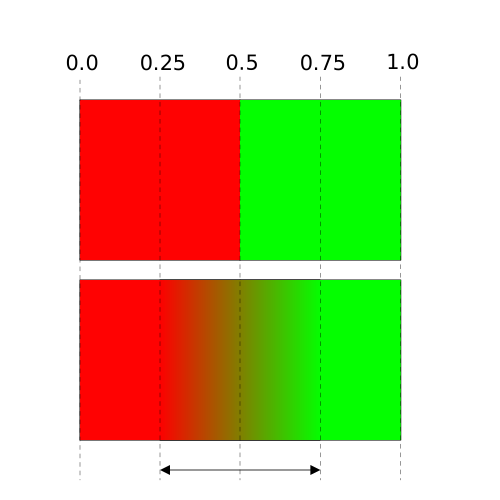
texture coordinate range for ramp
There's a half a pixel on each side with no interpolation. Imagine if the texture had
set TEXTURE_WRAP_S to REPEAT. We'd then expect the left most half of a red pixel to
linearly blend toward green as though the green repeated to the left. But what's on
the left is more red since we are using CLAMP_TO_EDGE.
To really get a ramp we just want to choose values from that center range. We can do that with a little math in our shader
precision mediump float;

// Passed in from the vertex shader.
varying vec3 v_normal;

uniform vec3 u_reverseLightDirection;
uniform vec4 u_color;
uniform sampler2D u_ramp;
+uniform vec2 u_rampSize;

void main() {
  // because v_normal is a varying it's interpolated
  // so it will not be a unit vector. Normalizing it
  // will make it a unit vector again
  vec3 normal = normalize(v_normal);

  float cosAngle = dot(normal, u_reverseLightDirection);

  // convert from -1 <-> 1 to 0 <-> 1
  float u = cosAngle * 0.5 + 0.5;

  // make a texture coordinate.
  vec2 uv = vec2(u, 0.5);

+  // scale to size of ramp
+  vec2 texelRange = uv * (u_rampSize - 1.0);
+
+  // offset by half a texel and convert to texture coordinate
+  vec2 rampUV = (texelRange + 0.5) / u_rampSize;

-  vec4 rampColor = texture2D(u_ramp, uv);
+  vec4 rampColor = texture2D(u_ramp, rampUV);

  gl_FragColor = u_color;
  gl_FragColor *= rampColor;
}
Above we're basically scaling our uv coordinate so it goes from 0 to 1 over 1 less than the width of the texture. Then adding half a pixel and converting back to normalized texture coordinates.
We need to lookup the location of u_rampSize
var colorLocation = gl.getUniformLocation(program, "u_color");
var rampLocation = gl.getUniformLocation(program, "u_ramp");
+var rampSizeLocation = gl.getUniformLocation(program, "u_rampSize");
And we need to set it at render time
// bind the texture to active texture unit 0
gl.activeTexture(gl.TEXTURE0 + 0);
gl.bindTexture(gl.TEXTURE_2D, tex);
// tell the shader that u_ramp should use the texture on texture unit 0
gl.uniform1i(rampLocation, 0);
+gl.uniform2fv(rampSizeLocation, [2, 1]);
Before we run it let's add a flag so we can compare with and without the ramp texture
precision mediump float;

// Passed in from the vertex shader.
varying vec3 v_normal;

uniform vec3 u_reverseLightDirection;
uniform vec4 u_color;
uniform sampler2D u_ramp;
uniform vec2 u_rampSize;
+uniform bool u_useRampTexture;

void main() {
  // because v_normal is a varying it's interpolated
  // so it will not be a unit vector. Normalizing it
  // will make it a unit vector again
  vec3 normal = normalize(v_normal);

  float cosAngle = dot(normal, u_reverseLightDirection);

  // convert from -1 <-> 1 to 0 <-> 1
  float u = cosAngle * 0.5 + 0.5;

  // make a texture coordinate.
  vec2 uv = vec2(u, 0.5);

  // scale to size of ramp
  vec2 texelRange = uv * (u_rampSize - 1.0);

  // offset by half a texel and convert to texture coordinate
  vec2 rampUV = (texelRange + 0.5) / u_rampSize;

  vec4 rampColor = texture2D(u_ramp, rampUV);

+  if (!u_useRampTexture) {
+    rampColor = vec4(u, u, u, 1);
+  }

  gl_FragColor = u_color;
  gl_FragColor *= rampColor;
}
We'll look up the location of that uniform too.
var rampLocation = gl.getUniformLocation(program, "u_ramp");
var rampSizeLocation = gl.getUniformLocation(program, "u_rampSize");
+var useRampTextureLocation = gl.getUniformLocation(program, "u_useRampTexture");
and set it
var data = {
  useRampTexture: true,
};

...

// bind the texture to active texture unit 0
gl.activeTexture(gl.TEXTURE0 + 0);
gl.bindTexture(gl.TEXTURE_2D, tex);
// tell the shader that u_ramp should use the texture on texture unit 0
gl.uniform1i(rampLocation, 0);
gl.uniform2fv(rampSizeLocation, [2, 1]);

+gl.uniform1i(useRampTextureLocation, data.useRampTexture);
And with that we can see the old lighting way and the new ramp texture way match
Clicking the "useRampTexture" checkbox we see no change as the two techniques now match.
note: I don't normally recommend using a conditional like
u_useRampTexturein a shader. Instead I recommend making 2 shader programs, one that uses normal lighting and one that uses the ramp texture. Unfortunately since the code is not using something like out helper library it would fairly large change to support 2 shader programs. Each program needs its own set of locations. Making that big of a change would have distracted from the point of this article so in this case I decided to use a conditional. In general though I try avoid conditionals to select features in shaders and instead create different shaders for different features.
Note: This math is only important if we're using LINEAR filtering. If we're using NEAREST
filtering we want the original math.
Now that we know the ramp math is correct let's make a bunch of different ramp textures.
+// make a 256 array where elements 0 to 127
+// go from 64 to 191 and elements 128 to 255
+// are all 255.
+const smoothSolid = new Array(256).fill(255);
+for (let i = 0; i < 128; ++i) {
+  smoothSolid[i] = 64 + i;
+}
+
+const ramps = [
+  { name: 'dark-white',          color: [0.2, 1, 0.2, 1], format: gl.LUMINANCE, filter: false,
+    data: [80, 255] },
+  { name: 'dark-white-skewed',   color: [0.2, 1, 0.2, 1], format: gl.LUMINANCE, filter: false,
+    data: [80, 80, 80, 255, 255] },
+  { name: 'normal',              color: [0.2, 1, 0.2, 1], format: gl.LUMINANCE, filter: true,
+    data: [0, 255] },
+  { name: '3-step',              color: [0.2, 1, 0.2, 1], format: gl.LUMINANCE, filter: false,
+    data: [80, 160, 255] },
+  { name: '4-step',              color: [0.2, 1, 0.2, 1], format: gl.LUMINANCE, filter: false,
+    data: [80, 140, 200, 255] },
+  { name: '4-step skewed',       color: [0.2, 1, 0.2, 1], format: gl.LUMINANCE, filter: false,
+    data: [80, 80, 80, 80, 140, 200, 255] },
+  { name: 'black-white-black',   color: [0.2, 1, 0.2, 1], format: gl.LUMINANCE, filter: false,
+    data: [80, 255, 80] },
+  { name: 'stripes',             color: [0.2, 1, 0.2, 1], format: gl.LUMINANCE, filter: false,
+    data: [80, 255, 80, 255, 80, 255, 80, 255, 80, 255, 80, 255, 80, 255, 80, 255, 80, 255, 80, 255, 80, 255, 80, 255, 80, 255, 80, 255, 80, 255, 80, 255] },
+  { name: 'stripe',              color: [0.2, 1, 0.2, 1], format: gl.LUMINANCE, filter: false,
+    data: [80, 80, 80, 80, 80, 80, 80, 80, 80, 80, 80, 80, 0, 0, 255, 255, 255, 255, 255, 255, 255, 255, 255, 255, 255, 255, 255, 255] },
+  { name: 'smooth-solid',        color: [0.2, 1, 0.2, 1], format: gl.LUMINANCE, filter: false,
+    data: smoothSolid },
+  { name: 'rgb',                 color: [  1, 1,   1, 1], format: gl.RGB,       filter: true,
+    data: [255, 0, 0, 0, 255, 0, 0, 0, 255] },
+];
+
+var elementsForFormat = {};
+elementsForFormat[gl.LUMINANCE] = 1;
+elementsForFormat[gl.RGB      ] = 3;
+
+ramps.forEach((ramp) => {
+  const {name, format, filter, data} = ramp;
  var tex = gl.createTexture();
  gl.bindTexture(gl.TEXTURE_2D, tex);
+  gl.pixelStorei(gl.UNPACK_ALIGNMENT, 1);
+  const width = data.length / elementsForFormat[format];
  gl.texImage2D(
      gl.TEXTURE_2D,     // target
      0,                 // mip level
*      format,            // internal format
*      width,
      1,                 // height
      0,                 // border
*     format,            // format
      gl.UNSIGNED_BYTE,  // type
*      new Uint8Array(data));
  gl.texParameteri(gl.TEXTURE_2D, gl.TEXTURE_WRAP_S, gl.CLAMP_TO_EDGE);
  gl.texParameteri(gl.TEXTURE_2D, gl.TEXTURE_WRAP_T, gl.CLAMP_TO_EDGE);
*  gl.texParameteri(gl.TEXTURE_2D, gl.TEXTURE_MIN_FILTER, filter ? gl.LINEAR : gl.NEAREST);
*  gl.texParameteri(gl.TEXTURE_2D, gl.TEXTURE_MAG_FILTER, filter ? gl.LINEAR : gl.NEAREST);
+  ramp.texture = tex;
+  ramp.size = [width, 1];
+});
and let's make the shader so we can handle both NEAREST and LINEAR. Like I mentioned
above I don't generally use boolean if statements in shaders but if the difference is
simple and I can do it without an conditional then I'll consider using one shader.
To do that here we can add a float uniform u_linearAdjust that we'll set to 0.0 or 1.0
precision mediump float;

// Passed in from the vertex shader.
varying vec3 v_normal;

uniform vec3 u_reverseLightDirection;
uniform vec4 u_color;
uniform sampler2D u_ramp;
uniform vec2 u_rampSize;
-uniform bool u_useRampTexture;
-uniform float u_linearAdjust;  // 1.0 if linear, 0.0 if nearest

void main() {
  // because v_normal is a varying it's interpolated
  // so it will not be a unit vector. Normalizing it
  // will make it a unit vector again
  vec3 normal = normalize(v_normal);

  float cosAngle = dot(normal, u_reverseLightDirection);

  // convert from -1 <-> 1 to 0 <-> 1
  float u = cosAngle * 0.5 + 0.5;

  // make a texture coordinate.
  vec2 uv = vec2(u, 0.5);

  // scale to size of ramp
-  vec2 texelRange = uv * (u_rampSize - 1.0);
+  vec2 texelRange = uv * (u_rampSize - u_linearAdjust);

-  // offset by half a texel and convert to texture coordinate
-  vec2 rampUV = (texelRange + 0.5) / u_rampSize;
+  // offset by half a texel if linear and convert to texture coordinate
+  vec2 rampUV = (texelRange + 0.5 * u_linearAdjust) / u_rampSize;

  vec4 rampColor = texture2D(u_ramp, rampUV);

-  if (!u_useRampTexture) {
-    rampColor = vec4(u, u, u, 1);
-  }

  gl_FragColor = u_color;
  gl_FragColor *= rampColor;
}
at init time look up the location
var colorLocation = gl.getUniformLocation(program, "u_color");
var rampLocation = gl.getUniformLocation(program, "u_ramp");
var rampSizeLocation = gl.getUniformLocation(program, "u_rampSize");
+var linearAdjustLocation = gl.getUniformLocation(program, "u_linearAdjust");
and at render time pick one of the textures
var data = {
  ramp: 0,
};

...
+const {texture, color, size, filter} = ramps[data.ramp];

// Set the color to use
-gl.uniform4fv(colorLocation, [0.2, 1, 0.2, 1]);
+gl.uniform4fv(colorLocation, color);

// set the light direction.
gl.uniform3fv(reverseLightDirectionLocation, m4.normalize([-1.75, 0.7, 1]));

// bind the texture to active texture unit 0
gl.activeTexture(gl.TEXTURE0 + 0);
-gl.bindTexture(gl.TEXTURE_2D, tex);
+gl.bindTexture(gl.TEXTURE_2D, texture);
// tell the shader that u_ramp should use the texture on texture unit 0
gl.uniform1i(rampLocation, 0);
-gl.uniform2fv(rampSizeLocation, [2, 1]);
+gl.uniform2fv(rampSizeLocation, size);

+// adjust if linear
+gl.uniform1f(linearAdjustLocation, filter ? 1 : 0);
Try the different ramp textures and you'll see lots of strange effects. This is one way make a generic adjusting shader. You could make a shader that does 2 color toon shading by setting 2 colors and a threshold like this.
uniform vec4 color1;
uniform vec4 color2;
uniform float threshold;

...

  float cosAngle = dot(normal, u_reverseLightDirection);

  // convert from -1 <-> 1 to 0 <-> 1
  float u = cosAngle * 0.5 + 0.5;

  gl_FragColor = mix(color1, color2, step(cosAngle, threshold));
And it would work. But, then if you wanted a 3 step or a 4 step version you'd need to write another shader. With a ramp texture you can just provide a different texture. Further, notice above, even if you want a 2 step toon shader you can still adjust where the step happens just by putting more or less data in your texture. For example a texture with
[dark, light]
Gives you a 2 step texture where it splits in the middle between facing toward or away the light. But a texture like
[dark, dark, dark, light, light]
Would give move the split to the 60% mark between facing away and facing toward the light all without having to change the shader.
This specific example of using a ramp texture for toon shading or strange effects may or may not be that useful to you but the more important takeaway is just the basic concept of using some value to look up data in a texture. Using textures like this is not just for converting the light calculation. You could use ramp textures for post processing to achieve the same affect as the gradient map in photoshop
You can also use ramp textures for GPU based animation. You store your key values in the texture and use "time" as your value to move over the texture. There are many uses for this technique.
此内容由惯性聚合(RSS阅读器)自动聚合整理,仅供阅读参考。 原文来自 — 版权归原作者所有。