


This post is a continuation of a series of posts about WebGL. The first started with fundamentals and the previous was about 3D Basics. If you haven't read those please view them first.
In the last post we went over how to do 3D but that 3D didn't have any perspective. It was using what's called an "orthographic" view which has its uses but it's generally not what people want when they say "3D".
Instead we need to add perspective. Just what is perspective? It's basically the feature that things that are further away appear smaller.
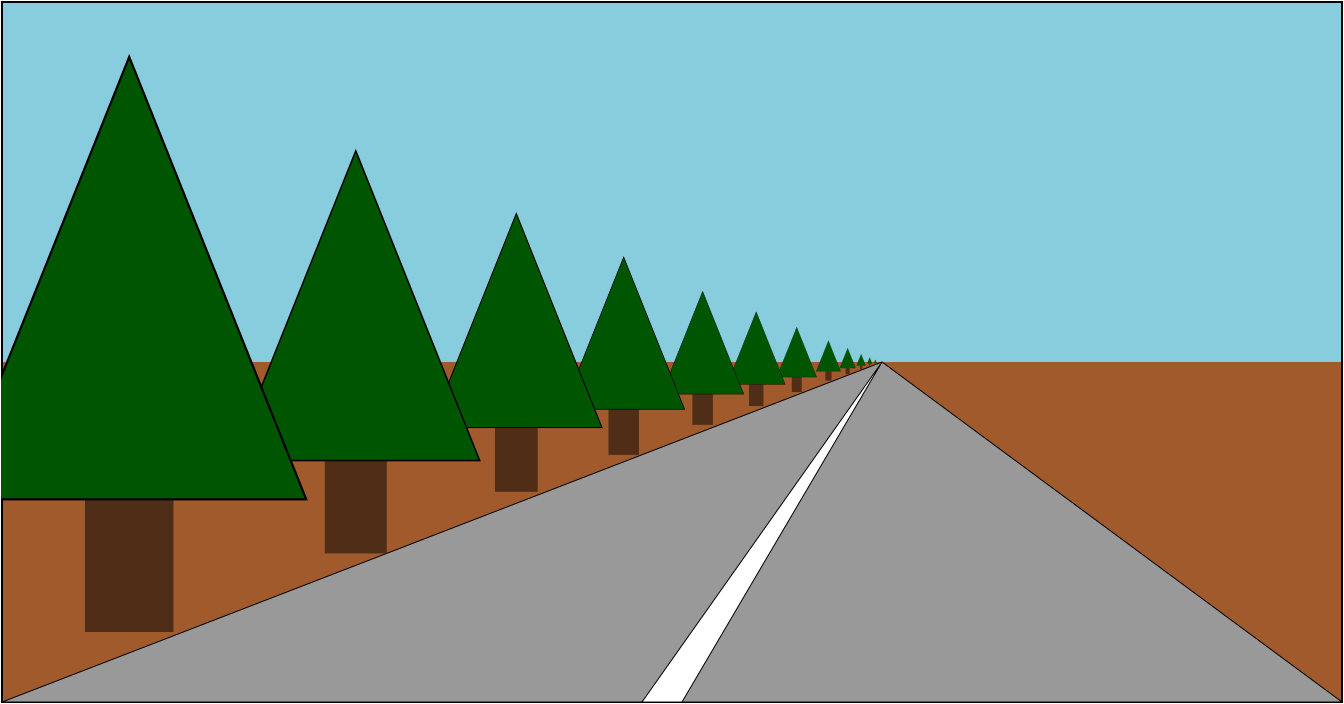
Looking at the example above we see that things further away are drawn smaller. Given our current sample one easy way to make it so that things that are further away appear smaller would be to divide the clip space X and Y by Z.
Think of it this way: If you have a line from (10, 15) to (20,15) it's 10 units long. In our current sample it would be drawn 10 pixels long. But if we divide by Z then for example if Z is 1
10 / 1 = 10
20 / 1 = 20
abs(10-20) = 10
it would be 10 pixels long, If Z is 2 it would be
10 / 2 = 5
20 / 2 = 10
abs(5 - 10) = 5
5 pixels long. At Z = 3 it would be
10 / 3 = 3.333
20 / 3 = 6.666
abs(3.333 - 6.666) = 3.333
You can see that as Z increases, as it gets further away, we'll end up drawing it smaller. If we divide in clip space we might get better results because Z will be a smaller number (-1 to +1). If we add a fudgeFactor to multiply Z before we divide we can adjust how much smaller things get for a given distance.
Let's try it. First let's change the vertex shader to divide by Z after we've multiplied it by our "fudgeFactor".
<script id="vertex-shader-3d" type="x-shader/x-vertex">
...
+uniform float u_fudgeFactor;
...
void main() {
  // Multiply the position by the matrix.
  vec4 position = u_matrix * a_position;

+  // Adjust the z to divide by
+  float zToDivideBy = 1.0 + position.z * u_fudgeFactor;

*  // Divide x and y by z.
*  gl_Position = vec4(position.xy / zToDivideBy, position.zw);
}
</script>
Note, because Z in clip space goes from -1 to +1 I added 1 to get
zToDivideBy to go from 0 to +2 * fudgeFactor
We also need to update the code to let us set the fudgeFactor.
  ...
  var fudgeLocation = gl.getUniformLocation(program, "u_fudgeFactor");

  ...
  var fudgeFactor = 1;
  ...
  function drawScene() {
    ...
    // Set the fudgeFactor
    gl.uniform1f(fudgeLocation, fudgeFactor);

    // Draw the geometry.
    var primitiveType = gl.TRIANGLES;
    var offset = 0;
    var count = 16 * 6;
    gl.drawArrays(primitiveType, offset, count);
And here's the result.
If it's not clear drag the "fudgeFactor" slider from 1.0 to 0.0 to see what things used to look like before we added our divide by Z code.
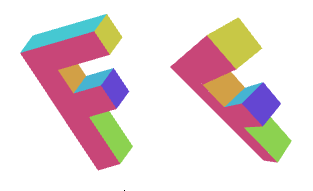
orthographic vs perspective
It turns out WebGL takes the x,y,z,w value we assign to gl_Position in
our vertex shader and divides it by w automatically.
We can prove this very easily by changing the shader and instead of doing
the division ourselves, put zToDivideBy in gl_Position.w.
<script id="vertex-shader-2d" type="x-shader/x-vertex">
...
uniform float u_fudgeFactor;
...
void main() {
  // Multiply the position by the matrix.
  vec4 position = u_matrix * a_position;

  // Adjust the z to divide by
  float zToDivideBy = 1.0 + position.z * u_fudgeFactor;

  // Divide x, y and z by zToDivideBy
*  gl_Position = vec4(position.xyz, zToDivideBy);

  // Pass the color to the fragment shader.
  v_color = a_color;
}
</script>
and see how it's exactly the same.
Why is the fact that WebGL automatically divides by W useful? Because now, using more matrix magic, we can just use yet another matrix to copy z to w.
A Matrix like this
1, 0, 0, 0,
0, 1, 0, 0,
0, 0, 1, 1,
0, 0, 0, 0,
will copy z to w. You can look at each of those columns as
x_out = x_in * 1 +
        y_in * 0 +
        z_in * 0 +
        w_in * 0 ;

y_out = x_in * 0 +
        y_in * 1 +
        z_in * 0 +
        w_in * 0 ;

z_out = x_in * 0 +
        y_in * 0 +
        z_in * 1 +
        w_in * 0 ;

w_out = x_in * 0 +
        y_in * 0 +
        z_in * 1 +
        w_in * 0 ;
which when simplified is
x_out = x_in;
y_out = y_in;
z_out = z_in;
w_out = z_in;
We can add the plus 1 we had before with this matrix since we know w_in is always 1.0.
1, 0, 0, 0,
0, 1, 0, 0,
0, 0, 1, 1,
0, 0, 0, 1,
that will change the W calculation to
w_out = x_in * 0 +
        y_in * 0 +
        z_in * 1 +
        w_in * 1 ;
and since we know w_in = 1.0 then that's really
Finally we can work our fudgeFactor back in if the matrix is this
1, 0, 0, 0,
0, 1, 0, 0,
0, 0, 1, fudgeFactor,
0, 0, 0, 1,
which means
w_out = x_in * 0 +
        y_in * 0 +
        z_in * fudgeFactor +
        w_in * 1 ;
and simplified that's
w_out = z_in * fudgeFactor + 1;
So, let's modify the program again to just use matrices.
First let's put the vertex shader back. It's simple again
<script id="vertex-shader-2d" type="x-shader/x-vertex">
uniform mat4 u_matrix;

void main() {
  // Multiply the position by the matrix.
  gl_Position = u_matrix * a_position;
  ...
}
</script>
Next let's make a function to make our Z → W matrix.
function makeZToWMatrix(fudgeFactor) {
  return [
    1, 0, 0, 0,
    0, 1, 0, 0,
    0, 0, 1, fudgeFactor,
    0, 0, 0, 1,
  ];
}
and we'll change the code to use it.
    ...
    // Compute the matrices
*    var matrix = makeZToWMatrix(fudgeFactor);
*    matrix = m4.multiply(matrix, m4.projection(gl.canvas.clientWidth, gl.canvas.clientHeight, 400));
    matrix = m4.translate(matrix, translation[0], translation[1], translation[2]);
    matrix = m4.xRotate(matrix, rotation[0]);
    matrix = m4.yRotate(matrix, rotation[1]);
    matrix = m4.zRotate(matrix, rotation[2]);
    matrix = m4.scale(matrix, scale[0], scale[1], scale[2]);

    ...
and note, again, it's exactly the same.
All that was basically just to show you that dividing by Z gives us perspective and that WebGL conveniently does this divide by Z for us.
But there are still some problems. For example if you set Z to around -100 you'll see something like the animation below
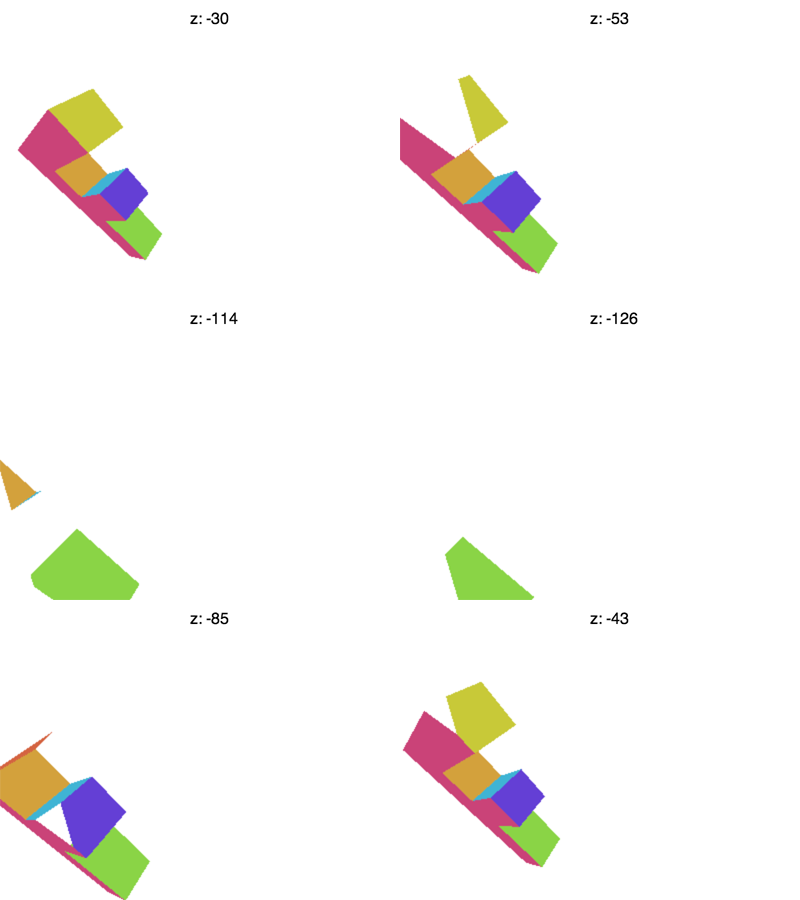
What's going on? Why is the F disappearing early? Just like WebGL clips X and Y or +1 to -1 it also clips Z. What we're seeing here is where Z < -1.
I could go into detail about the math to fix it but you can derive it the same way we did 2D projection. We need to take Z, add some amount and scale some amount and we can make any range we want get remapped to the -1 to +1.
The cool thing is all of these steps can be done in 1 matrix. Even
better, rather than a fudgeFactor we'll decide on a fieldOfView and
compute the right values to make that happen.
Here's a function to build the matrix.
var m4 = {
  perspective: function(fieldOfViewInRadians, aspect, near, far) {
    var f = Math.tan(Math.PI * 0.5 - 0.5 * fieldOfViewInRadians);
    var rangeInv = 1.0 / (near - far);

    return [
      f / aspect, 0, 0, 0,
      0, f, 0, 0,
      0, 0, (near + far) * rangeInv, -1,
      0, 0, near * far * rangeInv * 2, 0
    ];
  },

  ...
This matrix will do all our conversions for us. It will adjust the units
so they are in clip space, it will do the math so that we can choose a
field of view by angle and it will let us choose our Z-clipping space. It
assumes there's an eye or camera at the origin (0, 0, 0) and given a
zNear and a fieldOfView it computes what it would take so that stuff
at zNear ends up at Z = -1 and stuff at zNear that is half of
fieldOfView above or below the center ends up with Y = -1 and Y = 1
respectively. It computes what to use for X by just multiplying by the
aspect passed in. We'd normally set this to the width / height of the
display area. Finally, it figures out how much to scale things in Z so
that stuff at zFar ends up at Z = 1.
Here's a diagram of the matrix in action.
That shape that looks like a 4 sided cone the cubes are spinning in is
called a "frustum". The matrix takes the space inside the frustum and
converts that to clip space. zNear defines where things will get
clipped in the front and zFar defines where things get clipped in the
back. Set zNear to 23 and you'll see the front of the spinning cubes
get clipped. Set zFar to 24 and you'll see the back of the cubes get
clipped.
There's just one problem left. This matrix assumes there's a viewer at 0,0,0 and it assumes it's looking in the negative Z direction and that positive Y is up. Our matrices up to this point have done things in a different way.
To make it appear we need to move it inside the frustum. We can do that by moving our F. We were drawing at (45, 150, 0). Let's move it to (-150, 0, -360) and let's set the rotation to something that makes it appear right side up.
Now, to use it we just need to replace our old call to m4.projection
with a call to m4.perspective
var aspect = gl.canvas.clientWidth / gl.canvas.clientHeight;
var zNear = 1;
var zFar = 2000;
var matrix = m4.perspective(fieldOfViewRadians, aspect, zNear, zFar);
matrix = m4.translate(matrix, translation[0], translation[1], translation[2]);
matrix = m4.xRotate(matrix, rotation[0]);
matrix = m4.yRotate(matrix, rotation[1]);
matrix = m4.zRotate(matrix, rotation[2]);
matrix = m4.scale(matrix, scale[0], scale[1], scale[2]);
And here it is.
We're back to just a matrix multiply and we're getting both a field of view and we're able to choose our Z space. We're not done but this article is getting too long. Next up, cameras.
In the other samples we had the F at (45, 150, 0) but in the last sample it's been moved to (-150, 0, -360). Why did it need to be moved so far away?
The reason is up until this last sample our m4.projection function
has made a projection from pixels to clip space. That means the area we
were displaying represented 400x300 pixels. Using 'pixels' really doesn't
make sense in 3D.
In other words if we tried to draw with the F at 0,0,0 and not rotated we'd get this
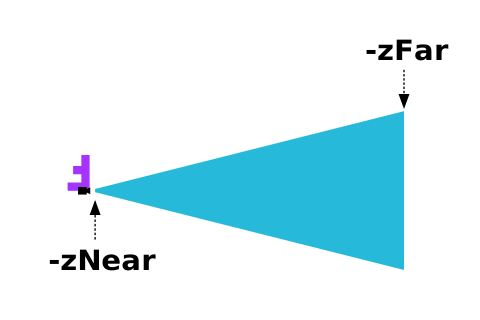
The F has its top left front corner at the origin. The projection looks toward negative Z but our F is built in positive Z. The projection has positive Y up but our F is built with positive Z down.
Our new projection only sees what's in the blue frustum. With -zNear = 1 and with a field of view of 60 degrees
then at Z = -1 the frustum is only 1.154 units tall and 1.154 * aspect units wide. At Z = -2000 (-zFar) its 2309 units tall.
Since our F is 150 units big and the view can only see 1.154
units when something is at -zNear we need to move it pretty far away from the origin to
see all of it.
Moving it -360 units in Z moves in inside the frustum. We also rotated it to be right side up.
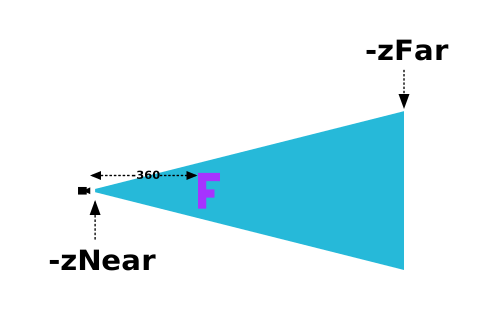
not to scale
此内容由惯性聚合(RSS阅读器)自动聚合整理,仅供阅读参考。 原文来自 — 版权归原作者所有。