


This is a post in the Practical Redux series.
Table of Contents 🔗︎
- Planning the Sample Application
- UI Mockups
- Project Setup and Configuration
- Final Thoughts
- Further Information
Planning The Sample Application 🔗︎
As I mentioned in the series introduction, I've got a number of specific techniques and concepts that I'd like to talk about. I've had several requests to show some actual working examples of these techniques, so I've decided to try to build a small example application to demonstrate these ideas in a meaningful context.
I'm a big fan of the Battletech game universe, a game about big stompy robots with weapons that are used to fight wars a thousand years in the future. The game universe includes miniatures tabletop games, computer games, roleplaying games, fiction, and more.
There's a number of fan-built projects based in the Battletech universe. One of the most popular is Megamek, a cross-platform computer implementation of the Classic Battletech tabletop game. In addition, the Megamek authors have built a tool called MekHQ, a tool for managing an ongoing campaign for a fictional combat organization, such as a mercenary unit.
For this blog series, I'm planning to build a miniature version of the MekHQ application. I definitely do not intend to seriously rebuild all of MekHQ's functionality, but it should serve as a useful inspiration and justification for most of the techniques I want to show off.
On a related note: I'm absolutely making this up as I go along :) I've got some definite ideas for what I want to show off, but I'll be developing this sample app as I work on each post. That means I'll probably make some mistakes, need to change things, and iterate on the code. This will be a learning experience for everyone involved :)
Every project needs a good name. I haven't come up with a good name yet, so we'll call this "Project Mini-Mek" for now. (If anyone comes up with a better name, I'm listening!)
Project Features 🔗︎
MekHQ is a very complex and in-depth application. The "About" page describes it this way:
MekHQ is a Java program that allow users to manage units in-between actual games of MegaMek. It implements most of the rules in the "Maintenance, Repair, and Salvage" section of Strategic Operations, many of the rules and options from the Mercenary Field Manual, and various options that allow users to customize a mercenary, house, or clan campaign to their liking . Some of the features include:
- Track XP and improve pilot skills and abilities
- Integration with MegaMek and MegaMekLab
- Planetary map and the plotting of jumpship travel
- Organize a TO&E
- Create and resolve missions and scenarios
- Repair and salvage units
- Equipment tracking
- Financial tracking
For Project Mini-Mek, we're only going to deal with a couple of these, and at a very simple level. Here's a tentative list of features:
- Load JSON data describing the pilots and Battlemechs in a combat force
- For both pilots and Battlemechs:
- Show a list of all items
- Allow selection of an item in the list, and show details of the selected item
- Edit the details for a pilot
- Organize the pilots and their mechs into "lances" of four mechs, and the "lances" into a "company" of three lances.
- Add and remove pilots and mechs from the force
- Save the force back out to JSON
So, basically Yet Another CRUD APP, with some specific themes :) For now, I'm not planning to deal with a backend or any AJAX handling. I figure I'll start with static JSON being directly imported, and then maybe add file import/export later on.
UI Mockups 🔗︎
MekHQ: Pilot Listing 🔗︎
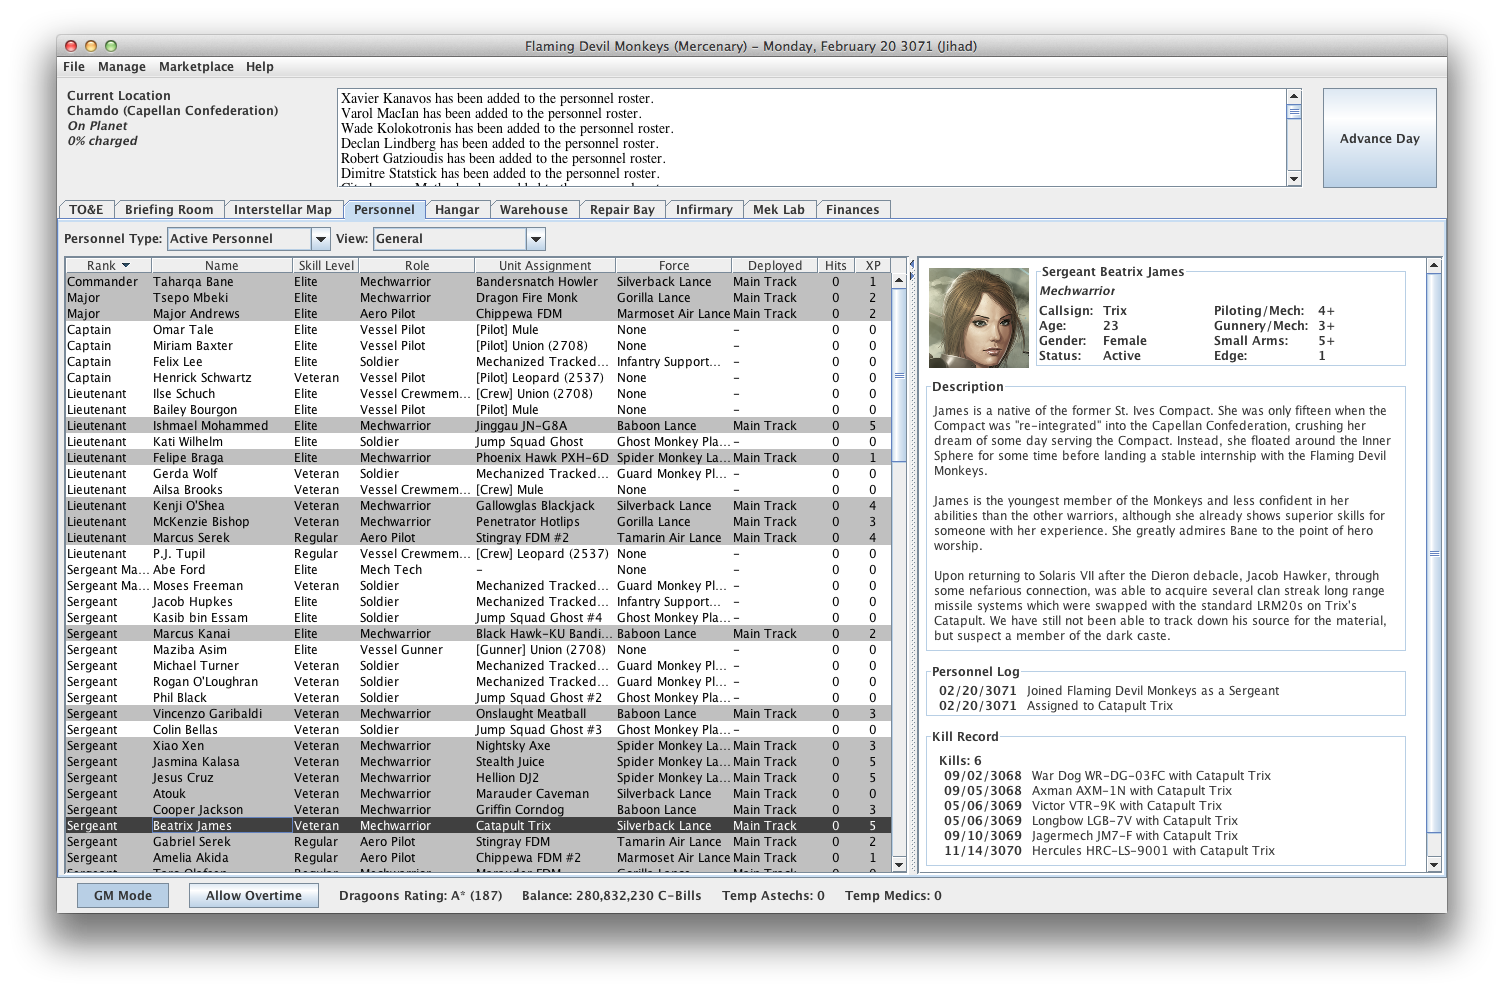
Let's start by looking at some screenshots of the original MekHQ UI. First, here's the screen that shows the list of pilots, and the details for the currently selected pilot:
MekHQ: Unit Table of Organization Tree 🔗︎
Next, the "Unit Table of Organization" section, showing the various sub-units in a tree structure, and again with a details section on the right:
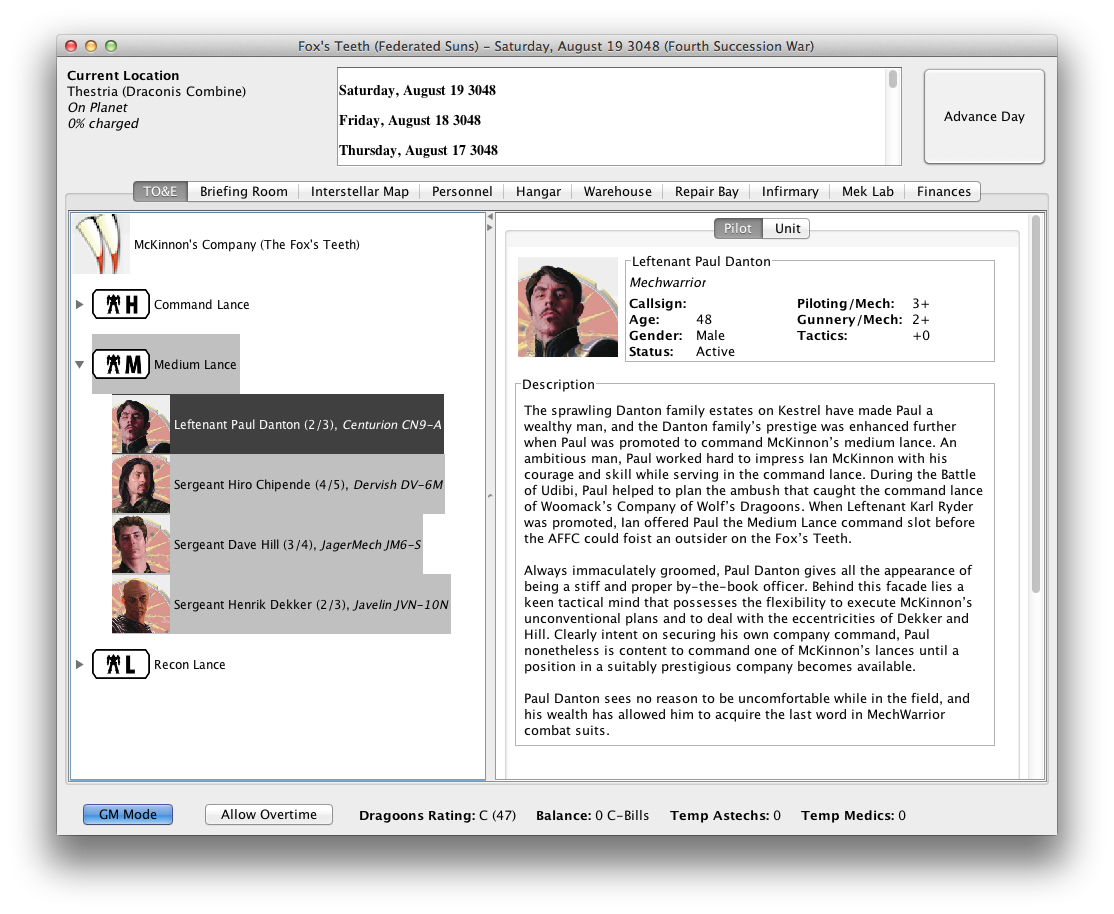
This gives us a general idea of the UI layout we want: a tab bar across the top, with most of the tab panes containing a list of some kind on the left, and a details box for the currently selected item on the right.
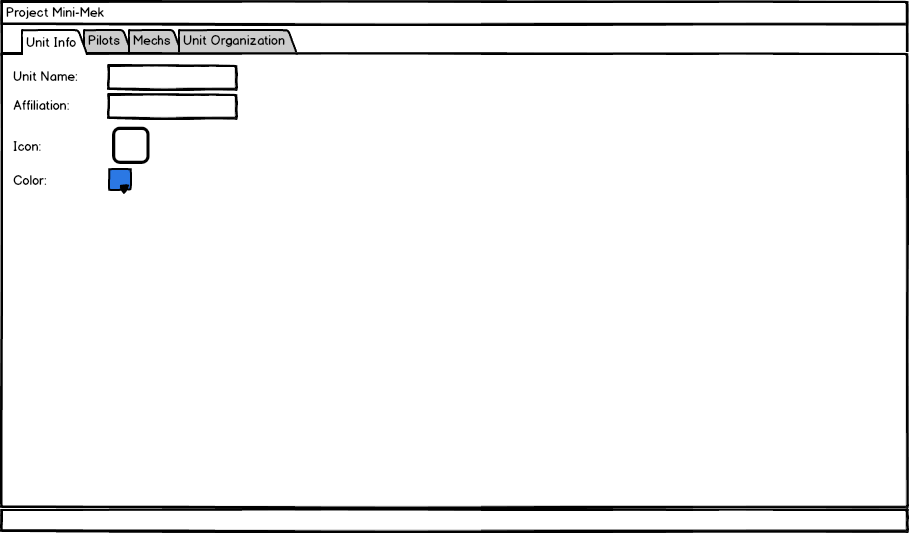
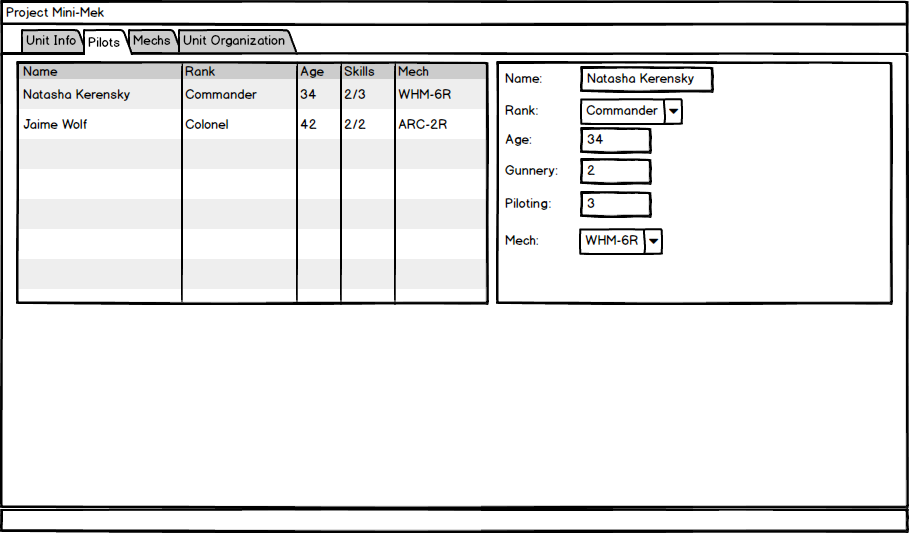
Here's some rough mockups of what our UI might look like:
Project Mini-Mek: Unit Info 🔗︎
Project Mini-Mek: Pilot Listing 🔗︎
Project Mini-Mek: Mech Listing 🔗︎
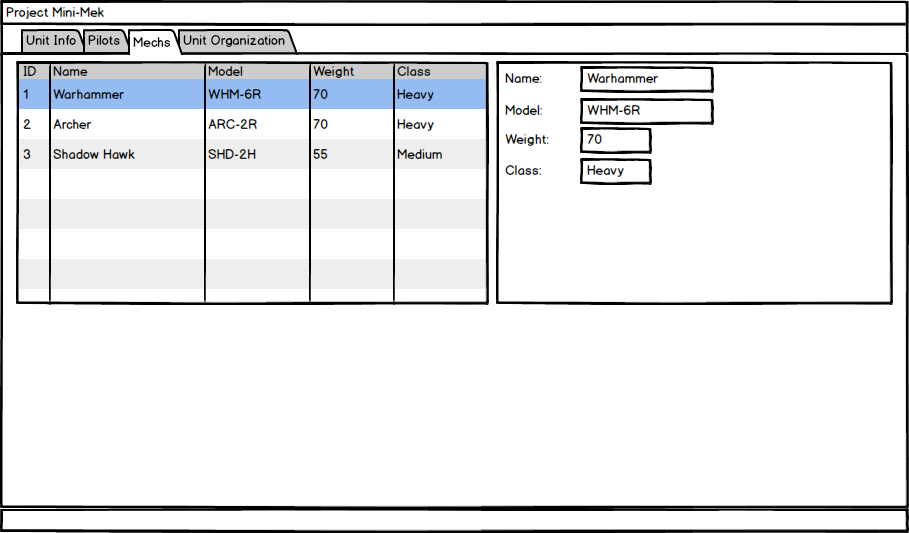
Project Mini-Mek: Unit Table of Organization Tree 🔗︎
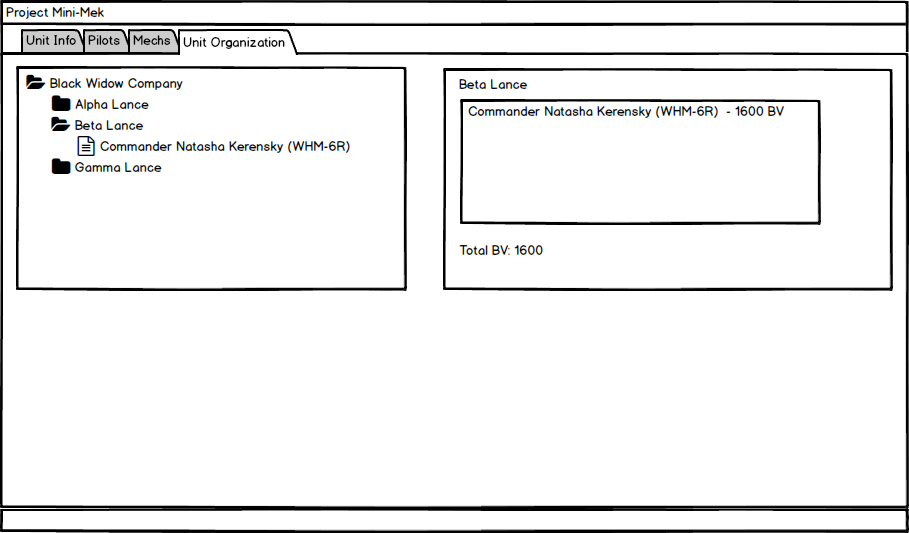
Project Setup and Configuration 🔗︎
We're going to set up the project using the excellent Create-React-App tool. I'm also going to be using the new Yarn package manager, partly because it's supposed to be faster, and partly because this gives me a chance to try it out. Also, as an FYI, I'm writing all this on Windows, but I don't expect any meaningful OS/platform issues to pop up as we go. Finally, I don't necessarily intend to show every last command I've typed or bit of code I've written as we go on - the real focus is intended to be on using Redux itself, not using Git or an editor.
The project is available on Github, at https://github.com/markerikson/project-minimek. I plan on updating it as I publish each post, and hope to show both some of the nitty-gritty "WIP" commits as well as cleaner "final result" commits. Also, when I show code snippets or refer to source files in the repo, I'll usually try to link to that file on Github at the specific version where the changes were made.
All right, let's do this!
Creating the Project 🔗︎
Follow the instructions for installing the create-react-app and yarn tools on your system. Once that's done, we can create our project:
create-react-app project-minimek
This is a good time to initialize a Git repo for the initial sample files and project config files. After the project is created, we want to set up a Yarn lockfile to nail down the specific dependency versions we're using. create-react-app already installed everything it needs (using NPM, although Yarn support is planned), but we need to run yarn to make sure we're ready for adding more dependencies:
cd project-minimek
yarn
There's a bunch more file work done as Yarn figures out what dependencies you have, and prepares its lockfile, yarn.lock. That should be committed to Git as well.
Dependencies 🔗︎
Time to pull in our initial list of dependencies. Here's what we're going to add:
- Redux: because without it, this would be a really short blog series
- React-Redux: ditto
- Redux-Thunk: the most common and simple addon for side effects and complex dispatching logic
- Reselect: needed for memoized "selector" functions when retrieving data from our state
- Redux-ORM: a handy abstraction layer for managing relational data in our state
- Lodash: every useful function you can think of, and a bunch more you didn't even know existed
- cuid: We'll probably be generating IDs at some point, so this will fill that need
We can add them all in at once:
yarn add redux react-redux redux-thunk reselect redux-orm lodash cuid
And then commit our package.json and yarn.lock again.
Initial Redux Configuration 🔗︎
We need to set up the initial Redux store and reducers, make the store available to our component tree, and make sure that it's being used. Here's what my initial Redux configuration looks like:
import {createStore, applyMiddleware, compose} from "redux";

import thunk from "redux-thunk";

import rootReducer from "../reducers/rootReducer";

export default function configureStore(preloadedState) {
    const middlewares = [thunk];
    const middlewareEnhancer = applyMiddleware(...middlewares);

    const storeEnhancers = [middlewareEnhancer];

    const composedEnhancer = compose(...storeEnhancers);

    const store = createStore(
        rootReducer,
        preloadedState,
        composedEnhancer
    );

    return store;
}
I like to keep my store setup logic in a configureStore function that can be further improved as time goes on. I also try to keep the setup for each piece of the configuration process separate, so it's easy to follow what's going on.
const initialState = {
    data : 42
};

export default function testReducer(state = initialState, action) {
    return state;
}
import {combineReducers} from "redux";

import testReducer from "./testReducer";

const rootReducer = combineReducers({
    test : testReducer,
});

export default rootReducer;
Our initial reducers just pass along some test data so we can verify things are working.
We then create a store instance and use it in the rendering process:
import React from 'react';
import ReactDOM from 'react-dom';
import {Provider} from "react-redux";

import App from './App';
import './index.css';

import configureStore from "./store/configureStore";
const store = configureStore();

ReactDOM.render(
    <Provider store={store}>
        <App />
    </Provider>,
    document.getElementById('root')
);
Finally, we add a simple test component, connect it to Redux, and render it in our App component to verify that everything's hooked up properly:
import React, {Component} from "react";
import {connect} from "react-redux";

const mapState = state => ({
    data : state.test.data
});

class SampleComponent extends Component {
    render() {
        const {data} = this.props;

        return (
            <div>
                Data from Redux: {data}
            </div>
        );
    }
}

export default connect(mapState)(SampleComponent);
import React, { Component } from 'react';
import logo from './logo.svg';
import './App.css';

import SampleComponent from "./SampleComponent";

class App extends Component {
    render() {
        return (
            <div className="App">
                <div className="App-header">
                    <img src={logo} className="App-logo" alt="logo"/>
                    <h2>Project Mini-Mek</h2>
                </div>
                <SampleComponent />
            </div>
        );
    }
}

export default App;
We should now see the text "Data from Redux: 42" in our page, right below the header bar.
Adding the Redux DevTools Extension 🔗︎
One of the original reasons for Redux's creation was the goal of "time-travel debugging": the ability to see the list of dispatched actions, view the contents of an action, see what parts of the state were changed after the action was dispatched, view the overall application state after that dispatch, and step back and forth between dispatched actions. Dan Abramov wrote the original Redux DevTools toolset, which showed that information with the UI as a component within the page.
Since then, Mihail Diordiev has built the Redux DevTools Extension, a browser extension that bundles together the core Redux DevTools logic and several community-built data visualizers as a browser extension, and adds a bunch of useful functionality on top of that. Connecting the DevTools Extension to your store requires a few extra checks, so there's now a package available that encapsulates the process needed to hook up the DevTools Extension to your store.
We'll add the helper package with yarn add redux-devtools-extension, then make a couple small changes to the store setup logic:
- import {createStore, applyMiddleware, compose} from "redux";
+ import {createStore, applyMiddleware} from "redux";
+ import { composeWithDevTools } from 'redux-devtools-extension/developmentOnly';


- const composedEnhancer = compose(...storeEnhancers);
+ const composedEnhancer = composeWithDevTools(...storeEnhancers);
This should add the DevTools enhancer to our store, but only when we're in development mode. With that installed, the Redux DevTools browser extension can now view the contents of our store and the history of the dispatched actions.
Component Hot Reloading 🔗︎
Out of the box, create-react-app will watch your files on disk, and whenever you save changes, it will recompile the application and reload the entire page. That's nice, but we can actually set up some improvements on that. In particular, the Webpack build tool used by create-react-app supports a feature known as Hot Module Replacement, or HMR, which can hot-swap the newly compiled versions of files into your already-open application. That lets us see our changes faster. This works great with a React app, and even better in combination with Redux, since we can reload our component tree but still keep the same application state as before.
We'll also want to add the redbox-react package, which we can use to render an error message and a stack trace if something goes wrong. Once that's installed, we need to update index.js to rework the top-level rendering logic:
import React from 'react';
import ReactDOM from 'react-dom';
import {Provider} from "react-redux";

import './index.css';

import configureStore from "./store/configureStore";
const store = configureStore();

// Save a reference to the root element for reuse
const rootEl = document.getElementById("root");

// Create a reusable render method that we can call more than once
let render = () => {
    // Dynamically import our main App component, and render it
    const App = require("./App").default;

    ReactDOM.render(
        <Provider store={store}>
            <App />
        </Provider>,
        rootEl
    );
};

if(module.hot) {
    // Support hot reloading of components
    // and display an overlay for runtime errors
    const renderApp = render;
    const renderError = (error) => {
        const RedBox = require("redbox-react").default;
        ReactDOM.render(
            <RedBox error={error} />,
            rootEl,
        );
    };

    // In development, we wrap the rendering function to catch errors,
    // and if something breaks, log the error and render it to the screen
    render = () => {
        try {
            renderApp();
        }
        catch(error) {
            console.error(error);
            renderError(error);
        }
    };

    // Whenever the App component file or one of its dependencies
    // is changed, re-import the updated component and re-render it
    module.hot.accept("./App", () => {
        setTimeout(render);
    });
}

render();
With this in place, editing one of our components (such as changing the text in SampleComponent.jsx) should now just reload the component tree, rather than reloading the entire page. If there's an error, we should see it displayed on the screen and logged in the console. (To try it out, you can add throw new Error("Oops!") to SampleComponent.render() and see what happens.)
Reducer Hot Reloading 🔗︎
Finally, we can also configure our project to hot-reload our reducers as well. Right now, if we edit the initial state in our testReducer.js from data : 42 to data : 123, we'll see the whole page reload, just like it did for component edits before we added the hot reloading. We need to listen for updates to the root reducer file, re-import it, and then replace the old reducer in the store with the new one. The updated configureStore.js looks like this:
import {createStore, applyMiddleware} from "redux";
import { composeWithDevTools } from 'redux-devtools-extension/developmentOnly';

import thunk from "redux-thunk";

import rootReducer from "../reducers/rootReducer";

export default function configureStore(preloadedState) {
    const middlewares = [thunk];
    const middlewareEnhancer = applyMiddleware(...middlewares);

    const storeEnhancers = [middlewareEnhancer];

    const composedEnhancer = composeWithDevTools(...storeEnhancers);

    const store = createStore(
        rootReducer,
        preloadedState,
        composedEnhancer
    );

    if(process.env.NODE_ENV !== "production") {
        if(module.hot) {
            module.hot.accept("../reducers/rootReducer", () =>{
                const newRootReducer = require("../reducers/rootReducer").default;
                store.replaceReducer(newRootReducer)
            });
        }
    }

    return store;
}
Final Thoughts 🔗︎
At this point, we know what kind of app we want to build, and have a decent idea what it should do and what it should look like (or at least enough of an idea to get us started). We also have an initial project set up with our basic dependencies, and some nice tweaks to the development workflow.
Next time, we'll at setting up some initial UI layout, and possibly tackle some of the initial data modeling as well.
If you've got questions, comments, or suggestions, please let me know! Leave me a comment here, file an issue in the repo, or ping me on Twitter or Reactiflux.
Further Information 🔗︎
- Project Mini-Mek repo
- Create-React-App home
- Time travel debugging:
- Webpack Hot Module Replacement info
This is a post in the Practical Redux series. Other posts in this series:
- Jan 01, 2018 - Practical Redux, Part 11: Nested Data and Trees
- Nov 28, 2017 - Practical Redux course now available on Educative.io!
- Jul 25, 2017 - Practical Redux, Part 10: Managing Modals and Context Menus
- Jul 11, 2017 - Practical Redux, Part 9: Upgrading Redux-ORM and Updating Dependencies
- Jan 26, 2017 - Practical Redux, Part 8: Form Draft Data Management
- Jan 12, 2017 - Practical Redux, Part 7: Form Change Handling, Data Editing, and Feature Reducers
- Jan 10, 2017 - Practical Redux, Part 6: Connected Lists, Forms, and Performance
- Dec 12, 2016 - Practical Redux, Part 5: Loading and Displaying Data
- Nov 22, 2016 - Practical Redux, Part 4: UI Layout and Project Structure
- Nov 10, 2016 - Practical Redux, Part 3: Project Planning and Setup
- Oct 31, 2016 - Practical Redux, Part 2: Redux-ORM Concepts and Techniques
- Oct 31, 2016 - Practical Redux, Part 1: Redux-ORM Basics
- Oct 31, 2016 - Practical Redux, Part 0: Introduction