
惯性聚合 高效追踪和阅读你感兴趣的博客、新闻、科技资讯
阅读原文 在惯性聚合中打开

推荐订阅源

量子位
奇客Solidot–传递最新科技情报
奇客Solidot–传递最新科技情报
博客园_首页
AWS News Blog
AWS News Blog
阮一峰的网络日志
阮一峰的网络日志
Vercel News
Vercel News
C
Cybersecurity and Infrastructure Security Agency CISA
P
Proofpoint News Feed
Exploit-DB.com RSS Feed
T
Tailwind CSS Blog
PCI Perspectives
PCI Perspectives
Application and Cybersecurity Blog
博客园 - 叶小钗
IT之家
IT之家
V2EX - 技术
V2EX - 技术
Cloudbric
Cloudbric
cs.CV updates on arXiv.org
宝玉的分享
宝玉的分享
Know Your Adversary
Know Your Adversary
爱范儿
爱范儿
OSCHINA 社区最新新闻
OSCHINA 社区最新新闻
cs.CL updates on arXiv.org
S
Schneier on Security
博客园 - 【当耐特】
G
Google Developers Blog
S
Security @ Cisco Blogs
N
Netflix TechBlog - Medium
T
Tenable Blog
C
Check Point Blog
The Cloudflare Blog
J
Java Code Geeks
The Register - Security
Google Online Security Blog
Security Latest
Security Latest
T
Tor Project blog
T
The Blog of Author Tim Ferriss
S
Security Affairs
S
Securelist
P
Privacy & Cybersecurity Law Blog
Security Archives - TechRepublic
P
Privacy International News Feed
博客园 - 三生石上(FineUI控件)
D
DataBreaches.Net
N
News and Events Feed by Topic
Hacker News - Newest:
Hacker News - Newest: "LLM"
让小产品的独立变现更简单 - ezindie.com
A
About on SuperTechFans
G
GRAHAM CLULEY
Jina AI
Jina AI
Spread Privacy
Spread Privacy

oida.dev | TypeScript, Rust

TypeScript's `erasableSyntaxOnly` Flag Unsafe for work Tokio: Macros Tokio: Channels Tokio: Getting Started Network Applications on the Tokio Stack Remake, Remodel, Reduce. The `never` type and error handling in TypeScript 5 Inconvenient Truths about TypeScript Refactoring in Rust: Introducing Traits Refactoring in Rust: Abstraction with the Newtype Pattern Announcing the TypeScript Cookbook TypeScript: Iterating over objects The road to universal JavaScript 10 years of oida.dev Rust: Tiny little traits The TypeScript converging point How not to learn TypeScript Getting started with Rust Introducing Slides and Coverage TypeScript: The humble function overload TypeScript + React: Children types are broken TypeScript: In defense of any Rust: Enums to wrap multiple errors Dissecting Deno Error handling in Rust TypeScript: Unexpected intersections Upgrading Node.js dependencies after a yarn audit TypeScript: Array.includes on narrow types TypeScript + React: Typing Generic forwardRefs shared, util, core: Schroedinger's module names Learning Rust and Go TypeScript: Narrow types in catch clauses TypeScript: Low maintenance types Tidy TypeScript: Name your generics Tidy TypeScript: Avoid traditional OOP patterns Tidy TypeScript: Prefer type aliases over interfaces Tidy TypeScript: Prefer union types over enums My new book: TypeScript in 50 Lessons Go Preact! ❤️ this in JavaScript and TypeScript TypeScript and ECMAScript Modules TypeScript + React: Why I don't use React.FC TypeScript + React: Component patterns TypeScript: Augmenting global and lib.dom.d.ts Vite with Preact and TypeScript TypeScript: Union to intersection type 11ty: Generate Twitter cards automatically Are large node module dependencies an issue? TypeScript: Variadic Tuple Types Preview TypeScript: Improving Object.keys Remake, Remodel. Part 4. TypeScript + React: Typing custom hooks with tuple types TypeScript: Assertion signatures and Object.defineProperty TypeScript: Check for object properties and narrow down type Boolean in JavaScript and TypeScript void in JavaScript and TypeScript Symbols in JavaScript and TypeScript Why I use TypeScript TypeScript + React: Extending JSX Elements TypeScript: Validate mapped types and const context TypeScript: Match the exact object shape TypeScript: The constructor interface pattern Streaming your Meetup - Part 4: Directing and Streaming with OBS Streaming your Meetup - Part 2: Speaker video Streaming your Meetup - Part 1: Basics and Projector TypeScript and React Guide: Added a new styles chapter TypeScript and React Guide: Added a new render props chapter TypeScript and React: Styles and CSS TypeScript and React TypeScript and React Guide: Added a new prop types chapter TypeScript without TypeScript -- JSDoc superpowers TypeScript: Mapped types for type maps JAMStack vs serverless web apps The Unsung Benefits of JAMStack Sites TypeScript: Ambient modules for Webpack loaders My most favourite talks in 2018 TypeScript and React Guide: Added a new context chapter TypeScript: Built-in generic types TypeScript: Type predicates JSX is syntactic sugar TypeScript and React Guide: Added a new hooks chapter Getting your CfP application right FAQ on our Angular Connect Talk: Automating UI development TypeScript and Substitutability Debugging Node.js apps in TypeScript with Visual Studio Code From Medium: Deconfusing Pre- and Post-processing From Medium: PostCSS misconceptions Saving and scraping a website with Puppeteer Cutting the mustard - 2018 edition Wordpress as CMS for your JAMStack sites My most favourite podcast episodes in 2017 My most favourite talks in 2017 My most favourite books in 2017 The Best Request Is No Request, Revisited Not so hidden figures - Organizing ScriptConf My podcast journey to ScriptCast Grid layout, grid layout everywhere! #scriptconf and #devone Object streams in Node.js
Streaming your Meetup - Part 3: Speaker audio
2019-07-30 · via oida.dev | TypeScript, Rust

We successfully set up the projector in the first chapter. We are able to record the speaker’s video as described in the second chapter. Now let there be sound!
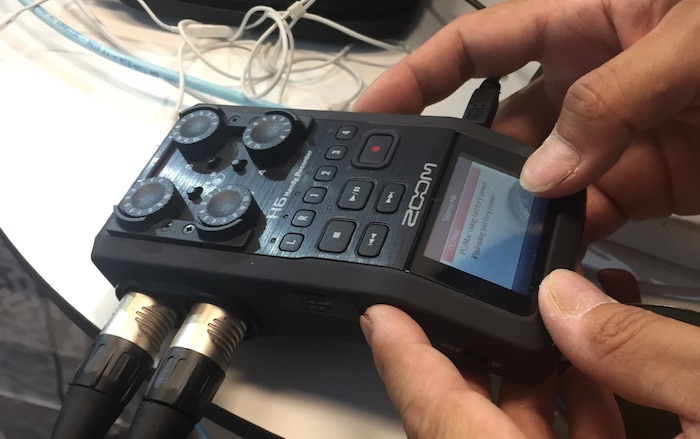
The Zoom

There are a ton of options for sound, let’s make sure your speakers sound great!

  1. Basics and Projector
  2. Recording the speaker
  3. Recording audio – 📍you are here
  4. Directing and streaming with OBS

Let’s go!

A few words before we start #

I focus mainly on providing sound for one speaker at a time. I will list some options on how to deal with multiple speakers if you choose a certain scenario.

I also try to find solutions that work with an audio jack solution. An audio jack like you might have on your notebook or similar. Also, some cameras allow standard audio cables to be plugged in.

If your camera has an audio in for external audio, this is always the preferred way. When you transport the camera signal to your laptop (either via Webcam or CamLink), the sound is always in tune with the images. No need to fine-tune it later on.

Also, audio is a beast. Don’t be worried if you don’t get TV interview quality for your live event. The solutions shown in this guide are good enough for your meetup.

Ready? Let’s check our first option.

The 6m lapel microphone #

This is actually the cheapest solution: A 6 meter long lapel microphone, just like the MAONO (Amazon) lapel microphone.

Here’s two things why I think this is an awesome idea:

  1. Lapel microphones are very closely located to the speaker. This means that you get a good sound from the speaker with little inferences from the surroundings
  2. 6 meters are a lot. The speaker can freely move, and since you are close enough to them anyway it doesn’t hinder them a lot when moving.

Also, they are cheap! A good lapel microphone is around 25 EUR. It comes with its own power supply in case you need it, and is pluggable via standard audio jacks.

If you have two speakers, there’s also a version with two lapel microphones for the same price. It’s a lot harder to get one continuous sound level, though. But it works really fine!

If you need an example of how recording with a 6m lapel microphone sounds, check out this video from Stahlstadt.js or with the dual microphone at the .NET Meetup. Listen how it adapts to the different surroundings.

The RODE Filmmaker kit #

You can also go wireless! A really, really good wireless lapel microphone is the RODE filmmaker kit. It’s also a lapel microphone, but comes with a transmitter and receiver, that can be easily plugged in your camera or laptop. It has the same implications as a standard lapel microphone, but the speaker are not attached in any way to your recording setup, which is always a plus. It’s a bit costy, though: It’s around 300 EUR. But some say it’s totally worth the money.

Rainer (I featured him in the previous article) is using this one. Check out his talk on Azure Container Registry. Wonderful sound. See also how he is using a headset microphone from the venue, but is still wearing the lapel mic on his collar. Nobody says you can’t combine those two!

It’s hard though to get two speakers connected. You would need an additional tool. Like the Zoom H6.

The Zoom H6 #

It’s more a tool like a ful-fledged microphone: The Zoom H6. The Zoom H6 is a little mixer and recorder where you can plug XLR (or 1/4 inch audio connectors) and either record, or transmit via audio cable or USB to your laptop.

It’s pictured above. I use it for podcasting, and it allows me to record 6 invidual tracks that I can mix later on. But how does this help with streaming? Well, if you are at a location that has an audio setup themselves (with proper headsets, a proper mixer and all), you normally can lead the audio signal not only to the speakers, but also to your small mixer. Ask your host if they have cables for that.
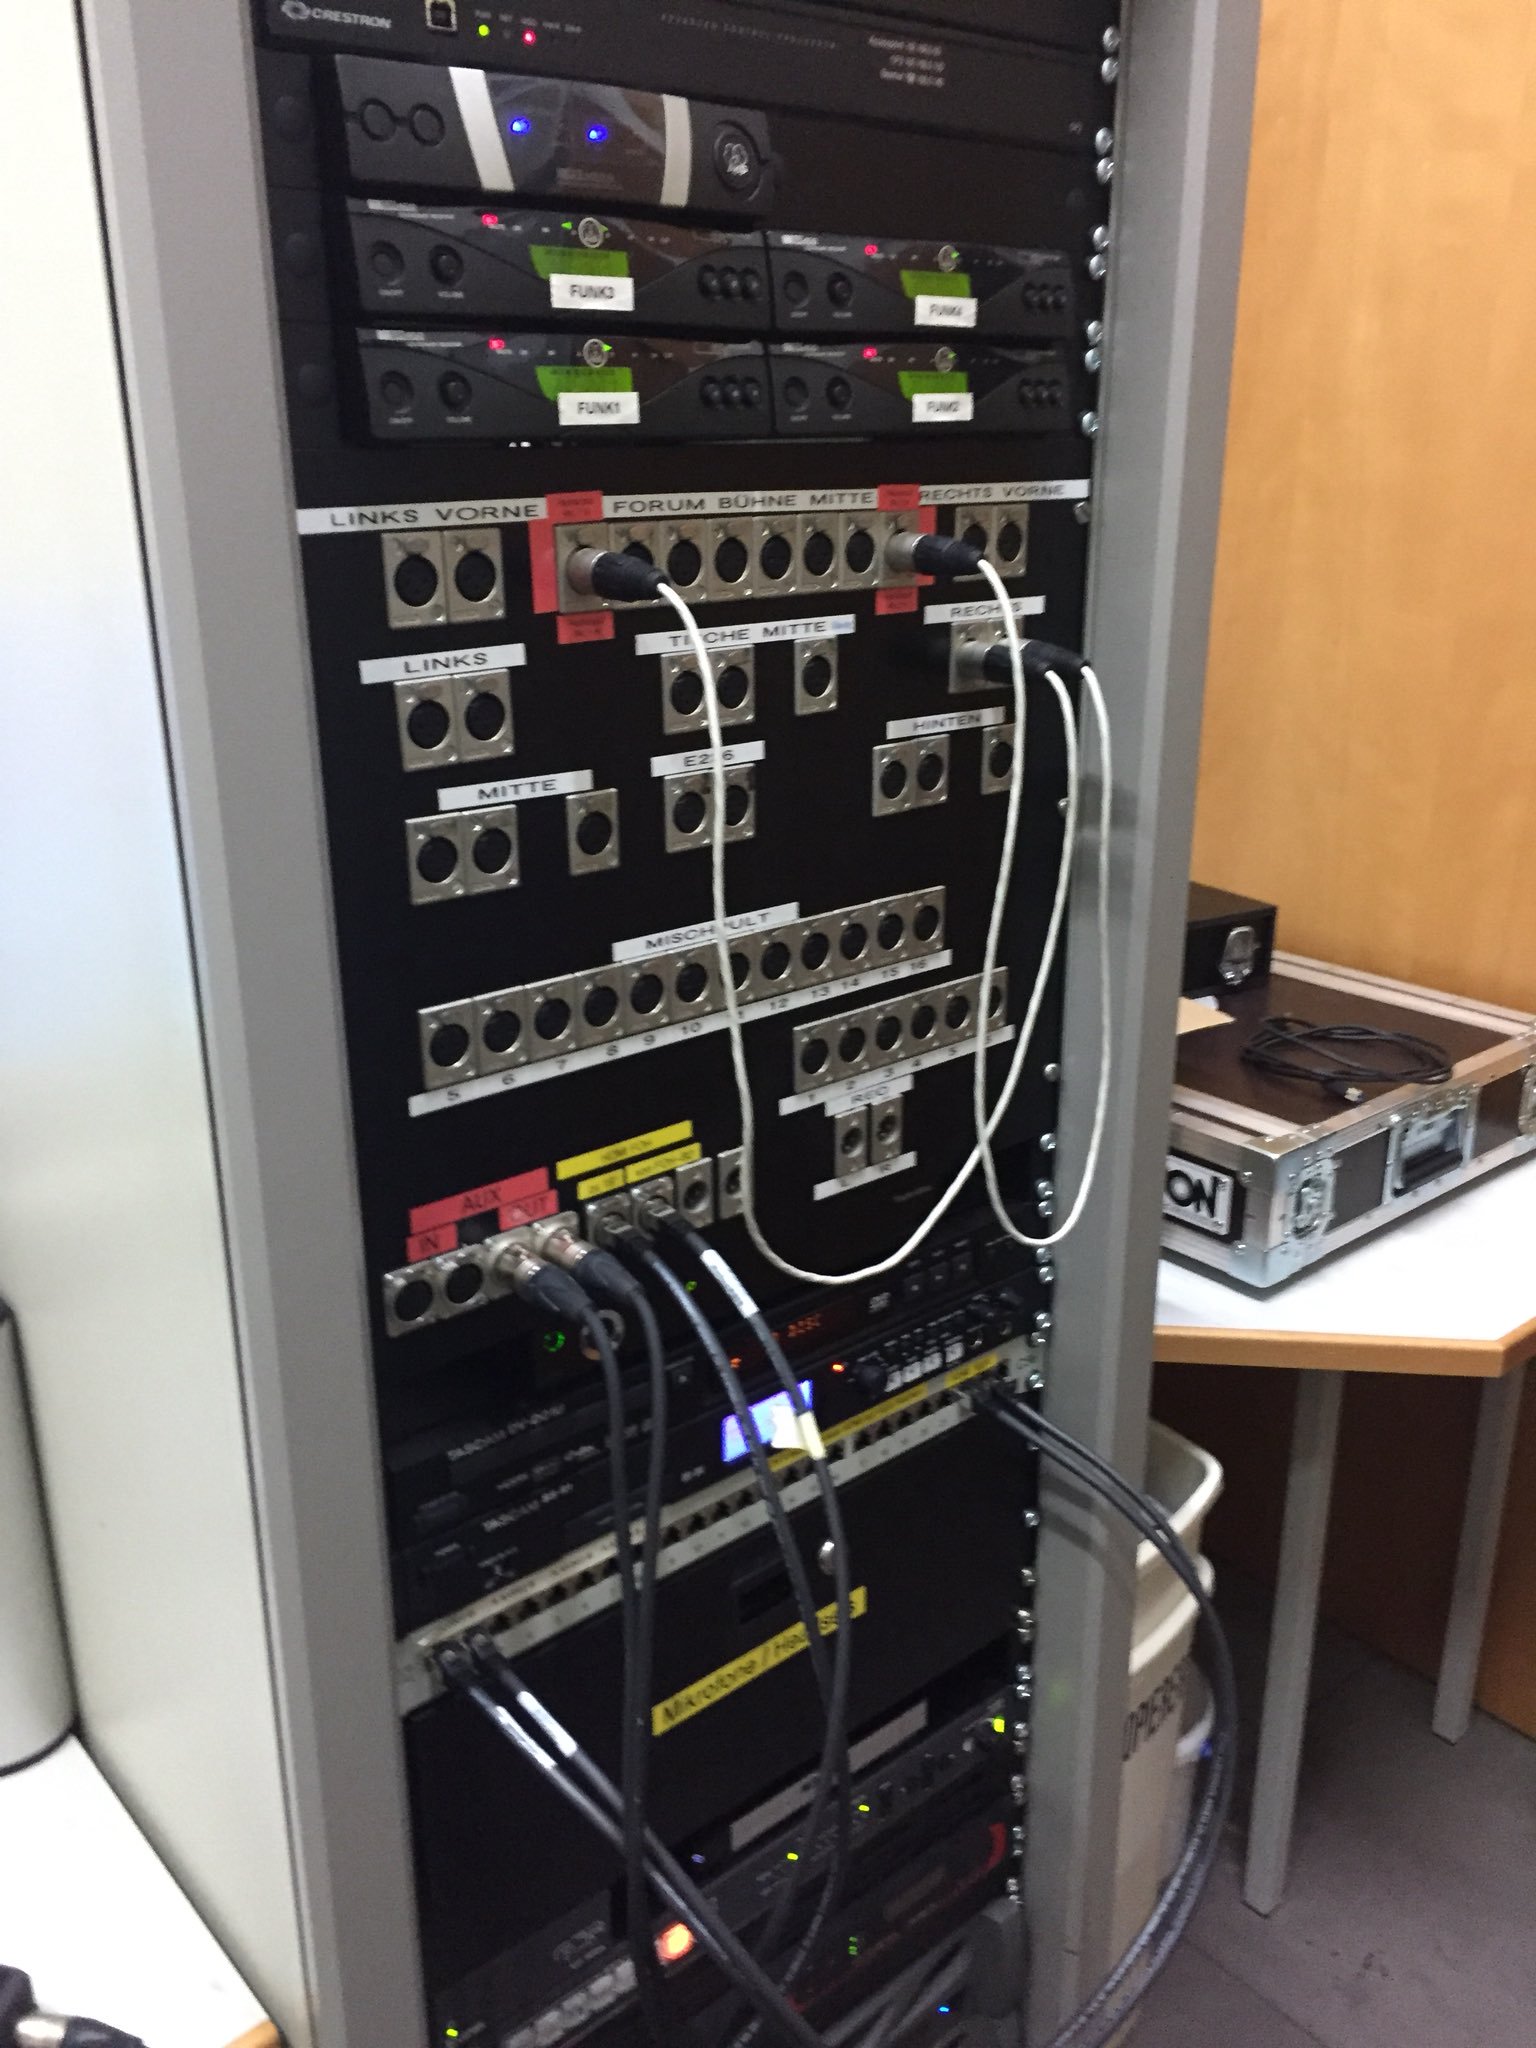
A mixer

With that, you get A+ sound at almost no effort. The Zoom H& costs around 250 to 400 EUR, and is totally worth it if you do a lot with audio.

Check out the audio of this recording. Crystal clear.

Since you have 4 plugs, you can connect either 4 lapel microphones (even MAONO, which makes it 8 speakers in total), or different sources to the Zoom, and get everything to your laptop.

Highly recommended if your location is suited for that.

You can also mount the Zoom H6 on a regular tripod and attach a directional microphone on it. The microphone is part of the Zoom H6 and makes a kick-ass sound. This might also be a good alternative for your if you don’t want to invest in another microphone.

Summary #

Audio can be rough, but I think the options above provide a good baseline. I’d go for the lapel microphone regardless, as it is cheap and you can use it also with the Zoom H6 if you want to level up at some point.

This is the setup so far:
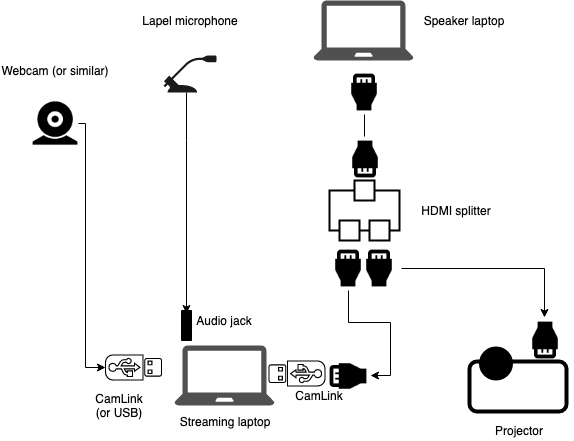
The streaming setup

  • 2 extra HDMI cables (we assume that there is one available from the projector)
  • An HDMI splitter
  • 1-2 CamLinks
  • A webcam (or similar)
  • Your streaming notebook
  • A MAONO 6 meter Lapel microphone

Money spent so far #

The MAONO lapel microphone is set. If you want to level up at some point, consider both options, especially the Zoom H& as it’s an essential tool for any audio needs that exceed recording one voice.

Together with 290 EUR from the previous chapter, we spent 315 EUR to stream.

Related Articles