


The Document Object Model (DOM) is the foundation of the modern web, but its inner workings inside a browser like Google Chrome can often seem like a mystery. This article, a re-edited version of Chromium's original DOM documentation prepared for publication, breaks down the core concepts of the DOM and the powerful Shadow DOM.
Using diagrams and conceptual examples, we'll visualize the journey from a simple node tree to the complex composed tree and the final flat tree that the browser renders. We will explore how Shadow DOM achieves its powerful encapsulation and how events move through this intricate structure. This guide is for curious web developers wanting to look under the hood and for browser engineers new to DOM implementation.
The most fundamental structure for representing web pages inside a browser is the Node Tree.
In this article, we draw a tree in left-to-right direction in ascii-art
notation. A is the root of the tree.
A
├───B
├───C
│   ├───D
│   └───E
└───F
Node is the fundamental class for all types of nodes in a node tree. Each Node has the following 3 pointers (among others):
parent_or_shadow_host_node_: Points to the parent (or the shadow host if it
is a shadow root; explained later)previous_: Points to the previous siblingnext_: Points to the next siblingContainerNode, from which Element extends, has the additional pointers for its
child:
first_child_: Points to the first child.last_child_: Points to the last child.Key implications of this design include:
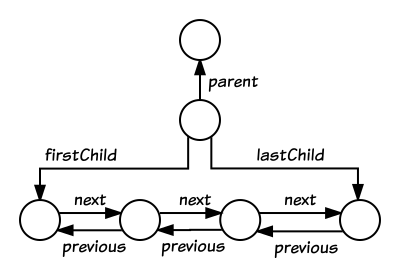
Figure 1: An illustration of node connectivity in a tree.
Further info:
Node: The fundamental building block of the DOM tree. Everything in an HTML document, such as a <div> element, a piece of text, or a comment, is a Node.Element: The most common type of node, representing HTML elements, and importantly, it can have children.ContainerNode: A Chromium-specific implementation class for a type of Node that can have children, like an Element or Document.After understanding the basic structure of the DOM, this section explores Shadow DOM, which is at the heart of Web Components, and explains the concept of a shadow tree and how it enables powerful encapsulation.
A shadow tree is a node tree whose root is a ShadowRoot. From a web
developer's perspective, a shadow root can be created using the
element.attachShadow({ ... }) API. The element here is called a shadow
host, or just a host if the context is clear.
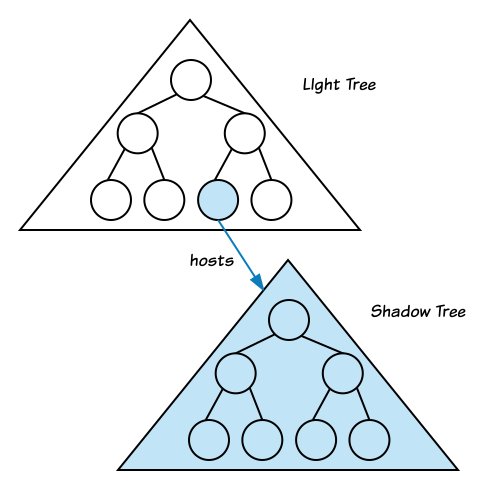
Figure 2: An illustration of a shadow tree attached to a shadow host, with the light tree.
For example, given the example node tree:
A
├───B
├───C
│   ├───D
│   └───E
└───F
Assuming the node B in our diagram has an id of "B", web developers can attach a shadow tree to node B and manipulate it as follows:
// In JavaScript
const b = document.querySelector("#B");
const shadowRoot = b.attachShadow({ mode: "open" });
const sb = document.createElement("div");
shadowRoot.appendChild(sb);
The resulting shadow tree would be:
shadowRoot
└── sb
The resulting tree structure, with the shadow tree attached, is:
A
└── B
    ├──/shadowRoot
    │   └── sb
    ├── C
    │   ├── D
    │   └── E
    └── F
In this article, a notation (──/) is used to represent a
shadowhost-shadowroot relationship, in a composed tree. A composed tree
will be explained later. A shadowhost-shadowroot is a 1:1 relationship.
Though a shadow root always has a corresponding shadow host element, a light
tree and a shadow tree should be considered separately from a node tree's
perspective. (──/) is NOT a parent-child relationship in a node tree. This distinction is critical, as it means standard tree traversal methods:
// In C++
for (Node& node : NodeTraversal::startsAt(A)) {
  ...
}
traverses only A, B, C, D, E and F nodes. It never visits
shadowRoot nor sb. NodeTraversal never crosses a shadow boundary, ──/.
Further info:
Another crucial concept for efficiently managing information within different DOM trees is TreeScope. This section will explain how Document and ShadowRoot implement TreeScope to manage important data for each tree.
Document and ShadowRoot are always the root of a node tree. Both Document
and ShadowRoot implement TreeScope.
TreeScope keeps a lot of information about the underlying tree for
efficiency. For example, TreeScope has an id-to-element mapping, as
TreeOrderedMap, so that querySelector('#foo') can
find an element whose id attribute is "foo" in O(1). In other words,
root.querySelector('#foo') can be slow if it is used in a node tree whose
root is not TreeScope.
Each Node has a tree_scope_ pointer, which points to:
That means tree_scope_ pointer is always non-null (except for while in a DOM
mutation), but it doesn't always point to the node's root.
Since each node doesn't always have a direct pointer to its root, Node::getRootNode(...) can take O(N) to find it. However, if the node is within a TreeScope (which Node#IsInTreeScope() can check), its root can be retrieved in O(1) time.
Each node has flags, which is updated in DOM mutation, so that we can tell
whether the node is in a document tree, in a shadow tree, or in none of them, by
using Node::IsInDocumentTree() and/or Node::IsInShadowTree().
If you want to add new features to Document, Document might be the wrong place
to add. Instead, please consider to add functionality to TreeScope. We want to
treat document and shadow trees as similarly as possible.
document
└── a1
    ├──/shadowRoot1
    │   └── s1
    └── a2
        └── a3

document-fragment
└── b1
    ├──/shadowRoot2
    │   └── t1
    └── b2
        └── b3
For this example, all nodes (except Document and ShadowRoot) are created by document.createElement(...), meaning each node's owner document is the main document.
| node | node's root | node's _tree_scope points to: |
|---|---|---|
| document | document (self) | document (self) |
| a1, a2, a3 | document | document |
| shadowRoot1 | shadowRoot1 (self) | shadowRoot1 (self) |
| s1 | shadowRoot1 | shadowRoot1 |
| document-fragment | document-fragment (self) | document |
| b1, b2, b3 | document-fragment | document |
| shadowRoot2 | shadowRoot2 (self) | shadowRoot2 (self) |
| t1 | shadowRoot2 | shadowRoot2 |
Further Info:
TreeScope: An object representing the scope of a tree, such as a document or a shadow root. It stores information that helps to speed up operations like searching for an element by its ID.tree_scope.h, tree_scope.ccNode#GetTreeScope()Node#IsInTreeScope()While we've discussed document trees and shadow trees separately, they often interact. This section introduces the concept of a Composed Tree, which unifies these different node trees into a single structure, crucial for understanding Shadow DOM's encapsulation.
<details> and <summary>You've likely used composed trees without even realizing it. Many native HTML elements, like <details>, are rendered by the browser using their own internal, hidden Shadow DOM.
Consider this simple HTML:
<details>
  <summary>Click to see details</summary>
  <p>This is the content you'll see.</p>
</details>
When the browser renders this, the <details> element acts as a shadow host. It has a user-agent (UA) shadow tree attached to it that contains the logic for the interactive triangle and correctly places your <summary> and <p> content. The simplified composed tree looks like this:
<details> (shadow host)
├── <summary>... (light tree child)
├── <p>... (light tree child)
└── /shadowRoot (user-agent)
    ├── <div class="marker">▶</div>
    └── <slot name="summary-slot"></slot>
    └── <slot name="content-slot"></slot>
This is a perfect example of a composed tree in action. The browser combines the light tree you write (your <summary> and <p>) with the internal shadow tree to produce the final rendered output.
The key to this mechanism is the <slot> element, which acts as a placeholder. We will explain exactly how slots and node assignments work in a later section.
As seen in the <details> example, different node trees (like your HTML content and the browser's internal shadow tree) are connected. This interconnected structure is called a composed tree, which is essentially a tree made up of other trees.
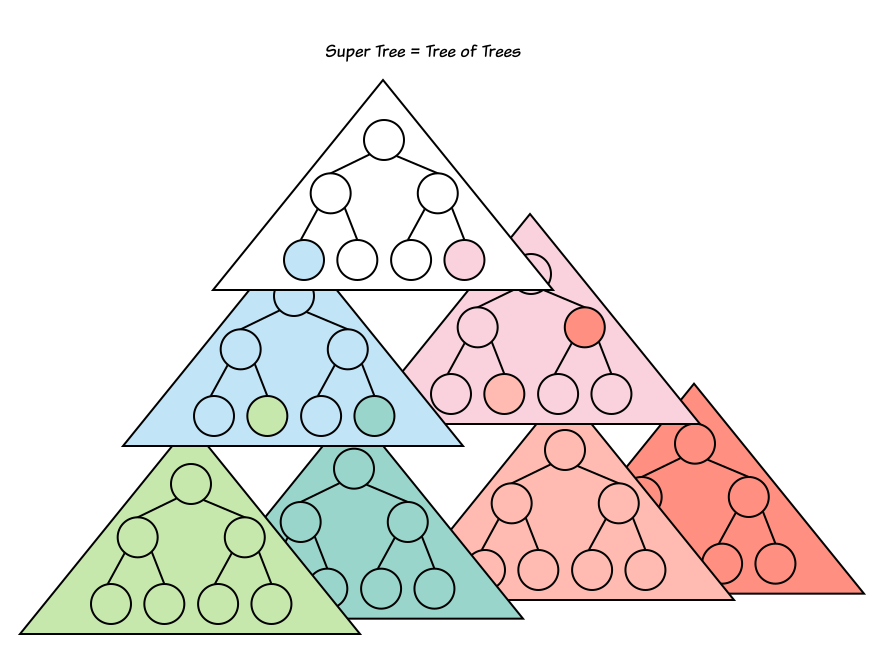
Figure 3: A conceptual diagram illustrating how multiple node trees combine to form a super-tree or composed tree.
The following is a complex example:
document
├── a1 (host)
│   ├──/shadowRoot1
│   │   └── b1
│   └── a2 (host)
│       ├──/shadowRoot2
│       │   ├── c1
│       │   │   ├── c2
│       │   │   └── c3
│       │   └── c4
│       ├── a3
│       └── a4
└── a5
    └── a6 (host)
        └──/shadowRoot3
            └── d1
                ├── d2
                ├── d3 (host)
                │   └──/shadowRoot4
                │       ├── e1
                │       └── e2
                └── d4 (host)
                    └──/shadowRoot5
                        ├── f1
                        └── f2
On careful inspection, you'll see that this composed tree is made up of 6 node trees; 1 document tree and 5 shadow trees:
document tree
document
├── a1 (host)
│   └── a2 (host)
│       ├── a3
│       └── a4
└── a5
    └── a6 (host)
shadow tree 1
shadowRoot1
└── b1
shadow tree 2
shadowRoot2
├── c1
│   ├── c2
│   └── c3
└── c4
shadow tree 3
shadowRoot3
└── d1
    ├── d2
    ├── d3 (host)
    └── d4 (host)
shadow tree 4
shadowRoot4
├── e1
└── e2
shadow tree 5
shadowRoot5
├── f1
└── f2
If we consider each node tree as node of a super-tree, we can draw a super-tree as such:
document (a)
├── shadowRoot1 (b)
├── shadowRoot2 (c)
└── shadowRoot3 (d)
    ├── shadowRoot4 (e)
    └── shadowRoot5 (f)
Here, a root node is used as a representative of each node tree; A root node and a node tree itself are sometimes used interchangeably in explanations.
This kind of "super-tree" — a tree whose node is a node tree — is called a composed tree. The concept of a composed tree is very useful to understand how Shadow DOM's encapsulation works.
To navigate this composed tree precisely, the DOM Standard defines a specific set of terminologies:
For example,
To maintain Shadow DOM's encapsulation, we have a concept of visibility relationship between two nodes.
In the following table, "✓" means that "node B (target) is visible from node A (observer)", and "x" means it is hidden.
| Node (A) \ Target (B) | document, a1, a2 | b1 | c1 | d1, d2 | e1 | f1 |
|---|---|---|---|---|---|---|
| document, a1, a2 | ✓ | x | x | x | x | x |
| b1 | ✓ | ✓ | x | x | x | x |
| c1 | ✓ | x | ✓ | x | x | x |
| d1, d2 | ✓ | x | x | ✓ | x | x |
| e1 | ✓ | x | x | ✓ | ✓ | x |
| f1 | ✓ | x | x | ✓ | x | ✓ |
For example, document is visible from any node.
To understand the visibility relationship, here is a simple rule of thumb:
B is visible from node A if A can reach B by traversing recursively from parent to child, or from child to parent.──/ edge (representing the shadow host-root connection) is a special case and is one-directional:
Okay).Forbidden).
In other words, a node in an outer tree cannot see into an inner tree (its descendant shadow trees), but a node in an inner tree can see into an outer tree (its ancestor trees).We have designed (or re-designed) many web-facing APIs to follow this basic principle. If you add a new API to the web platform and Blink, please consider this rule and don't leak a node that should be hidden from web developers.
Key Takeaway: The Composed Tree is the complete logical map of all nodes on a page, including all shadow trees. Its strict, one-way visibility rules are what make Shadow DOM's encapsulation possible.
Further Info:
TreeScope::ParentTreeScope()Node::IsConnected()The Composed Tree provides a complete logical model of all nodes and their relationships. However, for a browser to actually render content, it needs a single, unified tree. This is the purpose of the Flat Tree: to create the final, flattened structure that is used to build the layout and paint what you see on the screen. It's important to note that shadow roots themselves do not appear in the flat tree.
A composed tree itself can't be rendered as is. From the rendering's
perspective, Blink has to construct a layout tree, which would be used as an
input to the paint phase. A layout tree is a tree whose node is
LayoutObject, which points to Node in a node tree, plus additional
calculated layout information.
Before the Web Platform got Shadow DOM, the structure of a layout tree is very similar to the structure of a document tree; where only a single node tree, document tree, is involved.
Since the Web Platform got Shadow DOM, we now have a composed tree which is composed of multiple node trees, instead of a single node tree. That means we have to flatten the composed tree into a single node tree, called a flat tree, from which a layout tree is constructed.
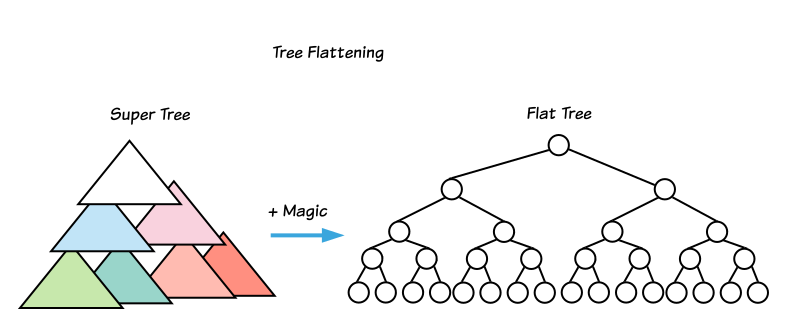
Figure 4: A diagram illustrating how a composed tree is flattened into a single flat tree for rendering.
For example, given the following composed tree,
document
├── a1 (host)
│   ├──/shadowRoot1
│   │   └── b1
│   └── a2 (host)
│       ├──/shadowRoot2
│       │   ├── c1
│       │   │   ├── c2
│       │   │   └── c3
│       │   └── c4
│       ├── a3
│       └── a4
└── a5
    └── a6 (host)
        └──/shadowRoot3
            └── d1
                ├── d2
                ├── d3 (host)
                │   └──/shadowRoot4
                │       ├── e1
                │       └── e2
                └── d4 (host)
                    └──/shadowRoot5
                        ├── f1
                        └── f2
This composed tree would be flattened into the following flat tree (assuming
there are not <slot> elements there):
document
├── a1 (host)
│   └── b1
└── a5
    └── a6 (host)
        └── d1
            ├── d2
            ├── d3 (host)
            │   ├── e1
            │   └── e2
            └── d4 (host)
                ├── f1
                └── f2
We can't explain the exact algorithm of how to flatten a composed tree into a
flat tree until we explain the concept of slots and slot assignment. If we
ignore the effect of <slot>, we can define a flat tree as:
In the composed tree example above, a2 is a light DOM child of a1. Since a1 is a shadow host, and the shadow tree (shadowRoot1) does not contain a <slot> element to project a2, the a2 node (and all its descendants) does not appear in the final flat tree.
This simplified definition is a good starting point, but the complete flattening algorithm depends heavily on the concept of slots and node assignment, which we will explore next.
To fully understand how the composed tree is flattened, especially with dynamic content, we need to introduce slots and node assignments. This section will explain how <slot> elements act as placeholders inside Shadow DOM and how content from the light tree gets assigned to them.
For more information on the general usage of <slot> elements, please see the
how <slot> elements work in general.
Given the following composed tree and slot assignments,
Composed tree:
A
├──/shadowRoot1
│   ├── slot1
│   └── slot2
├── B
└── C
Slot Assignments:
| slot | slot's assigned nodes |
|---|---|
| slot1 | [C] |
| slot2 | [B] |
The flat tree would be:
A
├── slot1
│   └── C
└── slot2
    └── B
More complex example is here.
Composed tree:
A
├──/shadowRoot1
│   ├── B
│   │   └── slot1
│   ├── slot2
│   │   └── C
│   ├── D
│   └── slot3
│       ├── E
│       └── F
├── G
├── H
├── I
└── J
Slot Assignments:
| slot | slot's assigned nodes |
|---|---|
| slot1 | [H] |
| slot2 | [G, I] |
| slot3 | [] (nothing is assigned) |
The flat tree would be:
A
├── B
│   └── slot1
│       └── H
├── slot2
│   ├── G
│   └── I
├── D
└── slot3
    ├── E
    └── F
slot2's child, C, is not shown in this flat tree because slot2 has
non-empty assigned nodes, [G, I], which are used as slot2's children in
the flat tree.slot3) are used as fallback content in the flat tree.J.A slot itself can be assigned to another slot.
For example, if we attach a shadow root to B, and put a <slot>, slot4,
inside of the shadow tree.
A
├──/shadowRoot1
│   ├── B
│   │   ├──/shadowRoot2
│   │   │   └── K
│   │   │       └── slot4
│   │   └── slot1
│   ├── slot2
│   │   └── C
│   ├── D
│   └── slot3
│       ├── E
│       └── F
├── G
├── H
├── I
└── J
| slot | slot's assigned nodes |
|---|---|
| slot1 | [H] |
| slot2 | [G, I] |
| slot3 | [] (nothing is assigned) |
| slot4 | [slot1] |
The flat tree would be:
A
├── B
│   └── K
│       └── slot4
│           └── slot1
│               └── H
├── slot2
│   ├── G
│   └── I
├── D
└── slot3
    ├── E
    └── F
<details> and <summary> Revisited: How Slots WorkLet's return to our real-world example of the <details> element to see exactly how slot assignment works.
The Light Tree (what you write):
<details>
  <summary>Click to see details</summary>
  <p>This is the content you'll see.</p>
</details>
The User-Agent Shadow Tree (simplified):
<div class="marker">▶</div>
<slot name="summary-slot"></slot>
<slot name="content-slot"></slot>
The browser performs slot assignment to create the final flat tree:
<summary> element is assigned to the <slot name="summary-slot">.<p> element is assigned to the <slot name="content-slot">.The Final Flat Tree (what is rendered):
<details>
├── <div class="marker">▶</div>
├── <slot name="summary-slot">
│   └── <summary>Click to see details</summary>
└── <slot name="content-slot">
    └── <p>This is the content you'll see.</p>
As you can see, the light DOM content has "filled" the slots in the shadow DOM, creating the final, rendered tree. This powerful mechanism is what allows native elements to be styled and structured internally while still accepting and displaying your content.
Events are a fundamental part of web interactivity, but their propagation becomes complex with Shadow DOM. This section explains how an event is dispatched and how its event path is calculated, using examples.
The DOM Standard defines how an event should be dispatched here, including how the event path should be calculated.
Basically, an event is dispatched across shadow trees.
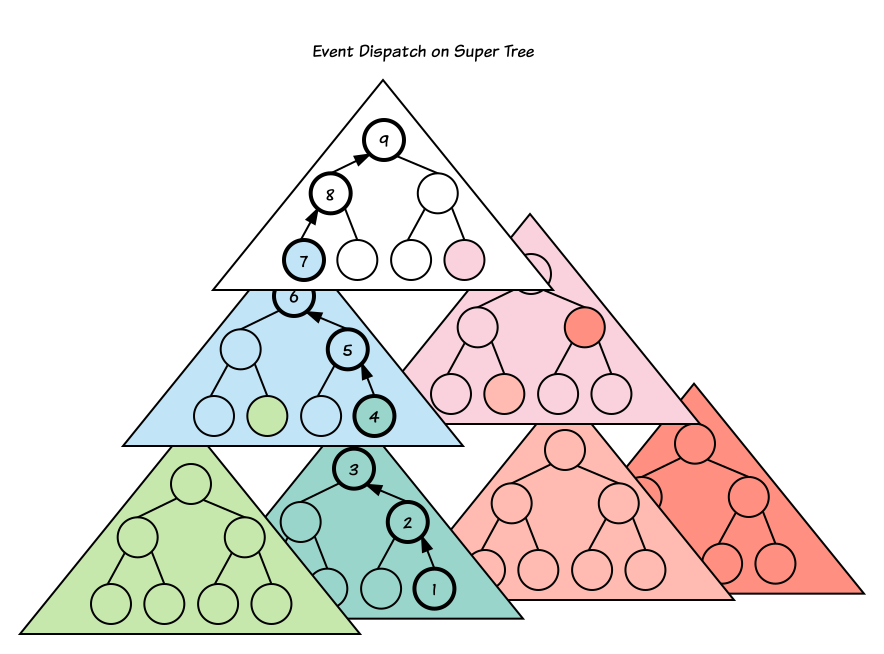
Figure 5: An illustration of event dispatch across shadow trees.
Here is a more complex composed tree example, involving slots:
A
└── B
    ├──/shadowroot-C
    │   └── D
    │       ├──/shadowroot-E
    │       │   └── F
    │       │       └── slot-G
    │       └── H
    │           └── I
    │               ├──/shadowroot-J
    │               │   └── K
    │               │       ├──/shadowroot-L
    │               │       │   └── M
    │               │       │       ├──/shadowroot-N
    │               │       │       │   └── slot-O
    │               │       │       └── slot-P
    │               │       └── Q
    │               │           └── slot-R
    │               └── slot-S
    └── T
        └── U
Slot Assignments:
| slot | slot's assigned nodes |
|---|---|
| slot-G | [H] |
| slot-O | [slot-P] |
| slot-P | [Q] |
| slot-R | [slot-S] |
| slot-S | [T] |
The resulting flat tree would be:
A
└── B
    └── D
        └── F
            └── slot-G
                └── H
                    └── I
                        └── K
                            └── M
                                └── slot-O
                                    └── slot-P
                                        └── Q
                                            └── slot-R
                                                └── slot-S
                                                    └── T
                                                        └── U
If an event is fired on U, the resulting event path is (in reverse order):
[U => T => slot-S => slot-R => Q => slot-P => slot-O => shadowroot-N => M
=> shadowroot-L => K => shadowroot-J => I => H => slot-G => F => shadowroot-E
=> D => shadowroot-C => B => A]
Unlike the flat tree, which is constructed for rendering, the event path does include shadow roots as the event bubbles up through the composed tree. This difference stems from their distinct purposes: event paths reflect the DOM's logical model for interactions, while flat trees represent the layout for visual presentation.
The "parent" of a node in an event path is determined by the following rules:
While event.target usually remains constant, it changes when an event originates inside a shadow tree and then bubbles out. To preserve Shadow DOM's encapsulation, the browser performs event re-targeting.
The rule is simple: When an event bubbles out of a shadow tree, its event.target is changed to be the host element (as if the event was originally fired at that host element) if the original event.target is not visible from the current event.currenttarget. This prevents code in the outer tree from seeing the specific nodes inside the shadow tree where the event originated.
For instance, if an event happens on node U (which is in the document tree), event.target is always U for all listeners because U is visible from any node in the event path; event re-targeting does not occur. However, if the event is fired on node Q (which is within a shadow tree), re-targeting will take place.
The following table shows this in action for an event fired on node Q:
| event.currenttarget | (re-targeted) event.target |
|---|---|
| Q, slot-P, slot-O, shadowroot-N, M, shadowroot-L, K, shadowroot-J | Q |
| I, H, slot-G, F, shadowroot-E, D, shadowroot-C | I |
| B, A | B |
In this table, it's important to note that at every step, the (re-targeted) event.target node is always visible from the event.currenttarget node. This illustrates how event re-targeting effectively "hides" nodes within shadow boundaries from outer listeners, ensuring encapsulation is maintained by presenting the closest visible ancestor.
In this article, we have explored the foundational concepts of the DOM and Shadow DOM as implemented in Chromium. We've seen how a simple node tree forms the basis of a document, how Shadow DOM enables encapsulation through shadow trees, and how these separate trees are unified into a composed tree. We also covered the flat tree, which is what gets rendered, and how events propagate through this complex structure.
Understanding these concepts is crucial for advanced web development and for anyone looking to contribute to the Chromium project. I hope this deep dive has been helpful in demystifying the inner workings of the DOM.
You can manually traverse a node tree using primitive pointers:
// In C++
// Iterates through all direct children of a 'parent' node.
for (Node* child = parent.firstChild(); child; child = child->nextSibling()) {
  ...
}
// In C++
// Traverses nodes in tree order (depth-first traversal) recursively.
void traverse(const Node& node) {
  ...
  for (Node* child = node.firstChild(); child; child = child->nextSibling()) {
    traverse(*child);  // Recursively
  }
}
Tree order is:
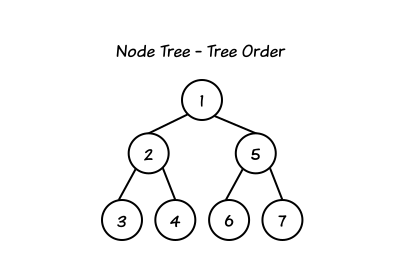
Figure 6: A diagram illustrating the tree traversal order.
This manual traversal, however, can be error-prone. To prevent common errors, you can use the NodeTraversal and ElementTraversal utility classes. They provide C++11 range-based for loops such as:
// In C++
// Traverses the direct children of 'parent'. For the tree above,
// if parent were 1, this would traverse 2, and 5.
for (Node& child : NodeTraversal::childrenOf(parent)) {
  ...
}
// In C++
// Traverses all nodes in the tree in tree order (depth-first). For the tree above,
// if root were 1, this would traverse 1, 2, 3, 4, 5, 6, and 7.
for (Node& node : NodeTraversal::startsAt(root)) {
  ...
}
These traversal APIs (NodeTraversal and ElementTraversal) are implemented as C++ templates and are designed as zero-cost abstractions. This means they are expanded to equivalent manual traversal code at compile time, so you don't have to worry about performance degradation when using them.
Further info:
NodeTraversal and ElementTraversal utility classes provide a convenient and safe way to iterate over nodes. They are implemented as C++ templates and designed as zero-cost abstractions, meaning they are expanded to manual traversal code at compile time with no performance degradation.Since Blink doesn't store a complete flat tree data structure in memory, it relies on FlatTreeTraversal—a Chromium utility class—for efficient traversal. This class allows it to traverse the composed tree in flat tree order.
For example, let's consider the composed tree from "Example 1" in the "Slots and node assignments" section:
A
├──/shadowRoot1
│   ├── slot1 (assigned nodes: [C])
│   └── slot2 (assigned nodes: [B])
├── B
└── C
FlatTreeTraversal will follow the slot assignments. Here's how it would work:
FlatTreeTraversal::firstChild(slot2) returns B (because B is assigned to slot2)FlatTreeTraversal::parent(B) returns slot2FlatTreeTraversal::nextSibling(B) returns null (as B is the only assigned node to slot2)The APIs which FlatTreeTraversal provides are very similar to ones other
traversal utility classes provide, such as NodeTraversal and
ElementTraversal.
When the DOM or Shadow DOM changes, how are slot assignments updated? This section briefly covers the process of Slot Assignment Recalculation, with a link to a more in-depth document.
Please see Incremental Shadow DOM to know how assignments are recalculated.
此内容由惯性聚合(RSS阅读器)自动聚合整理,仅供阅读参考。 原文来自 — 版权归原作者所有。