You may have noticed when opening various pages on my site (especially blog posts) that the images start as blurry and then the full image fades-in once it's loaded. Here's a video to demonstrate that experience:
I want to walk you through some of the things I had to do for this to work, and compare some of what I'm doing to what the ultimate image app (unsplash.com) does.
First of all, you'll notice that the image doesn't pop into place and cause a reflow/layout shift. In fact, I've got a 100/100 on the "Cumulative Layout Shift" web vitals score 😊. I do this by specifying the size of the area that holds the image via the aspect-ratio support in tailwind (my site uses tailwind btw 😅).
TL;DR:
<div class="aspect-[3/4] md:aspect-[3/2]">
	<img src="..." alt="..." class="..." />
</div>
That's all I need to make sure I don't get a bunch of layout shift while the image is loading (read more about this in Setting Height And Width On Images Is Important Again).
sizes, srcset, and CloudinaryAnother important aspect of making the image load fast is ensuring that you're only loading the size of image that you need. If you've got an image that's 3000x3000 and rendering that onto a retina screen in a 600x600 square, then you're serving 1800x1800 too many pixels! (retina means double-the pixels).
This is where the img tag's
sizes
and
srcset
attributes come to into play. The TL;DR of these attributes is that it allows
you to tell the browser different versions of your image for different screen
widths (srcset) and what size the image should be for a given set of media
queries (sizes). Here's the example from MDN:
<img
	src="/files/16870/new-york-skyline-wide.jpg"
	srcset="
		/files/16870/new-york-skyline-wide.jpg 3724w,
		/files/16869/new-york-skyline-4by3.jpg 1961w,
		/files/16871/new-york-skyline-tall.jpg 1060w
	"
	sizes="((min-width: 50em) and (max-width: 60em)) 50em,
              ((min-width: 30em) and (max-width: 50em)) 30em,
              (max-width: 30em) 20em"
/>
What this says is that when the screen width is between 50em and 60em then
the image will be 50em. So then the browser can determine the best image to
load for that image size from the srcset you gave it. And look at that
progressive enhancement! If the browser doesn't support these attributes it'll
just use the src attribute like usual.
Unsplash uses this feature a great deal and so do I. But creating all those sizes of images would be an enormous pain, that's why I use cloudinary!
Here's what my img tag looks like for a blog post:
<img
	title="Photo by Kari Shea"
	class="z-10 rounded-lg object-cover object-center transition-opacity"
	alt="MacBook Pro on top of brown table"
	src="https://res.cloudinary.com/kentcdodds-com/image/upload/w_1517,q_auto,f_auto,b_rgb:e6e9ee/kentcdodds.com/content/blog/how-i-built-a-modern-website-in-2021/banner_iplhop"
	srcset="
		https://res.cloudinary.com/kentcdodds-com/image/upload/w_280,q_auto,f_auto,b_rgb:e6e9ee/kentcdodds.com/content/blog/how-i-built-a-modern-website-in-2021/banner_iplhop   280w,
		https://res.cloudinary.com/kentcdodds-com/image/upload/w_560,q_auto,f_auto,b_rgb:e6e9ee/kentcdodds.com/content/blog/how-i-built-a-modern-website-in-2021/banner_iplhop   560w,
		https://res.cloudinary.com/kentcdodds-com/image/upload/w_840,q_auto,f_auto,b_rgb:e6e9ee/kentcdodds.com/content/blog/how-i-built-a-modern-website-in-2021/banner_iplhop   840w,
		https://res.cloudinary.com/kentcdodds-com/image/upload/w_1100,q_auto,f_auto,b_rgb:e6e9ee/kentcdodds.com/content/blog/how-i-built-a-modern-website-in-2021/banner_iplhop 1100w,
		https://res.cloudinary.com/kentcdodds-com/image/upload/w_1650,q_auto,f_auto,b_rgb:e6e9ee/kentcdodds.com/content/blog/how-i-built-a-modern-website-in-2021/banner_iplhop 1650w,
		https://res.cloudinary.com/kentcdodds-com/image/upload/w_2500,q_auto,f_auto,b_rgb:e6e9ee/kentcdodds.com/content/blog/how-i-built-a-modern-website-in-2021/banner_iplhop 2500w,
		https://res.cloudinary.com/kentcdodds-com/image/upload/w_2100,q_auto,f_auto,b_rgb:e6e9ee/kentcdodds.com/content/blog/how-i-built-a-modern-website-in-2021/banner_iplhop 2100w,
		https://res.cloudinary.com/kentcdodds-com/image/upload/w_3100,q_auto,f_auto,b_rgb:e6e9ee/kentcdodds.com/content/blog/how-i-built-a-modern-website-in-2021/banner_iplhop 3100w
	"
	sizes="(max-width:1023px) 80vw, (min-width:1024px) and (max-width:1620px) 67vw, 1100px"
/>
And of course I don't write this out manually. I have a utility to generate these props for me:
function getImgProps(
	imageBuilder: ImageBuilder,
	{
		widths,
		sizes,
		transformations,
	}: {
		widths: Array<number>
		sizes: Array<string>
		transformations?: TransformerOption
	},
) {
	const averageSize = Math.ceil(widths.reduce((a, s) => a + s) / widths.length)

	return {
		alt: imageBuilder.alt,
		src: imageBuilder({
			quality: 'auto',
			format: 'auto',
			...transformations,
			resize: { width: averageSize, ...transformations?.resize },
		}),
		srcSet: widths
			.map((width) =>
				[
					imageBuilder({
						quality: 'auto',
						format: 'auto',
						...transformations,
						resize: { width, ...transformations?.resize },
					}),
					`${width}w`,
				].join(' '),
			)
			.join(', '),
		sizes: sizes.join(', '),
	}
}
Then I use it like so:
<img
	key={frontmatter.bannerCloudinaryId}
	title={frontmatter.bannerCredit}
	{...getImgProps(
		getImageBuilder(
			frontmatter.bannerCloudinaryId,
			getBannerAltProp(frontmatter),
		),
		{
			className: 'rounded-lg object-cover object-center',
			widths: [280, 560, 840, 1100, 1650, 2500, 2100, 3100],
			sizes: [
				'(max-width:1023px) 80vw',
				'(min-width:1024px) and (max-width:1620px) 67vw',
				'1100px',
			],
			transformations: {
				background: 'rgb:e6e9ee',
			},
		},
	)}
/>
We don't have too much time to get into the imageBuilder stuff. It's just a
little abstraction I have on top of
cloudinary-build-url for building
cloudinary URLs in a typesafe way. My point is that Cloudinary makes it easy for
me to serve you the right sized image for your device and screen size so it
loads quickly and I save you data!
If I stopped just at this point then users would just get a blank space before
the image loads in. Much better to show some kind of placeholder. You've seen
these around the web for sure. Medium was the first place I saw something like
this. I used gatsby-plugin-sharp on the old version of this website which had
support for an inline SVG that was a sort of tracing of the image (with mixed,
but mostly positive results). And unsplash also has support for this. For this
to work well, you need the placeholder to be smallish, server rendered, and
inline. If you have to load your placeholder then you'll need a placeholder for
your placeholder! As ridiculous as that sounds, this is actually what Unsplash
does.
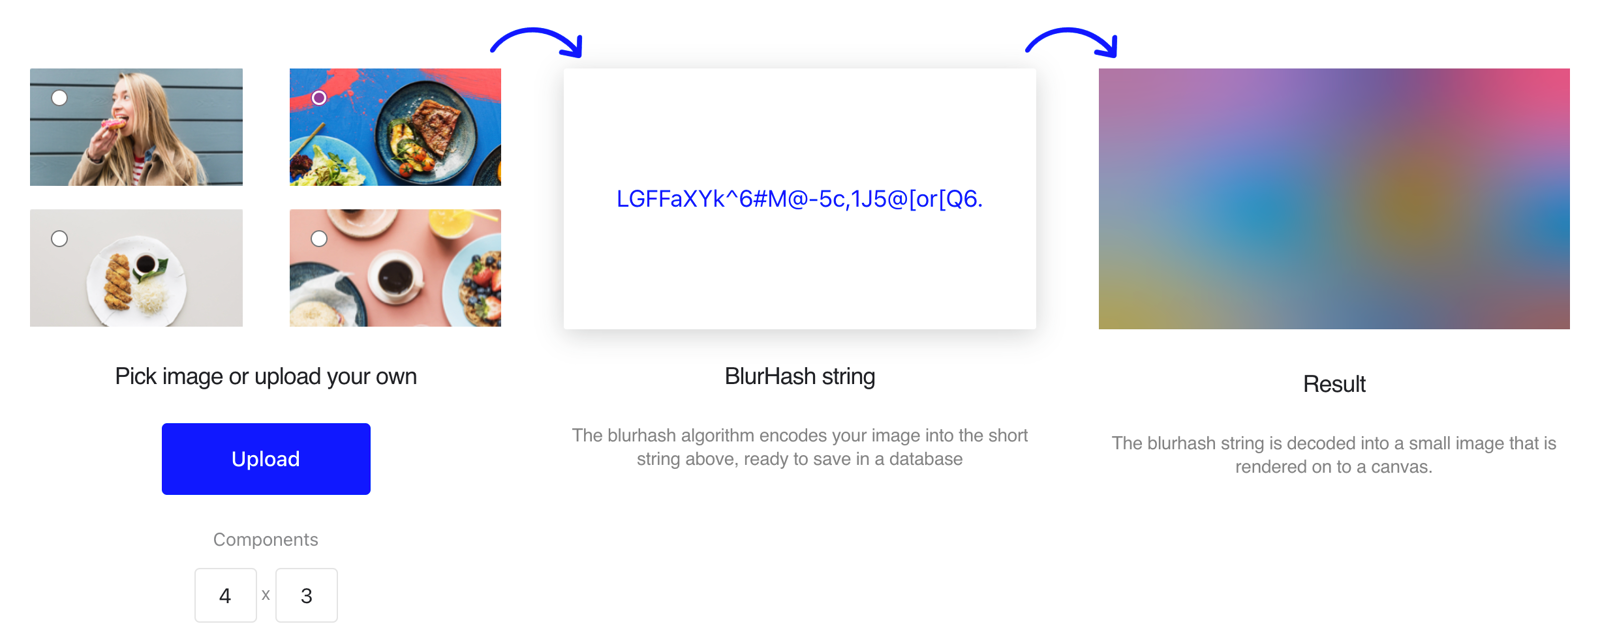
When you land on an unsplash image, there are three things that can happen in series depending on your network speed:
*There's a bit more to that step 3 which we'll talk about later.
These actually all happen, but they're layered with the image on top, then the blur canvas, then the div with a background color. That way unsplash shows the best thing it can as soon as possible. For this reason, it's quite possible you'll not see the blurred image on the initial page load, but if you navigate around after the page loads that's what you'll see for all other images and you won't see the primary color background anymore. This is because showing the blurred image canvas requires JavaScript to work.
So if the image loads before the JavaScript then the JavaScript won't have a chance to set up the canvas for the blurred image for you before you're looking at the actual image. And if the JavaScript is already loaded (like if you're doing client-side navigation) you won't see the background color and will only see the blurred image.
This is a nice setup and when I was working on my own image loading experience I
looked at this for inspiration. The really cool thing about the blurhash /
canvas approach is the size of the data required for the image is really small.
Like, seriously, this is all you need to pass to the blurhash client library for
a nice looking blur of a full image: LGFFaXYk^6#M@-5c,1J5@[or[Q6.:
Honestly, it's so cool. Magical 🧙
Ultimately the goal here is to minimize the amount of data needed to give the user a good experience while the full resolution image is loading. It's a balance of speed and a good user experience.
When I was reverse engineering unsplash's image loading techniques, I evaluated
whether I should just adopt their approach or try something a little different.
I really didn't like the fact that they have to render a div with a solid
background color before they can render the blurred image. Why not just render
the blurred image on the server via a base64 encoded data URL?
So I decided to try it out. First I needed to find a way to automatically generate the base64 data URL. For one thing, I know that the URL would be very large if I just tried with the regular size image (this would basically negate all the user experience gains by making my page load slowly).
So I needed to generate a base64 data URL for a downscaled version of the image. This is really easy since I'm using Cloudinary for all my images. Additionally, cloudinary has the ability to apply transforms like blur on the image. This means that I could easily reduce the amount of data to represent in my base64 string. So I generate a cloudinary URL like this:
https://res.cloudinary.com/kentcdodds-com/image/upload/w_100,q_auto,f_webp,e_blur:1000/kentcdodds.com/content/blog/how-i-built-a-modern-website-in-2021/banner_iplhopAnd when I fetch that image and base64 encode it, I end up with this:
data:image/webp;base64,UklGRhQBAABXRUJQVlA4IAgBAAAQDQCdASpkAEMAPrFGmko7qyWhsls9U3AWCWkGcA01nlwbK5buwWRoA3koD7+5vLBXAtOMrneG2GT90JyrLz+2XeotIAEq5PL4F0N1qTRIJ7LnMa5Zcre8UaDTMRtFt14eXNoGYkhNSt0REMN2PN4FwAD+7s4jHeyE9BXykzZMxIuwC4FSp408GYxRjoczsMvwZlqrnzr4cuA6X6MspvaoVHUro1XNU1SNxrLKLjhZrJ3GmlyoorlW1L532OP9tbhOeQgFiDwE81g+CH4d16xfOjEGrpus0wYxdunoI7Nokc5fnyoAw8pKJEq6cW3Yp4rqZw9fosV61qnAN+ViAH+WOzoqC6R90AA=Now, that's quite a bit more than the 30 or so characters that represent the hash for blurhash, but remember that blurhash also requires a client library which is larger than this. But that's actually not the reason I didn't go with blurhash. Once you apply this to just a couple of images, blurhash more than pays for its own weight. So a site like unsplash definitely hits that point where it makes a lot of sense.
And blurhash would probably pay for itself on my site too. I have the recommendations at the bottom of every page which are all blur-loaded as well.
So why didn't I go with blurhash at this point? It's because I really didn't want to render the primary color. I just didn't think it looked good for my site. And this data URL wasn't so big that I thought it was worth server-rendering the solid block of color. It's a shame we can't server render a canvas. That'd be the best of both worlds. sigh
So I went with rendering the base64 behind the actual image. So while the image is loading I display a server-rendered blurred and upscaled version of the image.
Unfortunately, upscaling it like this made it look really pixelated.
The platform to the rescue! I just slapped this in the DOM after my base64 image and we were in business:
<div class="backdrop-blur-xl"></div>
That ends up effectively applying this css:
backdrop-filter: blur(24px);
And we get the nice blur effect:
Sweet!
I had a nice placeholder, but one thing that bothered me was when the image did
load it would just appear in place of the placeholder, and I wanted it to feel
like the placeholder kinda turned into the actual image. For this to work, I
needed to write some JavaScript. I think it's about time I show you my
BlurrableImage component... First, here's how I use it on my blog post page:
function BlogScreen() {
	// ...
	return (
		// ...
		<div className="col-span-full mt-10 lg:col-span-10 lg:col-start-2 lg:mt-16">
			{frontmatter.bannerCloudinaryId ? (
				<BlurrableImage
					key={frontmatter.bannerCloudinaryId}
					blurDataUrl={frontmatter.bannerBlurDataUrl}
					className="aspect-[3/4] md:aspect-[3/2]"
					img={
						<img
							key={frontmatter.bannerCloudinaryId}
							title={frontmatter.bannerCredit}
							{...getImgProps(
								getImageBuilder(
									frontmatter.bannerCloudinaryId,
									frontmatter.bannerAlt ??
										frontmatter.bannerCredit ??
										frontmatter.title ??
										'Post banner',
								),
								{
									className: 'rounded-lg object-cover object-center',
									widths: [280, 560, 840, 1100, 1650, 2500, 2100, 3100],
									sizes: [
										'(max-width:1023px) 80vw',
										'(min-width:1024px) and (max-width:1620px) 67vw',
										'1100px',
									],
									transformations: {
										background: 'rgb:e6e9ee',
									},
								},
							)}
						/>
					}
				/>
			) : null}
		</div>
		// ...
	)
	// ...
}
And here's the BlurrableImage component itself:
import * as React from 'react'
import { clsx } from 'clsx'
import { useSSRLayoutEffect } from '#app/utils/misc'

export function BlurrableImage({
	img,
	blurDataUrl,
	...rest
}: {
	img: React.ReactElement<React.ImgHTMLAttributes<HTMLImageElement>>
	blurDataUrl?: string
} & React.HTMLAttributes<HTMLDivElement>) {
	const [visible, setVisible] = React.useState(false)
	const jsImgElRef = React.useRef<HTMLImageElement>(null)

	React.useEffect(() => {
		if (!jsImgElRef.current) return
		if (jsImgElRef.current.complete) return

		let current = true
		jsImgElRef.current.addEventListener('load', () => {
			if (!jsImgElRef.current || !current) return
			setTimeout(() => {
				setVisible(true)
			}, 0)
		})

		return () => {
			current = false
		}
	}, [])

	const jsImgEl = React.cloneElement(img, {
		ref: jsImgElRef,
		className: clsx(img.props.className, 'transition-opacity', {
			'opacity-0': !visible,
		}),
	})

	return (
		<div {...rest}>
			{blurDataUrl ? (
				<>
					<img
						src={blurDataUrl}
						className={img.props.className}
						alt={img.props.alt}
					/>
					<div className={clsx(img.props.className, 'backdrop-blur-xl')} />
				</>
			) : null}
			{jsImgEl}
			<noscript>{img}</noscript>
		</div>
	)
}
Alright, that's a bit to take in... Let me walk you through it...
First, the props are pretty simple. We accept an img element which is the
ultimate image we want to be loaded. We accept a blurDataUrl to render a
blurred version of the image while we're waiting for the image to load. And then
the rest of the props are just applied to the div that's the container for
everything. I pretty much only use that for the className for the aspect ratio
stuff.
Let's skip all the stuff in the middle and go down to what we're rendering:
We render a wrapper div to keep everything together (in particular for the aspect ratio stuff to work properly).
Then if there is a blurDataUrl, we render an img element with the
blurDataUrl. We inherit the className to ensure we get stuff like the right
border radius etc.
Then under that we render the backdrop to smooth out the blurriness of the data URL image since that's going to be scaled up as described earlier.
Then we render what I call a jsImgEl. This is a copy of the img. The
jsImgEl is the primary image that will be displayed to the user when all is
said and done. I make a copy of it so I can add some css for the fade-in action.
More on this in a moment.
Finally, the <noscript>{img}</noscript> stuff is there for the handful of
users who might disable JavaScript because otherwise they'll never get the image
displayed (because displaying the image requires JavaScript). There probably
aren't many (any) users like this, but it's just so easy so why not?
Alrighty, so to make the fade work, we need to have the jsImgEl start out as
invisible. The browser will still load this for us though, and it fires events
along the way, so we use useEffect to add an event handler to know when it's
loaded and when it does finish loading we'll trigger an update to make the image
fade in.
And really that's it.
... except now it's 2023 and I decided to improve one more thing...
One problem with our implementation is that the image won't fade in until after the JavaScript has been loaded. This is annoying because if the image is already in the browser cache, we'll still see the blurred image for a fraction of a second before the JS is loaded, parsed, and executed. I wanted it to be faster!
So I decided to add an onload prop 😱. Inline JavaScript in HTML is normally
not something you want to do, but in this case it's perfect. So this is what I
wanted to do:
// ...
const jsImgEl = React.cloneElement(img, {
	ref: jsImgElRef,
	onload: "this.classList.remove('opacity-0')",
	className: clsx(img.props.className, 'transition-opacity', {
		'opacity-0': !visible,
	}),
})
// ...
This works great because it means that the inline JS will run as soon as the image finishes loading (the JS doesn't need to "load" because it's inline!).
Unfortunately, doing that doesn't work because React throw a big stink about
wanting you to use onLoad instead (with inline function handler instead of an
inline string of JS).
So I had to go with a bit of a more complicated route to make this work.
This post is already quite long, so I'm not going to go into the details, but you can look at the commit which fixed all this. Here's the difference:
I unironically deployed an inline event handler in HTML in a production app. I used it to avoid an unnecessary blur. So you still get the nice blur loading experience when the image isn't downloaded yet, but if it's already in your browser cache, you don't get a flash of blur! twitter.com/kentcdodds/status/1630362305409216512
Nice win there!
So in review, to make an excellent image loading experience I'm doing a few things:
<img /> attributes sizes and
srcset + cloudinary transforms.And that's what powers the awesome image loading experience on this site. It's important to remember that user experience is not all about performance. It's also about the experience. And I feel like the trade-offs I've made here are solid for the user experience I want to provide you as you navigate this site. I hope you love it :)
P.S. I'm eyeing unpic-img which
promises to be a framework agnostic solution to this and includes nice
placeholder support that has support for server rendering as well. May be
something to look at!
此内容由惯性聚合(RSS阅读器)自动聚合整理,仅供阅读参考。 原文来自 — 版权归原作者所有。