


Edit · Sep 3, 2014 · 14 minutes read · Follow @mgechev React.js JavaScript WebRTC p2p Peer to Peer
In this blog post I’m going to share how could be build WebRTC chat with React.js. Before we continue lets describe briefly what React.js and WebRTC are.
The application from this tutorial is available at GitHub.
React.js
React.js is reactive JavaScript framework, which helps you to build user interface. Facebook states that we can think of React as the “V” in MVC. React’s main aspect is the state. When the state of the application changes this automatically propagates through the application’s components. A React component is a self-contained module, which is composed by one or more other components. Usually the component depends on state, which is being provided by a parent component. May be the explanation seems quite abstract now, but during the tutorial the picture will get much more clear.
WebRTC
RTC stands for Real-Time Communication. Until browsers implemented WebRTC our only way to provide communication between several browsers was to proxy the messages via a server between them (using WebSockets or HTTP). WebRTC makes the peer-to-peer communication between browsers possible. Using the NAT traversal framework - ICE, we are able find the most appropriate route between the browsers and make them communicate without mediator. Since 1st of July 2014, v1.0 of the WebRTC browser APIs standard is already published by W3C.
NAT
Before we continue with the tutorial, lets say a few words about what NAT is. NAT stands for Network Address Translation. It is quite common way for translating internal (private) IP addresses to public ones and vice verse. A lot of ISP providers with limited capacity of public IP addresses uses this way of scaling using private IP addresses in their internal networks and translating them to public addresses visible to the outside world. More about NAT and the different types of NAT could be read in this wiki article.
Implementation
Now lets get starting with the actual implementation of our WebRTC based chat.
Architecture
High-level overview
Since I’m kind of traditionalist I’ll start by providing a basic, high-level overview of the architecture of our p2p (peer to peer) chat.
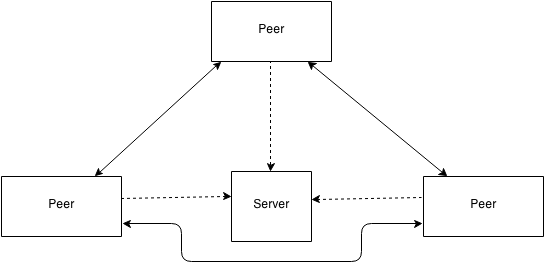
The dashed arrows, in the diagram, indicate signaling WebSocket connections. Each client initiates such connection with the server. With these connections each client aims to register itself on the server and use the server as a proxy during the NAT traversal procedures, defined by the signaling protocol (for now we can think of the signaling protocol as SIP or XMPP Jingle). Actually the signaling protocol in our case is provided by Peer.js.
The solid arrow stands for peer-to-peer TCP or UDP (TCP in our case) data channel between the browsers. We use full mesh, which scales badly especially when we use video or audio streaming. For the purpose of our chat full mesh is good enough.
Low-level overview
In the beginning of the blog post I mentioned that React.js application contains a finite amount of React.js components composed together. In this subsection I’ll illustrate, which are the different components of our application and how they are composed together. The diagram below isn’t following the UML standard, it only illustrate, as clearly as possible, our micro-architecture.
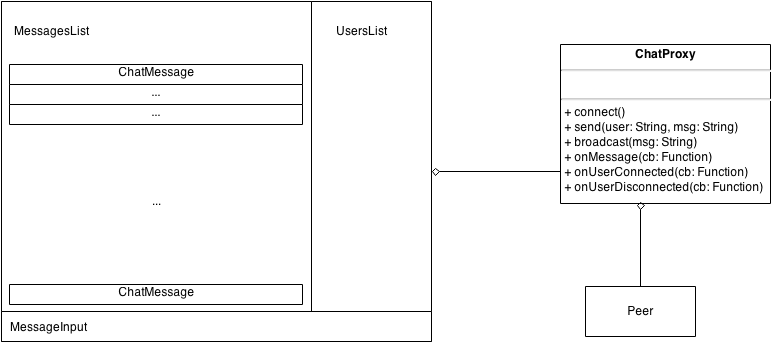
Lets concentrate on the left-hand side of the diagram. As you see we have a set of nested components. The most outer, non-named, component (the rectangle, which contains all other rectangles), is the ChatBox component. In its left-hand side is positioned the MessagesList component, which is composition of ChatMessage components. Each ChatMessage component contains a different chat message, which has author, date when published and content. On the right-hand side of the ChatBox is positioned the UsersList component. This component lists all users, which are currently in the chat session. The last component is the MessageInput component. The MessageInput component is a simple text input, which once detect a press of the Enter key triggers an event, with data - its value.
The ChatBox component uses ChatProxy. The ChatProxy is responsible for registering the current client on the server and talking with the other peers. For simplicity I’ve used Peer.js, which provides nice high-level API, wrapping the browser’s WebRTC API.
Getting started
In this section we are going to setup our project…
Create a directory called react-p2p and enter it:
mkdir react-p2p && cd react-p2pCreate a package.json file with the content:
{
  "name": "react-peerjs",
  "version": "0.0.0",
  "description": "ReactJS chat with PeerJS",
  "main": "index.js",
  "scripts": {
    "test": ""
  },
  "keywords": [
    "webrtc",
    "nodejs",
    "react",
    "javascript",
    "awesome"
  ],
  "author": "mgechev",
  "license": "MIT",
  "dependencies": {
    "express": "~4.8.4",
    "peer": "~0.2.6",
    "socket.io": "~1.0.6"
  }
}
This file defines primitive information for our server, like name, version, keywords and dependencies. The dependencies of our server are:
express- we are going to use express as a static serverpeer- A server, which implements the signaling of our applicationsocket.io
Now lets take a look at ./bower.json:
{
  "name": "react-peerjs",
  "main": "index.js",
  "version": "0.0.0",
  "authors": [
    "mgechev"
  ],
  "license": "MIT",
  "ignore": [
    "**/.*",
    "node_modules",
    "bower_components",
    "public/lib",
    "test",
    "tests"
  ],
  "dependencies": {
    "react": "~0.11.1",
    "jquery": "~2.1.1",
    "bootstrap": "~3.2.0",
    "eventEmitter": "~4.2.7",
    "peerjs": "~0.3.9"
  }
}bower.json file defines primitive information and dependencies for the client-side of the application.
The required dependencies are:
react- the framework, we are going to use for building our UI.eventEmitter- our components are going to fire events, which later are going to be handled by other components. EventEmitter will be used as based class for our “event-driven” components.peerjs- wraps the browser’s WebRTC API into high-level, easier to use API.jquerybootstrap
And… .bowerrc
{
  "directory": "public/lib"
}
In .bowerrc we define that we want all bower dependencies to be saved at /public/lib.
Now, in order to resolve all dependencies, run:
bower install && npm installNow lets start with our implementation.
Server-side
We have a few lines of Node.js, which are required for signaling and establishing p2p connection between the peers.
Create a file called index.js in the root of our application and add the following content:
var PeerServer = require('peer').PeerServer,
    express = require('express'),
    Topics = require('./public/src/Topics.js'),
    app = express(),
    port = process.env.PORT || 3001;

app.use(express.static(__dirname + '/public'));

var expressServer = app.listen(port);
var io = require('socket.io').listen(expressServer);

console.log('Listening on port', port);

var peerServer = new PeerServer({ port: 9000, path: '/chat' });

peerServer.on('connection', function (id) {
  io.emit(Topics.USER_CONNECTED, id);
  console.log('User connected with #', id);
});

peerServer.on('disconnect', function (id) {
  io.emit(Topics.USER_DISCONNECTED, id);
  console.log('User disconnected with #', id);
});
In the snippet above, we create a simple express server, which servers static files from the directory /public, located in the root folder. After that we create a PeerServer, which on the other hand is responsible for handling the signaling between the different peers. In our case we can think of the PeerServer and the protocol, which it implements as alternative of SIP or XMPP Jingle.
Once our PeerServer detects that a peer has been connected to it, it triggers the event USER_CONNECTED to all peers. Once a client disconnects from the PeerServer we trigger USER_DISCONNECTED. These two events are very important for handling the list of currently available users.
Client-side
ChatProxy.js
Now lets take a look at the component responsible for communication between our peers and registering them on the server.
The biggest advantage of putting the logic for p2p communication and signaling out of the react components is achieving separation of concerns. This way we achieve highly coherent components, which are reusable and testable.
Inside /public/src/models/ create a file called ChatProxy.js.
function ChatProxy() {
  EventEmitter.call(this);
  this._peers = {};
}

ChatProxy.prototype = Object.create(EventEmitter.prototype);
Our ChatProxy extends EventEmitter. We use inheritance because we want to reuse the functionality provided by the EventEmitter and fire events when we receive new message, client connects or disconnects.
The most complex method, which ChatProxy implements is the connect method. Lets take a look at it:
ChatProxy.prototype.connect = function (username) {
  var self = this;
  this.setUsername(username);
  this.socket = io();
  this.socket.on('connect', function () {
    self.socket.on(Topics.USER_CONNECTED, function (userId) {
      if (userId === self.getUsername()) {
        return;
      }
      self._connectTo(userId);
      self.emit(Topics.USER_CONNECTED, userId);
      console.log('User connected', userId);
    });
    self.socket.on(Topics.USER_DISCONNECTED, function (userId) {
      if (userId === self.getUsername()) {
        return;
      }
      self._disconnectFrom(userId);
      self.emit(Topics.USER_DISCONNECTED, userId);
      console.log('User disconnected', userId);
    });
  });
  console.log('Connecting with username', username);
  this.peer = new Peer(username, {
    host: location.hostname, port: 9000, path: '/chat'
  });
  this.peer.on('open', function (userId) {
    self.setUsername(userId);
  });
  this.peer.on('connection', function (conn) {
    self._registerPeer(conn.peer, conn);
    self.emit(Topics.USER_CONNECTED, conn.peer);
  });
};
If the client have passed username to the connect call we set the current username, after that with io() we establish new socket.io connection. The socket.io connection is going to be used for receiving USER_CONNECTED and USER_DISCONNECTED events. Once we have been connected to the socket.io server, we bind to these events. We need extra, socket.io, connection here because the API of Peer.js doesn’t provide all required events by its public API.
In the snippet:
self.socket.on(Topics.USER_CONNECTED, function (userId) {
  if (userId === self.getUsername()) {
    return;
  }
  self._connectTo(userId);
  self.emit(Topics.USER_CONNECTED, userId);
  console.log('User connected', userId);
});
Once we receive event, which indicates that new user is connected, we make sure that the connected peer is not us. In this case, we establish connection with it by calling the “private” method _connectTo.
The callback for USER_DISCONNECTED is almost analogous so we won’t take a further look at it.
The next interesting part of the connect method is the snippet where we establish new Peer.js connection:
this.peer = new Peer(username, {
  host: location.hostname, port: 9000, path: '/chat'
});
this.peer.on('open', function (userId) {
  self.setUsername(userId);
});
this.peer.on('connection', function (conn) {
  self._registerPeer(conn.peer, conn);
  self.emit(Topics.USER_CONNECTED, conn.peer);
});
Once we invoke the constructor function Peer, provided by Peer.js, with the appropriate parameters, we bind to the open event. When the callback passed for the open event is being invoked, we receive the unique identifier of the current user, in the ideal case it will be the username entered in the home screen. Once we receive the user identifier we can save it.
When we receive connection event we register the connected peer and emit USER_CONNECTED event. The USER_CONNECTED event will be handled by the ChatBox, which will lead to change of the state of the UI.
The full content of ChatProxy could be found at GitHub.
app.jsx
The initial view of the user would be:
<section id="container">
  <div class="reg-form-container">
    <label for="username-input">Username</label>
    <input type="text" id="username-input" class="form-control">
    <br>
    <button id="connect-btn" class="btn btn-primary">Connect</button>
  </div>
</section>
Once rendered in the browser, this would be a simple text box asking the client for optional username. In order to see what happens once the user click on the #connect-btn, lets take a look at the app.jsx file, which is located at /public/app.jsx:
/** @jsx React.DOM */

$(function () {
  $('#connect-btn').click(function () {
    initChat($('#container')[0],
      $('#username-input').val());
  });

  function initChat(container, username) {
    React.renderComponent(<ChatBox chatProxy={new ChatProxy()}
      username={username}></ChatBox>, container);
  }

  window.onbeforeunload = function () {
    return 'Are you sure you want to leave this page?';
  };

});
When the user clicks on #connect-btn we render the ChatBox component inside the #container element. So now lets see what the ChatBox does:
ChatBox.jsx
At /public/src/components/chat/ create a file called ChatBox.jsx and add the following content:
/** @jsx React.DOM */

'use strict';

var ChatBox = React.createClass({
  getInitialState: function () {
    return { users: [] };
  },

  componentDidMount: function () {
    this.chatProxy = this.props.chatProxy;
    this.chatProxy.connect(this.props.username);
    this.chatProxy.onMessage(this.addMessage.bind(this));
    this.chatProxy.onUserConnected(this.userConnected.bind(this));
    this.chatProxy.onUserDisconnected(this.userDisconnected.bind(this));
  },

  userConnected: function (user) {
    var users = this.state.users;
    users.push(user);
    this.setState({
      users: users
    });
  },

  userDisconnected: function (user) {
    var users = this.state.users;
    users.splice(users.indexOf(user), 1);
    this.setState({
      users: users
    });
  },

  messageHandler: function (message) {
    message = this.refs.messageInput.getDOMNode().value;
    this.addMessage({
      content: message,
      author : this.chatProxy.getUsername()
    });
    this.chatProxy.broadcast(message);
  },

  addMessage: function (message) {
    if (message) {
      message.date = new Date();
      this.refs.messagesList.addMessage(message);
    }
  },

  render: function () {
    return (
      <div className="chat-box" ref="root">
        <div className="chat-header ui-widget-header">React p2p Chat</div>
        <div className="chat-content-wrapper row">
          <MessagesList ref="messagesList"></MessagesList>
          <UsersList users={this.state.users} ref="usersList"></UsersList>
        </div>
        <MessageInput
          ref="messageInput"
          messageHandler={this.messageHandler}>
        </MessageInput>
      </div>
    );
  }
});
Lets take a look at the render method:
render: function () {
  return (
    <div className="chat-box" ref="root">
      <div className="chat-header ui-widget-header">React p2p Chat</div>
      <div className="chat-content-wrapper row">
        <MessagesList ref="messagesList"></MessagesList>
        <UsersList users={this.state.users} ref="usersList"></UsersList>
      </div>
      <MessageInput
        ref="messageInput"
        messageHandler={this.messageHandler}>
      </MessageInput>
    </div>
  );
}
The render method returns the markup, which should be rendered. We use components, which are already defined and available in the given scope (components like MessagesList and MessageInput).
Once the component has been mounted the componentDidMount method is being invoked:
componentDidMount: function () {
  this.chatProxy = this.props.chatProxy;
  this.chatProxy.connect(this.props.username);
  this.chatProxy.onMessage(this.addMessage.bind(this));
  this.chatProxy.onUserConnected(this.userConnected.bind(this));
  this.chatProxy.onUserDisconnected(this.userDisconnected.bind(this));
},
In this method we create new ChatProxy, invoke its method connect and add event handlers. Once we receive a new message the callback registered for onMessage will be invoked, once a user is connected the callback userConnected will be invoked and once a peer is being disconnected the callback userDisconnected will be invoked. We use Function.prototype.bind in order to change the context for the callbacks with appropriate one.
userConnected and userDisconnected are similar:
userConnected: function (user) {
  var users = this.state.users;
  users.push(user);
  this.setState({
    users: users
  });
},

userDisconnected: function (user) {
  var users = this.state.users;
  users.splice(users.indexOf(user), 1);
  this.setState({
    users: users
  });
}
They both change the state, which leads to call of the render method with the new state, which reflects on other components and respectively on the current UI.
In the addMessage method we have:
addMessage: function (message) {
  if (message) {
    message.date = new Date();
    this.refs.messagesList.addMessage(message);
  }
}
The interesting part here is the line: this.refs.messagesList.addMessage(message);, where we use this.refs. This is built-in React.js feature, which allows us to reference to existing child components. Once we set the ref attribute of given component (like <MessagesList ref="messagesList"></MessagesList>) we can later access the component by using this.refs.REF_ATTRIBUTE_VALUE.
MessagesList.jsx
Inside /public/src/components/chat/ add file called MessagesList.jsx and add the following content:
/** @jsx React.DOM */

'use strict';

var MessagesList = React.createClass({

  getInitialState: function () {
    return { messages: [] };
  },

  addMessage: function (message) {
    var messages = this.state.messages,
        container = this.refs.messageContainer.getDOMNode();
    messages.push(message);
    this.setState({ messages: messages });
    // Smart scrolling - when the user is
    // scrolled a little we don't want to return him back
    if (container.scrollHeight -
        (container.scrollTop + container.offsetHeight) >= 50) {
      this.scrolled = true;
    } else {
      this.scrolled = false;
    }
  },

  componentDidUpdate: function () {
    if (this.scrolled) {
      return;
    }
    var container = this.refs.messageContainer.getDOMNode();
    container.scrollTop = container.scrollHeight;
  },

  render: function () {
    var messages;
    messages = this.state.messages.map(function (m) {
      return (
        <ChatMessage message={m}></ChatMessage>
      );
    });
    if (!messages.length) {
      messages = <div className="chat-no-messages">No messages</div>;
    }
    return (
      <div ref="messageContainer" className="chat-messages col-xs-9">
        {messages}
      </div>
    );
  }
});
Lets take a look at the render method of this component:
render: function () {
  var messages;
  messages = this.state.messages.map(function (m) {
    return (
      <ChatMessage message={m}></ChatMessage>
    );
  });
  if (!messages.length) {
    messages = <div className="chat-no-messages">No messages</div>;
  }
  return (
    <div ref="messageContainer" className="chat-messages col-xs-9">
      {messages}
    </div>
  );
}
Initially we iterate over all messages from the state of the current component (this.state.messages). Using Array.prototype.map we turn our messages array into ChatMessages and later render them into the div.chat-messages.
In addMessage we add new chat messages by appending them to the list of all messages:
addMessage: function (message) {
  var messages = this.state.messages,
      container = this.refs.messageContainer.getDOMNode();
  messages.push(message);
  this.setState({ messages: messages });
  // Smart scrolling - when the user is
  // scrolled a little we don't want to return him back
  if (container.scrollHeight -
      (container.scrollTop + container.offsetHeight) >= 50) {
    this.scrolled = true;
  } else {
    this.scrolled = false;
  }
}
The interesting part here is:
if (container.scrollHeight -
    (container.scrollTop + container.offsetHeight) >= 50) {
  this.scrolled = true;
} else {
  this.scrolled = false;
}
Basically, this snippet checks whether the user have scrolled more than 50pxs. If he did, we don’t want to scroll to bottom once he have started reading messages from the history of the chat. Thats why depending on whether the user have or haven’t scrolled we set this.scrolled to true or false.
We use this.scrolled in componentDidUpdate:
componentDidUpdate: function () {
  if (this.scrolled) {
    return;
  }
  var container = this.refs.messageContainer.getDOMNode();
  container.scrollTop = container.scrollHeight;
}
Once the component is going to be updated (for example because of new message added), we check whether the user have scrolled and if he had, we set scrollTop to the appropriate value. For getting the scroll container we use this.refs, as explained above.
MessageInput.jsx
This is the last component we will look at.
/** @jsx React.DOM */

'use strict';

var MessageInput = React.createClass({

  mixins: [React.addons.LinkedStateMixin],

  keyHandler: function (event) {
    var msg = this.state.message.trim();
    if (event.keyCode === 13 && msg.length) {
      this.props.messageHandler(msg);
      this.setState({ message: '' });
    }
  },

  getInitialState: function () {
    return { message: '' };
  },

  render: function () {
    return (
      <input type="text"
        className = "form-control"
        placeholder="Enter a message..."
        valueLink={this.linkState("message")}
        onKeyUp={this.keyHandler}/>
    );
  }
});
In this component we use the mixin React.addons.LinkedStateMixin, which adds the method linkState to our component. Once the linkState method is called we can create two-way data binding between given input and property of our state. The name of the property depends on the value we pass to the linkState call. For example if we invoke this.linkState('value'), once the value of the input is being changed, this will reflect on this.state.value.
Another interesting moment here is the key handler. On key up of input.form-control the keyHandler method will be called. The method checks whether the event was called by pressing enter and whether the length of the trimmed value of the current message is more than zero, if it is, it updates the value of the current message to be the empty string and invokes this.props.messageHandler. this.props.messageHandler is passed by the ChatBox component as property of the MessageInput:
<MessageInput
  ref="messageInput"
  messageHandler={this.messageHandler}>
</MessageInput>
Run the project…
The next step is to run the project by:
node index.js && open http://localhost:3001Fin!
I hope the blog post was fun and useful! :-)