暂无文章
Python加Django开发网页程序真的很方便,连我这个菜鸟看看教程之类的也能写出来程序。本地测试完了之后,想在服务器上跑跑看,结果发现,要发布到服务器端,可是比PHP程序要麻烦的多,从昨天下午就开始看相关的教程,后来在宝塔面板下部署成功了,但是我不想用宝塔面板,于是继续折腾的道路,经过一天的折腾,重装了好几次测试的服务器,终于算是部署成功了,虽然只是一个测试的项目,但是总算又迈出去了一步不是。项目采用nginx+uwsgi+django。服务器端采用的是debian11。

由于debian11本身带有3.9.2版本的,所以,这里就不安装了。直接在data文件夹里建立一个虚拟目录。
python3 -m venv env
然后进入虚拟环境
source env/bin/activate
安装环境
可以用本地服务器的导出的requirements.txt,命令是:
pip freeze > requirements.txt #在本地虚拟环境使用
切换到服务器端,上传这个文件到data目录下

pip install -r requirements.txt #这样就可以在建立起和你的本地一样的环境
pip install uwsgi#虚拟环境里装了后,需要在真实环境再运行一次
上传本地的项目到data
在与manage.py同级目录下建立一个新文件。uwsgi.ini
#添加配置选择
[uwsgi]
#配置和nginx连接的socket连接
socket=127.0.0.1:8997
#配置项目路径,项目的所在目录
chdir=/data/wwwroot/mysite/
#配置wsgi接口模块文件路径,也就是wsgi.py这个文件所在的目录
wsgi-file=myblog/wsgi.py
#配置启动的进程数
processes=4
#配置每个进程的线程数
threads=2
#配置启动管理主进程
master=True
#配置存放主进程的进程号文件
pidfile=uwsgi.pid
#配置dump日志记录
daemonize=uwsgi.log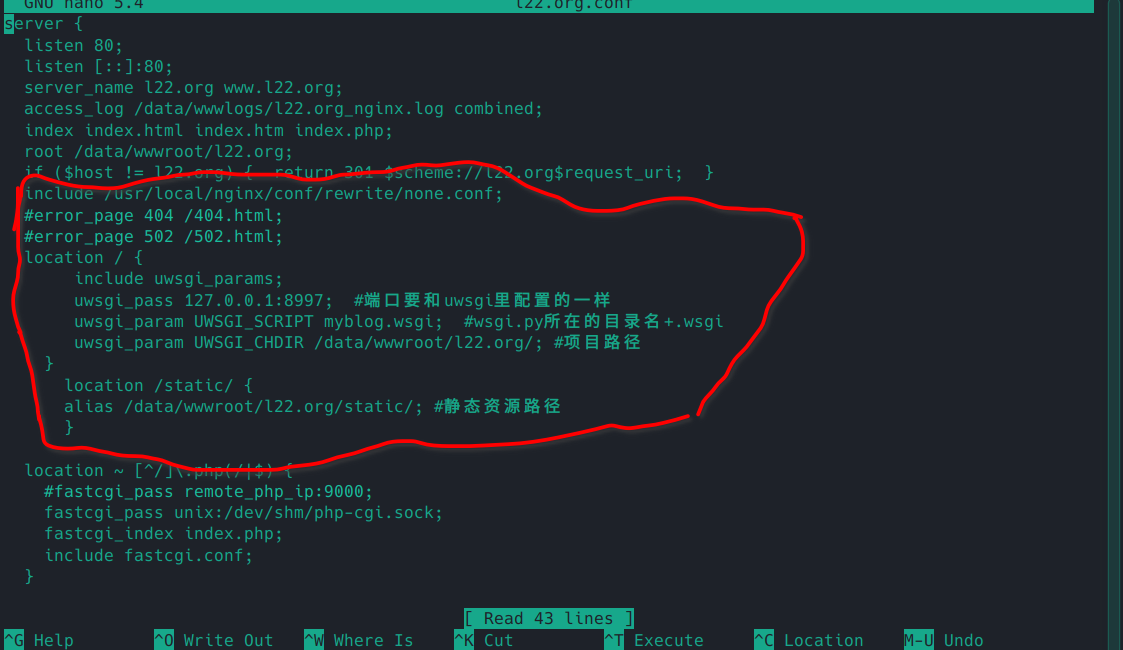
home=/data/env/由于使用习惯了oneinstack,这里继续用这个面板安装,只需安装nginx即可,可去官网看安装方法,安装完成后,./vhost建立虚拟主机。虚拟主机的目录定位到你放置项目的位置。然后在usr/local/nginx/conf/vhost/下编辑你创建的这个主机的conf。加入以下的语句。
location / {
       include uwsgi_params;
       uwsgi_pass 127.0.0.1:8997;  #端口要和uwsgi里配置的一样
       uwsgi_param UWSGI_SCRIPT myblog.wsgi;  #wsgi.py所在的目录名+.wsgi
       uwsgi_param UWSGI_CHDIR /data/wwwroot/**/; #项目路径
    }
      location /static/ {
      alias /data/wwwroot/**/static/; #静态资源路径
      }
service nginx restart

进项目目录,虚拟环境下
uwsgi --ini uwsgi.ini
然后打开你的域名,应该就没有问题了
1、python manage.py runserver正常,但是浏览器用IP:8000打不开的问题,需要用以下命令
python manage.py runserver 0.0.0.0:8000
2、没有在uwsgi.ini中配置虚拟环境目录,导致浏览器打开时候报502的错误。只需要正确的配置目录,是会正常启动的。
此内容由惯性聚合(RSS阅读器)自动聚合整理,仅供阅读参考。 原文来自 — 版权归原作者所有。