


Many home labs have both Proxmox VE hosts (for running VMs and LXCs) as well as a Synology NAS. If you want to run Proxmox Backup Server on your Synology NAS as a VM, this post is for you. I’ll show you how to install PBS as VM on your NAS, as well as configure a local disk (EXT4) as a datastore for the backups.
Not all Synology NAS devices can run VMs. In addition, I recommend using 4GB of RAM for the PBS VM, so your NAS should have at least 8GB of RAM or more. If you meet the base requirements for a VM of this size, this article is for you.
1. Login to your Synology and go to Package Center. Verify that Virtual Machine Manager is installed. If not, install it.
2. Open Virtual Machine Manager. If this is your first launch, click Start.
3. Review Host Settings and click Next.
4. If any settings need to be automatically changed, click Yes.
5. Select the volume for your VMs. Click Next.
6. If the wizard appears to freeze, refresh your browser and navigate back to Virtual Machine Manager.
1. Download the latest Proxmox Backup Server ISO. (4.0 as of August 2025).
2. Upload the ISO to a folder on your Synology NAS.
3. Open the Synology VMM console, and in the left pane click on Virtual Machine.
4. Click Create. Select Linux. Click Next.
5. Select your Storage and click Next.
6. Configure the following:
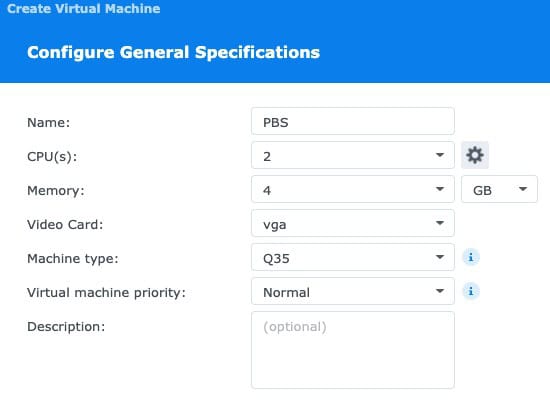
7. Click Next.
8. For the first disk (OS), I suggest 25GB.
9. Add a second disk, and make it as large as you want to store all of your backups over time. I’ll use 100GB here as an example.
Note: If you want to use ability of PBS 4.0 to use S3 storage, Proxmox recommends adding a dedicated disk as the S3 cache. They suggest 64-128GB. If you are interested in using S3 storage, I would add a third disk that’s 64-128GB. Follow the same formating/mounting procedure but it will likely be called /dev/sdc. Use this disk exclusively for the S3 cache. It could be mounted as /mnt/s3cache, for example.
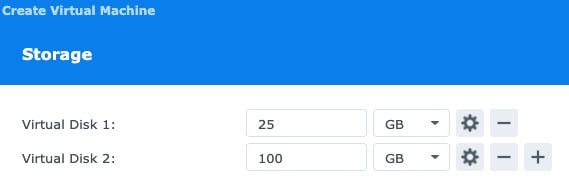
10. Click Next.
11. Don’t change the network settings unless necessary. Click Next.
12. Configure Other Settings:
13. Click Next.
14. Assign the appropriate user(s) power management features. Click Next.
15. Review the settings, check the box to power on the VM, and click Done.
16. Wait for the VM to fully provision and change to the Running status.
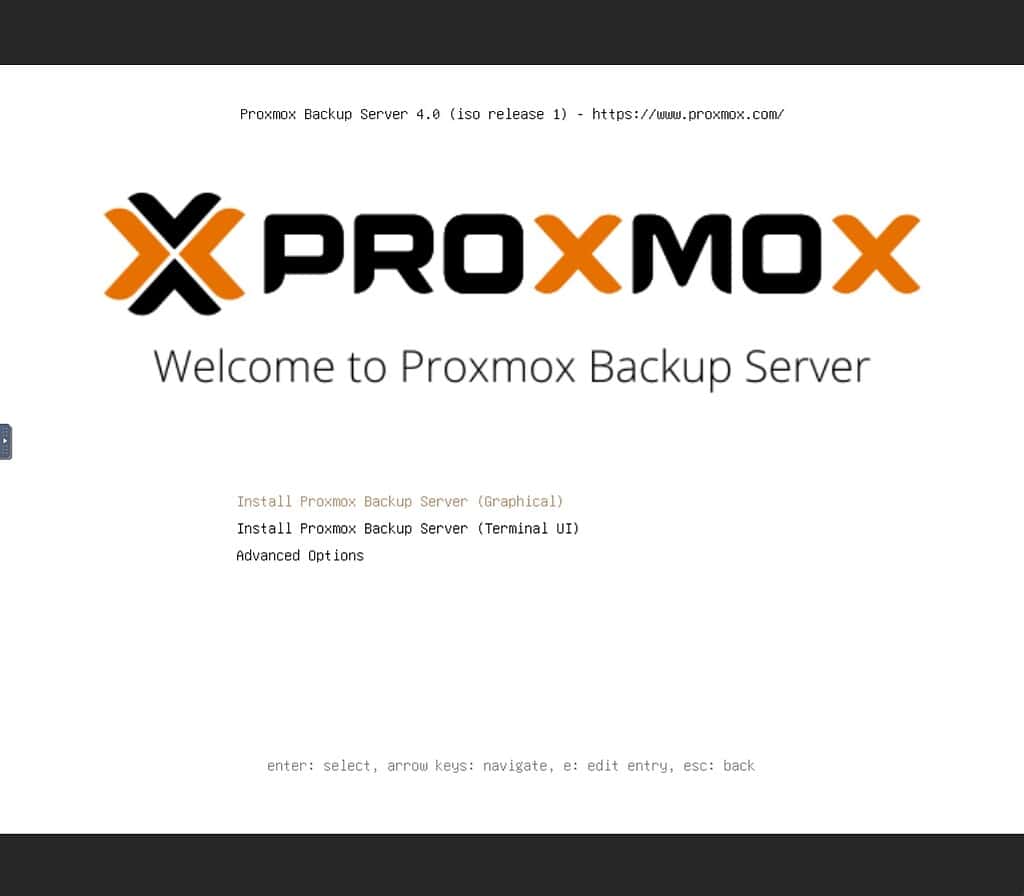
3. Click I agree on the license terms.
4. On the Target Harddisk screen make sure the boot OS disk size is listed, and click Next.
5. Change your Country, time zone and keyboard as needed.
6. Enter a complex root password and alerting email address.
7. Enter a Hostname, IP, gateway and DNS server.
8. Review Summary for accuracy and click Install.
9. Wait for the install to complete.
10. Once completed, in DSM VMM locate the VM, click on it, click Action, then Edit. On the Others tab, and change the PBS ISO to Unmounted. Click OK.
1. Open a browser and go to https://<IP>:8007 and verify you get the Proxmox Login window. Acknowledge SSL certificate warnings as needed.
2. Login (User name: root, Password: <your password>, Realm: Linux PAM). Acknowledge the subscription warning.
3. On the left click on Shell and run the following commands:
					apt update
apt-get install qemu-guest-agent
systemctl start qemu-guest-agent
lsblk -d -o NAME,SIZE,MODEL,TYPE
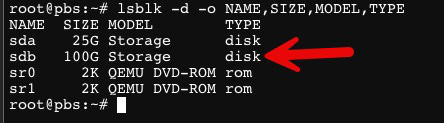
4. Look for the second disk which you created, very likely sdb. Verify the size is correct.
5. Create a new partition table for sdb:
fdisk /dev/sdb
n # Create new partition
p # Primary partition
1 # Partition number
# Press Enter for default first sector
# Press Enter for default last sector (use whole disk)
w # Write changes and exit
6. Format the disk with EXT4.
mkfs.ext4 /dev/sdb1
7. Mount the new disk by UUID and make it permanent:
mkdir -p /mnt/pbs &amp;&amp; UUID=$(blkid -s UUID -o value /dev/sdb1) &amp;&amp; grep -q "UUID=$UUID" /etc/fstab || echo "UUID=$UUID /mnt/pbs ext4 defaults 0 2" | tee -a /etc/fstab &amp;&amp; mount /mnt/pbs
8. Reload fstab:
systemctl daemon-reload
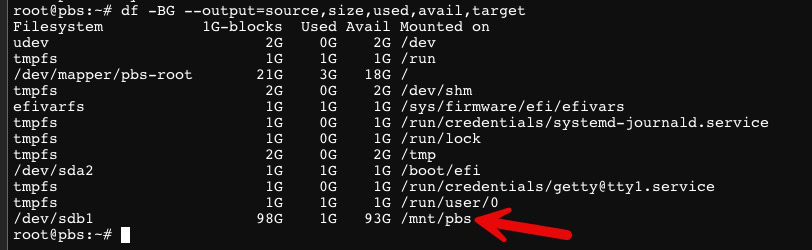
9. Run the following command and validate /mnt/pbs exists with the expected disk size.
df -BG --output=source,size,used,avail,target
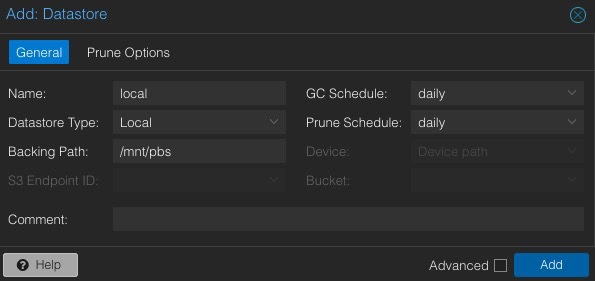
1. In the left pane of PBS click on Add Datastore.
2. Configure the following:
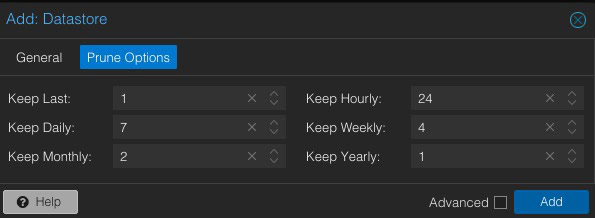
3. Click on Prune Options and configure as you see fit.
4. Click Add.
5. Click on the new datastore on the left and verify everything looks good.
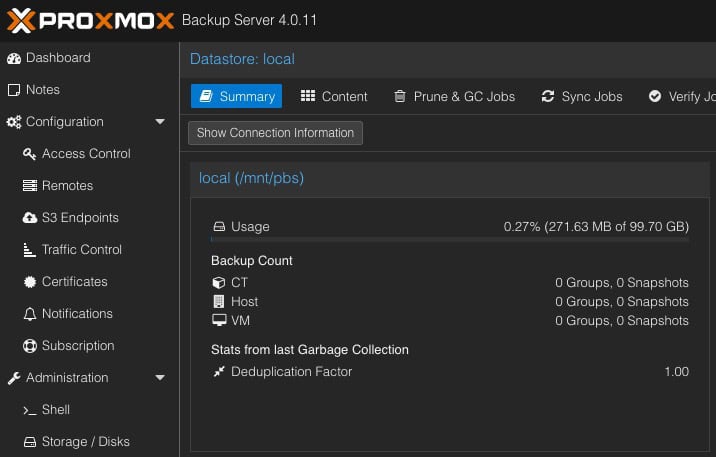
6. Reboot the PBS VM, login, and validate that the local datastore is present.
If down the road your datastore disk is running low on space, you can do an online expansion.
read -p "Enter the disk letter (e.g. b, c): " x &amp;&amp; apt update &amp;&amp; apt install -y cloud-guest-utils &amp;&amp; echo 1 &gt; /sys/block/sd${x}/device/rescan &amp;&amp; growpart /dev/sd${x} 1 &amp;&amp; resize2fs /dev/sd${x}1 &amp;&amp; fdisk -l /dev/sd${x}
4. Validate that /dev/sdb1 is the new size. Run the following command to validate /mnt/pbs has increased in size.
df -BG --output=source,size,used,avail,target
Now that you have your PBS VM running and a local datastore configured, there’s a number of other configuration steps, such as:
For a step-by-step procedure for all of those items, check out my post: How To: Proxmox Backup Server 4 (VM) Installation and skip down to the section titled “Proxmox Backup Server 4 Configuration“. Follow the remainder of the post to tackle all of the areas above.
If your Synology NAS has enough physical resources (CPU, RAM, disk) to run a small Proxmox Backup Server 4.0 VM, this article was for you. By running the PBS VM on your NAS, it provides a centralized way to consolidate backups from all of your Proxmox hosts. Most NAS CPUs are very dated and slow, so don’t expect blistering backup speeds. However, for a small home environment it may work quite well.
此内容由惯性聚合(RSS阅读器)自动聚合整理,仅供阅读参考。 原文来自 — 版权归原作者所有。