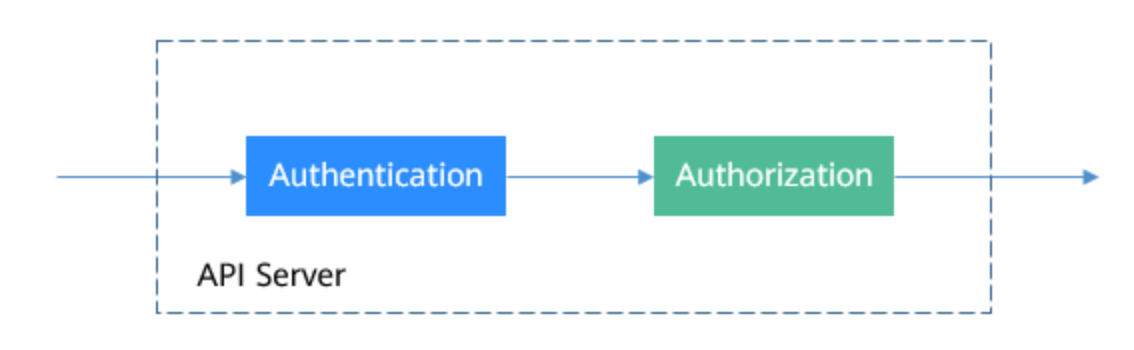
Kubernetes中所有的访问,无论外部内部,都会通过API Server处理,访问Kubernetes资源前需要经过认证与授权。
Kubernetes的用户分为服务帐户(ServiceAccount)和普通帐户两种类型。
ServiceAccount同样是Kubernetes中的资源,与Pod、ConfigMap类似,且作用于独立的命名空间,也就是ServiceAccount是属于命名空间级别的,创建命名空间时会自动创建一个名为default的ServiceAccount。
使用下面命令可以查看ServiceAccount。
bash
$ kubectl get sa
NAME     SECRETS   AGE
default  1         30d
同时Kubernetes还会为ServiceAccount自动创建一个Secret,使用下面命令可以查看到。
bash
$ kubectl describe sa default
Name:                default
Namespace:           default
Labels:              <none>
Annotations:         <none>
Image pull secrets:  <none>
Mountable secrets:   default-token-6r7dm
Tokens:              default-token-6r7dm
Events:              <none>
在Pod的定义文件中,可以用指定帐户名称的方式将一个ServiceAccount赋值给一个Pod,如果不指定就会使用默认的ServiceAccount。 当API Server接收到一个带有认证Token的请求时,API Server会用这个Token来验证发送请求的客户端所关联的ServiceAccount是否允许执行请求的操作。
继续探究token
bash
$ kubectl get secret default-token-6r7dm -o yaml
apiVersion: v1
data:
  ca.crt: LS0tLS1CRUdJTiBDRVJUSUZJQ0FURS0tLS0t....
  namespace: ZGVmYXVsdA==
  token: ZXlKaGJHY2lPaUpTVXpJ....
kind: Secret
metadata:
  annotations:
    kubernetes.io/service-account.name: default
    kubernetes.io/service-account.uid: 4943cbdb-453f-4ae6-b768-a53363178828
  creationTimestamp: "2022-07-20T11:39:38Z"
  name: default-token-6r7dm
  namespace: default
  resourceVersion: "460"
  uid: 55d3e935-a4c9-484f-aa5d-6ef8e54bf329
type: kubernetes.io/service-account-token
其中 data 中的 ca.crt,token 和 namespace 是被 base64 过的
bash
# 解码namespace: 输出 default
echo ZGVmYXVsdA== |base64 -d

# 我们解码 ca.crt 可以得到证书信息,包含过期时间,发行人,加密算法等细节
kubectl get secret default-token-6r7dm -n default  -o jsonpath="{['data']['ca\.crt']}" | base64 -d | openssl x509 -text
Certificate:
    Data:
        Version: 3 (0x2)
        Serial Number: 0 (0x0)
        Signature Algorithm: sha256WithRSAEncryption
        Issuer: CN = kubernetes
        Validity
            Not Before: Jul 20 11:39:05 2022 GMT
            Not After : Jul 17 11:39:05 2032 GMT
        Subject: CN = kubernetes
        Subject Public Key Info:
            Public Key Algorithm: rsaEncryption
                Public-Key: (2048 bit)
                Modulus:
                    00:a7:20:5d:b1:72:ee:cc:e1:c5:b0:77:4c:aa:97:
                    26:c0:b1:e4:54:38:62:72:6e:31:58:89:e0:54:c0:
                    3e:88:e3:66:0c:85:1f:bc:5c:2c:8f:65:66:16:78:
                    55:29:09:58:1b:73:c6:17:03:f4:4c:28:36:94:4b:
                    6d:91:e6:a1:dc:45:7b:11:cd:d7:72:a1:ff:16:27:
                    60:e0:02:d3:81:cc:4c:a1:de:98:14:d0:6d:a7:ae:
                    d2:28:c7:aa:d4:bf:7f:e9:12:4b:95:70:80:b5:a4:
                    f2:06:58:28:c8:27:b9:82:17:50:63:62:f6:26:93:
                    93:59:28:64:15:b4:97:4f:4c:37:51:6c:65:e1:d7:
                    a3:a7:a5:b6:2a:b0:0b:3c:38:3a:c5:20:fe:ba:ec:
                    59:70:8a:45:af:18:64:ed:81:e4:6d:35:f3:2b:3f:
                    48:49:fb:44:fe:2b:04:e7:2b:75:a4:5c:b9:40:6b:
                    14:da:b3:9a:5b:f9:27:db:fb:81:a2:16:4a:9d:05:
                    73:4d:78:74:01:e9:2d:2b:7d:52:58:9b:7b:84:a3:
                    2a:02:18:7b:d7:b7:96:3e:d3:1b:d9:67:f1:f1:48:
                    c4:cc:e5:9d:09:2a:e5:e7:c1:8c:af:d7:db:6d:85:
                    b7:c5:f7:8d:4f:86:1d:43:92:62:ba:8e:9c:54:5b:
                    53:81
                Exponent: 65537 (0x10001)
        X509v3 extensions:
            X509v3 Key Usage: critical
                Digital Signature, Key Encipherment, Certificate Sign
            X509v3 Basic Constraints: critical
                CA:TRUE
            X509v3 Subject Key Identifier:
                E6:22:94:7C:38:17:5A:43:C8:27:93:B9:49:88:85:7D:CB:B9:92:75
            X509v3 Subject Alternative Name:
                DNS:kubernetes
    Signature Algorithm: sha256WithRSAEncryption
    Signature Value:
        03:b8:28:fa:26:f5:f9:45:0a:05:0a:ff:ff:97:51:51:fa:08:
        84:5b:8d:4f:98:11:44:d3:a1:18:c1:ae:15:29:ed:b3:a7:7d:
        85:dc:8a:07:e8:ea:ac:65:0c:66:b4:16:4f:b2:d5:99:6d:d6:
        44:11:4e:5f:32:cf:c8:47:c1:f9:77:c6:51:01:84:8f:5a:3d:
        c3:50:1d:43:8c:2d:51:4b:36:00:e2:d7:ca:64:d5:c1:0d:db:
        ed:e0:87:53:8f:1d:a0:a2:0b:6e:6a:7d:cf:fb:05:96:be:b7:
        16:22:e5:b6:67:13:db:7c:51:3a:5d:88:ca:27:ee:5c:48:cc:
        5c:d6:4d:94:1e:c1:0b:99:48:1c:2b:a3:6e:22:e6:8c:ed:ae:
        ca:37:5a:8b:ae:de:91:74:17:a8:c1:3a:c4:43:3a:1e:49:3a:
        c2:28:72:b4:fd:21:ed:1e:82:00:c6:c6:77:1e:14:2c:a0:db:
        0c:c2:56:4f:23:da:ae:e6:5e:be:fc:81:8e:40:63:a7:9a:36:
        df:39:35:7d:20:90:ce:46:b5:fd:2a:b4:13:ee:08:04:18:b5:
        22:64:7b:1a:a3:a1:00:2f:91:15:d9:1c:ef:5f:dd:03:7f:ee:
        08:85:2e:56:17:28:9f:00:f9:81:79:c0:9c:0b:42:a1:00:e9:
        5d:76:77:5a
-----BEGIN CERTIFICATE-----
MIIC/jCCAeagAwIBAgIBADANBgkqhkiG9w0BAQsFADAVMRMwEQYDVQQDEwprdWJl
cm5ldGVzMB4XDTIyMDcyMDExMzkwNVoXDTMyMDcxNzExMzkwNVowFTETMBEGA1UE
AxMKa3ViZXJuZXRlczCCASIwDQYJKoZIhvcNAQEBBQADggEPADCCAQoCggEBAKcg
XbFy7szhxbB3TKqXJsCx5FQ4YnJuMViJ4FTAPojjZgyFH7xcLI9lZhZ4VSkJWBtz
xhcD9EwoNpRLbZHmodxFexHN13Kh/xYnYOAC04HMTKHemBTQbaeu0ijHqtS/f+kS
S5VwgLWk8gZYKMgnuYIXUGNi9iaTk1koZBW0l09MN1FsZeHXo6eltiqwCzw4OsUg
/rrsWXCKRa8YZO2B5G018ys/SEn7RP4rBOcrdaRcuUBrFNqzmlv5J9v7gaIWSp0F
c014dAHpLBBBBBBBWWWWWWCCCVVVVV7TG9ln8fFIxMzlnQkq5efBjK/X222Ft8X3
jU+GHUOSYrqOnFRbU4ECAwEAAaNZMFcwDgYDVR0PAQH/BAQDAgKkMA8GA1UdEwEB
/wQFMAMBAf8wHQYDVR0OBBYEFOYilHw4F1pDyCeTuUmIhX3LuZJ1MBUGA1UdEQQO
MAyCCmt1YmVybmV0ZXMwDQYJKoZIhvcNAQELBQADggEBAAO4KPom9flFCgUK//+X
UVH6CIRbjU+YEUTToRjBrhUp7bOnfYXcigfo6qxlDGa0Fk+y1Zlt1kQRTl8yz8hH
wfl3xlEBhI9aPcNQHUOMLVFLNgDi18pk1cEN2+3gh1OPHaCiC25qfc/7BZa+txYi
5bZnE9t8UTpdiMon7lxIzFzWTZQewQuZSBwro24i5oztrso3Wouu3pF0F6jBOsRD
Oh5JOsIocrT9Ie0eggDGxnceFCyg2wzCVk8j2q7mXr78gY5AY6eaNt85NX0gkM5G
tf0qtBPuCAQYtSJkexqjoQAvkRXZHO9f3QN/7giFLlYXKJ8A+YF5wJwLQqEA6V12
d1o=
-----END CERTIFICATE-----bash
$ k create serviceaccount sa-example
# 可以看到已经创建了与ServiceAccount相关联的Token。
$ k describe sa sa-example
Name:                sa-example
Namespace:           default
Labels:              <none>
Annotations:         <none>
Image pull secrets:  <none>
Mountable secrets:   sa-example-token-gpgcf
Tokens:              sa-example-token-gpgcf
Events:              <none>

# 查看Secret的内容,可以发现ca.crt、namespace和token三个数据。
$ k describe secret sa-example-token-gpgcf
Name:         sa-example-token-gpgcf
Namespace:    default
Labels:       <none>
Annotations:  kubernetes.io/service-account.name: sa-example
              kubernetes.io/service-account.uid: 7e6ef492-25b0-4d67-a74d-4277e45c8032

Type:  kubernetes.io/service-account-token

Data
====
ca.crt:     1099 bytes
namespace:  7 bytes
token:      eyJhbGciOiJSUzI1NiIsI...
# 查看详细数据
$ k get secret sa-example-token-gpgcf -o yamlPod中使用ServiceAccount非常方便,只需要指定ServiceAccount的名称即可。
yaml
apiVersion: v1
kind: Pod
metadata:
  name: sa-example
spec:
  serviceAccountName: sa-example
  containers:
  - image: nginx:alpine
    name: container-0
    resources:
      limits:
        cpu: 100m
        memory: 200Mi
      requests:
        cpu: 100m
        memory: 200Mi
创建并查看这个Pod,可以看到Pod挂载了sa-example-token-c7bqx,也就是sa-example这个ServiceAccount对应的Token,即Pod使用这个Token来做认证。
bash
$ kubectl create -f pod-sa-example

# Pod 挂载了sa
$ kubectl describe pod sa-example
...
Containers:
  sa-example:
    volumeMounts:
    - mountPath: /var/run/secrets/kubernetes.io/serviceaccount
      name: kube-api-access-2ps8d
      readOnly: true
....
 volumes:
  - name: kube-api-access-2ps8d
    projected:
      defaultMode: 420
      sources:
      - serviceAccountToken:
          expirationSeconds: 3607
          path: token
      - configMap:
          items:
          - key: ca.crt
            path: ca.crt
          name: kube-root-ca.crt
      - downwardAPI:
          items:
          - fieldRef:
              apiVersion: v1
              fieldPath: metadata.namespace
            path: namespace
如果你的K8S版本低于1.21,执行同样的指令得到的结果与上图完全不同,在1.21及更新的版本中,这种service account token被叫做Bound Service Account,比起之前的service account token,这种实际上更具安全性。
由上看一共三个volumes,其中serviceAccountToken是真正包含有token内容的volume,可以看到它有一个'expirationSeconds'的属性,上图显示是3607,代表着这个volume包含的内容会在1个小时的时间范围过期,每隔一个小时,这个pod会自动更新这个token来维持有效性。 第二个configmap的volume包含有CA的证书内容,最后一个downwardAPI里面则是包含有这个service account所属的namespace信息。这三个projected volume都会被自动mount在如下文件路径下: /var/run/secrets/kubernetes.io/serviceaccount
bash
# 进入Pod内部,还可以看到对应的文件,如下所示。

$ kubectl exec -it pod-sa-example -- /bin/sh

/ # cd /run/secrets/kubernetes.io/serviceaccount
/run/secrets/kubernetes.io/serviceaccount # ls
ca.crt     namespace  token

# 经过对比和sa-example的sa内容是一致的!

# 由于在Kubernetes集群中,默认为API Server创建了一个名为kubernetes的Service,通过这个Service可以访问API Server。

$ k get svc
NAME                      TYPE           CLUSTER-IP       EXTERNAL-IP                                                                  PORT(S)          AGE
kubernetes                ClusterIP      10.100.0.1       <none>                                                                       443/TCP          78d

# 我们来实验下
$ kubectl exec -it pod-sa-example -- /bin/sh

# 使用curl命令直接访问会得到如下返回信息,表示并没有权限。
/run/secrets/kubernetes.io/serviceaccount # curl https://kubernetes
curl: (60) SSL certificate problem: unable to get local issuer certificate
More details here: https://curl.se/docs/sslcerts.html

curl failed to verify the legitimacy of the server and therefore could not
establish a secure connection to it. To learn more about this situation and
how to fix it, please visit the web page mentioned above.

# 使用ca.crt和Token做认证,先将ca.crt放到CURL_CA_BUNDLE这个环境变量中,curl命令使用CURL_CA_BUNDLE指定证书;再将Token的内容放到TOKEN中,然后带上TOKEN访问API Server。

# export CURL_CA_BUNDLE=/var/run/secrets/kubernetes.io/serviceaccount/ca.crt
# TOKEN=$(cat /var/run/secrets/kubernetes.io/serviceaccount/token)
# curl -H "Authorization: Bearer $TOKEN" https://kubernetes
{
  "kind": "Status",
  "apiVersion": "v1",
  "metadata": {},
  "status": "Failure",
  "message": "forbidden: User \"system:serviceaccount:default:sa-example\" cannot get path \"/\"",
  "reason": "Forbidden",
  "details": {},
  "code": 403
}

# 可以看到,已经能够通过认证了,但是API Server返回的是cannot get path \"/\"",表示没有权限访问,这说明还需要得到授权后才能访问,授权机制将在RBAC中介绍。Kubernetes中完成授权工作的就是RBAC机制,RBAC授权规则是通过四种资源来进行配置。
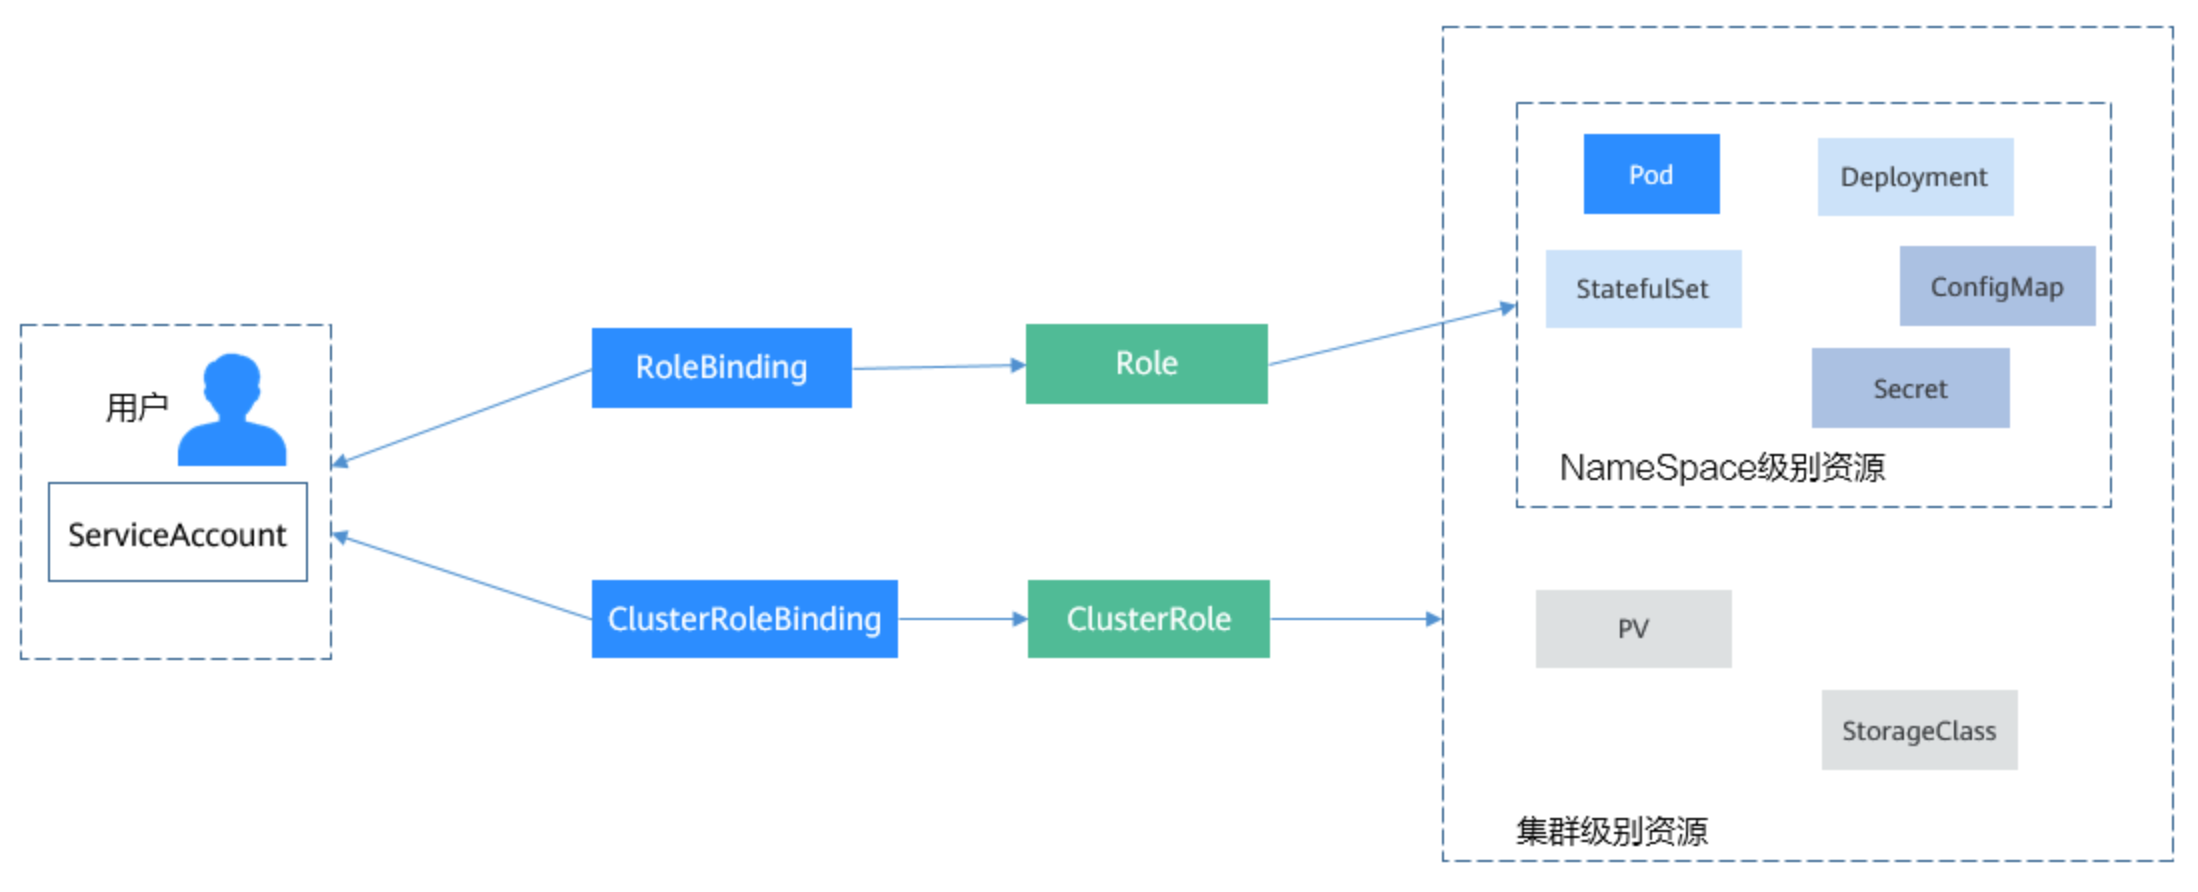
Role的定义非常简单,指定namespace,然后就是rules规则。如下面示例中的规则就是允许对default命名空间下的Pod进行GET、LIST操作。
kubectl create role role-pod-reader --verb=get --verb=list --resource=pods
yaml
kind: Role
apiVersion: rbac.authorization.k8s.io/v1
metadata:
  namespace: default                          # 命名空间
  name: role-pod-reader
rules:
- apiGroups: [""]
  resources: ["pods"]                         # 可以访问pod
verbs: ["get", "list"] # 可以执行GET、LIST操作有了Role之后,就可以将Role与具体的用户绑定起来,实现这个的就是RoleBinding了。如下所示。
命令式写法,注意--serviceaccount要求<namespace>:<ServiceAccount>k create rolebinding rolebinding-example --user=user-example --serviceaccount=default:sa-example --role=role-pod-reader
声明式写法
yaml
kind: RoleBinding
apiVersion: rbac.authorization.k8s.io/v1
metadata:
  name: rolebinding-example
  namespace: default
subjects:                                 # 指定用户
- kind: User                              # 普通用户
  name: user-example
  apiGroup: rbac.authorization.k8s.io
- kind: ServiceAccount                    # ServiceAccount
  name: sa-example
  namespace: default
roleRef:                                  # 指定角色
  kind: Role
  name: role-pod-reader
  apiGroup: rbac.authorization.k8s.io
这里的subjects就是将Role与用户绑定起来,用户可以是外部普通用户,也可以是ServiceAccount,这两种用户类型在ServiceAccount有过介绍。
下面来验证一下授权是否生效。
bash
$ kubectl exec -it pod-sa-example -- /bin/sh
# export CURL_CA_BUNDLE=/var/run/secrets/kubernetes.io/serviceaccount/ca.crt
# TOKEN=$(cat /var/run/secrets/kubernetes.io/serviceaccount/token)
# curl -H "Authorization: Bearer $TOKEN" https://kubernetes/api/v1/namespaces/default/pods
{
  "kind": "PodList",
  "apiVersion": "v1",
  "metadata": {
    "selfLink": "/api/v1/namespaces/default/pods",
    "resourceVersion": "10377013"
  },
  "items": [
    {
      "metadata": {
        "name": "sa-example",
        "namespace": "default",
        "selfLink": "/api/v1/namespaces/default/pods/sa-example",
        "uid": "c969fb72-ad72-4111-a9f1-0a8b148e4a3f",
        "resourceVersion": "10362903",
        "creationTimestamp": "2020-07-15T06:19:26Z"
      },
      "spec": {
...

# 返回结果正常,说明sa-example是有LIST Pod的权限的。再查询一下Deployment,返回如下,说明没有访问Deployment的权限。
# curl -H "Authorization: Bearer $TOKEN" https://kubernetes/api/v1/namespaces/default/deployments
{
  "kind": "Status",
  "apiVersion": "v1",
  "metadata": {},
  "status": "Failure",
  "message": "deployments is forbidden: User \"system:serviceaccount:default:sa-example\" cannot list resource \"deployments\" in API group \"\" in the namespace \"default\"",
  "reason": "Forbidden",
  "details": {
    "kind": "deployments"
  },
  "code": 403
}
Role和RoleBinding作用的范围是命名空间,能够做到一定程度的权限隔离,如下图所示,上面定义role-example就不能访问kube-system命名空间下的资源。
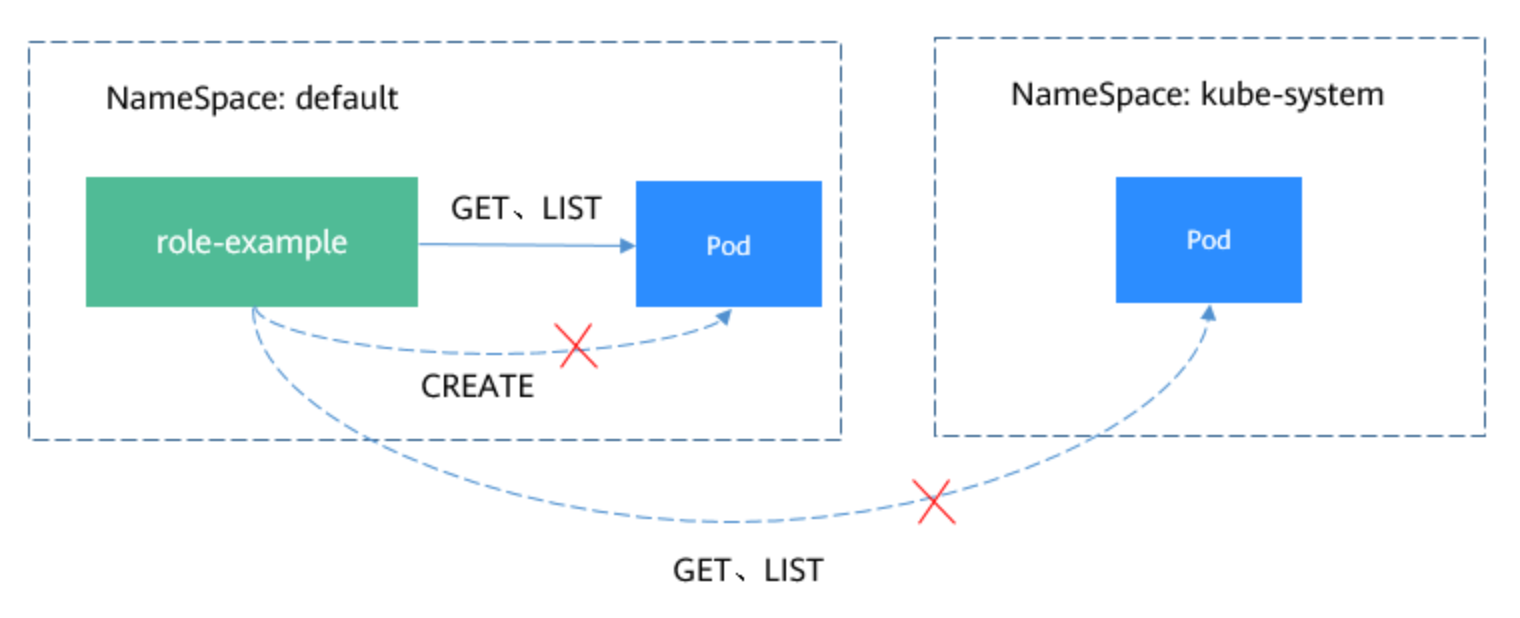
在上面Pod中继续访问,返回如下,说明确实没有权限。
bash
# curl -H "Authorization: Bearer $TOKEN" https://kubernetes/api/v1/namespaces/kube-system/pods
...
"status": "Failure",
"message": "pods is forbidden: User \"system:serviceaccount:default:sa-example\" cannot list resource \"pods\" in API group \"\" in the namespace \"kube-system\"",
"reason": "Forbidden",
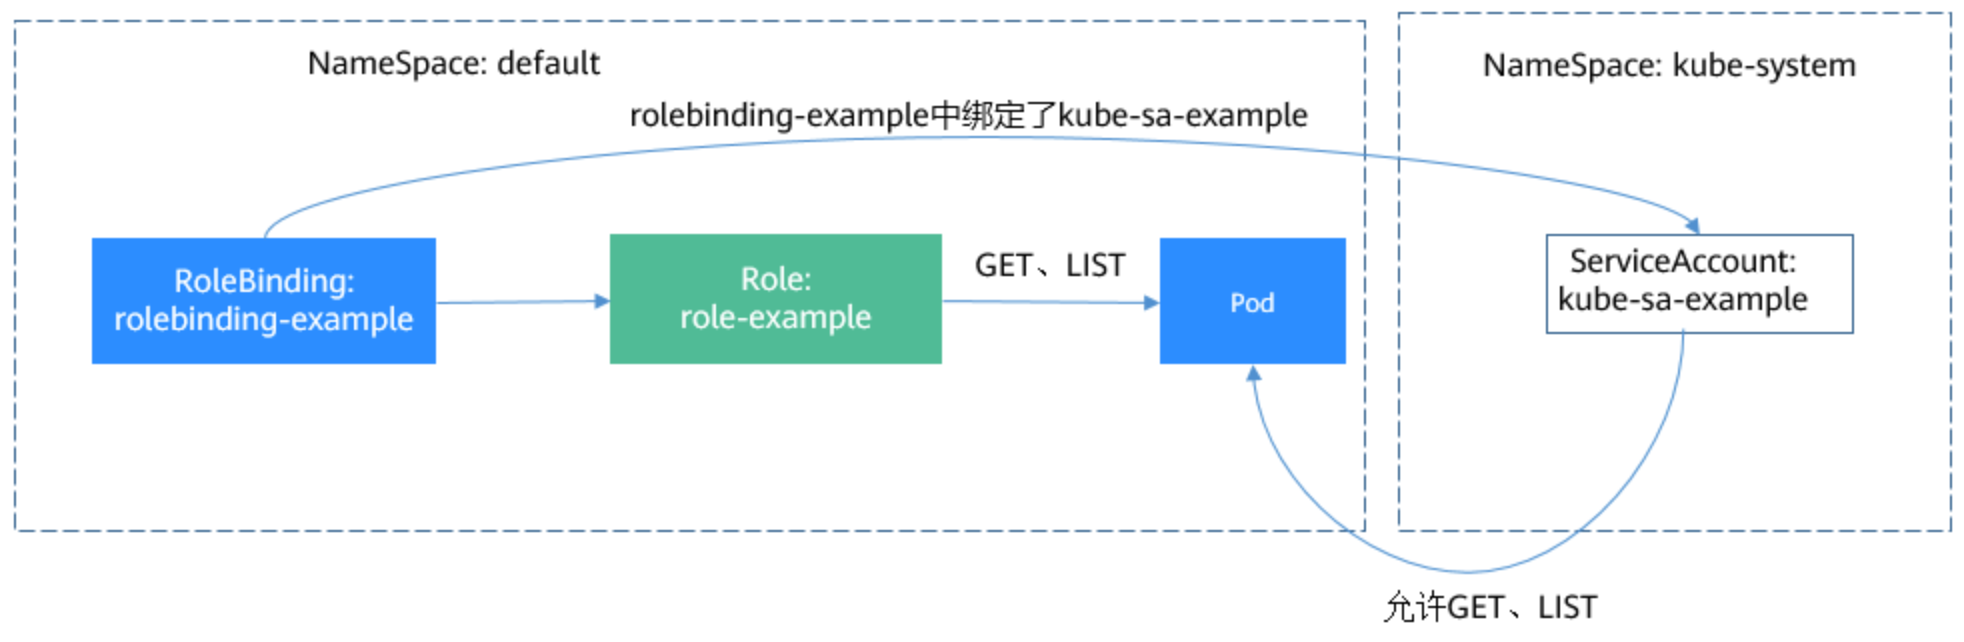
...在RoleBinding中,还可以绑定其他命名空间的ServiceAccount,只要在subjects字段下添加其他命名空间的ServiceAccount即可。
yaml
subjects:                                 # 指定用户
- kind: ServiceAccount                    # ServiceAccount
  name: kube-sa-example
namespace: kube-system加入之后,kube-system下kube-sa-example这个ServiceAccount就可以GET、LIST命名空间default下的Pod了,如下图所示。
相比Role和RoleBinding,ClusterRole和ClusterRoleBinding有如下几点不同:
可以看出ClusterRole和ClusterRoleBinding控制的是集群级别的权限。
在Kubernetes中,默认定义了非常多的ClusterRole和ClusterRoleBinding,如下所示。
其中,最重要最常用的是如下四个ClusterRole。
使用kubectl describe clusterrole命令能够查看到各个规则的具体权限。
通常情况下,使用这四个ClusterRole与用户做绑定,就可以很好的做到权限隔离。 这里的关键一点是理解到Role(规则、权限)与用户是分开的,只要通过Rolebinding来对这两者进行组合就能做到灵活的权限控制。
此内容由惯性聚合(RSS阅读器)自动聚合整理,仅供阅读参考。 原文来自 — 版权归原作者所有。