I’ve always wanted to learn RISC-V. A few days ago, I finally got my hands dirty with it now.
This post will guide you through the process of building a simple RISC-V VM from the ground up, using Rust as our implementation language.
Understanding the Core Concepts
Before writing any code, I need to grasp the fundamentals of RISC-V.
- RISC vs. CISC: RISC (Reduced Instruction Set Computing) architectures use a small, highly optimized set of instructions. This is in contrast to CISC (Complex Instruction Set Computing), which has a large number of complex instructions. RISC-V’s simplicity makes it ideal for building a VM.
- Modular Architecture: RISC-V has a base instruction set (RV32I for 32-bit systems) and optional extensions like M (for multiplication) or F (for floating-point). We’ll focus on the RV32I base to keep things simple.
- The Three Pillars: At its core, a CPU (and thus our VM) consists of three main components:
- Registers: A small set of high-speed memory locations used for calculations. RISC-V has 32 general-purpose registers (
x0-x31). - Memory: A much larger space for storing program code and data.
- Program Counter (PC): A special register that holds the memory address of the next instruction to be executed.
- Registers: A small set of high-speed memory locations used for calculations. RISC-V has 32 general-purpose registers (
We can get all the details of RISC-V instructions from RISC-V Technical Specifications.
The VM’s Core Logic
Our VM is essentially a program that emulates a real CPU’s behavior. The core of our VM is the instruction loop, which follows a simple fetch-decode-execute cycle.
- Fetch: Read the 32-bit instruction from the memory address pointed to by the PC.
- Decode: Parse the instruction’s binary code to determine its type and what operation to perform.
- Execute: Perform the operation (e.g., an addition) and update the relevant registers or memory.
Here’s a simplified Rust code snippet to illustrate the VM structure and the run loop:
pub struct VM {
    x_registers: [u32; 32],
    pc: u32,
    memory: Vec<u8>,
}

impl VM {
    pub fn run(&mut self) {
        loop {
                        let instruction = self.fetch_instruction();
                        let decoded_instruction = self.decode(instruction);
                        self.execute_instruction(decoded_instruction);
                        self.pc += 4;
        }
    }
}
The fetch instruction turns out to be very simple, we just load 4 bytes in little-endian format into a u32 integer:
    /// Fetch 32-bit instruction from memory at current PC
    fn fetch_instruction(&self) -> Option<u32> {
        let pc = self.pc as usize;
        if pc + 4 > self.memory.len() {
            return None;
        }

         RISC-V uses little-endian byte order
        let instruction = u32::from_le_bytes([
            self.memory[pc],
            self.memory[pc + 1],
            self.memory[pc + 2],
            self.memory[pc + 3],
        ]);

        Some(instruction)
    }
Then we need to decode the integer into a RISC-V instruction. Here’s how we decode IType and RType instructions. The specifications for these two types are:
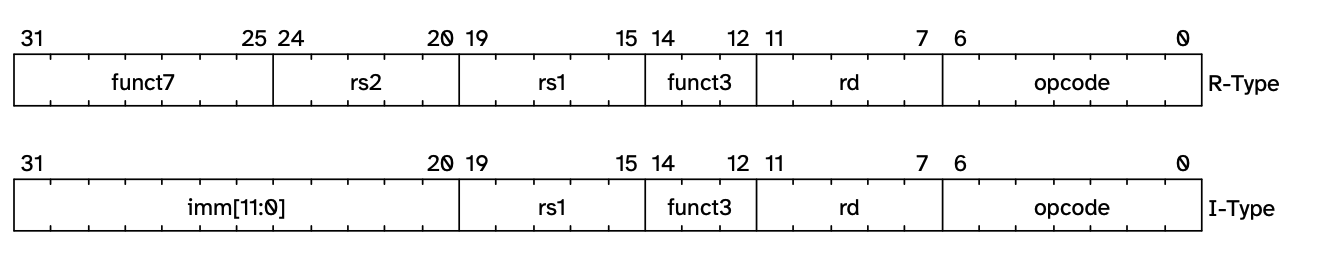
/// Decode 32-bit instruction into structured format
fn decode(&self, code: u32) -> Option<Instruction> {
    let opcode = code & 0x7f;

    match opcode {
        0x13 => {
                        let rd = ((code >> 7) & 0x1f) as usize;
            let rs1 = ((code >> 15) & 0x1f) as usize;
            let funct3 = (code >> 12) & 0x7;
            let imm = (code as i32) >> 20;
            Some(Instruction::IType {
                rd,
                rs1,
                imm,
                funct3,
            })
        }
        0x33 => {
                        let rd = ((code >> 7) & 0x1f) as usize;
            let rs1 = ((code >> 15) & 0x1f) as usize;
            let rs2 = ((code >> 20) & 0x1f) as usize;
            let funct3 = (code >> 12) & 0x7;
            let funct7 = (code >> 25) & 0x7f;

            Some(Instruction::RType {
                rd,
                rs1,
                rs2,
                funct3,
                funct7,
            })
        }
        _ => None,     }
}
Then we want to execute the instruction, just following the specification. For demonstration purposes, we return the execution debug string as a result:
/// Execute decoded instruction
fn execute(&mut self, instruction_type: Instruction) -> Result<String, String> {
    match instruction_type {
        Instruction::IType {
            rd,
            rs1,
            imm,
            funct3,
        } => {
            match funct3 {
                0x0 => {
                                        self.write_register(rd, self.x_registers[rs1] + imm as u32);
                    Ok(format!(
                        "ADDI x{}, x{}, {} -> x{} = {}",
                        rd, rs1, imm, rd, self.x_registers[rd]
                    ))
                }
                _ => Err(format!("Unsupported I-type funct3: {:#x}", funct3)),
            }
        }
        Instruction::RType {
            rd,
            rs1,
            rs2,
            funct3,
            funct7,
        } => {
            match (funct3, funct7) {
                (0x0, 0x00) => {
                                        let result = self.x_registers[rs1] + self.x_registers[rs2];
                    self.write_register(rd, result);
                    Ok(format!(
                        "ADD x{}, x{}, x{} -> x{} = {}",
                        rd, rs1, rs2, rd, self.x_registers[rd]
                    ))
                }
                (0x0, 0x20) => {
                                        let result = self.x_registers[rs1] - self.x_registers[rs2];
                    self.write_register(rd, result);
                    Ok(format!(
                        "SUB x{}, x{}, x{} -> x{} = {}",
                        rd, rs1, rs2, rd, self.x_registers[rd]
                    ))
                }
                _ => Err(format!(
                    "Unsupported R-type instruction: funct3={:#x}, funct7={:#x}",
                    funct3, funct7
                )),
            }
        }
    }
}
The simplest VM code is available at: riscv-vm-v0
From Rust to RISC-V binary
Now we need to write more complex assembly code for testing our VM, but we don’t want to write assembly code by hand.
To test our VM, we will write Rust code then use cross-compile toolchains to compile it into RISC-V executable files.
- Prepare the Environment: Install the
riscv32imac-unknown-none-elftarget toolchain. This is a bare-metal target, meaning it doesn’t rely on any operating system.
rustup target add riscv32imac-unknown-none-elf
Next, you’ll need a RISC-V linker. You can get this from the official RISC-V GNU toolchain.
# On Linux or macOS
sudo apt-get install gcc-riscv64-unknown-elf
# Alternatively, on macOS
brew install riscv-gnu-toolchain
Note: The gcc-riscv64-unknown-elf package includes both 32-bit and 64-bit tools.
- Write “Bare-Metal” Rust: Our Rust program must be written for a “bare-metal” environment, meaning you cannot use the standard library and must provide your own entry point and panic handler.
#[unsafe(no_mangle)]
pub extern "C" fn _start() {
    let mut sum = 0;
    for i in 1..=10 {
        sum += i;
    }

     Store the result (which should be 55) in a known memory location.
    let result_ptr = 0x1000 as *mut u32;
    unsafe {
        *result_ptr = sum;
    }
}

#[panic_handler]
fn panic(_info: &PanicInfo) -> ! {
    loop {}
}
- Cross-Compile: Use
cargowith the specific target and a linker script to build the executable. We need to add options for Cargo in.cargo/config.toml
[target.riscv32imac-unknown-none-elf]
rustflags = ["-C", "link-arg=-Tlink.ld"]
The content for link.ld is as follows. It tells the linker the layout of the binary file generated. Notice that we specify the entry point at address 0x80:
OUTPUT_ARCH(riscv)
ENTRY(_start)

SECTIONS {
    . = 0x80;
    .text : {
        *(.text.boot)
        *(.text)
    }
    .rodata : {
        *(.rodata)
    }
    .data : {
        *(.data)
    }
    .bss : {
        *(.bss)
    }
}
Then we can build the program to a binary:
cargo build --release --target riscv32imac-unknown-none-elf
- Disassemble and check the binary code: We can use the tool
riscv64-unknown-elf-objdumpto double-check the generated binary file:
riscv64-unknown-elf-objdump -d ./demo/target/riscv32imac-unknown-none-elf/release/demo

./demo/target/riscv32imac-unknown-none-elf/release/demo:     file format elf32-littleriscv

Disassembly of section .text._start:

00000080 <_start>:
  80:   4501                    li      a0,0
  82:   4605                    li      a2,1
  84:   45ad                    li      a1,11
  86:   4729                    li      a4,10
  88:   00e61763                bne     a2,a4,96 <_start+0x16>
  8c:   46a9                    li      a3,10
  8e:   9532                    add     a0,a0,a2
  90:   00e61863                bne     a2,a4,a0 <_start+0x20>
  94:   a809                    j       a6 <_start+0x26>
  96:   00160693                addi    a3,a2,1
  9a:   9532                    add     a0,a0,a2
  9c:   00e60563                beq     a2,a4,a6 <_start+0x26>
  a0:   8636                    mv      a2,a3
  a2:   feb6e3e3                bltu    a3,a1,88 <_start+0x8>
  a6:   6585                    lui     a1,0x1
  a8:   c188                    sw      a0,0(a1)
  aa:   8082                    ret
The complete cross-compile Rust code is available at: riscv-demo
Using the VM to Execute Binary
The first problem is how do we parse the executable file? It turns out there is a crate called elf that can help us parse the header of an ELF file. We extract the interested parts from the header and record the base_mem so that we can convert virtual address to physical address. Of course, we also load the code into memory:
pub fn new_from_elf(elf_data: &[u8]) -> Self {
    let mut memory = vec![0u8; MEM_SIZE];

    let elf = ElfBytes::<elf::endian::AnyEndian>::minimal_parse(elf_data)
        .expect("Failed to parse ELF file");

     Get the program entry point
    let entry_point = elf.ehdr.e_entry as u32;

     Iterate through program headers, load PT_LOAD type segments
    for segment in elf.segments().expect("Failed to get segments") {
        if segment.p_type == PT_LOAD {
            let virt_addr = segment.p_vaddr as usize;
            let file_size = segment.p_filesz as usize;
            let mem_size = segment.p_memsz as usize;
            let file_offset = segment.p_offset as usize;

                        let phys_addr = virt_addr - entry_point as usize;
                        if phys_addr + mem_size > MEM_SIZE {
                panic!(
                    "Segment is too large for the allocated memory. vaddr: {:#x}, mem_size: {:#x}",
                    virt_addr, mem_size
                );
            }

                        if file_size > 0 {
                let segment_data = &elf_data[file_offset..file_offset + file_size];
                memory[phys_addr..phys_addr + file_size].copy_from_slice(segment_data);
            }
        }
    }

    let mut vm = VM {
        x_registers: [0; 32],
                pc: entry_point,
        memory,
        mem_base: entry_point,
    };
    vm.x_registers[0] = 0;
    vm
}
What’s left is that we need to extend our VM to support all the instruction formats used in this binary file, including li, bne, beq, etc.
There are 16-bit compressed instructions, so we can’t always increment the PC by 4; sometimes we only need to increment it by 2 for shorter ones.
Another interesting thing is that some of them are conditional jump instructions, so we need to get the return new_pc from the execution of the instruction.
So now we need to update the core logic of fetch and execution of instructions:
// Check the lowest 2 bits to determine instruction length
if first_half & 0x3 != 0x3 {
    // 16-bit compressed instruction
    pc_increment = 2;
    new_pc = self.execute_compressed_instruction(first_half);
} else {
    // 32-bit instruction
    pc_increment = 4;
    if physical_pc.saturating_add(3) >= self.memory.len() {
        break;
    }
    let second_half = u16::from_le_bytes([
        self.memory[physical_pc + 2],
        self.memory[physical_pc + 3],
    ]);
    let instruction = (second_half as u32) << 16 | (first_half as u32);

    if instruction == 0 {
        break;
    }

    new_pc = self.execute_instruction(instruction);
}
The complete new VM which can run compiled RISC-V binary files is available at: riscv-vm
References