


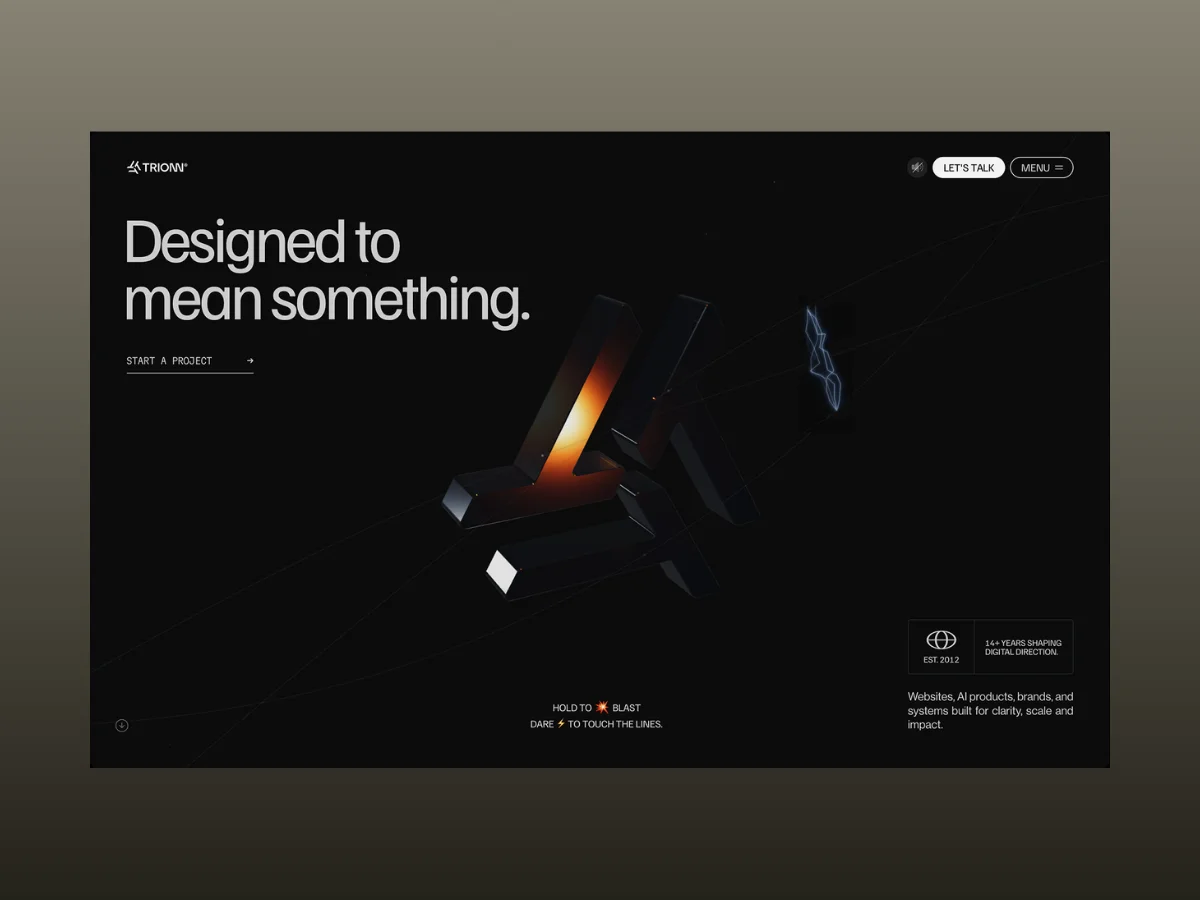
Trionn was built as an exploration of how far a studio website could be pushed when animation, WebGL, and interaction systems are treated as one unified experience. After months of experimentation and iteration, the final result combines GSAP, Three.js, Lenis, and custom Web Audio interactions into a responsive digital experience where every section is driven by its own carefully crafted system.
The project evolved through multiple concepts before reaching its final direction. The interactive hero, scroll-driven storytelling, procedural graphics, and real-time effects were not planned as isolated features, but gradually developed into a connected animation framework.
Built over four months, the site received recognition from FWA, GSAP, Orpetron, CSS Design Awards, Web Design Awards, CSS Winner, and several international design galleries. More importantly, the process revealed a series of technical challenges around performance, synchronization, rendering, and interaction design.
In this case study, we’ll explore the architecture behind Trionn, breaking down the animation systems, WebGL techniques, optimization strategies, and code patterns used to bring the experience to life.
Building a site with this level of animation meant balancing creative flexibility with performance. Each part of the stack has a clear responsibility, from driving animations and scroll interactions to rendering WebGL scenes and generating audio in real time.
The core technologies used throughout the project are:
GSAP sits at the center of the animation system. Page transitions, scroll-driven sequences, pinned sections, and component-level animations are all built around GSAP timelines and managed with <a href="https://gsap.com/resources/React/">useGSAP</a>, which simplifies setup and cleanup as components mount and unmount in Next.js.
ScrollTrigger handles most of the site’s scroll interactions, from pinned storytelling sections to scrubbed animations and reveal effects. We also rely heavily on gsap.matchMedia() so desktop and mobile layouts can have their own animation logic instead of sharing the same values.
For text animation, we built a reusable BlurTextReveal component using SplitText. It supports character-, word-, and line-based animations while centralizing reduced-motion handling, GPU layer cleanup, and ScrollTrigger refreshes instead of solving those problems for every individual heading.
Three.js powers the site’s custom WebGL experiences. We chose not to use React Three Fiber because we wanted direct control over the shared render loop, resource management, and the hero symbol’s individually animated mesh panels.
Lenis is driven directly from gsap.ticker, keeping scrolling synchronized with ScrollTrigger throughout the site.
Interactive sound effects—including the hero hover, blast, and weld effects—are generated at runtime with the Web Audio API instead of using prerecorded audio files.
The hero evolved considerably over the course of the project. It combines WebGL, GSAP, SplitText, and the Web Audio API into a single interaction system, making it one of the most technically involved parts of the site.
The hero is built from two layers that share the same state. The background is a single Three.js scene (useTrionnSymbolScene.ts) responsible for the brand symbol, including its idle motion, magnetic hover, hold-to-blast interaction, and weld spark effects. These interactions all contribute to a single explodeAmt value, which controls how far the symbol’s panels separate. Whether the user scrolls, hovers, or holds the mouse button, each interaction updates the same value, allowing transitions between states to feel smooth and continuous.
The foreground consists of standard DOM elements—the headline, rotating word, and stats hint—animated with GSAP and SplitText. Using regular HTML keeps the content accessible while mix-blend-mode: difference ensures it remains readable over the WebGL canvas.
Both layers are synchronized through a shared transitionReady flag. Animations don’t begin until the page transition has finished, with non-critical work deferred using requestIdleCallback to avoid competing with the initial page load.
On page load, the hero headline (“Designed to”) animates into view one character at a time using a staggered blur-to-sharp transition. Instead of a simple fade-in, each character gradually comes into focus, creating a more dynamic introduction to the page.
// components/Sections/Home/Banner.tsx — usage
<BlurTextReveal
  as="h1"
  text="Designed to"
  animationType="chars" // split per-character, not word/line
  stagger={0.08}
  delay={1.2} // waits for the page loader/transition to clear first
/>

// components/TextAnimation/BlurTextReveal.tsx — the engine behind it
const split = new SplitText(textRef.current, {
  type: "chars, words, lines",
  smartWrap: true,
});

const targets = split.chars; // animationType === "chars"

gsap.set([textRef.current, targets], {
  autoAlpha: 0,
  filter: "blur(12px)",
  willChange: "filter, opacity", // promote to its own GPU layer only while animating
});

const tl = gsap.timeline({
  paused: manual,
});

tl.to(textRef.current, {
    autoAlpha: 1,
    filter: "blur(0px)",
    duration: 0.5,
  }, delay)
  .to(targets, {
    autoAlpha: 1,
    filter: "blur(0px)",
    duration: 0.8,
    stagger: {
      each: 0.08,
      from: "random",
    }, // characters settle out of order
    ease: "power2.out",
  }, delay);
Using filter: blur() alongside opacity creates the impression that the text is coming into focus, rather than simply fading in. Once the animation completes, will-change is removed so the text no longer occupies its own GPU layer. The same BlurTextReveal component is reused throughout the site for the rotating word and the stats hint, with different animation settings.
When idle, the hero symbol rotates continuously while each of its three arms follows a subtle sine-wave motion with an independent phase offset. This prevents the animation from feeling perfectly synchronized and gives the symbol a more organic sense of movement.
// hooks/useTrionnSymbolScene.ts — per-frame update loop

// Auto-rotate: a constant rotational drift, eased toward the mouse position
if (!st.dragging) {
  st.rotY += prefersReducedMotion ? 0.0015 : 0.0042; // base spin speed
  st.rotX = Math.max(-Math.PI / 2, Math.min(Math.PI / 2, st.rotX));

  group.rotation.x +=
    (st.rotX + mouse.y * 0.22 - group.rotation.x) * 0.06; // eased lerp
  group.rotation.y +=
    (st.rotY + mouse.x * 0.22 - group.rotation.y) * 0.06;
}

// Per-panel ambient drift — each of the 3 arms gets its own phase offset
// so the whole symbol doesn't breathe in lockstep
particles.forEach((p) => {
  const phase = p.shapeIdx * (Math.PI * 2 / 3); // 0°, 120°, 240°

  const armDriftX =
    Math.sin(t * 0.4 + phase) * 0.012 * (1 - explodeAmt);
  const armDriftY =
    Math.cos(t * 0.35 + phase) * 0.008 * (1 - explodeAmt);
  const armDriftZ =
    Math.sin(t * 0.3 + phase * 1.5) * 0.006 * (1 - explodeAmt);

  // ...position += drift, scaled down to 0 the moment any explode/hover state kicks in
});
When prefersReducedMotion is enabled, the rotation speed is reduced instead of being disabled completely. Mouse movement is applied through linear interpolation (lerp), giving the symbol a smooth, magnetic feel rather than directly matching the cursor. The ambient drift is also scaled by (1 - explodeAmt), allowing it to fade out naturally as other interaction states take over.
As the cursor moves over the symbol, the panel beneath it briefly “charges,” becoming brighter and more reflective, while a short beep plays the first time the cursor enters that panel. Hover detection is performed with raycasting instead of CSS, allowing the interaction to follow the symbol’s actual 3D geometry as it rotates.
// hooks/useTrionnSymbolScene.ts — hover detection via raycasting

const raycaster = new THREE.Raycaster();

// Per frame: only check for hover when the symbol is fully assembled
// (not mid-explode, not scrolled away, not in the intro animation)
if (
  st.mouseScreenX !== -9999 &&
  st.scrollProgress < 0.08 &&
  st.clickBurst < 0.05 &&
  st.introAmt < 0.08
) {
  raycaster.setFromCamera(mouse, camera);

  const hits = raycaster.intersectObjects(
    particles
      .filter((p) => !p.isEdge)
      .map((p) => p.mesh as THREE.Mesh),
    false,
  );

  const nowHit = hits.length > 0 ? hits[0].object : null;

  if (nowHit !== st.hoveredMesh) {
    if (nowHit) {
      const hm = nowHit as THREE.Mesh & {
        _flash?: number;
        _flashActive?: boolean;
      };

      hm._flash = 1.0; // triggers the charge-up below
      hm._flashActive = true;

      audio.playHoverBeep(); // only fires on a new panel, not every frame
    }

    st.hoveredMesh = nowHit;
  }
}

// Elsewhere: decay the flash and ramp the material toward its "charged" look
mesh._flash = (mesh._flash || 0) * 0.92; // exponential decay each frame

const f = mesh._flash;

mat.envMapIntensity = 3.0 + f * 1.6; // brighter reflections
mat.clearcoatRoughness = Math.max(0.01, 0.05 - f * 0.035);
mat.transmission = 0.35 + f * 0.32; // more "glassy"
Raycasting against the symbol’s geometry ensures the hover effect follows its actual shape and rotation. Each panel’s highlight decays independently using a simple exponential decay, avoiding the overhead of creating a separate GSAP tween for every mesh.
Three guide lines animate outwards from the symbol when the page loads. Once the animation is complete, hovering over any of the lines triggers a short burst of weld-like sparks that arc toward one or two of the remaining lines, reinforcing the hero’s prompt: “Dare ⚡ to touch the lines.”
// hooks/useTrionnSymbolScene.ts

// Sparks are only enabled once the guide lines have finished drawing
const baseLinesReadyForSpark =
  inS1 &&
  undrawAmt < 0.02 &&
  st.lineState.every((s) => s.prog >= 0.995);

if (baseLinesReadyForSpark) {
  // Hit-test the mouse against all 3 line paths (14px tolerance)
  const allLinePts = [ptsL, ptsR, ptsB];

  let hitResult: { x: number; y: number } | null = null;
  let hitLineIdx = -1;

  for (let li = 0; li < allLinePts.length; li++) {
    const h = mouseNearLine(allLinePts[li], 14);

    if (h) {
      hitResult = h;
      hitLineIdx = li;
      break;
    }
  }

  if (hitResult !== null) {
    // New hover onto a line (not a continuous hold) → arm a short burst
    if (!st.sparkHoverActive && st.sparkWasAway) {
      st.sparkHoverActive = true;
      st.sparkBurstLeft = 5 + Math.floor(Math.random() * 2); // 5–6 bolts per hover
      st.sparkWasAway = false;
    }

    if (st.weldCooldown <= 0 && st.sparkBurstLeft > 0) {
      const wp = unproj2(hitResult.x, hitResult.y); // screen → world space

      // Pick 1–2 other lines as targets
      const otherIdxs = [0, 1, 2].filter((i) => i !== hitLineIdx);
      const count = Math.random() > 0.5 ? 1 : 2;

      const targetIdxs = otherIdxs
        .sort(() => Math.random() - 0.5)
        .slice(0, count);

      const nearWpts = targetIdxs.map((li) => {
        // Find the closest point on the target line to the hit position
        const pts = allLinePts[li];

        let bestPt: LinePt | null = null;
        let bestD = Infinity;

        for (const pt of pts) {
          const dd =
            (pt.x - hitResult!.x) ** 2 +
            (pt.y - hitResult!.y) ** 2;

          if (dd < bestD) {
            bestD = dd;
            bestPt = pt;
          }
        }

        return unproj2(bestPt!.x, bestPt!.y);
      });

      triggerWeld(wp, nearWpts, !st.sparkSoundPlayed);

      st.sparkBurstLeft--;
      st.weldCooldown = 0.04 + Math.random() * 0.06; // throttle between bolts
    }
  }
}
A “ready” check ensures the weld effect is only enabled once all three guide lines have finished drawing. The sparkWasAway flag triggers a new burst only when the cursor enters a line, preventing a continuous stream of sparks while hovering. Each burst varies slightly, with a random number of bolts and randomly selected target lines, so the interaction never plays out exactly the same way twice.
Bolt generation is also rate-limited using weldCooldown, which spaces each bolt 0.04–0.10 seconds apart regardless of frame rate. The glow effect is built by layering THREE.Line geometries, providing the desired look without the cost of a post-processing bloom pass.
The guide lines themselves are rendered to an offscreen 2D <canvas>, which is then used as a texture in the Three.js scene. This allows the weld effect to perform lightweight 2D hit testing against canvas-space coordinates instead of raycasting against 3D geometry. Because the effect behaves more like a particle system than a UI animation, its timing is driven by simple counters instead of GSAP timelines. A spark sound, synthesized with the Web Audio API, plays once per burst rather than once per bolt to prevent overlapping audio.
Clicking and holding the hero symbol triggers a multi-stage interaction. Nearby interface elements, including the navigation and headings, begin to vibrate as the charge builds. After roughly half a second, the symbol breaks apart into its individual panels, each following its own trajectory and rotation while an explosion and sustained “whoosh” sound play. Releasing the mouse reverses the sequence, smoothly bringing the symbol back together.
When the user presses the symbol, the interaction enters a charging state by resetting the timer and activating the initial vibration feedback before the blast sequence begins.
const onMouseDown = (e: MouseEvent) => {
  // ...hit-test guard omitted...

  st.holding = true;
  st.holdTime = 0;
  st.vibrateAmt = 1.0;
  st.vibratePhase = 0;
  st.clickBurst = 0;
  st.joinPlayed = false;
};

window.addEventListener("mousedown", onMouseDown);While the mouse button is held, the interaction progresses through two phases. The first 0.5 seconds are dedicated to the charge-up animation. Once that threshold is reached, the symbol breaks apart into its individual panels, transitioning into the blast sequence.
if (st.holding) {
  st.holdTime += 1 / 60;
  st.vibrateAmt = 1.0;

  if (st.holdTime < 0.5) {
    st.clickBurst = 0; // still charging
  } else {
    if (st.clickBurst === 0) {
      // first frame past the threshold
      audio.stopVibrateSound();
      audio.playExplodeSound();
      audio.startWooshSound();
    }

    st.vibrateAmt *= 0.88;
    st.clickBurst = Math.min(1.0, st.clickBurst + 0.02); // ramps from 0 → 1 over ~50 frames
  }
} else {
  // Released — both values ease back down instead of snapping to 0
  st.vibrateAmt = Math.max(0, st.vibrateAmt - 0.08);
  st.clickBurst = Math.max(0, st.clickBurst - 0.025);
}
clickBurst Drives the ExplosionThe clickBurst value controls how far each panel moves from its original position. As it increases from 0 to 1, every panel follows its own predefined direction and rotation, creating the effect of the symbol breaking apart while remaining fully deterministic.
const burstContrib =
  st.scrollProgress < 0.15 ? st.clickBurst : 0;

const explodeAmt = Math.max(
  st.scrollProgress,
  st.hoverAmt,
  burstContrib,
  st.introAmt,
);

particles.forEach((p) => {
  const amt = Math.max(0, explodeAmt - p.delay); // staggered by each panel's delay
  const burst = amt * 5.5;

  p.mesh.position.set(
    p.explodeDir.x * burst + /* ...idle drift, mouse offset... */ 0,
    p.explodeDir.y * burst,
    p.explodeDir.z * burst,
  );

  p.mesh.rotation.x =
    p.spinAxis.x * p.spinSpeed * amt * Math.PI;
});While the symbol charges, nearby interface elements—including the navigation and headings—use the same shared state to add a subtle vibration effect. When the interaction ends, they return smoothly to their resting position using CSS transitions.
vibrateEls.forEach((el) => {
  el.style.transition = "none";
  el.style.transform = `translate(${sx}px, ${sy}px)`; // sx/sy from a sine wave
});

// On release:
el.style.transition =
  "transform 0.7s cubic-bezier(0.25, 0.46, 0.45, 0.94)";
el.style.transform =
  "perspective(600px) translate(0px, 0px) rotateX(0deg)";
The 0.5-second charge-up introduces a deliberate delay before the explosion, making the interaction feel intentional rather than instantaneous. A single explodeAmt value combines the effects of scrolling, hovering, and the hold-to-blast interaction using Math.max(), allowing every state to share the same animation logic. Because the interaction is driven by state values instead of tweens, releasing the mouse at any point smoothly reverses the effect without requiring a separate animation path.
The Services section is the most complex scroll-driven sequence on the site. A single shared scrollProgressRef value (0–1) coordinates every part of the experience: scrubbing through a 371-frame WebP image sequence, breaking the “OUR SERVICES” headline into animated glyph particles, revealing the six service cards along predefined motion paths, transitioning the site’s color palette from black to white, and finishing with a stripe wipe into the Testimonials section.
The entire Services sequence is driven by a single normalized scrollProgressRef value ranging from 0 to 1. Rather than creating separate timelines for each animation, individual progress ranges are derived from this shared value to control the image sequence, headline animation, service cards, color transitions, and section outro. This approach keeps every part of the sequence synchronized while making it easier to adjust the timing of individual effects.
// components/Sections/Home/TrionnServices.tsx

const TOTAL = 371;

const EXPLODE_START = 0.35;
const EXPLODE_END = 0.53;
const CARDS_START = 0.56;
const CARDS_END = 1.0;

// Inside the RAF loop:
const linear = scrollProgressRef.current; // 0 → 1, owned by the parent bridge

s.scrollT = mapServicesScrollProgress(linear, isMobile); // remapped for this section

const targetFrame = s.scrollT * (TOTAL - 1);
s.videoIdx += (targetFrame - s.videoIdx) * 0.12; // ease toward the target frame

drawFrame(s.videoIdx); // updates the <img> source

const inZone =
  s.scrollT >= EXPLODE_START &&
  s.scrollT <= EXPLODE_END;

const explodeT = inZone
  ? (s.scrollT - EXPLODE_START) / (EXPLODE_END - EXPLODE_START)
  : 0;

if (inZone && s.gsapTL) {
  s.gsapTL.progress(explodeT);
}

updateCards(s.cardsT); // cards use their own smoothed copy of scrollT
The background animation is a sequence of 371 WebP frames displayed by updating the src of a standard <img> element. Instead of rendering video or using a <canvas>, this approach keeps the implementation lightweight while still allowing the animation to be scrubbed directly by the scroll position.
// drawFrame — update a single <img> instead of using <canvas> or <video>
const drawFrame = useCallback((i: number) => {
  const el = imgRef.current;
  const img = stateRef.current.imgs[Math.round(i)];

  if (!img || !img.complete) return;

  // Only update the DOM when the frame actually changes
  if (el.src !== img.src) {
    el.src = img.src;
  }
}, []);

// Preload all 371 frames in idle-time chunks of 20
const loadChunk = (start: number) => {
  const end = Math.min(start + CHUNK, TOTAL);

  for (let i = start; i < end; i++) {
    const img = new Image();

    img.src = `/images/stone/frame_${String(i + 1).padStart(4, "0")}.webp`;

    // decode() avoids jank when the frame is first displayed
    img.decode().then(checkChunkDone, checkChunkDone);
  }
};The “OUR SERVICES” headline is split into individual glyphs, each measured and animated independently. As the scroll reaches the transition point, every glyph follows its own trajectory, creating the effect of the text breaking apart before the service cards are introduced.
// Measure each character's on-screen position using the Range API.
// This matches the rendered layout, including kerning and line wrapping.
const measureChars = useCallback(() => {
  overlay.querySelectorAll("[data-line]").forEach((line) => {
    // ...

    for (let i = 0; i < raw.length; i++) {
      range.setStart(textNode, i);
      range.setEnd(textNode, i + 1);

      const r = range.getBoundingClientRect();

      results.push({
        ch: display[i],
        x: r.left + r.width / 2,
        y: r.top + r.height / 2,
        /* font props */
      });
    }
  });

  return results;
}, []);

// Each measured character becomes its own <span>, preserving the original
// typography before being animated along an individual trajectory.
m.forEach((p, i) => {
  const isHero = hi.has(i);

  const angle = rand(-Math.PI, Math.PI);
  const speed = isHero
    ? rand(0.05, 0.15) * maxDim
    : rand(0.4, 0.9) * maxDim;

  s.particles.push({
    el,
    ox: p.x,
    oy: p.y,
    dirX: Math.cos(angle),
    dirY: Math.sin(angle) * rand(-1.0, 0.18),
    speed,
    /* ... */
  });
});As the headline particles disperse, the six service cards animate into view along predefined curved paths. On desktop, the cards are introduced in left and right pairs, creating a balanced composition while keeping the scroll sequence easy to follow.
// Desktop: each pair starts 0.2 timeline units apart and follows a curved X path
const arc =
  frac <= 0.5 ? Math.sin(frac * Math.PI) : 1;

const lX = lStartX + arc * (lPeakX - lStartX);
const lY = lStartY + frac * (lEndY - lStartY); // Y moves linearly from bottom to top

frames.push({
  x: lX,
  y: lY,
  opacity: op,
});

// Once a pair reaches its center point, animate the SVG icon stroke
if (!s.svgFired.has(lk) && tlTime >= centerTime) {
  s.svgFired.add(lk);

  gsap.fromTo(
    paths,
    {
      drawSVG: "0%",
    },
    {
      drawSVG: "100%",
      duration: 1.5,
      stagger: 0.04,
    },
  );
}The section ends with a stripe wipe transition that is reused throughout the site, including the Vision and About sections. Using the same transition pattern across multiple sections helps maintain visual consistency while keeping the implementation centralized and reusable.
// `applyStripeHold` scrubs a paused stripe reveal timeline over the final
// portion of the section's scroll range, then slides the Testimonials section
// into view using a GPU-accelerated `yPercent` transform.

const holdT = Math.max(
  0,
  Math.min(1, (linear - holdStart) / (1 - holdStart)),
);

cache.tl.progress(holdT);
Unlike most of the site, this section doesn’t use ScrollTrigger. Every animation is derived from a single scroll progress value that’s recalculated each frame, keeping the entire sequence synchronized without coordinating multiple timelines.
To avoid blocking the initial page load, the 371 WebP frames are preloaded in requestIdleCallback batches of 20, with img.decode() used to prepare each frame before it’s displayed. The service card motion follows a different approach: the GSAP timeline is built once whenever the layout changes and then scrubbed via .progress() during scrolling, avoiding the cost of recalculating each card’s trajectory every frame.
The Double Helix Gallery combines DOM elements and WebGL to create a scroll-driven 3D sequence. Nine cards are arranged along a parametric helix that rotates past the camera as the user scrolls, while two animated guide lines trace the structure. Cards respond to hover through raycasting, and the sequence concludes with the helix unfolding into a flat grid, complete with rounded-corner masking and a decaying ripple effect.
The gallery layout is generated entirely with parametric equations rather than a prebuilt 3D model. Each card’s position and orientation are calculated from its place along the helix, making the entire structure procedural and easy to adapt as the user scrolls.
// components/DribbleSection.tsx

const dip = (a: number) => {
  const d = (a - MID) / DIP_S;
  return DIP_A * Math.exp(-d * d); // Gaussian dip at the midpoint
};

const hPos = (a: number) =>
  new THREE.Vector3(
    R * Math.cos(a),
    Y_START + a * pitchPerRad - dip(a), // rises steadily with a subtle midpoint dip
    R * Math.sin(a),
);Rather than positioning individual meshes around the helix, each card’s geometry is deformed directly so it naturally follows the curve. By rewriting the vertex positions, every card bends to match the shape of the helix while remaining a single mesh, producing a much more convincing result than simply rotating flat planes.
// wrapCardOnHelix — runs once per visible card, per frame
for (let col = 0; col < C; col++) {
  const angle =
    (sArcStart + (col / W_SEGS) * sArcWidth) / dsPerRad;

  // Position each column along the helix using inline scalar math.
  // Avoiding Vector3 allocations keeps the render loop free of GC pressure.
  for (let row = 0; row < 2; row++) {
    pos.setXYZ(
      row * C + col,
      cpX + ux * offsetAmt,
      cpY + uy * offsetAmt,
      cpZ + uz * offsetAmt,
    );
  }
}

pos.needsUpdate = true;The helix isn’t rendered in a continuous animation loop. Instead, rendering is driven directly by scroll position, with a lightweight ticker only running when needed to let interactions and transitions settle smoothly. This keeps the scene responsive while avoiding unnecessary work when the helix is at rest.
const st = ScrollTrigger.create({
  trigger: section,
  start: "top top",
  end: `+=${totalScroll}`,
  pin: true,

  onUpdate: () => {
    renderTick(); // render immediately on every scroll update
    syncTicker?.(); // determine whether the idle ticker should remain active
  },
});

const isActive = () => {
  const margin = window.innerHeight; // one viewport before and after the section

  const viewTop = window.scrollY - margin;
  const viewBottom = window.scrollY + window.innerHeight + margin;

  return (
    viewBottom > st.start &&
    viewTop < st.start + totalScroll
  );
};

syncTicker = () => {
  isActive() ? startTicker() : stopTicker();
};Cards respond to hover using Three.js raycasting rather than DOM events. Instead of instantly changing size, each card smoothly eases toward a target scale, making the interaction feel more natural and preserving the fluid motion of the helix.
if (pointerActive) {
  raycaster.setFromCamera(pointer, cam);

  const hits = raycaster.intersectObjects(
    cards.filter((c) => c.visible),
    false,
  );

  if (hits.length > 0) {
    hoveredCard = hits[0].object as THREE.Mesh;
  }
}

for (let k = 0; k < N; k++) {
  const cur = cards[k].userData.hoverScale ?? 1.0;
  const target = cards[k] === hoveredCard ? 1.12 : 1.0;

  // Ease toward the target scale instead of snapping instantly
  cards[k].userData.hoverScale =
    cur + (target - cur) * hoverLerpK;
}Rather than relying on transparent PNGs or nine-slice assets, each card uses a lightweight fragment shader to generate rounded corners procedurally. A signed-distance function masks the image in the shader, producing crisp edges at any size while keeping the geometry simple and the rendering efficient.
// Fragment shader — rounded corners for the gallery cards

vec2 q = abs(pxPos) - halfSize + uRadius;

float dist =
  min(max(q.x, q.y), 0.0) +
  length(max(q, 0.0)) -
  uRadius;

float alpha = 1.0 - smoothstep(-0.5, 0.5, dist);

if (alpha <= 0.0) {
  discard;
}

gl_FragColor = vec4(texture2D(map, vUv).rgb, alpha);To prevent a noticeable hitch when the section first comes into view, the WebGL scene is warmed up before the user reaches it. Textures, shaders, and geometry are rendered once ahead of time, ensuring the first visible frame is already prepared and the scroll experience remains smooth.
// Shader compilation and texture upload normally happen on the first render.
// Warming up the scene ahead of time avoids that work landing on the first
// visible frame.

const warmUp = () => {
  cards.forEach((m) => (m.visible = true));

  renderer.compile(scene, cam); // compile all shaders
  renderer.render(scene, cam);  // upload textures and initialize GPU resources

  cards.forEach((m, i) => {
    m.visible = wasVisible[i];
  });

  renderer.clear(); // discard the warm-up frame
};

// Run once on initialization, then again after all textures have loaded.
warmUp();
Rendering is driven directly by ScrollTrigger updates rather than a continuously running animation loop. A gsap.ticker only subscribes while the section is within one viewport of the screen and there are still animations settling, such as hover easing or the ripple effect, reducing unnecessary work when the scene is idle.
To avoid a noticeable hitch the first time the gallery appears, the scene is also explicitly warmed up. Shaders are compiled and textures uploaded to the GPU before the section becomes visible, moving that one-time initialization cost off the user’s first scroll into the experience.
The footer combines SVG, Web Audio, and WebGL into a single interactive experience. The wireframe wordmark behaves like a set of guitar strings that can be plucked with the cursor, producing synthesized notes and animated waves. At the same time, a separate WebGL smoke layer reacts to the live audio signal, responding not only to user interaction but also to the frequency content of the sound itself.
Every stroke of the SVG wordmark is treated as an independent string with its own oscillation state. Hovering or clicking injects energy into that string, causing it to vibrate while triggering a synthesized note. Because each path maintains its own state, multiple strings can be plucked independently, allowing overlapping interactions without interfering with one another.
// components/Footer/TrionnFooterLogo.tsx

for (const p of paths) {
  if (!hasStroke(p)) continue;

  const ep = getEndpoints(p); // actual start/end points of the SVG path

  const state: StringState = {
    x1: ep.x1,
    y1: ep.y1,
    x2: ep.x2,
    y2: ep.y2,
    amp: 0,
    phase: 0,
    speed: 0,
    cycles: 2.2,
    note: DEFAULT_SCALE[i % DEFAULT_SCALE.length] * (i % 2 ? 1 : 0.5),
    intensity:
      i === 0
        ? 0
        : Math.pow(i / (paths.length - 1), 1.25),
  };

  p.addEventListener("mouseenter", () => {
    state.amp = hoverAmp;
    state.speed = 18;

    gsap.killTweensOf(state);

    // Ease the string back to its resting state
    gsap.to(state, {
      amp: 0,
      duration: 0.9,
      ease: "expo.out",
    });

    gsap.to(state, {
      speed: 0,
      duration: 0.9,
      ease: "expo.out",
    });

    pluckFluteDreamy(state.note, state.intensity);
    pulseSmoke(0.4); // notify the fog layer
  });
}Rather than relying on a CSS animation, the wave is recalculated and redrawn every frame. This makes it possible to control the amplitude, frequency, and damping of each string independently, so every interaction feels responsive and behaves like a plucked wire instead of a looping animation.
const makeWavePath = (
  x1,
  y1,
  x2,
  y2,
  amp,
  phase,
  cycles,
) => {
  const ux = (x2 - x1) / len;
  const uy = (y2 - y1) / len; // unit vector along the string

  const px = -uy;
  const py = ux; // perpendicular ("wobble") direction

  let d = `M ${x1} ${y1}`;

  for (let i = 1; i <= 26; i++) {
    const t = i / 26;

    const env = Math.sin(Math.PI * t); // zero at the ends, strongest at the center
    const wobble = Math.sin(
      Math.PI * 2 * cycles * t + phase,
    );

    const x =
      x1 +
      (x2 - x1) * t +
      px * wobble * amp * env;

    const y =
      y1 +
      (y2 - y1) * t +
      py * wobble * amp * env;

    d += ` L ${x} ${y}`;
  }

  return d;
};

// Update only strings that are still moving.
if (st.amp > 0.02 || st.speed > 0.02) {
  st.phase += st.speed * dt;

  el.setAttribute(
    "d",
    makeWavePath(
      st.x1,
      st.y1,
      st.x2,
      st.y2,
      st.amp,
      st.phase,
      st.cycles,
    ),
  );
}Because the visible SVG strokes are only a few pixels wide, interacting with them directly would be frustrating. Instead, each string has an invisible duplicate with a much thicker stroke that’s used exclusively for pointer events. This provides a much larger hit area while keeping the visual appearance of the logo unchanged.
const clone = p.cloneNode(true) as SVGPathElement;

clone.setAttribute("stroke", "transparent");
clone.style.strokeWidth = `${Math.max(12, strokeWidth * 18)}`; // much wider than the visible stroke
clone.setAttribute("pointer-events", "stroke");

clone.addEventListener("mouseenter", () => {
  p.dispatchEvent(
    new Event("mouseenter", {
      bubbles: true,
    }),
  );
});

p.parentNode?.insertBefore(clone, p.nextSibling);Rather than playing prerecorded audio, each pluck is synthesized in real time using the Web Audio API. Three slightly detuned sine-wave oscillators are layered together and fed through a feedback delay, producing a soft, flute-like sound that responds instantly to every interaction.
const osc1 = ctx.createOscillator();
osc1.frequency.setValueAtTime(freq, now);

const osc2 = ctx.createOscillator();
osc2.frequency.setValueAtTime(freq * 2, now); // octave

const osc3 = ctx.createOscillator();
osc3.frequency.setValueAtTime(freq * 3, now); // harmonic

// Slow vibrato applied to the fundamental oscillator
const lfo = ctx.createOscillator();
lfo.frequency.setValueAtTime(4.9, now);

lfoGain.connect(osc1.frequency);

const delay = ctx.createDelay(1.0);
delay.delayTime.setValueAtTime(0.14, now);

const fb = ctx.createGain(); // feedback loop for the echo/reverb tail
fb.gain.linearRampToValueAtTime(
  0.32 + intensity * 0.12,
  now + 0.05,
);

delay.connect(echoLP);
echoLP.connect(fb);
fb.connect(delay);The fog effect is rendered as a single full-screen fragment shader rather than a particle system. Layered fractal noise (FBM) creates the base pattern, while domain warping breaks up repetition and gives the smoke a more organic flow. The result is a lightweight effect that continuously drifts upward and responds smoothly to user interaction.
// components/Footer/FooterFog.tsx — fragment shader

float fbm(vec2 p) {
  // Fractal Brownian Motion: layered noise at progressively smaller scales
  float v = 0.0;
  float a = 0.5;

  for (int i = 0; i < 3; i++) {
    v += a * vnoise(p);
    p = p * 2.1 + vec2(3.7, 8.3);
    a *= 0.5;
  }

  return v;
}

float rise = T * 0.07; // slow upward drift over time

vec2 q = vec2(
  uv.x * aspect * 3.0,
  (1.0 - y) * 4.5 + rise
);

float f = fbm(
  q + 1.4 * fbm(q2 + ...)
  + ...
); // domain-warped noise creates organic, non-repeating smoke

// H is the hover energy injected by logo interactions.
vec3 col = mix(charcoal, ashGrey, pow(f, 1.0));
col = mix(col, lightGrey, pow(f, 2.2));
col = mix(col, hoverTint, H * 0.55 * f);The fog doesn’t simply respond to hover events. Instead, it listens to the same audio graph used to synthesize the pluck sounds through a live AnalyserNode. This allows the shader to react to the actual frequency content of the audio, making the movement and intensity of the smoke reflect the sound being played rather than a simple on/off trigger.
// FooterFog reads from an AnalyserNode tapped off the logo's audio graph.
if (analyser && freqData) {
  analyser.getByteFrequencyData(freqData);

  let sum = 0;

  // Measure the energy in the mid-frequency range.
  for (let i = 2; i < freqData.length * 0.5; i++) {
    sum += freqData[i];
  }

  const raw =
    sum / (freqData.length * 0.5 * 255);

  // Smooth the response for a more natural attack and decay.
  freqEnergy +=
    (raw - freqEnergy) * lerpFactor;
}

// Louder notes make the fog morph more quickly.
morphOffset +=
  (4.0 + freqEnergy * 16.0 + hoverBoost * 2.8) * dt;
The pluck sound is synthesized entirely in real time using the Web Audio API, combining three oscillators, a subtle vibrato LFO, and a feedback delay instead of relying on prerecorded audio. To make the interaction feel effortless, each visible SVG stroke also has a much wider invisible duplicate that handles pointer events, allowing thin lines to remain easy to hover and click.
The logo and fog remain loosely coupled through a small shared atmosphere context. The logo simply exposes methods such as pulseSmoke() and getSmokeAnalyser(), while the fog only reacts to the data it receives. It doesn’t know what triggered the event—only that new energy is available—keeping the effect cleanly separated and easy to reuse elsewhere.
This section combines a depth mapped image with interactive WebGL effects to create the illusion of depth. A portrait of the lion responds to cursor movement through a fragment shader, while draggable curtain strips peel back with spring physics to reveal the image beneath. Pulling the curtain triggers a synchronized sound sequence, beginning with the fabric movement and ending with a lion’s growl.
The lion animation is intentionally delayed until the headline animation has finished. Waiting for the text to complete creates a clear visual rhythm and ensures the reveal feels like a continuation of the story, rather than competing for the user’s attention.
// components/Sections/About/AboutHero.tsx

useEffect(() => {
  if (!earlyStart || introStartedRef.current) return;

  introStartedRef.current = true;

  // Reveal the headline first.
  mainHeadingRef.current?.play();

  const tLion = window.setTimeout(() => {
    document.documentElement.dataset.trionnLionStart = "true";

    window.dispatchEvent(
      new CustomEvent("trionn:about-lion-start"),
    );
  }, headingAnimMs);

  // Subtitle and scroll hint follow shortly after.

  return () => clearTimeout(tLion);
}, [earlyStart]);

// components/Sections/About/AboutLion.tsx

useEffect(() => {
  const handler = () => setShouldInit(true);

  if (
    document.documentElement.dataset.trionnLionStart ===
    "true"
  ) {
    setShouldInit(true); // Event has already fired.
    return;
  }

  window.addEventListener(
    "trionn:about-lion-start",
    handler,
    { once: true },
  );

  return () => {
    window.removeEventListener(
      "trionn:about-lion-start",
      handler,
    );
  };
}, []);The lion portrait creates the illusion of depth using a single fragment shader and a precomputed depth map rather than real 3D geometry. As the cursor moves, the shader offsets the image based on the stored depth information, producing a convincing parallax effect while rendering only a single textured plane.
// AboutLion.tsx — fragment shader

vec2 mouse = (uMouseEase - 0.5) * vec2(2.0, -2.0); // normalize to -1...1 (Y flipped)

float depth = texture2D(uDepth, contained).r; // precomputed depth map

float breathing =
  sin(uTime * 0.0012) * 0.5 + 0.5; // subtle idle motion

float amount =
  (0.03 + 0.012 * breathing) * uHover;

vec2 disp = mouse * depth * amount; // brighter pixels shift more

vec2 uv = contained - disp;

// Small RGB offset creates a subtle chromatic fringe.
float r = texture2D(uImage, uv + disp * 0.16).r;
float g = texture2D(uImage, uv).g;
float b = texture2D(uImage, uv - disp * 0.16).b;

gl_FragColor = vec4(
  mix(bg, vec3(r, g, b), a),
  1.0
);

// JavaScript: ease the cursor toward its target position.
state.eased.x +=
  (state.mouse.x - state.eased.x) * 0.07;

state.eased.y +=
  (state.mouse.y - state.eased.y) * 0.07;

gl.uniform2f(
  uniforms.mouseEase,
  state.eased.x,
  state.eased.y,
);Each curtain strip behaves like a simple spring that is updated every frame. When a strip is dragged, it naturally eases back to its resting position, while the surrounding strips are pulled along to preserve the shape of the curtain. This creates the impression of a continuous piece of fabric rather than a collection of independent elements.
// physicsStep() — runs once per frame for every strip

const sp = -offY[i] * 0.12; // spring force pulling the strip back to rest
velY[i] = (velY[i] + sp) * 0.65; // apply damping
offY[i] += velY[i];

// While dragging, neighboring strips are pulled along to avoid
// visible gaps or overlaps, creating the impression of a continuous curtain.
if (dy > 0) {
  for (let ii = 1; ii < stripCount; ii++) {
    const overlap = aboveBot - thisRest;

    if (overlap <= 0) break;

    const sp = (overlap - offY[ni]) * 0.22;

    velY[ni] = (velY[ni] + sp) * 0.62;
    offY[ni] += velY[ni];
  }
}Each strip is drawn procedurally on a 2D canvas instead of using a static image. The shape is warped by a Gaussian drag envelope centered on the user’s grab point, creating a smooth deformation that spreads naturally across the strip and closely mimics the behavior of fabric.
const updateDragEnvelope = () => {
    const clickX = dragSeg / SEGS; // where along the strip you grabbed it
    for (let s = 0; s <= SEGS; s++) {
        const t = s / SEGS;
        const dx = t - clickX;
        dragEnvelope[s] = Math.exp(-(dx * dx) * SIGMA_INV); // Gaussian falloff from the grab point
    }
};
// Each strip’s path bends most where you grabbed it, tapering off toward its ends:
const py = restY + displacement * dragEnvelope[s];The audio is tied directly to the user’s interaction with the curtain. The main sound effect loops only while a real drag is happening, using a selected section of the recording to create a continuous texture. Additional sounds are triggered based on the progress of the movement, while simple clicks or incomplete gestures remain silent.
const startCurtainSound = () => {
    // Loop just the middle section of the curtain SFX for as long as the drag continues
    dragSource.buffer = curtainBuffer;
    dragSource.loop = true;
    dragSource.loopStart = Math.min(0.1, duration * 0.1);
    dragSource.loopEnd = Math.min(1.5, duration * 0.5);
    dragSource.start(0, dragStart);
};

const maybeTriggerSounds = () => {
    if (!curtainStarted && dragSpeed > DRAG_MOVE_PX) {
        startCurtainSound();
    }

    // Growl only fires once the curtain has been audibly open for CURTAIN_LEAD_S
    // so it never plays on a quick tap, only a real pull.
    if (
        !growlStarted &&
        curtainStarted &&
        Math.abs(offY[dragStrip]) > CURTAIN_OPEN_PX &&
        audioCtx.currentTime - curtainStartedAt >= CURTAIN_LEAD_S
    ) {
        startGrowlSound();
    }
};

// On release: only play the “thud” if something actually moved.
// A plain click should be silent.
if (!playedSomething) return;
A CustomEvent (trionn:about-lion-start) connects the two components, triggering the lion sequence only after the hero headline has finished revealing. Unlike the hero symbol and footer logo, this interaction uses recorded audio assets such as the curtain movement and lion growl instead of synthesized sound. The clips are dynamically manipulated through looping sections, randomized start offsets, and drag-speed-driven volume changes, creating a more responsive audio experience that evolves with the interaction.
The “Work hard. Play loud.” section uses a scattered image layout where eleven team photos animate into place from different directions during scroll. Each image is assigned a randomized position from a predefined set of collision-safe slots, creating a layout that feels organic while remaining controlled. Clicking a photo brings it forward, adjusts surrounding images to avoid overlap, and extracts its dominant color client-side to influence the background.
The gallery layout uses a fixed collection of positions rather than completely random coordinates. Each image receives a shuffled slot at runtime, meaning the arrangement changes between visits while keeping every photo within a controlled, non-overlapping area. Small position offsets and rotation values are added afterward to create a more natural scattered effect.
// components/TrionnGallery/TrionnGallery.tsx

// Each image defines a desktop/mobile position fraction. The SET of
// positions is shuffled at runtime, so a given photo doesn’t always land
// in the same slot. This keeps the layout collision-free while still
// introducing variation.
const cells = IMAGES.map((img) =>
    isMobile ? img.position.mobile : img.position.desktop
);

const shuffled = cells
    .map((cell) => ({
        cell,
        sort: Math.random(),
    }))
    .sort((a, b) => a.sort - b.sort)
    .map((x) => x.cell);

return items.map((item, index) => {
    const rotation = randomBetween(-4, 4);

    // Account for the rotated bounding box when calculating limits
    const bounds = getRotatedBounds(
        rect.width,
        rect.height,
        rotation
    );

    const cell = shuffled[index];

    // Add small variations so the layout does not feel too rigid
    const jitterX = randomBetween(-36, 36);
    const jitterY = randomBetween(-36, 36);

    return {
        x: clamp(
            cell[0] * vw - vw / 2 + jitterX,
            minX,
            maxX
        ),
        y: clamp(
            cell[1] * vh - vh / 2 + jitterY,
            minY,
            maxY
        ),
        r: rotation,
        s: 1,
    };
});Instead of moving every image in from the same direction, each photo starts from one of several off-screen positions before settling into its final location. This creates a more dynamic reveal where the gallery feels like it is assembling itself around the viewer.
const getStartPosition = (index: number) => {
    const gap = Math.max(vw, vh) * 0.72;

    const starts = [
        {
            x: -vw / 2 - gap,
            y: -vh / 2 - 80,
        }, // far off-screen, each corner/edge
        {
            x: vw / 2 + gap,
            y: -vh / 2 + 30,
        },
        {
            x: -80,
            y: -vh / 2 - gap,
        }, // from the top
        {
            x: 130,
            y: vh / 2 + gap,
        }, // from the bottom

        // …10 total positions, cycled by index
    ];

    return starts[index % starts.length];
};The gallery reveal is controlled by a pinned scroll timeline that staggers each photo’s entrance before transitioning into the final stripe wipe. Each image is introduced with a slight delay, creating a sequential composition, while the second animation phase is triggered only after the gallery has fully settled.
const animationEnd = GALLERY_VH / (GALLERY_VH + STRIPE_HOLD_VH);
// Fraction of the pinned scroll duration reserved for the photo entrance

galleryTimeline = gsap.timeline({
    scrollTrigger: {
        trigger: section,
        start: "top top",
        end: `+=${GALLERY_VH + STRIPE_HOLD_VH}%`,
        scrub: 0.6,
        pin: true,

        onUpdate: (self) => {
            const holdT = Math.max(
                0,
                Math.min(
                    1,
                    (self.progress - animationEnd) / (1 - animationEnd)
                )
            );

            // Stripes only start once the gallery entrance is complete
            if (stripesTL) stripesTL.progress(holdT);
        },
    },
});

items.forEach((item, index) => {
    galleryTimeline!.to(
        item,
        {
            x: end.x,
            y: end.y,
            rotate: end.r,
            duration: 1.2,
        },
        index * 0.34
    );
});The selected image is analyzed directly in the browser to determine its dominant color without requiring any external processing. The image is first reduced to a smaller canvas for faster sampling, then pixels are grouped into color buckets to identify the most prominent tones while ignoring transparent, very dark, bright, or low-saturation areas. The resulting color is used to dynamically tint the gallery background.
const getDominantImageColor = (img: HTMLImageElement): RGB => {
    const canvas = document.createElement("canvas");

    canvas.width = canvas.height = 72; // downsample for speed

    ctx.drawImage(img, 0, 0, 72, 72);

    const pixels = ctx.getImageData(0, 0, 72, 72).data;

    const buckets = new Map(); // quantize colors into coarse buckets

    for (let i = 0; i < pixels.length; i += 4) {
        const [r, g, b, a] = [
            pixels[i],
            pixels[i + 1],
            pixels[i + 2],
            pixels[i + 3],
        ];

        if (a < 220) continue;

        const brightness = (r + g + b) / 3;
        const saturation = Math.max(r, g, b) - Math.min(r, g, b);

        // Skip near-black, near-white, and gray areas
        if (brightness < 25 || brightness > 245 || saturation < 12) {
            continue;
        }

        const key = `${Math.round(r / 22) * 22},${Math.round(g / 22) * 22},${Math.round(b / 22) * 22}`;

        // Accumulate count + a "vividness" score per bucket...
    }

    // Pick the bucket with the best count × score weighting,
    // then average its raw pixels.
};Clicking a photo creates a pull-forward effect that briefly moves it toward the viewer before returning it to its original position. At the same time, nearby overlapping photos are detected and pushed away from the interaction point, creating a subtle physical response that makes the scattered layout feel more dynamic.
const onClick = () => {
    if (isCardAnimating) return;

    isCardAnimating = true;

    updateBackgroundTone(item);
    moveOverlappingCards(item); // see below

    gsap.timeline({
        onComplete: () => {
            resetInnerCard(item);
            isCardAnimating = false;
        },
    })
    .to(inner, {
        x: pullX,
        y: pullY,
        rotation: direction * 4.5,
        scale: 1.035,
        opacity: 0.18,
        duration: 0.34,
    })
    .set(item, {
        zIndex: activeZIndex,
    })
    .to(inner, {
        x: 0,
        y: 0,
        rotation: 0,
        scale: 1,
        opacity: 1,
        duration: 0.56,
    });
};

const moveOverlappingCards = (clickedItem) => {
    items.forEach((otherItem) => {
        if (!isOverlapping(clickedRect, otherItem.getBoundingClientRect())) {
            return;
        }

        const dx = otherCenterX >= clickedCenterX ? 1 : -1;
        // Push away from the clicked photo

        gsap.timeline()
            .to(inner, {
                x: dx * gsap.utils.random(18, 34),
                rotation: dx * gsap.utils.random(1.4, 2.8),
                duration: 0.34,
            })
            .to(inner, {
                x: 0,
                y: 0,
                rotation: 0,
                duration: 0.52,
            }); // spring back
    });
};The gallery images are mounted only after the component is rendered on the client, avoiding unnecessary server-side image loading for a section that depends entirely on interaction and animation. This keeps the initial render lighter while still allowing the images to be processed in the browser for color extraction.
const mounted = useSyncExternalStore(
    () => () => {},
    () => true,
    () => false
);

// …

{
    mounted && (
        <img
            src={img.src}
            alt={img.alt}
            crossOrigin="anonymous"
        />
    )
}
The dominant color extraction is performed by reducing each image to a 72×72 canvas and grouping similar pixel values into color buckets. Near-black, near-white, and low-saturation pixels are removed from the calculation so images with neutral backgrounds can still produce a meaningful accent color. The pinned scroll timeline is divided into two stages, with the photo entrance completing before the stripe wipe begins, following the same progressive transition pattern used across the Services and Hero sections.
Looking back, a shared canvasManager architecture from the beginning would have simplified the management of multiple WebGL experiences across the site. One of the main lessons was that the final level of polish came less from individual effects and more from carefully synchronizing every layer of the experience, including scrolling, animations, transitions, and audio.
Maintaining consistent patterns throughout the project, such as a shared GSAP ticker, idle-task scheduling, GPU-friendly animations, and synthesized Web Audio, helped keep the experience performant while preserving the level of detail across every section. This same attention to timing and interaction was carried through to the smaller moments as well, including the footer, where the experience continues beyond the main content.
此内容由惯性聚合(RSS阅读器)自动聚合整理,仅供阅读参考。 原文来自 — 版权归原作者所有。