After such positive reception of our SaasKit last month, we’ve teamed up with Supabase to bring you yet another Deno Fresh starter. This time, we’ve created a custom ChatGPT-style doc search using the OpenAI Text Completion API.
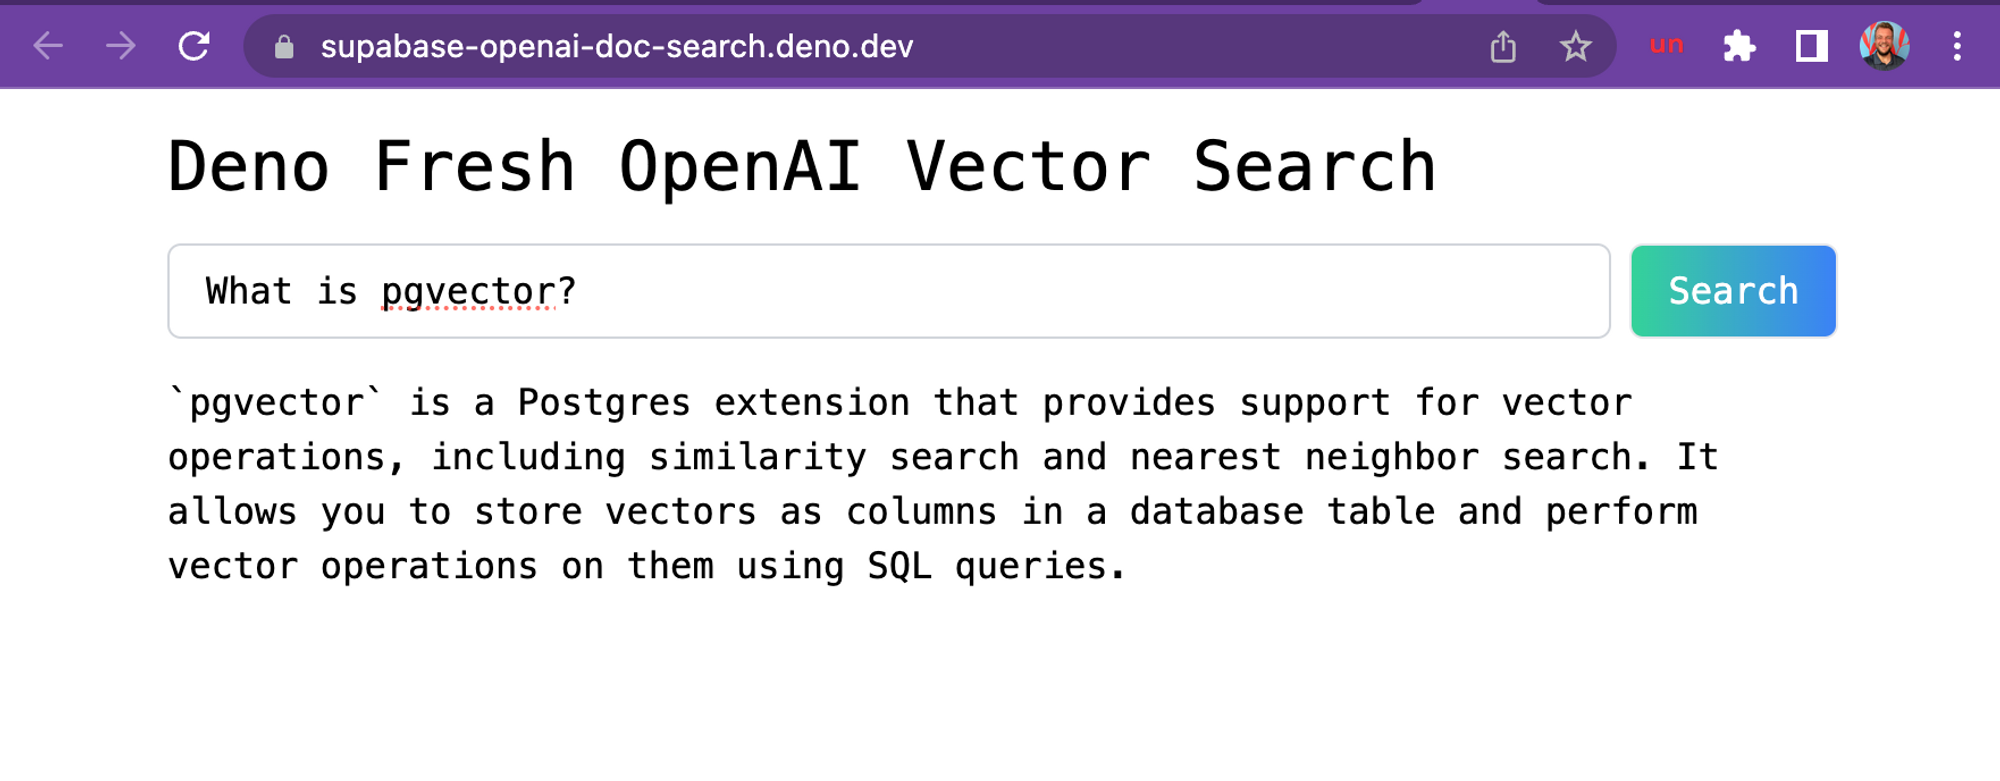
A screenshot of the demo hosted on Deno Deploy, based off Supabase’s docs.
Supabase’s free, hosted PostgresDB is perfect to use with OpenAI’s GPT-3, since the database comes with the extension pgvector, allowing you to store embeddings and perform vector similarity search. Both of those are required for building GPT-3 apps.
If you want to dive into more details, check out this blogpost. Or you can dive right in and start building your own custom ChatGPT doc search.
Let’s start coding!
Building your own custom ChatGPT involves four steps:
.mdx files in your docs folder).Step 1. and 2. happen via
a GitHub Action anytime
we make changes to the main branch.
When main is merged, this
generate-embeddings
script is executed, which performs the following tasks:
.mdx filesHere’s a workflow diagram of what happens:
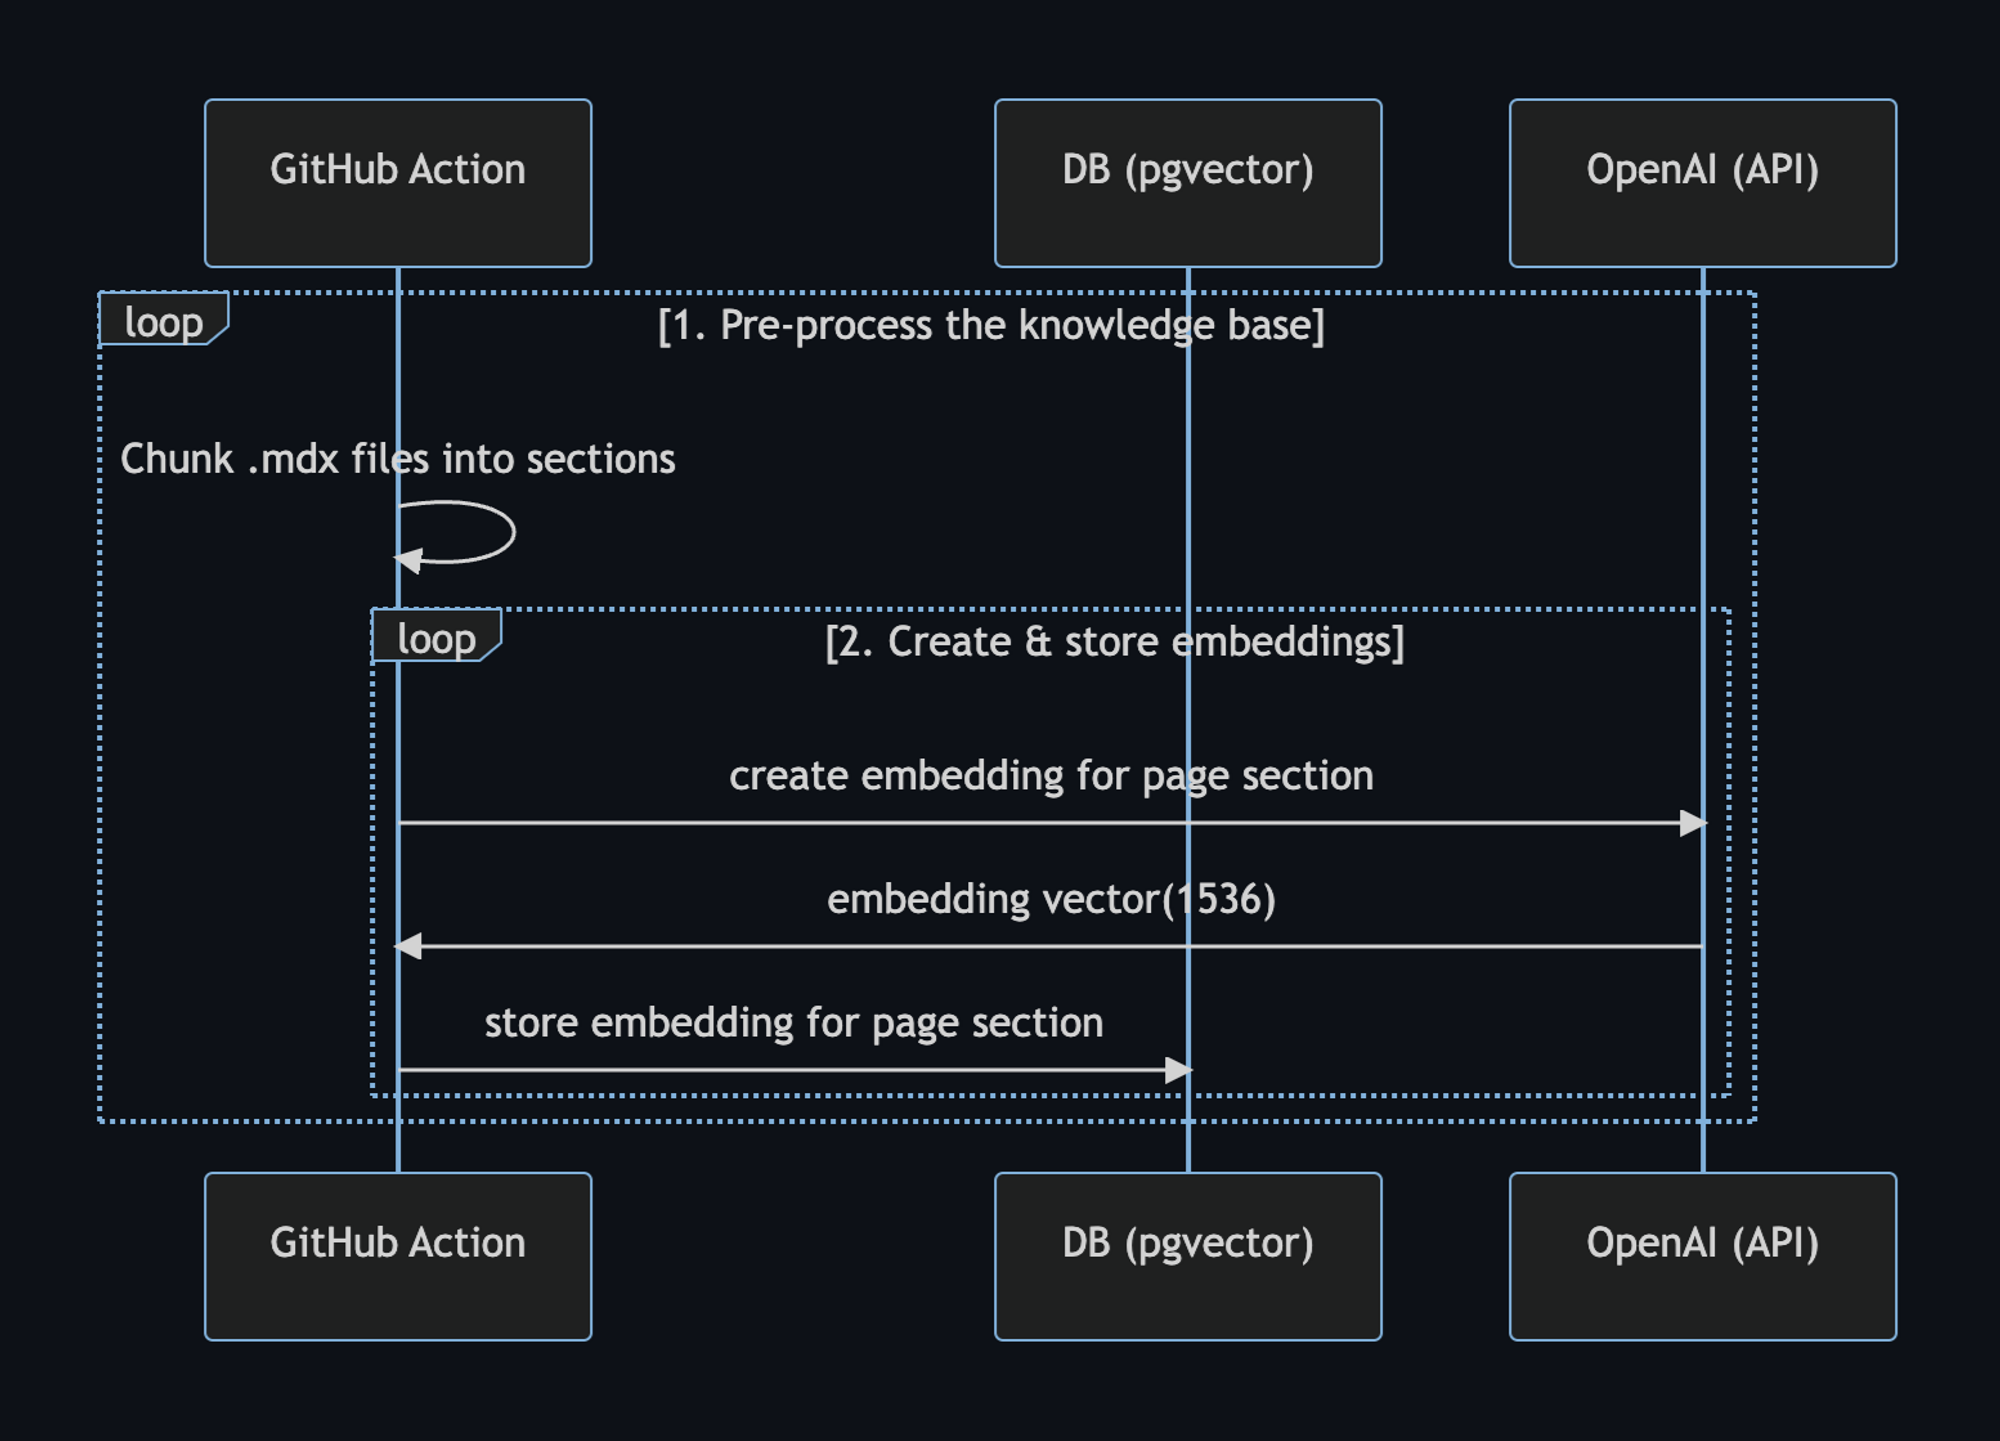
We can use the setup-deno GitHub Action to execute TypScript scripts via Deno in GitHub Actions. This action allows us to also use npm specifiers.
Here’s the GitHub Action yml file:
name: Generate Embeddings

on:
  push:
    branches:
      - main
  workflow_dispatch:

jobs:
  generate-embeddings:
    runs-on: ubuntu-latest

    env:
      SUPABASE_URL: ${{ secrets.SUPABASE_URL }}
      SUPABASE_SERVICE_ROLE_KEY: ${{ secrets.SUPABASE_SERVICE_ROLE_KEY }}
      OPENAI_KEY: ${{ secrets.OPENAI_KEY }}

    steps:
      - uses: actions/checkout@v3

      - uses: denoland/setup-deno@v1
        with:
          deno-version: v1.x

      - run: deno task embeddings
In addition to storing the embeddings, this script generates a checksum for each
of your .mdx files and stores this in another database table to make sure the
embeddings are only regenerated when the file has changed.
Step 3. and 4. happen at runtime, anytime the user submits a question. When this happens, the following sequence of tasks is performed:
pgvector, which returns the relevant docsHere’s a workflow diagram describing the steps in further detail:
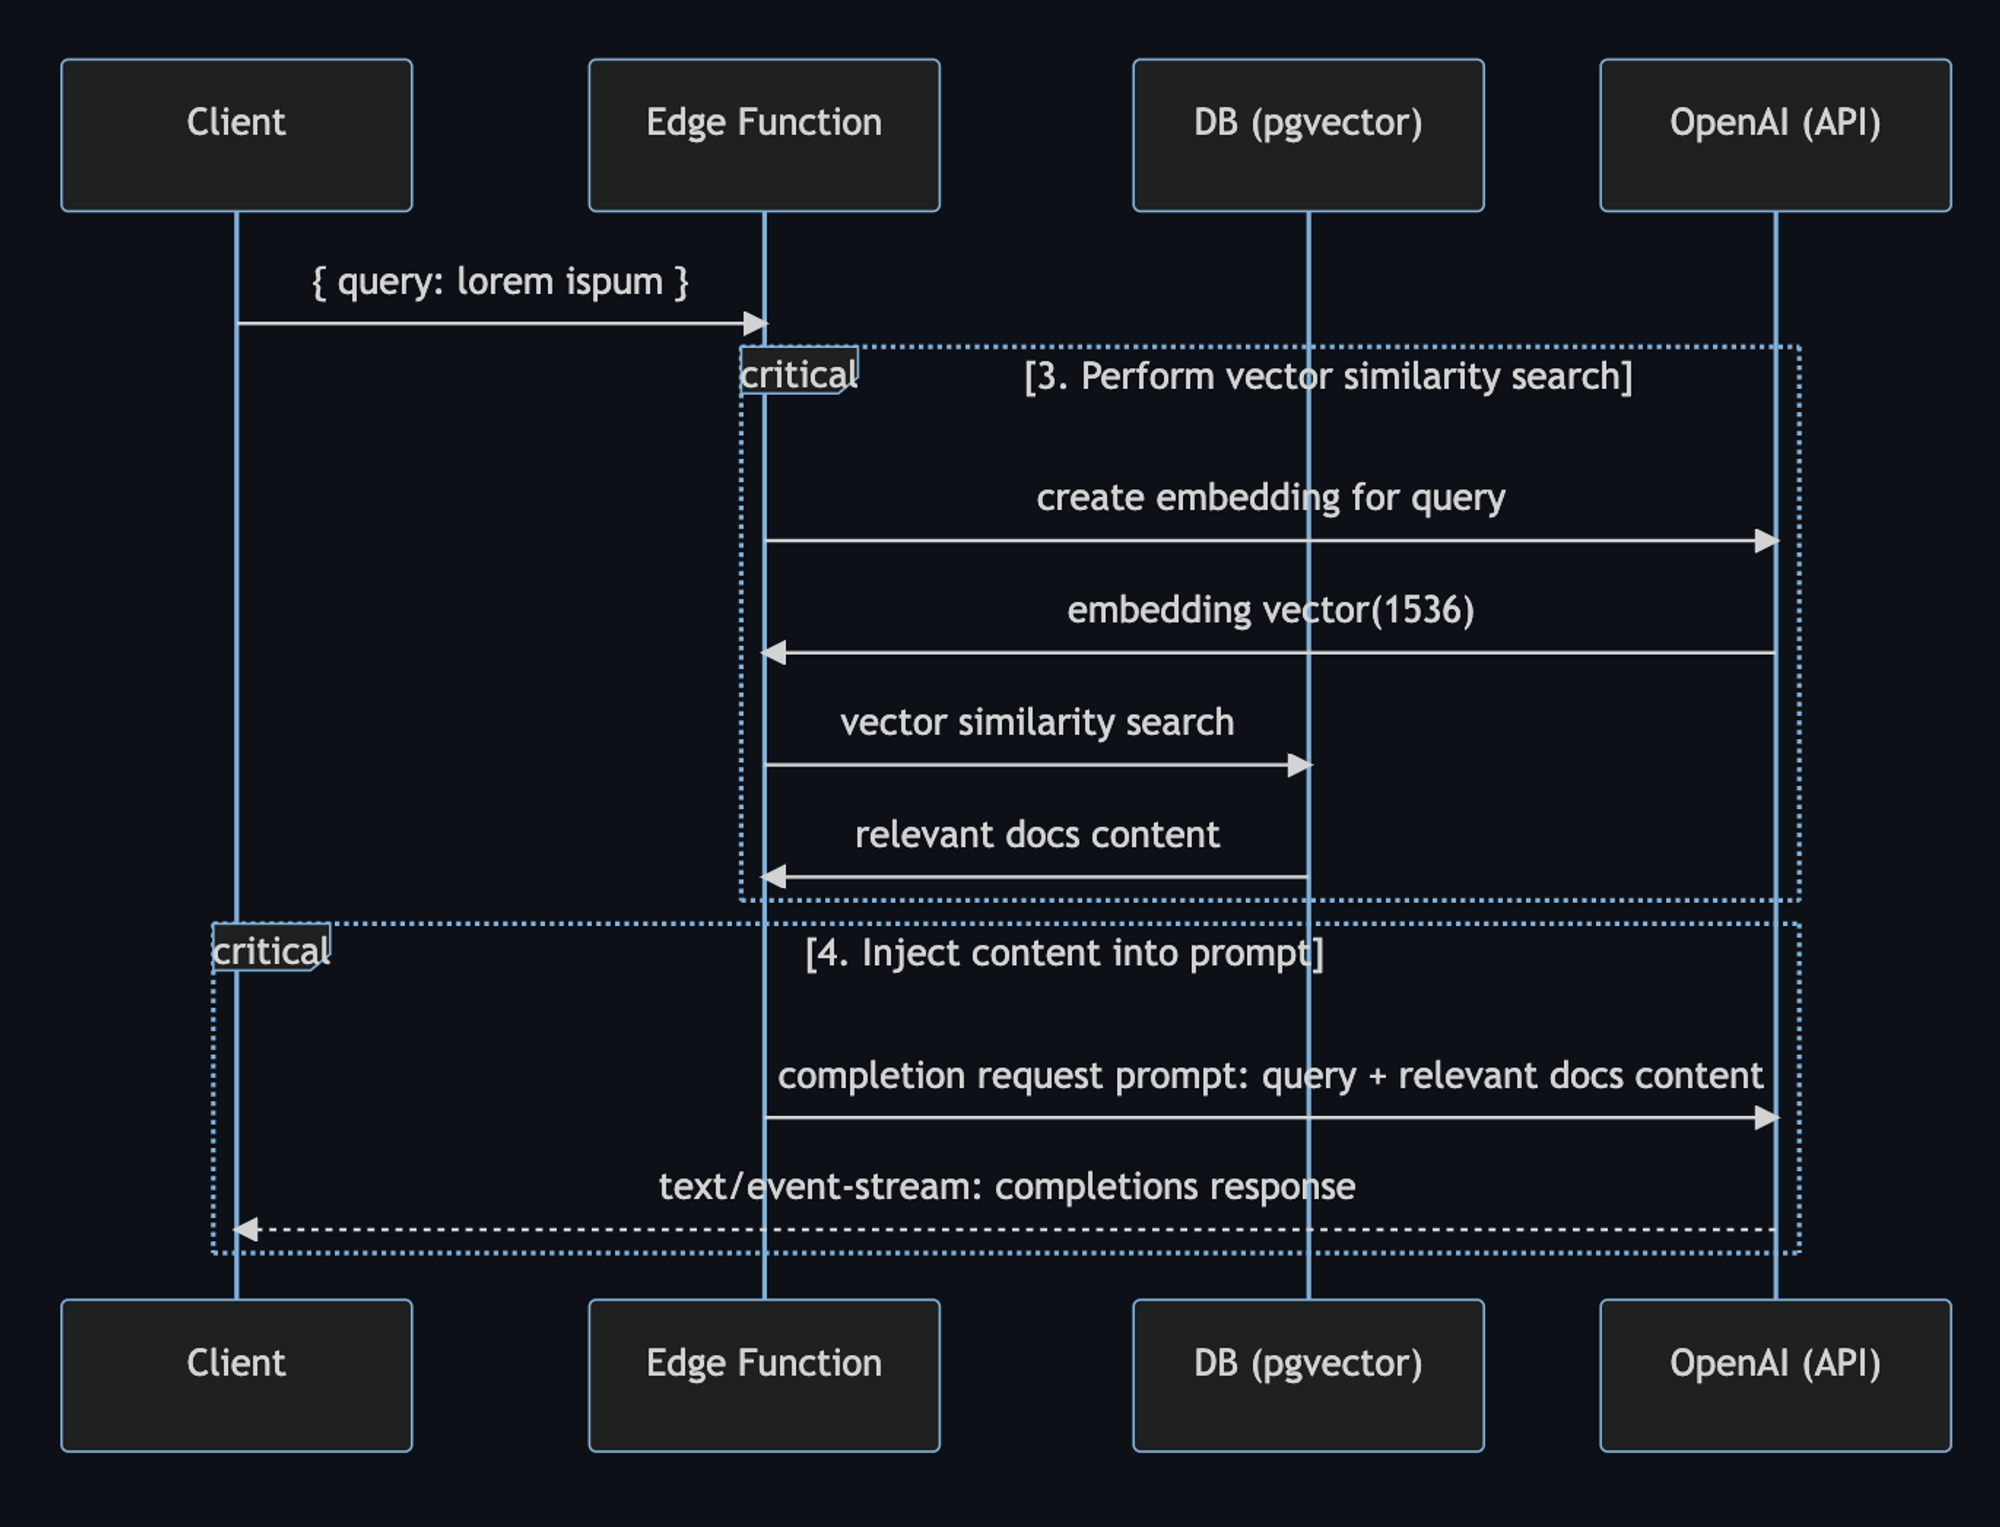
In the code, the user prompt begins with the
SearchDialog island.
Then, the
vector-search API endpoint
generates the embedding, then performs the vector search on Supabase. When it
gets the response with relevant docs, it assembles the prompt for OpenAI:
const prompt = codeBlock`
${oneLine`
  You are a very enthusiastic Supabase representative who loves
  to help people! Given the following sections from the Supabase
  documentation, answer the question using only that information,
  outputted in markdown format. If you are unsure and the answer
  is not explicitly written in the documentation, say
  "Sorry, I don't know how to help with that."
`}

Context sections:
${contextText}

Question: """
${sanitizedQuery}
"""

Answer as markdown (including related code snippets if available):
`;

const completionOptions: CreateCompletionRequest = {
  model: "text-davinci-003",
  prompt,
  max_tokens: 512,
  temperature: 0,
  stream: true,
};


const response = await fetch("https://api.openai.com/v1/completions", {
  headers: {
    Authorization: `Bearer ${OPENAI_KEY}`,
    "Content-Type": "application/json",
  },
  method: "POST",
  body: JSON.stringify(completionOptions),
});


return new Response(response.body, {
  headers: {
    ...corsHeaders,
    "Content-Type": "text/event-stream",
  },
});
Finally, the SearchDialog island uses the
EventSource web API
to process
server-sent events
that are returned from the OpenAI API. This is what allows us to stream the
response to the client as it is being generated from OpenAI:
const onSubmit = (e: Event) => {
  e.preventDefault();
  answer.value = "";
  isLoading.value = true;

  const query = new URLSearchParams({ query: inputRef.current!.value });
  const eventSource = new EventSource(`api/vector-search?${query}`);

  eventSource.addEventListener("error", (err) => {
    isLoading.value = false;
    console.error(err);
  });
  eventSource.addEventListener("message", (e: MessageEvent) => {
    isLoading.value = false;

    if (e.data === "[DONE]") {
      eventSource.close();
      return;
    }

    const completionResponse: CreateCompletionResponse = JSON.parse(e.data);
    const text = completionResponse.choices[0].text;

    answer.value += text;
  });

  isLoading.value = true;
};
This is the full power of open source and the modern web coming together right here at your fingertips. Try it out now, we can’t wait to see what you will build!
Here are additional resources to learn about building with OpenAI and ChatGPT.
Finally, we’d like to thank Asher Gomez for his contribution on this project.
Don’t miss any updates - follow us on Twitter!
此内容由惯性聚合(RSS阅读器)自动聚合整理,仅供阅读参考。 原文来自 — 版权归原作者所有。