


Introduction
Toyota Motor North America (TMNA) is on a multi-year manufacturing digital transformation journey to support vehicle electrification, enhance customer experience, empower an agile workforce, and seamlessly integrate advanced digital technologies. Toyota is preparing for the future by transforming its vehicle lineup and manufacturing methods, which includes new tools, updated procedures, and a skilled workforce.
NEXUS is Toyota’s IIoT (Industrial Internet of Things) platform that unifies plant floor data for real-time operational insights, helps reduce silos to enable smarter decisions, improve efficiency, and predictive maintenance across North American facilities. Built on a secure, scalable MQTT messaging backbone, NEXUS connects plant equipment to edge brokers that aggregate telemetry locally and push it to a cloud-hosted HiveMQ cluster on Amazon ECS.
This post covers how Toyota deployed HiveMQ on Amazon ECS with mutual TLS (mTLS) for a secure, scalable IIoT architecture, now scaling beyond a successful single-plant pilot across all North American facilities.
By the end of this post, you will understand how to:
- Configure a Route 53 hostname for Domain Name System (DNS) resolution used by HiveMQ and MQTT clients to connect
- Deploy a Network Load Balancer with TLS pass-through to route traffic to HiveMQ
- Run HiveMQ on Amazon ECS Fargate
- Implement mTLS for authentication and encrypted communication
- Enable downstream systems to subscribe to MQTT topics securely
HiveMQ Broker on Amazon ECS – Architecture Overview
HiveMQ Enterprise – A high-performance, Java-based MQTT broker designed for large-scale IIoT. It supports clustered deployments, millions of concurrent connections, and a pluggable extension system for custom auth and data routing.
Mutual TLS (mTLS) – A transport-layer security protocol in which both the client and the server authenticate each other by exchanging and validating X.509 certificates signed by a trusted Certificate Authority. In this architecture, any client that cannot present a valid certificate is rejected during the TLS handshake, before MQTT communication even begins, ensuring zero-trust connectivity at the transport level.
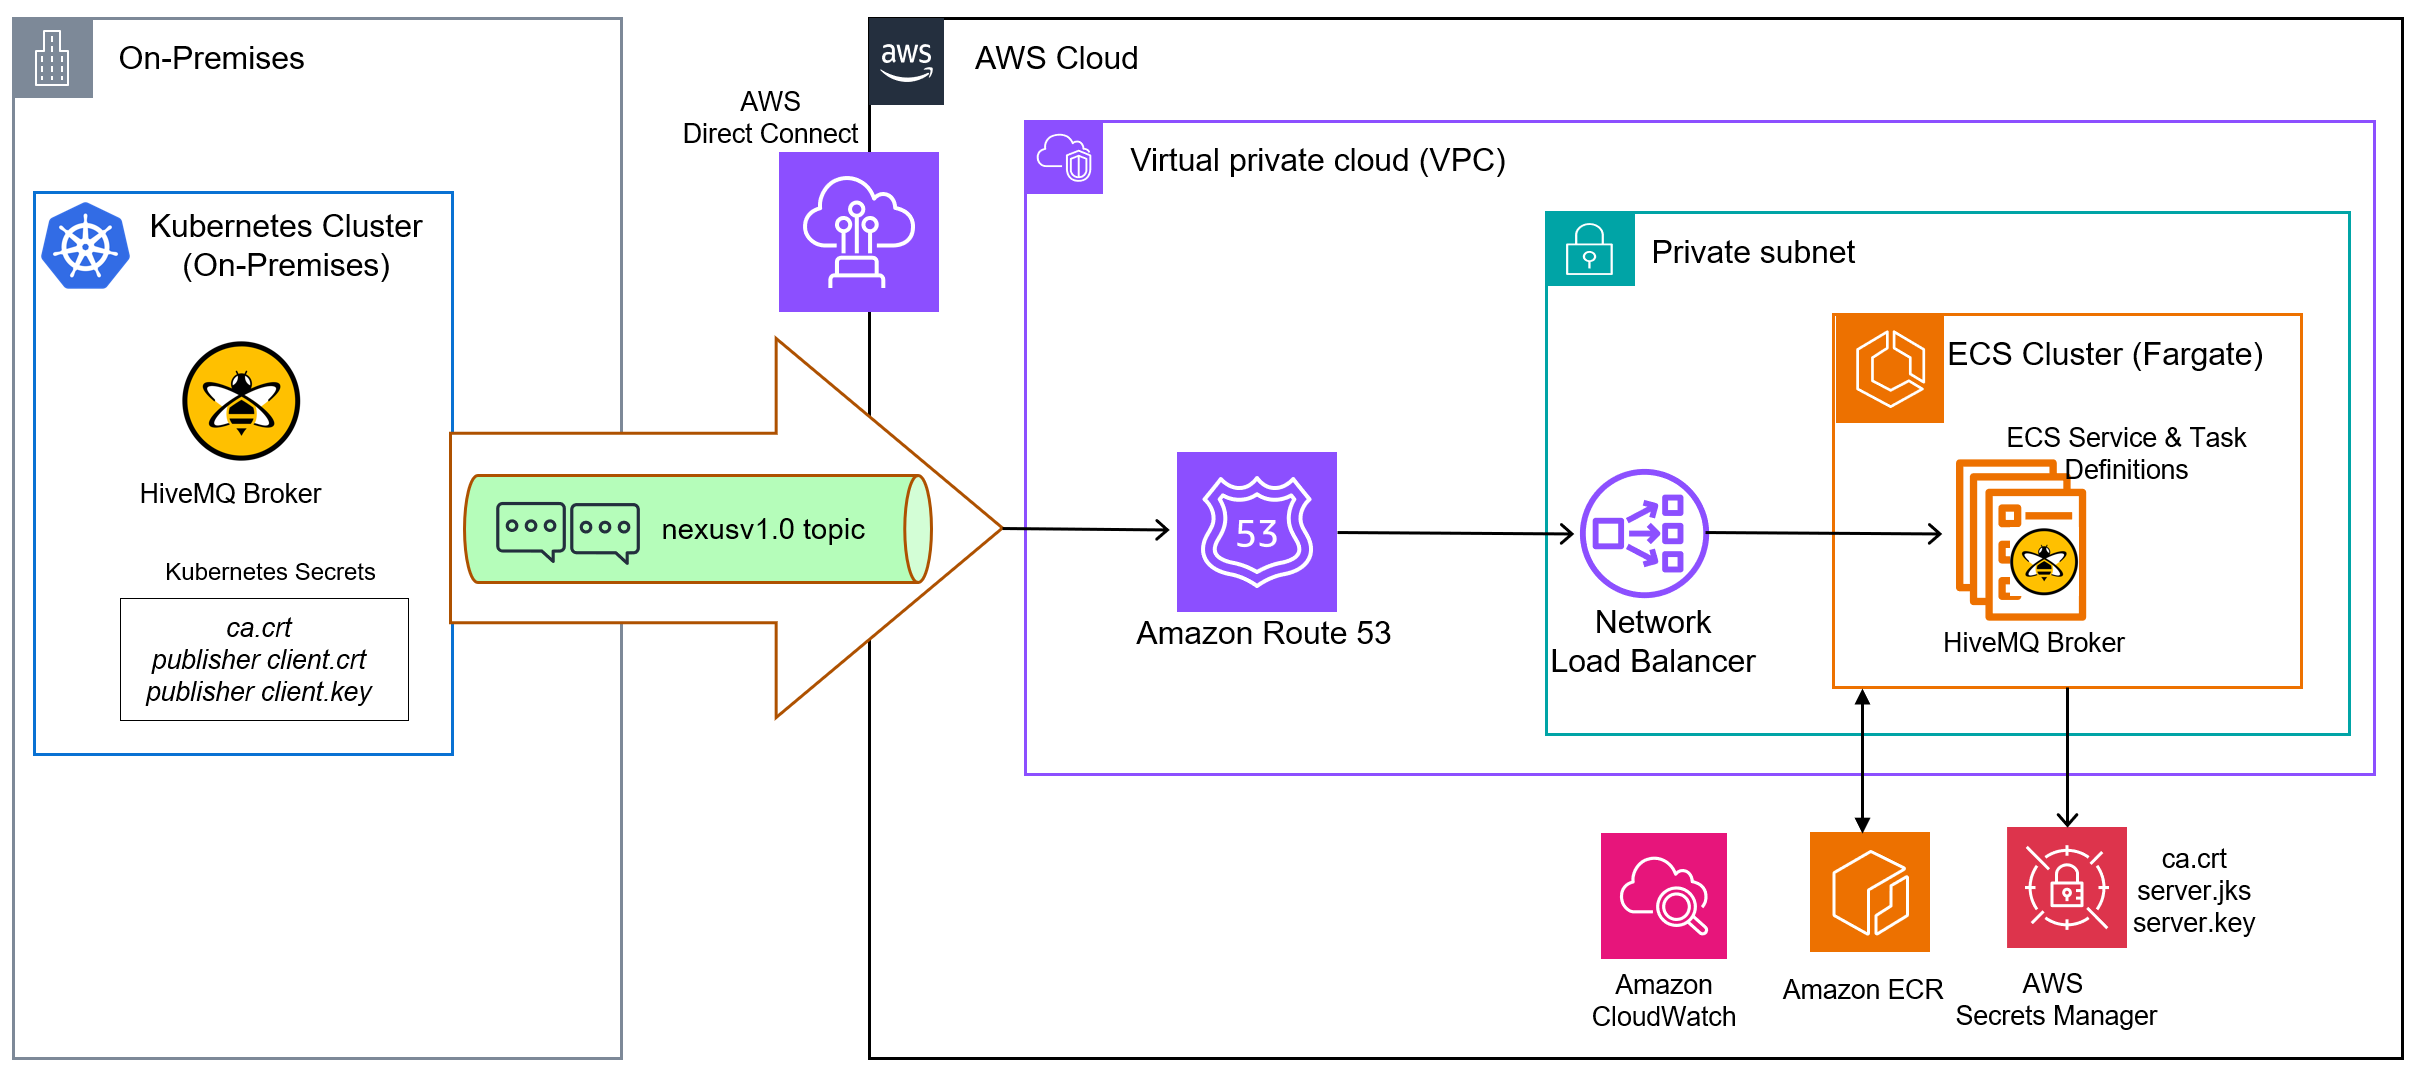
Figure 1: Architecture deploying HiveMQ Broker on AWS
Architecture – Key Components & Design
- The on-premises Admin Network hosts the HiveMQ Broker, which acts as the Enterprise Message Bus for bidirectional MQTT communication. Using a certificate from the cloud HiveMQ instance, the on-premises broker establishes a secure connection and publishes IIoT JSON data from the plant floor to the cloud HiveMQ topic over AWS Direct Connect. Amazon Route 53 provides DNS resolution for the HiveMQ endpoint.
- The on-prem broker authenticates using a certificate from the cloud HiveMQ instance.
- Route 53 handles DNS resolution for MQTT client connections.
- Incoming MQTT connections enter AWS through a Network Load Balancer (NLB) operating at Layer 4 (TCP). The NLB forwards raw TCP traffic with TLS intact directly to HiveMQ containers without terminating the TLS session.
- HiveMQ performs the full TLS handshake and validates client certificates against the CA trust store.
- HiveMQ runs as containers on Amazon ECS Fargate in private subnets, with auto scaling behind the NLB.
- Certificates and credentials are stored in AWS Secrets Manager and pulled at runtime by the ECS task.
- Downstream applications subscribe to HiveMQ topics to receive authenticated messages.
The following sequence diagram illustrates the end-to-end MQTT message flow from on-premises plant floor devices through the HiveMQ bridge into AWS, including TLS/mTLS provisioning and downstream subscriber delivery.
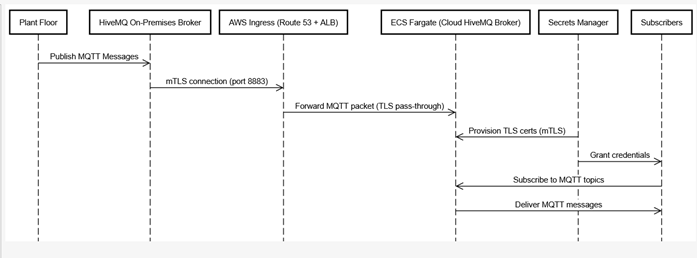
Figure 2: Sequence diagram of end-to-end MQTT message flow
Prerequisites
This post assumes working knowledge of Amazon ECS, Amazon ECR, Amazon Route 53, Network Load Balancers, AWS Identity and Access Management (IAM), AWS Secrets Manager, Docker containers, and familiarity with basic MQTT concepts.
Before beginning the setup, ensure the following prerequisites are in place:
- AWS Account with permissions to create ECS clusters, ECR repositories, Network Load Balancers, Amazon Route 53 hosted zones, IAM roles, and Secrets Manager secrets
- AWS CLI installed and configured with credentials for your target AWS region
- Docker installed locally for building and pushing the customized HiveMQ container image
- OpenSSL installed locally for certificate generation
- VPC, subnets, and security groups already provisioned
- Amazon ECS Cluster created with an ECS Task Role and Task Execution Role; the Task Execution Role must have Secrets Manager permissions scoped to the specific secret ARNs used in this deployment
- Basic familiarity with MQTT concepts such as topics, publish/subscribe patterns, and QoS levels
Implementation Steps
The following section covers key implementation steps and configurations of five components: Route53, Certificate Authority, Network Load Balancer, HiveMQ, ECS, and validating the setup.
Configure Route53
Create a Route 53 public hosted zone for your domain (e.g., yourapp.yourcompany.com). This allows you to manage DNS records for all the cloud services under a single domain. In a subsequent step we will add an Alias record pointing to the Network Load Balancer
Certificate Authority and mTLS Certificate Generation
For the purposes of this blog post, we use a self-signed CA with OpenSSL. For production deployments at scale, we recommend using AWS Private CA for automated certificate lifecycle management and rotation. We will now create the required certificates.
Create the Certificate Authority (CA) and generate certificates
The Certificate Authority (CA) is the root of trust. Publisher or subscriber certificates must be created using this CA so that HiveMQ will trust them. Note that you should use the Route53 hostname from the prior step for the Common Name (CN).
1. Install OpenSSL in your development environment.
2. Generate CA private key and self-signed certificate
# Generate CA private key and self-signed certificate (10-year validity)
openssl req -new -x509 -days 3650 -keyout ca.key -out ca.crt \
-subj "/CN= <<yourapp.yourcompany.com>>-CA/O=<<yourcompany>>/C=US"
3. Create server extensions server-extensions.conf with SAN (Subject Alternative Name). Using the CA key and certificate generated above and server extension config, create the HiveMQ server certificate. The Common Name (CN) must match the Route53 hostname that clients will connect to:
openssl genrsa -out server.key 2048
openssl req -new -key server.key -out server.csr \
-subj "/CN= <<yourbroker.env.yourapp.yourcompany.com>> /O=<<yourcompany>>/C=US"
openssl x509 -req -days 365 -in server.csr \
-CA ca.crt -CAkey ca.key -CAcreateserial \
-extfile server-extensions.conf
-out server.crt
Generate Publisher and Subscriber Client Certificates
Create the client extension file, client-extensions.conf, with a Subject Alternative Name (SAN) specific to the on-premises publisher. The on-premises HiveMQ broker receives its own client certificate signed by the same CA.
Repeat this process for each distinct client identity:
openssl genrsa -out client.key 2048
openssl req -new -key client.key -out client.csr \
-subj "/CN=<<yourpublisherapp>>/O=<<yourcompany>>/C=US"
openssl x509 -req -days 365 -in client.csr \
-CA ca.crt -CAkey ca.key -CAcreateserial \
-extfile client-extensions.conf -out client.crt
Similarly, create client certificate for subscriber to test using MQTT Explorer.
Create JKS Keystores and Truststores
HiveMQ uses Java KeyStore (JKS) or PKCS12 format for its TLS configuration. Convert the OpenSSL-generated certificates into JKS format with a password.
The certificate artifacts required for mTLS include the following:
| Certificate | Purpose | Destination |
| server.jks | HiveMQ broker identity (keystore) | AWS Secrets Manager → ECS container at runtime |
| ca.jks | Truststore – validates incoming client certs | AWS Secrets Manager → ECS container at runtime |
| client.crt + client.key | Publisher application identity | Enables the publisher application (Refer Architecture diagram – On-premises Kubernetes cluster) to establish a secure connection to the MQTT broker. |
Table 1: Server and client certificates
HiveMQ Configuration XML
We will now update the HiveMQ configuration referencing the keystore and truststore, as shown below:
<?xml version="1.0" encoding="UTF-8" ?>
<hivemq xmlns:xsi="http://www.w3.org/2001/XMLSchema-instance"
xsi:noNamespaceSchemaLocation="config.xsd">
<listeners>
<!-- MQTT TLS Listener -->
<tls-tcp-listener>
<port>8883</port>
<bind-address>0.0.0.0</bind-address>
<tls>
<keystore>
<path>/opt/hivemq/conf/server.jks</path>
<password>${KEYSTORE_PASSWORD}</password>
<private-key-password>${PRIVATE_KEY_PASSWORD}</private-key-password>
</keystore>
<truststore>
<path>/opt/hivemq/conf/ca.jks</path>
<password>${TRUSTSTORE_PASSWORD}</password>
</truststore>
<client-authentication-mode>REQUIRED</client-authentication-mode>
<protocols>
<protocol>TLSv1.2</protocol>
<protocol>TLSv1.3</protocol>
</protocols>
</tls>
</tls-tcp-listener>
</listeners>
</hivemq>
<client-authentication-mode>REQUIRED</client-authentication-mode> is the key directive that enforces mTLS. Only clients presenting a certificate signed by the CA in ca.jks are permitted to connect. Any device without a valid certificate has its connection rejected during the TLS handshake.
Store Certificates and configs in AWS Secrets Manager
Store the config, keystore, truststore and keystore password, trust store password, private key password in Secrets Manager using the AWS CLI. All secrets are now stored securely and ready to be fetched at ECS container startup, as explained below.
Configure the Network Load Balancer (NLB)
Route 53 is the entry point for all MQTT traffic from the on-premises environment. Route 53 resolves the broker hostname to the NLB, based on the DNS record configuration. Create an NLB listener with the TCP protocol on port 8883, which is the standard port for MQTT over TLS. Configure the listener action to forward traffic to the target group. The listener uses the TCP protocol with TLS pass-through, so the full TLS session is forwarded intact to the HiveMQ container.
Target Group Configuration
Define an NLB target group with target type IP, protocol TCP, and port 8883. ECS dynamically registers and deregisters task IP addresses with the target group as tasks start and stop. This ensures the NLB always routes traffic to healthy HiveMQ instances.Configure TCP health checks on port 8883 and set an appropriate deregistration delay to allow graceful connection draining during task shutdowns. For additional guidance, see Best practices for NLB target groups.
Next, navigate to Route 53 and create an alias record with a value similar to yourbroker.env.yourapp.yourcompany.com, pointing to the NLB provisioned above.
At this point, the ingress layer, including the Network Load Balancer, target group, and DNS configuration, is complete. Next, we will set up the HiveMQ ECS service.
Build and Push the HiveMQ Docker Image to ECR
Toyota’s deployment uses a customized HiveMQ Docker image (version 4.39.1) that bundles the required HiveMQ extensions. The image is built locally, tagged, and pushed to Amazon Elastic Container Registry (ECR).We will use the full image URI is in the ECS Task Definition in the following step.
Provision the service on the ECS Cluster
On the ECS Cluster that you have provisioned, we will create a service for HiveMQ that integrates with the NLB for traffic distribution. With the service in place, ECS maintains the desired number of HiveMQ tasks, automatically replaces unhealthy tasks, and registers new task IP addresses with the NLB target group. This provides self-healing infrastructure.
Service configuration:
- Service name: <<your-service-name>>
- Launch type: Fargate
- Load balancer: Attach to the NLB target group on port 8883
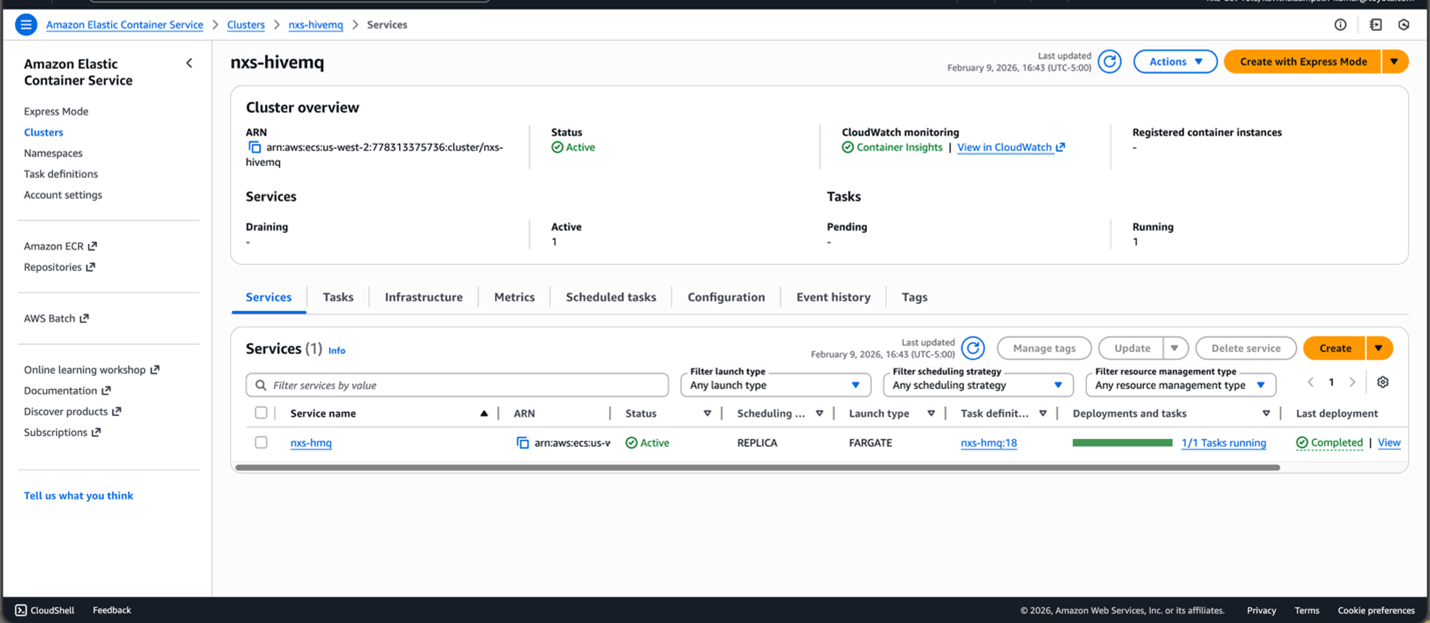
Figure 3: ECS Cluster with HiveMQ Service
Create the ECS Task Definition and ECS Task
The ECS task definition is the blueprint for the HiveMQ container. It defines the container image, resource allocation, port mappings, environment variables, and critically, the startup command that retrieves all secrets from Secrets Manager before launching HiveMQ.
Task definition includes portMapping with container port as 8883 for secure MQTT communication. Certificates are fetched from Secrets Manager at runtime via Container Startup Command and copied to a mounted volume. This approach ensures that no secrets are stored in the container image, the task definition, they are fetched only at runtime.
Task Definition:
{
    "taskDefinitionArn": "arn:aws:ecs:us-west-2: <<ACCOUNTNO>>:task-definition/nxs-hmq:18",
    "containerDefinitions": [
        {
            "name": "nxs-hivemq",
            "image": "<ACCOUNTNO>.dkr.ecr.<REGION>.amazonaws.com/<yourimageURL>",
            "cpu": 0,
            "portMappings": [
                {
                    "containerPort": 8883,
                    "hostPort": 8883,
                    "protocol": "tcp"
                }
            ],
            "essential": true,
            "entryPoint": ["/bin/bash", "-c"],
            "command": [
                "echo 'Installing dependencies...' && \
                apt-get update && apt-get install -y awscli gettext-base curl && \
                echo 'Creating directories...' && \
                mkdir -p /opt/hivemq/conf-secrets /opt/hivemq/certs && \
                echo 'Fetching HiveMQ configuration from Secrets Manager...' && \
                aws secretsmanager get-secret-value --secret-id hivemq/config-xml --query SecretString --output text > /opt/hivemq/conf-secrets/config-template.xml && \
                echo 'Fetching certificates from Secrets Manager...' && \
                aws secretsmanager get-secret-value --secret-id hivemq/keystore --query SecretBinary --output text | base64 -d > /opt/hivemq/certs/server.jks && \
                aws secretsmanager get-secret-value --secret-id hivemq/truststore --query SecretBinary --output text | base64 -d > /opt/hivemq/certs/ca.jks && \
                echo 'Fetching passwords from Secrets Manager...' && \
                export KEYSTORE_PASSWORD=$(aws secretsmanager get-secret-value --secret-id hivemq/keystore-password --query SecretString --output text) && \
                export TRUSTSTORE_PASSWORD=$(aws secretsmanager get-secret-value --secret-id hivemq/truststore-password --query SecretString --output text) && \
                export PRIVATE_KEY_PASSWORD=$(aws secretsmanager get-secret-value --secret-id hivemq/private-key-password --query SecretString --output text) && \
                echo 'Processing configuration template...' && envsubst < /opt/hivemq/conf-secrets/config-template.xml > /opt/hivemq/conf/config.xml && \
                echo 'Creating symlinks for certificates...' && ln -sf /opt/hivemq/certs/server.jks /opt/hivemq/conf/server.jks && \
                ln -sf /opt/hivemq/certs/ca.jks /opt/hivemq/conf/ca.jks && \
                echo 'Setting proper permissions...' && \
                chmod 644 /opt/hivemq/conf/config.xml && \
                chmod 644 /opt/hivemq/certs/*.jks && \
                echo 'Configuration complete. Starting HiveMQ...' && \
                exec /opt/docker-entrypoint.sh /opt/hivemq/bin/run.sh"
            ],
            "mountPoints": [
                {
                    "sourceVolume": "hivemq-config",
                    "containerPath": "/opt/hivemq/conf-secrets",
                    "readOnly": false
                },
                {
                    "sourceVolume": "hivemq-certs",
                    "containerPath": "/opt/hivemq/certs",
                    "readOnly": false
                }
            ],
         # include all other required attributes like logConfiguration, taskRoleArn, executionRoleArn, Volumes, networkMode, compatibilities, requiredCompatibilities, cpu, memory, tags
}
Using this task definition blueprint create the ECS task under ECS Service you set up in prior step.
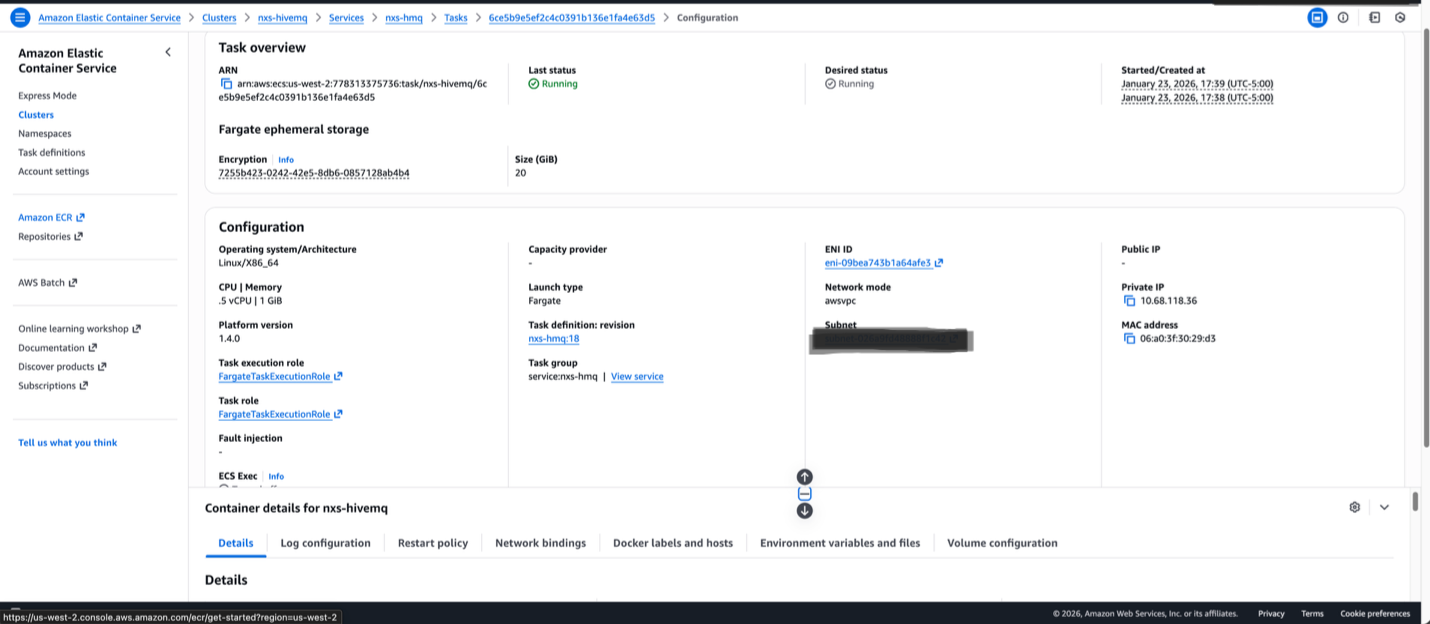
Figure 4: ECS Cluster with HiveMQ Task Configuration
This concludes the setup for running HiveMQ with mTLS on Amazon ECS.
Validation of HiveMQ Publish and Subscribe
This section describes how you can validate the data flow end to end with an MQTT topic using MQTT Explorer.
Publisher:
In MQTT Connection tab, provide name, set validate certificate turned on, encryption(tls) turned on, protocol as MQTT, host name as your-on-premises-hostname and port as 8883
In Advanced tab, include Topic as “#”.
In certificates tab, upload ca.crt in server certificate (CA), upload publisher client.crt in client certificate and upload publisher client.key in client tab tab. Click connect to establish a secured connection to HiveMQ server. Now publisher is ready to publish to the topic. Send a message to a testtopic.
Subscriber:
In another instance of MQTT Explorer, configure the provide name, set validate certificate turned on, encryption(tls) turned on, protocol as MQTT, host name pointing to your MQTT cloud host (yourbroker.env.yourapp.yourcompany.com) and port as 8883
In Advanced tab, include Topic as “#”.
In certificates tab, upload ca.crt in server certificate (CA), upload subscriber client.crt in client certificate and upload subscriber client.key in client tab. Click connect to establish a secure connection to HiveMQ server, started listening to testtopic/# topic
Left hand side MQTT Explorer is a publisher from on-premises connects to hivemq host using publisher cert and ca.crt.
Right hand side MQTT Explorer is a Cloud HiveMQ Broker connected using server cert and ca.crt.
Conclusion
Toyota’s deployment of HiveMQ on Amazon ECS proves that enterprise-grade IIoT messaging can be designed to deliver both security and scalability. By combining HiveMQ’s production-ready MQTT broker with ECS Fargate and a Network Load Balancer configured for Layer 4 TLS pass-through, Toyota North America has built a messaging backbone capable of scaling out to multiple sites and thousands of equipment on the factory floor. To explore a similar architecture for your manufacturing environment, contact your AWS account team or, visit the AWS for automotive page to learn more about how AWS powers connected, intelligent manufacturing.