本文转自http://catlikecoding.com/unity/tutorials/editor/custom-list/
In this Unity C# tutorial you will create a custom visualization for arrays and lists in the editor. You will learn to
SerializedObjectSerializedProperty that represents an array or listThis tutorial comes after the Custom Data tutorial.
This tutorial is for Unity version 4.3 and above. The older version can still be found here.
 Customized lists.
Unity's default way to show lists is serviceable, but it's possible to find yourself wanting for an alternative. The specifics can vary from case to case. So it would be useful if we could use a mix of different visualizations. It is possible to do this by adding attributes to variables that specify how the editor should show them.
We start with the finished Custom Data tutorial project, or by creating a new empty project and importing custom-data.unitypackage.
Then we create a new test script named ListTester with some test arrays, and make a new prefab and prefab instance with it, so we can see it all works as expected.
using UnityEngine;

public class ListTester : MonoBehaviour {

	public int[] integers;

	public Vector3[] vectors;

	public ColorPoint[] colorPoints;

	public Transform[] objects;
}
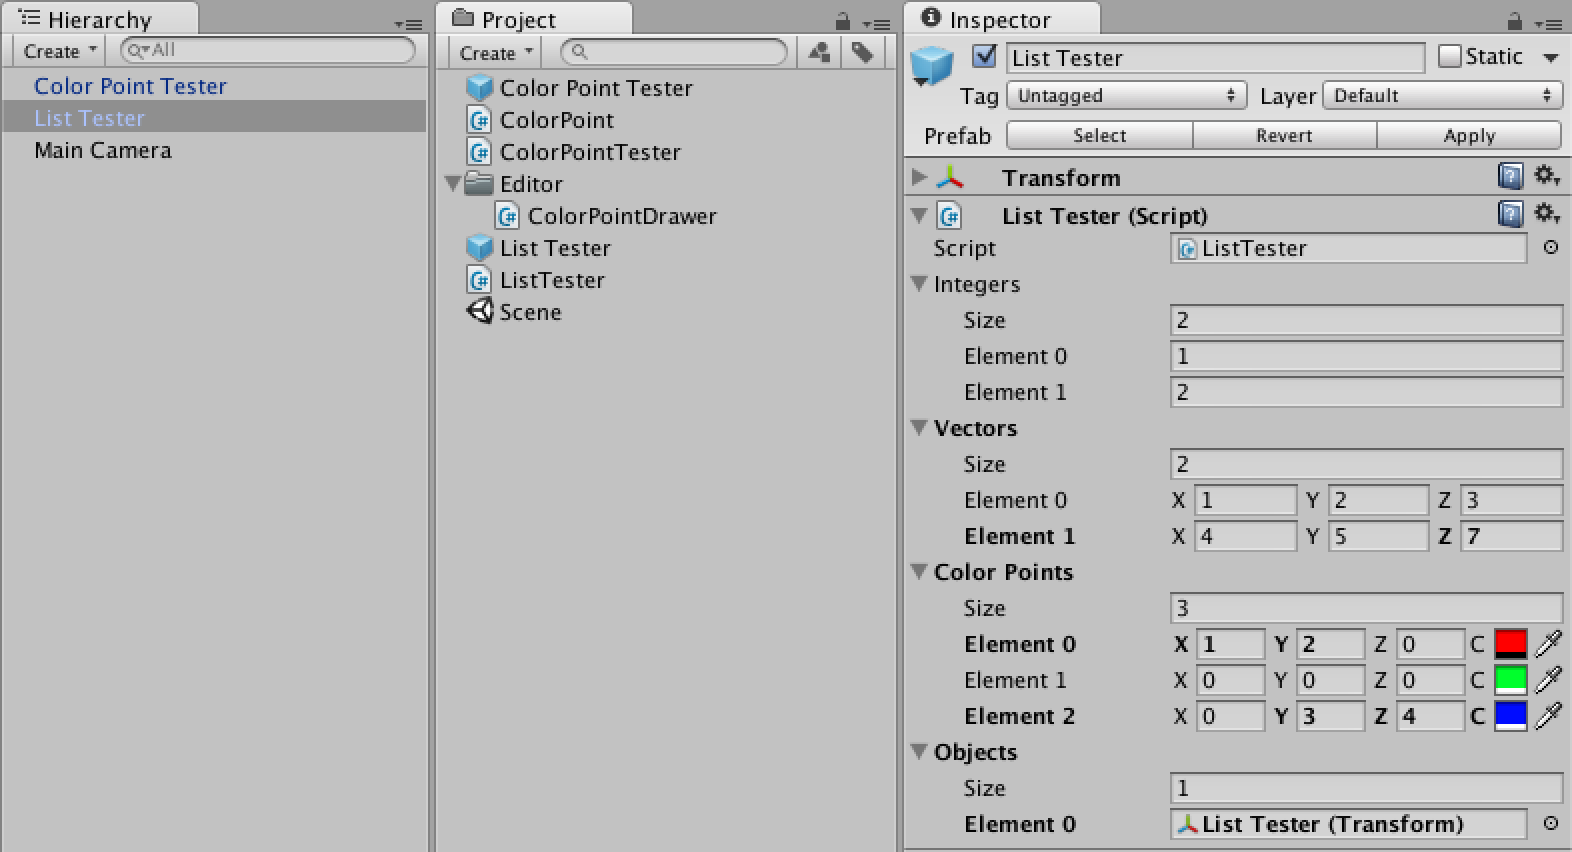 New test object, with wide inspector.
Our first step to customizing our lists is to create a custom inspector for our test component. Create a new C# script named ListTesterInspector in the Editor folder, make it extend UnityEditor.Editor, and apply the UnityEditor.CustomEditor attribute to tell Unity that we want it to do the drawing for our component.
using UnityEditor;
using UnityEngine;

[CustomEditor(typeof(ListTester))]
public class ListTesterInspector : Editor {
}
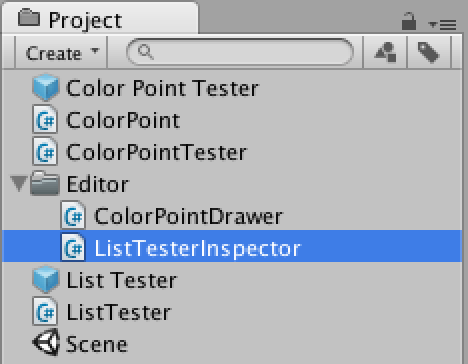 Custom inspector script.
To actually change the inspector we need to override the OnInspectorGUI method of the Editorclass. Leaving the method empty will result in an empty inspector as well.
	public override void OnInspectorGUI () {
	}
![]() Empty inspector.
Empty inspector.
There are three important differences between a property drawer and an editor. Firstly, in the editor we work with an entire SerializedObject instead of a single SerializedProperty. Secondly, an instance of the editor exists as long as the object stays selected, keeping a reference to its data instead of getting it via a method parameter. Finally, we can use EditorGUILayout, which takes care of positioning for us.
We can get to the serialized object via the serializedObject property. To prepare it for editing, we must first synchronize it with the component it represents, by calling its Update method. Then we can show the properties. And after we are done, we have to commit any changes via its ApplyModifiedProperties method. This also takes care of Unity's undo history. In between these two is where we'll draw our properties.
	public override void OnInspectorGUI () {
		serializedObject.Update();
		EditorGUILayout.PropertyField(serializedObject.FindProperty("integers"));
		EditorGUILayout.PropertyField(serializedObject.FindProperty("vectors"));
		EditorGUILayout.PropertyField(serializedObject.FindProperty("colorPoints"));
		EditorGUILayout.PropertyField(serializedObject.FindProperty("objects"));
		serializedObject.ApplyModifiedProperties();
	}
 Inspector with empty properties.
The fields are visible again, but they're empty. This is because PropertyField doesn't show any children – like array elements – unless we tell it to do so.
	public override void OnInspectorGUI () {
		serializedObject.Update();
		EditorGUILayout.PropertyField(serializedObject.FindProperty("integers"), true);
		EditorGUILayout.PropertyField(serializedObject.FindProperty("vectors"), true);
		EditorGUILayout.PropertyField(serializedObject.FindProperty("colorPoints"), true);
		EditorGUILayout.PropertyField(serializedObject.FindProperty("objects"), true);
		serializedObject.ApplyModifiedProperties();
	}
 Inspector with children.
To use a customized list in our inspector, we'll create an alternative for the PropertyFieldmethod. We will name this method Show and put it in its own static utility class, so we can use it wherever we want. We'll name this class EditorList and place it in the Editor folder.
using UnityEditor;
using UnityEngine;

public static class EditorList {

	public static void Show (SerializedProperty list) {
	}
}
 EditorList script.
This method doesn't do anything yet, but we can already use it in our custom editor, resulting once again in an empty inspector.
	public override void OnInspectorGUI () {
		serializedObject.Update();
		EditorList.Show(serializedObject.FindProperty("integers"));
		EditorList.Show(serializedObject.FindProperty("vectors"));
		EditorList.Show(serializedObject.FindProperty("colorPoints"));
		EditorList.Show(serializedObject.FindProperty("objects"));
		serializedObject.ApplyModifiedProperties();
	}
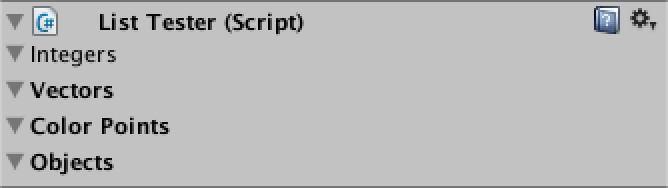
Showing a list consists of three parts, its foldout, its size, and its elements. We can show the foldout by using EditorGUILayout.PropertyField without having it show the children of the list. Then we can show the list elements ourselves with help of the arraySize property and the GetArrayElementAtIndex method of SerializedProperty. We'll leave the size for later.
	public static void Show (SerializedProperty list) {
		EditorGUILayout.PropertyField(list);
		for (int i = 0; i < list.arraySize; i++) {
			EditorGUILayout.PropertyField(list.GetArrayElementAtIndex(i));
		}
	}
 Lists without indented elements.
We have our lists again, but their elements aren't indented. We can solve this by increasing the indent level before showing the elements, and decreasing it again afterwards.
	public static void Show (SerializedProperty list) {
		EditorGUILayout.PropertyField(list);
		EditorGUI.indentLevel += 1;
		for (int i = 0; i < list.arraySize; i++) {
			EditorGUILayout.PropertyField(list.GetArrayElementAtIndex(i));
		}
		EditorGUI.indentLevel -= 1;
	}
 Messed up indenting.
Now indentation works again, except for our color point list, which goes wrong after the first element. This is because we set the indent level to zero in our custom property drawer. There are two ways to fix this. Either our custom list should set the indent level to the correct value again after each element, or the property drawer should make sure it leaves the indent level unchanged. Let's make sure that ColorPointDrawer behaves well.
	public override void OnGUI (Rect position, SerializedProperty property, GUIContent label) {
		int oldIndentLevel = EditorGUI.indentLevel;
		label = EditorGUI.BeginProperty(position, label, property);
		Rect contentPosition = EditorGUI.PrefixLabel(position, label);
		if (position.height > 16f) {
			position.height = 16f;
			EditorGUI.indentLevel += 1;
			contentPosition = EditorGUI.IndentedRect(position);
			contentPosition.y += 18f;
		}
		contentPosition.width *= 0.75f;
		EditorGUI.indentLevel = 0;
		EditorGUI.PropertyField(contentPosition, property.FindPropertyRelative("position"), GUIContent.none);
		contentPosition.x += contentPosition.width;
		contentPosition.width /= 3f;
		EditorGUIUtility.labelWidth = 14f;
		EditorGUI.PropertyField(contentPosition, property.FindPropertyRelative("color"), new GUIContent("C"));
		EditorGUI.EndProperty();
		EditorGUI.indentLevel = oldIndentLevel;
	}
 Correct indenting, but no collapsing.
Now that indenting works, we can take care of the next problem. Toggling the foldouts should collapse and expand the lists, but it currently doesn't work. This is easy to fix by checking the isExpanded property of our list.
	public static void Show (SerializedProperty list) {
		EditorGUILayout.PropertyField(list);
		EditorGUI.indentLevel += 1;
		if (list.isExpanded) {
			for (int i = 0; i < list.arraySize; i++) {
				EditorGUILayout.PropertyField(list.GetArrayElementAtIndex(i));
			}
		}
		EditorGUI.indentLevel -= 1;
	}
 Correctly collapsing.
To show the list's size, we can use the special relative property named Array.size. We'll simply show it in between the foldout and the elements.
	public static void Show (SerializedProperty list) {
		EditorGUILayout.PropertyField(list);
		EditorGUI.indentLevel += 1;
		if (list.isExpanded) {
			EditorGUILayout.PropertyField(list.FindPropertyRelative("Array.size"));
			for (int i = 0; i < list.arraySize; i++) {
				EditorGUILayout.PropertyField(list.GetArrayElementAtIndex(i));
			}
		}
		EditorGUI.indentLevel -= 1;
	}
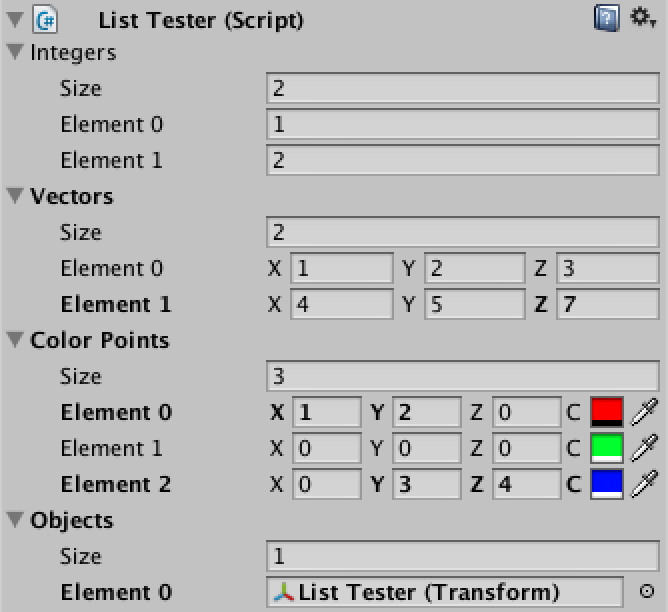
 Complete lists.
Now that we have replicated the default list, it's time to add customizations. An easy start is to make the size that we just added optional. We add a boolean parameter to control this and turn it on by default.
	public static void Show (SerializedProperty list, bool showListSize = true) {
		EditorGUILayout.PropertyField(list);
		EditorGUI.indentLevel += 1;
		if (list.isExpanded) {
			if (showListSize) {
				EditorGUILayout.PropertyField(list.FindPropertyRelative("Array.size"));
			}
			for (int i = 0; i < list.arraySize; i++) {
				EditorGUILayout.PropertyField(list.GetArrayElementAtIndex(i));
			}
		}
		EditorGUI.indentLevel -= 1;
	}
Using this new option, we can switch of the size for some of our lists.
	public override void OnInspectorGUI () {
		serializedObject.Update();
		EditorList.Show(serializedObject.FindProperty("integers"));
		EditorList.Show(serializedObject.FindProperty("vectors"));
		EditorList.Show(serializedObject.FindProperty("colorPoints"), false);
		EditorList.Show(serializedObject.FindProperty("objects"), false);
		serializedObject.ApplyModifiedProperties();
	}
 Hiding some of the list sizes.
As a second option, let's make the list's label optional as well. If we don't show the label, we won't indent either and we will always show the elements, regardless whether the list is expanded.
	public static void Show (SerializedProperty list, bool showListSize = true, bool showListLabel = true) {
		if (showListLabel) {
			EditorGUILayout.PropertyField(list);
			EditorGUI.indentLevel += 1;
		}
		if (!showListLabel || list.isExpanded) {
			if (showListSize) {
				EditorGUILayout.PropertyField(list.FindPropertyRelative("Array.size"));
			}
			for (int i = 0; i < list.arraySize; i++) {
				EditorGUILayout.PropertyField(list.GetArrayElementAtIndex(i));
			}
		}
		if (showListLabel) {
			EditorGUI.indentLevel -= 1;
		}
	}
Now we can remove the label from some of our lists.
	public override void OnInspectorGUI () {
		serializedObject.Update();
		EditorList.Show(serializedObject.FindProperty("integers"), true, false);
		EditorList.Show(serializedObject.FindProperty("vectors"));
		EditorList.Show(serializedObject.FindProperty("colorPoints"), false, false);
		EditorList.Show(serializedObject.FindProperty("objects"), false);
		serializedObject.ApplyModifiedProperties();
	}
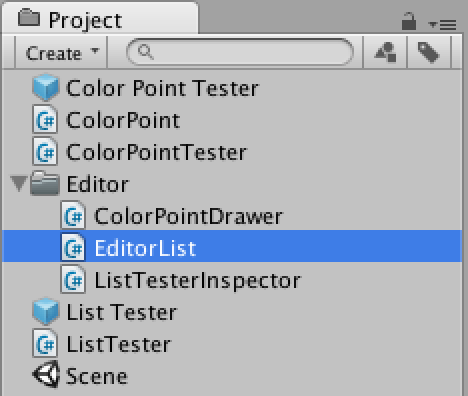
 Hiding some of the list labels.
While we can keep adding options this way, our method calls will become increasingly obscure. We could add wrapper methods with more descriptive names, but that would bloat our script and isn't flexible. An alternative is the use of option flags.
The first thing we need to do is create an enumeration of all our options. We name itEditorListOption and give it the System.Flags attribute. We place it in its own script file or in the same script as EditorList, but outside of the class.
using UnityEditor;
using UnityEngine;
using System;

[Flags]
public enum EditorListOption {
}
Now we add entries for the two options that we already have. We also add an option for when we want nothing and for when we want the default. The default is to show both the list's label and its size. We specify this by combining both options with the bitwise OR operator |.
[Flags]
public enum EditorListOption {
	None = 0,
	ListSize = 1,
	ListLabel = 2,
	Default = ListSize | ListLabel
}
The boolean parameters of the Show method can now be replaced with a single options parameter. Then we'll extract the individual options with the help of the bitwise AND operator &and store them in local variables to keep things clear.
	public static void Show (SerializedProperty list, EditorListOption options = EditorListOption.Default) {
		bool
			showListLabel = (options & EditorListOption.ListLabel) != 0,
			showListSize = (options & EditorListOption.ListSize) != 0;

		if (showListLabel) {
			EditorGUILayout.PropertyField(list);
			EditorGUI.indentLevel += 1;
		}
		if (!showListLabel || list.isExpanded) {
			if (showListSize) {
				EditorGUILayout.PropertyField(list.FindPropertyRelative("Array.size"));
			}
			for (int i = 0; i < list.arraySize; i++) {
				EditorGUILayout.PropertyField(list.GetArrayElementAtIndex(i));
			}
		}
		if (showListLabel) {
			EditorGUI.indentLevel -= 1;
		}
	}
Then we can modify our custom inspector to use the new options approach.
	public override void OnInspectorGUI () {
		serializedObject.Update();
		EditorList.Show(serializedObject.FindProperty("integers"), EditorListOption.ListSize);
		EditorList.Show(serializedObject.FindProperty("vectors"));
		EditorList.Show(serializedObject.FindProperty("colorPoints"), EditorListOption.None);
		EditorList.Show(serializedObject.FindProperty("objects"), EditorListOption.ListLabel);
		serializedObject.ApplyModifiedProperties();
	}
Another useful feature is the ability to hide the labels of the elements. So let's add an option for element labels and include it in the default. We can also add a convenient entry for the default without the element labels.
[Flags]
public enum EditorListOption {
	None = 0,
	ListSize = 1,
	ListLabel = 2,
	ElementLabels = 4,
	Default = ListSize | ListLabel | ElementLabels,
	NoElementLabels = ListSize | ListLabel
}
Now all we have to do in our Show method is extract this option and perform a simple check. Let's also move the element loop to its own private method, for clarity.
	public static void Show (SerializedProperty list, EditorListOption options = EditorListOption.Default) {
		bool
			showListLabel = (options & EditorListOption.ListLabel) != 0,
			showListSize = (options & EditorListOption.ListSize) != 0;

		if (showListLabel) {
			EditorGUILayout.PropertyField(list);
			EditorGUI.indentLevel += 1;
		}
		if (!showListLabel || list.isExpanded) {
			if (showListSize) {
				EditorGUILayout.PropertyField(list.FindPropertyRelative("Array.size"));
			}
			ShowElements(list, options);
		}
		if (showListLabel) {
			EditorGUI.indentLevel -= 1;
		}
	}

	private static void ShowElements (SerializedProperty list, EditorListOption options) {
		bool showElementLabels = (options & EditorListOption.ElementLabels) != 0;

		for (int i = 0; i < list.arraySize; i++) {
			if (showElementLabels) {
				EditorGUILayout.PropertyField(list.GetArrayElementAtIndex(i));
			}
			else {
				EditorGUILayout.PropertyField(list.GetArrayElementAtIndex(i), GUIContent.none);
			}
		}
	}
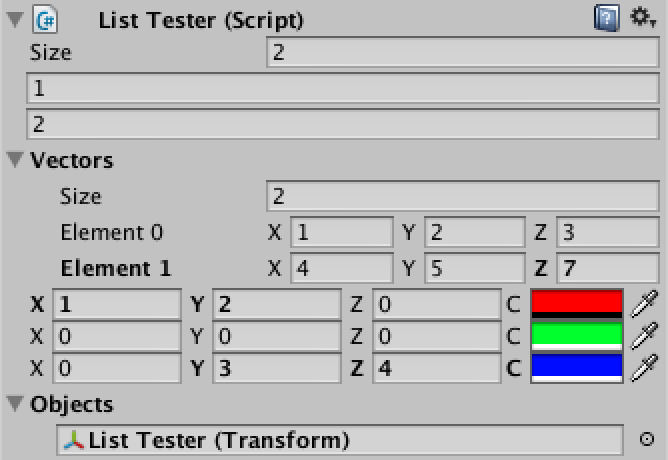
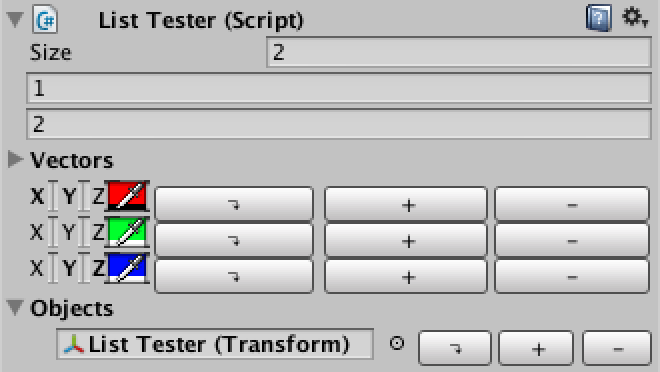
 Hiding some of the element labels, wide and narrow.
Our element labels can now be hidden, but something is wrong when we use a narrower inspector. It turns out that our color point drawer still decides to use an additional line, but without a label this is no longer useful. The solution is simply to make sure ColorPointDrawer does not claim an extra line when it does not receive a label.
	public override float GetPropertyHeight (SerializedProperty property, GUIContent label) {
		return label != GUIContent.none && Screen.width < 333 ? (16f + 18f) : 16f;
	}
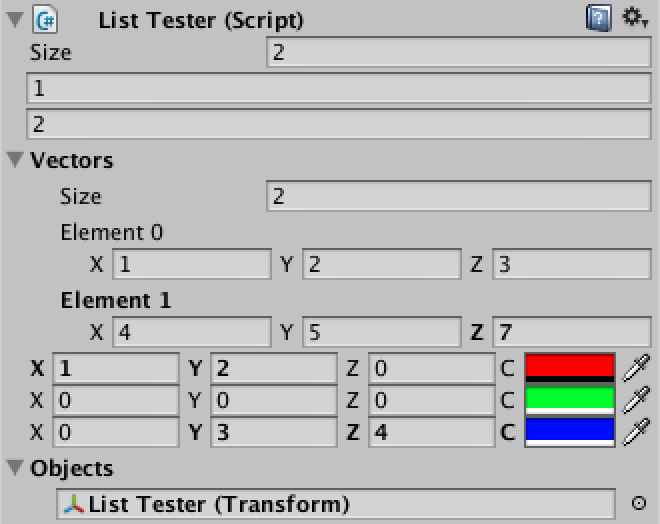 No longer needlessly claiming extra lines.
Instead of removing parts, we can also add thing to our list. We could add a set of buttons for manipulating list elements. They can provide an alternative way to delete and duplicate elements, and we can add a means to reorder the elements as well.
First we'll add an option for buttons, and also a convenient option to activate everything.
[Flags]
public enum EditorListOption {
	None = 0,
	ListSize = 1,
	ListLabel = 2,
	ElementLabels = 4,
	Buttons = 8,
	Default = ListSize | ListLabel | ElementLabels,
	NoElementLabels = ListSize | ListLabel,
	All = Default | Buttons
}
For the button labels we'll use a simple "+" for duplicate, a "-" for delete, and a "↴" (rightwards arrow with corner downwards) for move. You can directly insert the arrow unicode character, but I use its escape code just to be sure everyone can copy it correctly.
We predefine static GUIContent for these buttons and include handy tooltips as well. We also add a separate method for showing the buttons and call it after each element, if desired.
	private static GUIContent
		moveButtonContent = new GUIContent("\u21b4", "move down"),
		duplicateButtonContent = new GUIContent("+", "duplicate"),
		deleteButtonContent = new GUIContent("-", "delete");

	private static void ShowElements (SerializedProperty list, EditorListOption options) {
		bool
			showElementLabels = (options & EditorListOption.ElementLabels) != 0,
			showButtons = (options & EditorListOption.Buttons) != 0;

		for (int i = 0; i < list.arraySize; i++) {
			if (showElementLabels) {
				EditorGUILayout.PropertyField(list.GetArrayElementAtIndex(i));
			}
			else {
				EditorGUILayout.PropertyField(list.GetArrayElementAtIndex(i), GUIContent.none);
			}
			if (showButtons) {
				ShowButtons();
			}
		}
	}

	private static void ShowButtons () {
		GUILayout.Button(moveButtonContent);
		GUILayout.Button(duplicateButtonContent);
		GUILayout.Button(deleteButtonContent);
	}
Let's add these buttons to the lists for our color points and objects.
	public override void OnInspectorGUI () {
		serializedObject.Update();
		EditorList.Show(serializedObject.FindProperty("integers"), EditorListOption.ListSize);
		EditorList.Show(serializedObject.FindProperty("vectors"));
		EditorList.Show(serializedObject.FindProperty("colorPoints"), EditorListOption.Buttons);
		EditorList.Show(
			serializedObject.FindProperty("objects"),
			EditorListOption.ListLabel | EditorListOption.Buttons);
		serializedObject.ApplyModifiedProperties();
	}
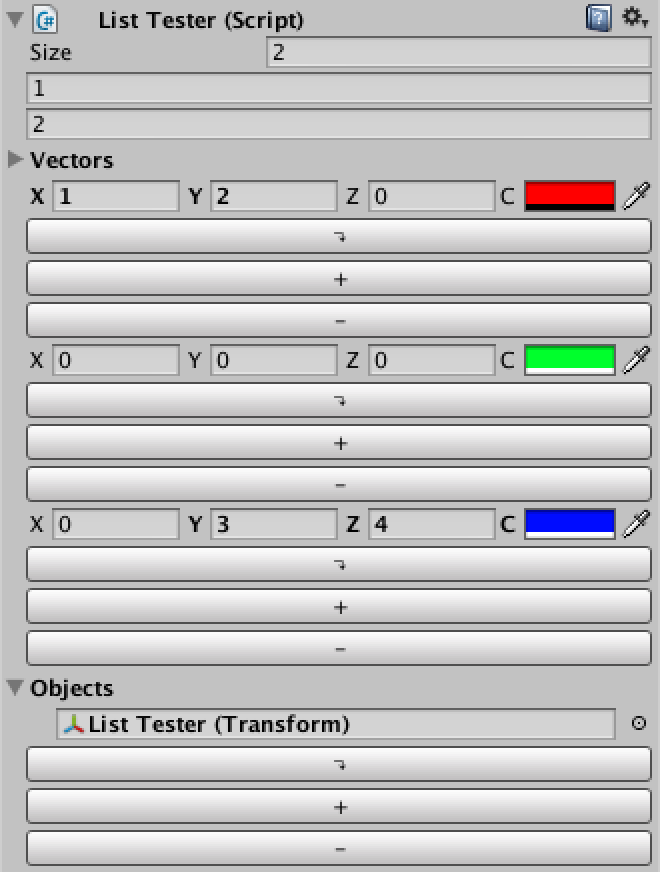 Quite huge buttons.
These buttons are way too large, because each claims an entire line. We want everything to stay together on a single line instead. We can instruct the automatic layout to do this by putting our content in between calls to EditorGUILayout.BeginHorizontal andEditorGUILayout.EndHorizontal.
	private static void ShowElements (SerializedProperty list, EditorListOption options) {
		bool
			showElementLabels = (options & EditorListOption.ElementLabels) != 0,
			showButtons = (options & EditorListOption.Buttons) != 0;

		for (int i = 0; i < list.arraySize; i++) {
			if (showButtons) {
				EditorGUILayout.BeginHorizontal();
			}
			if (showElementLabels) {
				EditorGUILayout.PropertyField(list.GetArrayElementAtIndex(i));
			}
			else {
				EditorGUILayout.PropertyField(list.GetArrayElementAtIndex(i), GUIContent.none);
			}
			if (showButtons) {
				ShowButtons();
				EditorGUILayout.EndHorizontal();
			}
		}
	}
 Pretty large buttons.
That is a lot better, but the buttons are still too large. We'll change two things to make them behave. First, we'll apply some mini button styles to them. Second, we'll give them a fixed width of 20 pixels each.
	private static GUILayoutOption miniButtonWidth = GUILayout.Width(20f);

	private static void ShowButtons () {
		GUILayout.Button(moveButtonContent, EditorStyles.miniButtonLeft, miniButtonWidth);
		GUILayout.Button(duplicateButtonContent, EditorStyles.miniButtonMid, miniButtonWidth);
		GUILayout.Button(deleteButtonContent, EditorStyles.miniButtonRight, miniButtonWidth);
	}
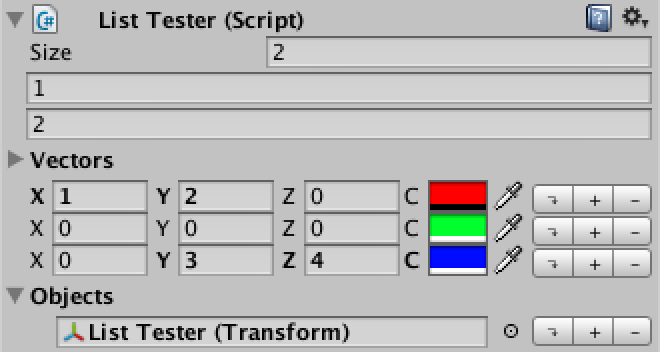 Mini buttons.
Now the buttons look fine, but they don't do anything yet.
Fortunately, adding functionality to the buttons is very simple, as we can directly use the methods for array manipulation provided by SerializedProperty. We need the list and the current element index for this to work, so we add them as parameters to our ShowButtons method and pass them along inside the loop of ShowElements.
Button work?private static void ShowElements (SerializedProperty list, EditorListOption options) { bool showElementLabels = (options & EditorListOption.ElementLabels) != 0, showButtons = (options & EditorListOption.Buttons) != 0; for (int i = 0; i < list.arraySize; i++) { if (showButtons) { EditorGUILayout.BeginHorizontal(); } if (showElementLabels) { EditorGUILayout.PropertyField(list.GetArrayElementAtIndex(i)); } else { EditorGUILayout.PropertyField(list.GetArrayElementAtIndex(i), GUIContent.none); } if (showButtons) { ShowButtons(list, i); EditorGUILayout.EndHorizontal(); } } } private static void ShowButtons (SerializedProperty list, int index) { if (GUILayout.Button(moveButtonContent, EditorStyles.miniButtonLeft, miniButtonWidth)) { list.MoveArrayElement(index, index + 1); } if (GUILayout.Button(duplicateButtonContent, EditorStyles.miniButtonMid, miniButtonWidth)) { list.InsertArrayElementAtIndex(index); } if (GUILayout.Button(deleteButtonContent, EditorStyles.miniButtonRight, miniButtonWidth)) { list.DeleteArrayElementAtIndex(index); } }
Our buttons now work as expected. Or do they? Try deleting an element from the objects list. If it references no component, it works. But if it does reference something, it will clear the reference, but not remove the element from the list.
While this is how Unity handles deletion in this case, it is weird. Instead, we want the element to always be removed, not sometimes cleared. We can enforce this by checking whether the list's size has remained the same after deleting the element. If so, it has only been cleared and we should delete it again, for real this time.
	private static void ShowButtons (SerializedProperty list, int index) {
		if (GUILayout.Button(moveButtonContent, EditorStyles.miniButtonLeft, miniButtonWidth)) {
			list.MoveArrayElement(index, index + 1);
		}
		if (GUILayout.Button(duplicateButtonContent, EditorStyles.miniButtonMid, miniButtonWidth)) {
			list.InsertArrayElementAtIndex(index);
		}
		if (GUILayout.Button(deleteButtonContent, EditorStyles.miniButtonRight, miniButtonWidth)) {
			int oldSize = list.arraySize;
			list.DeleteArrayElementAtIndex(index);
			if (list.arraySize == oldSize) {
				list.DeleteArrayElementAtIndex(index);
			}
		}
	}
An additional button we could include is one to add an element when the list is empty. This is useful when we're not showing the list size, because in that case you could neither duplicate an element nor manipulate the list size directly. So let's add such a button.
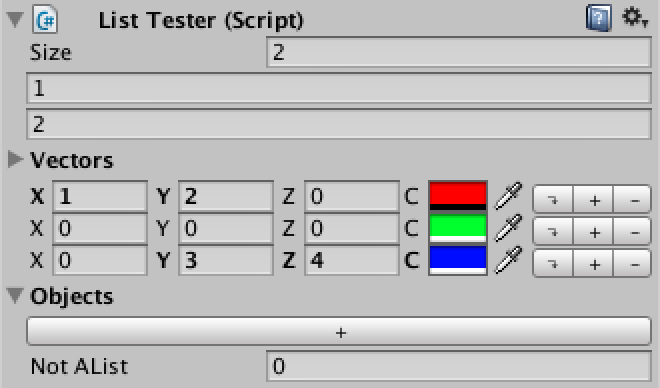
	private static GUIContent
		moveButtonContent = new GUIContent("\u21b4", "move down"),
		duplicateButtonContent = new GUIContent("+", "duplicate"),
		deleteButtonContent = new GUIContent("-", "delete"),
		addButtonContent = new GUIContent("+", "add element");

	private static void ShowElements (SerializedProperty list, EditorListOption options) {
		bool
			showElementLabels = (options & EditorListOption.ElementLabels) != 0,
			showButtons = (options & EditorListOption.Buttons) != 0;

		for (int i = 0; i < list.arraySize; i++) {
			if (showButtons) {
				EditorGUILayout.BeginHorizontal();
			}
			if (showElementLabels) {
				EditorGUILayout.PropertyField(list.GetArrayElementAtIndex(i));
			}
			else {
				EditorGUILayout.PropertyField(list.GetArrayElementAtIndex(i), GUIContent.none);
			}
			if (showButtons) {
				ShowButtons(list, i);
				EditorGUILayout.EndHorizontal();
			}
		}
		if (showButtons && list.arraySize == 0 && GUILayout.Button(addButtonContent, EditorStyles.miniButton)) {
			list.arraySize += 1;
		}
	}
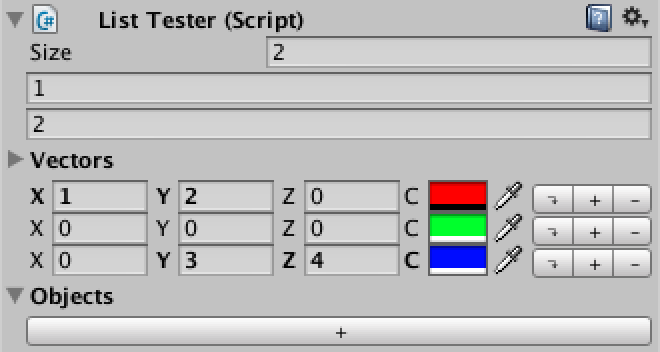 A big add button.
What would happen if we would try to use our editor list with something that isn't a list at all? Let's find out by adding something to ListTester that is not a list.
public int notAList;
Now also try to show it in ListTestInspector.
	public override void OnInspectorGUI () {
		serializedObject.Update();
		EditorList.Show(serializedObject.FindProperty("integers"), EditorListOption.ListSize);
		EditorList.Show(serializedObject.FindProperty("vectors"));
		EditorList.Show(serializedObject.FindProperty("colorPoints"), EditorListOption.Buttons);
		EditorList.Show(
			serializedObject.FindProperty("objects"),
			EditorListOption.ListLabel | EditorListOption.Buttons);
		EditorList.Show(serializedObject.FindProperty("notAList"));
		serializedObject.ApplyModifiedProperties();
	}
 Not a list shown.
It actually works for our integer. But it's not guaranteed to work for any arbitrary type and it will also result in errors for some options. It is a better idea to flatly refuse to show anything that isn't a list. So let's check whether the property is an array. If it isn't, we display a nicely formatted warning and nothing else.
	public static void Show (SerializedProperty list, EditorListOption options = EditorListOption.Default) {
		if (!list.isArray) {
			EditorGUILayout.HelpBox(list.name + " is neither an array nor a list!", MessageType.Error);
			return;
		}

		bool
			showListLabel = (options & EditorListOption.ListLabel) != 0,
			showListSize = (options & EditorListOption.ListSize) != 0;

		if (showListLabel) {
			EditorGUILayout.PropertyField(list);
			EditorGUI.indentLevel += 1;
		}
		if (!showListLabel || list.isExpanded) {
			if (showListSize) {
				EditorGUILayout.PropertyField(list.FindPropertyRelative("Array.size"));
			}
			ShowElements(list, options);
		}
		if (showListLabel) {
			EditorGUI.indentLevel -= 1;
		}
	}
 Only lists allowed.
Another interesting point is multi-object editing. You can test this by duplicating our list tester object, make them a little different, and selecting both at the same time.
![]() No multi-object editing yet.
No multi-object editing yet.
By default custom editors do not support multi-object editing, though that is easily fixed by adding the CanEditMultipleObjects attribute to our ListTesterInspector.
[CustomEditor(typeof(ListTester)), CanEditMultipleObjects]
 Multi-object editing.
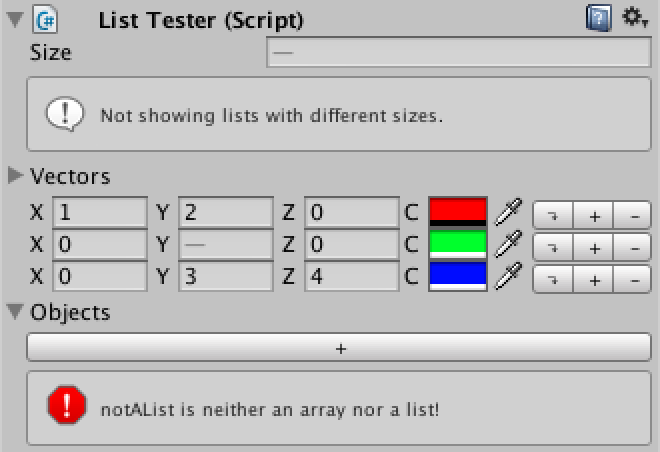
While this can be useful, it gets weird when you're editing multiple objects that have lists of different sizes. In general it is not very useful and might even be drawn wrong. So let's not show the list's elements when we have multiple different sizes.
	public static void Show (SerializedProperty list, EditorListOption options = EditorListOption.Default) {
		if (!list.isArray) {
			EditorGUILayout.HelpBox(list.name + " is neither an array nor a list!", MessageType.Error);
			return;
		}

		bool
			showListLabel = (options & EditorListOption.ListLabel) != 0,
			showListSize = (options & EditorListOption.ListSize) != 0;

		if (showListLabel) {
			EditorGUILayout.PropertyField(list);
			EditorGUI.indentLevel += 1;
		}
		if (!showListLabel || list.isExpanded) {
			SerializedProperty size = list.FindPropertyRelative("Array.size");
			if (showListSize) {
				EditorGUILayout.PropertyField(size);
			}
			if (size.hasMultipleDifferentValues) {
				EditorGUILayout.HelpBox("Not showing lists with different sizes.", MessageType.Info);
			}
			else {
				ShowElements(list, options);
			}
		}
		if (showListLabel) {
			EditorGUI.indentLevel -= 1;
		}
	}
Divergent lists will not be shown.
We now have a generic list drawer with four customization options that you can use instead of the default list representation. Quite handy!
此内容由惯性聚合(RSS阅读器)自动聚合整理,仅供阅读参考。 原文来自 — 版权归原作者所有。