本文是swarm docker集群的实施文档
环境: centos 7
192.168.1.23 swarm-manager rethinkdb controller swarm-agent consul-c1 registrator
192.168.1.45 registrator swarm-agent consul-s3
192.168.1.65 registrator swarm-agent consul-s2
192.168.1.66 registrator swarm-agent consul-s2
192.168.1.70 registrator consul-c2 consul-template (nginx、haproxy)
192.168.1.71 registrator consul-c2 consul-template (nginx、haproxy)
docker-engine 1.12.4
一、安装 docker-engine 1.12.4
1、先检查是否安装旧版本docker
|
1
2
3
|
rpm -qa|grep docker
如果有先卸载
yum remove docker*
|
2.编辑docker.repo文件,写入如下内容
|
1
2
3
4
5
6
7
|
cat >> /etc/yum.repos.d/docker-main.repo << EOF
name=Docker main Repository
baseurl=https://yum.dockerproject.org/repo/main/centos/7
enabled=1
gpgcheck=1
gpgkey=
EOF
|
3.安装docker
|
1
|
yum -y install docker-engine
|
4.关闭防火墙和selinux
|
1
2
3
4
5
|
systemctl stop firewalld.service
systemctl disable firewalld.service
关闭selinux
sed -i 's/SELINUX=.*/SELINUX=disabled/g' /etc/selinux/config
重启
|
5.增加tcp监听端口
|
1
2
|
修改/lib/systemd/system/docker.service
sed -i 's/ExecStart=.*/ExecStart=\/usr\/bin\/dockerd -H unix\:\/\/\/var\/run\/docker.sock -D -H tcp\:\/\/0.0.0.0\:2375/g' /lib/systemd/system/docker.service
|
6.重启docker
|
1
2
3
4
|
systemctl enable docker.service
systemctl restart docker
ps -ef|grep docker
能看到docker启动及2375端口
|
7、安装pip及docker api
|
1
2
3
|
yum -y install epel-release
yum -y install python-pip
pip install docker-py docker-compose
|
二、配置consul cluster
1、创建 consul 用户及组
|
1
2
|
groupadd -g 1000 consul
useradd -u 100 -g 1000 -s /sbin/nologin consul
|
2、创建consul 数据存储文件夹
|
1
2
|
mkdir -p /opt/consul/{data,conf}
chown -R consul: /opt/consul
|
3、拉取consul镜像
|
1
2
|
docker pull progrium/consul
提示:目录没有官方出consul镜像,以上consul镜像是星数最高的,也是consul官方推荐的第三方docker image
|
4、启动consul server 192.168.1.66
|
1
2
3
4
5
6
7
8
9
10
11
12
13
14
15
16
17
18
19
|
docker run -d \
-p 8300:8300 \
-p 8301:8301 \
-p 8301:8301/udp \
-p 8302:8302 \
-p 8302:8302/udp \
-p 8400:8400 \
-p 8500:8500 \
-p 8600:53 \
-p 8600:53/udp \
-v /opt/consul/data:/data \
-h consul-s1 \
--restart=always \
--name=consul-s1 \
progrium/consul \
-server -bootstrap-expect=1 \
-ui-dir=/ui \
-client 0.0.0.0 \
-advertise 192.168.1.66
|
5、启动consul server 192.168.1.65
|
1
2
3
4
5
6
7
8
9
10
11
12
13
14
15
16
17
18
19
|
docker run -d \
-p 8300:8300 \
-p 8301:8301 \
-p 8301:8301/udp \
-p 8302:8302 \
-p 8302:8302/udp \
-p 8400:8400 \
-p 8500:8500 \
-p 8600:53 \
-p 8600:53/udp \
-v /opt/consul/data:/data \
-h consul-s2 \
--restart=always \
--name=consul-s2 \
progrium/consul \
-server \
-ui-dir=/ui \
-client 0.0.0.0 \
-advertise 192.168.1.65 -join 192.168.1.66
|
6、启动consul server 192.168.1.45
|
1
2
3
4
5
6
7
8
9
10
11
12
13
14
15
16
17
18
19
|
docker run -d \
-p 8300:8300 \
-p 8301:8301 \
-p 8301:8301/udp \
-p 8302:8302 \
-p 8302:8302/udp \
-p 8400:8400 \
-p 8500:8500 \
-p 8600:53 \
-p 8600:53/udp \
-v /opt/consul/data:/data \
-h consul-s3 \
--restart=always \
--name=consul-s3 \
progrium/consul \
-server \
-ui-dir=/ui \
-client 0.0.0.0 \
-advertise 192.168.1.45 -join 192.168.1.66
|
7、启动consul Client 192.168.1.23
|
1
2
3
4
5
6
7
8
9
10
11
12
13
14
|
docker run -d -h consul-c1 \
-p 8300:8300 \
-p 8301:8301 \
-p 8301:8301/udp \
-p 8302:8302 \
-p 8302:8302/udp \
-p 8400:8400 \
-p 8500:8500 \
-p 8600:53 \
-p 8600:53/udp \
-v /opt/consul/data:/data \
--restart=always \
--name=consul-c1 \
progrium/consul -advertise 192.168.1.23 -join 192.168.1.66
|
8、启动consul Client 192.168.1.70
|
1
2
3
4
5
6
7
8
9
10
11
12
13
14
|
docker run -d -h consul-c2 \
-p 8300:8300 \
-p 8301:8301 \
-p 8301:8301/udp \
-p 8302:8302 \
-p 8302:8302/udp \
-p 8400:8400 \
-p 8500:8500 \
-p 8600:53 \
-p 8600:53/udp \
-v /opt/consul/data:/data \
--restart=always \
--name=consul-c2 \
progrium/consul -advertise 192.168.1.70 -join 192.168.1.66
|
9、启动consul Client 192.168.1.71
|
1
2
3
4
5
6
7
8
9
10
11
12
13
14
|
docker run -d -h consul-c3 \
-p 8300:8300 \
-p 8301:8301 \
-p 8301:8301/udp \
-p 8302:8302 \
-p 8302:8302/udp \
-p 8400:8400 \
-p 8500:8500 \
-p 8600:53 \
-p 8600:53/udp \
-v /opt/consul/data:/data \
--restart=always \
--name=consul-c3 \
progrium/consul -advertise 192.168.1.71 -join 192.168.1.66
|
10、关闭consul-s1并删除容器
|
1
2
3
4
5
6
7
8
9
10
11
12
13
14
15
16
17
18
19
20
21
22
|
docker rm -f consul-s1
重新启动一个新容器
docker run -d \
-p 8300:8300 \
-p 8301:8301 \
-p 8301:8301/udp \
-p 8302:8302 \
-p 8302:8302/udp \
-p 8400:8400 \
-p 8500:8500 \
-p 8600:53 \
-p 8600:53/udp \
-v /opt/consul/data:/data \
-h consul-s2 \
--restart=always \
--name=consul-s2 \
progrium/consul \
-server \
-ui-dir=/ui \
-client 0.0.0.0 \
-advertise 192.168.1.66 -join 192.168.1.65
进入容器运行 consul info 查询是否实现自动选举Leader
|
三、registrator状态获取
|
1
2
3
4
5
6
7
8
9
10
11
12
13
14
15
16
17
18
19
20
21
22
23
24
25
26
27
28
29
30
31
32
33
34
35
36
37
38
39
40
41
42
43
44
45
46
47
48
49
50
51
52
53
54
55
56
57
58
59
|
依次启动
docker run \
-d \
--restart=always \
--name=registrator \
--net=host \
-v /var/run/docker.sock:/tmp/docker.sock \
gliderlabs/registrator \
-ip 192.168.1.66 \
consul://192.168.1.66:8500
docker run \
-d \
--restart=always \
--name=registrator \
--net=host \
-v /var/run/docker.sock:/tmp/docker.sock \
gliderlabs/registrator \
-ip 192.168.1.65 \
consul://192.168.1.65:8500
docker run \
-d \
--restart=always \
--name=registrator \
--net=host \
-v /var/run/docker.sock:/tmp/docker.sock \
gliderlabs/registrator \
-ip 192.168.1.45 \
consul://192.168.1.45:8500
docker run \
-d \
--restart=always \
--name=registrator \
--net=host \
-v /var/run/docker.sock:/tmp/docker.sock \
gliderlabs/registrator \
-ip 192.168.1.23 \
consul://192.168.1.23:8500
docker run \
-d \
--restart=always \
--name=registrator \
--net=host \
-v /var/run/docker.sock:/tmp/docker.sock \
gliderlabs/registrator \
-ip 192.168.1.70 \
consul://192.168.1.70:8500
docker run \
-d \
--restart=always \
--name=registrator \
--net=host \
-v /var/run/docker.sock:/tmp/docker.sock \
gliderlabs/registrator \
-ip 192.168.1.71 \
consul://192.168.1.71:8500
|
四、安装 Shipyard+Swarm
1、 192.168.1.23
|
1
2
3
4
5
6
7
8
9
10
11
12
13
14
15
16
17
18
19
20
21
22
23
24
25
26
27
28
29
30
|
docker run -tid \
-p 3375:3375 \
--restart=always \
--name shipyard-swarm-manager \
swarm:latest \
manage --host tcp://0.0.0.0:3375 consul://192.168.1.66:8500
docker run -tid \
--restart=always \
--name=shipyard-rethinkdb \
-p 28015:28015 \
-p 29015:29015 \
-v /data/rethinkdb:/data \
index.tenxcloud.com/docker_library/rethinkdb
docker run -tid \
--restart=always \
--name shipyard-controller \
--link shipyard-rethinkdb:rethinkdb \
--link shipyard-swarm-manager:swarm \
-p 8080:8080 \
dockerclub/shipyard:latest \
server \
-d tcp://swarm:3375
docker run -tid \
--restart=always \
--name shipyard-swarm-agent \
swarm:latest \
join --addr 192.168.1.23:2375 consul://192.168.1.66:8500
|
2、安装swarm-agent (192.168.1.66,192.168.1.65,192.168.1.45)
|
1
2
3
4
5
6
7
8
9
10
11
12
13
14
15
|
docker run -tid \
--restart=always \
--name shipyard-swarm-agent \
swarm:latest \
join --addr 192.168.1.66:2375 consul://192.168.1.66:8500
docker run -tid \
--restart=always \
--name shipyard-swarm-agent \
swarm:latest \
join --addr 192.168.1.65:2375 consul://192.168.1.66:8500
docker run -tid \
--restart=always \
--name shipyard-swarm-agent \
swarm:latest \
join --addr 192.168.1.45:2375 consul://192.168.1.66:8500
|
五、安装haproxy or nginx (192.168.1.70,192.168.1.71)
1、安装haproxy
http://www.haproxy.org/download/1.7/src/haproxy-1.7.0.tar.gz
|
1
2
3
4
5
6
7
8
9
10
11
|
yum -y install git patch gcc gcc-c++ readline-devel zlib-devel libffi-devel \
openssl openssl-devel make autoconf automake libtool bison libxml2 \
libxml2-devel libxslt-devel libyaml-devel python python-docutils \
cmake imake expat-devel libaio libaio-devel bzr ncurses-devel wget \
libjpeg libjpeg-devel libpng libpng-devel freetype freetype-devel \
pcre-devel curl-devel libmcrypt libmcrypt-devel
cd /tmp
wget http://www.haproxy.org/download/1.7/src/haproxy-1.7.0.tar.gz
tar -xvf /tmp/haproxy-1.7.0.tar.gz
make TARGET=linux31 PREFIX=/opt/haproxy
make install PREFIX=/opt/haproxy
|
2、配置/opt/haproxy/conf/haproxy.conf
|
1
2
3
4
5
6
7
8
9
10
11
12
13
14
15
16
17
18
19
20
21
22
23
24
25
26
27
28
29
30
31
32
33
34
35
36
37
38
39
40
41
42
43
44
45
46
47
48
49
50
51
52
53
54
55
|
global
log 127.0.0.1 local0
maxconn 50000
chroot /opt/haproxy
uid 99
gid 99
daemon
nbproc 2
pidfile /opt/haproxy/run/haproxy.pid
defaults
mode tcp
option dontlognull
option forwardfor
option redispatch
retries 2
balance static-rr
stats enable
stats uri /ha?stats
timeout connect 3000
timeout client 50000
timeout server 50000
listen admin_stat
bind *:8888
mode http
stats refresh 30s
stats uri /admin?stats
stats realm Haproxy\ Statistics
stats auth admin:admin
listen login
bind *:9999
mode tcp
balance roundrobin
option httpchk
|
3、haproxy 启动脚本 /etc/init.d/haproxy
|
1
2
3
4
5
6
7
8
9
10
11
12
13
14
15
16
17
18
19
20
21
22
23
24
25
26
27
28
29
30
31
32
33
34
35
36
37
38
39
40
41
42
43
44
|
#! /bin/bash
PROGDIR=/opt/haproxy
PROGNAME=haproxy
DAEMON=$PROGDIR/sbin/$PROGNAME
CONFIG=$PROGDIR/conf/$PROGNAME.conf
PIDFILE=$PROGDIR/run/$PROGNAME.pid
DESC="HAProxy daemon"
SCRIPTNAME=/opt/haproxy/init.d/$PROGNAME
test -x $DAEMON || exit 0
start()
{
echo -n "Starting $DESC: $PROGNAME"
$DAEMON -f $CONFIG
echo "."
}
stop()
{ echo -n "Stopping $DESC: $PROGNAME"
cat $PIDFILE | xargs kill
echo "."
}
reload()
{ echo -n "reloading $DESC: $PROGNAME"
$DAEMON -f $CONFIG -p $PIDFILE -sf $(cat $PIDFILE)
}
case "$1" in
start)
start
;;
stop)
stop
;;
reload)
reload
;;
*)
echo "Usage: $SCRIPTNAME {start|stop|reload}" >&2
exit 1
;;
esac
exit 0
|
4、启动 haproxy 并加入开机启动
|
1
2
3
|
chmod +x haproxy
chkconfig haproxy on
service haproxy start
|
5、安装nginx 并支支持数字证书
https://www.openssl.org/source/openssl-1.1.0c.tar.gz
http://nginx.org/download/nginx-1.11.7.tar.gz
|
1
2
3
4
5
6
7
8
9
10
11
12
13
14
15
16
17
18
19
20
21
22
23
24
25
26
27
28
29
30
31
32
33
34
35
36
37
38
39
40
41
42
43
44
45
46
47
48
49
50
51
52
53
54
55
56
57
58
59
60
61
62
63
|
yum -y install git patch gcc gcc-c++ readline-devel zlib-devel libffi-devel \
openssl openssl-devel make autoconf automake libtool bison libxml2 \
libxml2-devel libxslt-devel libyaml-devel python python-docutils \
cmake imake expat-devel libaio libaio-devel bzr ncurses-devel wget \
libjpeg libjpeg-devel libpng libpng-devel freetype freetype-devel \
pcre-devel curl-devel libmcrypt libmcrypt-devel
下载安装openssl
cd /tmp
wget https://www.openssl.org/source/openssl-1.1.0c.tar.gz
tar -xvf openssl-1.1.0c.tar.gz
cd /tmp/openssl-1.1.0c
./config --openssldir=/usr/local/ssl
make && make install
./config shared --openssldir=/usr/local/ssl
make clean
make && make install
下载安装 nginx
cd /tmp
wget http://nginx.org/download/nginx-1.11.7.tar.gz
groupadd -r nginx
useradd -g nginx -r nginx
tar -xvf nginx-1.11.7.tar.gz
cd /tmp/nginx-1.11.7
./configure --prefix=/usr/local/nginx \
--sbin-path=/usr/sbin/nginx \
--conf-path=/etc/nginx/nginx.conf \
--error-log-path=/var/log/nginx/error.log \
--http-log-path=/var/log/nginx/access.log \
--pid-path=/var/run/nginx.pid \
--lock-path=/var/run/nginx.lock \
--http-client-body-temp-path=/var/cache/nginx/client_temp \
--http-proxy-temp-path=/var/cache/nginx/proxy_temp \
--http-fastcgi-temp-path=/var/cache/nginx/fastcgi_temp \
--http-uwsgi-temp-path=/var/cache/nginx/uwsgi_temp \
--http-scgi-temp-path=/var/cache/nginx/scgi_temp \
--user=nginx \
--group=nginx \
--with-http_ssl_module \
--with-http_realip_module \
--with-http_addition_module \
--with-http_sub_module \
--with-http_dav_module \
--with-http_flv_module \
--with-http_mp4_module \
--with-http_gunzip_module \
--with-http_gzip_static_module \
--with-http_random_index_module \
--with-http_secure_link_module \
--with-http_stub_status_module \
--with-http_auth_request_module \
--with-threads \
--with-stream \
--with-openssl=/tmp/openssl-1.1.0c \
--with-stream_ssl_module \
--with-http_slice_module \
--with-mail \
--with-mail_ssl_module \
--with-file-aio \
--with-http_v2_module \
--with-ipv6
mkdir -pv /var/cache/nginx/{client_temp,proxy_temp,fastcgi_temp,uwsgi_temp,scgi_temp}
make && make install
|
6、nginx 配置文件
|
1
2
3
4
5
6
7
8
9
10
11
12
13
14
15
16
17
18
19
20
21
22
23
24
25
26
27
28
29
30
31
32
33
34
35
36
37
38
39
40
41
42
43
44
45
46
47
48
49
50
51
52
53
54
55
56
57
58
59
60
61
62
63
64
65
66
67
68
69
70
71
72
73
74
75
76
77
78
79
80
81
82
83
|
修改/etc/nginx/nginx.conf
user nginx;
worker_processes 1;
error_log /var/log/nginx/error.log warn;
pid /var/run/nginx.pid;
events {
worker_connections 1024;
}
http {
include /etc/nginx/mime.types;
default_type application/octet-stream;
log_format main '$remote_addr - $remote_user [$time_local] "$request" '
'$status $body_bytes_sent "$http_referer" '
'"$http_user_agent" "$http_x_forwarded_for"';
access_log /var/log/nginx/access.log main;
sendfile on;
tcp_nopush on;
keepalive_timeout 65;
gzip on;
include /etc/nginx/conf.d/*.conf;
}
创建 /etc/nginx/conf.d 文件夹
mkdir -p /etc/nginx/conf.d
添加nginx默认web配置文件
/etc/nginx/conf.d/default.conf
server {
listen 80;
server_name localhost;
location / {
root /usr/local/nginx/html;
index index.php index.html index.htm;
}
error_page 500 502 503 504 /50x.html;
location = /50x.html {
root html;
}
location ~ \.php$ {
root /usr/local/nginx/html;
fastcgi_pass 127.0.0.1:9000;
fastcgi_index index.php;
fastcgi_param SCRIPT_FILENAME $document_root$fastcgi_script_name;
include fastcgi_params;
}
location ~* ^.+\.(jpg|jpeg|gif|png|bmp)$ {
access_log off;
root opencart;
expires 30d;
break;
}
}
|
7、创建nginx 启动脚本 /etc/init.d/nginx
|
1
2
3
4
5
6
7
8
9
10
11
12
13
14
15
16
17
18
19
20
21
22
23
24
25
26
27
28
29
30
31
32
33
34
35
36
37
38
39
40
41
42
43
44
45
46
47
48
49
50
51
52
|
PATH=/usr/local/bin:/sbin:/usr/bin:/bin
EXEC=/usr/sbin/nginx
PIDFILE=/var/run/nginx.pid
CONF="/etc/nginx/nginx.conf"
AUTH="1234"
case "$1" in
start)
if [ -f $PIDFILE ]
then
echo "$PIDFILE exists, process is already running or crashed."
else
echo "Starting nginx server..."
$EXEC &
fi
if [ "$?"="0" ]
then
echo "nginx is running..."
fi
;;
stop)
if [ ! -f $PIDFILE ]
then
echo "$PIDFILE exists, process is not running."
else
PID=$(cat $PIDFILE)
echo "Stopping..."
kill -9 $PID
PID=$(pidof nginx)
kill -9 $PID
rm -rf /var/run/nginx.pid
sleep 2
while [ -x $PIDFILE ]
do
echo "Waiting for nginx to shutdown..."
sleep 1
done
echo "nginx stopped"
fi
;;
restart|force-reload)
${0} stop
${0} start
;;
*)
echo "Usage: /etc/init.d/nginx {start|stop|restart|force-reload}" >&2
exit 1
esac
|
8、设置nginx开机启动并启动nginx
|
1
2
3
|
chmod +x nginx
chkconfig nginx on
service nginx start
|
六、安装consul-template 实现服务器自动发现
1、下载consul-template
https://releases.hashicorp.com/consul-template/0.16.0/consul-template_0.16.0_linux_amd64.zip
|
1
2
3
4
|
cd /tmp
wget https://releases.hashicorp.com/consul-template/0.16.0/consul-template_0.16.0_linux_amd64.zip
yum -y install unzip
unzip /tmp/consul-template_0.16.0_linux_amd64.zip -d /usr/bin/
|
2、consul-template haproxy配置
|
1
2
3
4
5
6
7
8
9
|
cat > /opt/consul/conf/haproxy_ctmpl.json << EOF
consul = "127.0.0.1:8500"
template {
source = "/opt/haproxy/conf/haproxy.ctmpl"
destination = "/opt/haproxy/conf/haproxy.conf"
command = "/etc/init.d/haproxy reload"
}
EOF
|
3、 /opt/haproxy/conf/haproxy.ctmpl 配置
|
1
2
3
4
5
6
7
8
9
10
11
12
13
14
15
16
17
18
19
20
21
22
23
24
25
26
27
28
29
30
31
32
33
34
35
36
37
38
39
40
41
42
43
44
45
46
47
48
49
50
51
52
53
54
55
56
57
58
59
60
61
62
63
64
65
66
67
|
global
log 127.0.0.1 local0
maxconn 50000
chroot /opt/haproxy
uid 99
gid 99
daemon
nbproc 2
pidfile /opt/haproxy/run/haproxy.pid
defaults
mode tcp
option dontlognull
option forwardfor
option redispatch
retries 2
balance static-rr
stats enable
stats uri /ha?stats
timeout connect 3000
timeout client 50000
timeout server 50000
listen admin_stat
bind *:8888
mode http
stats refresh 30s
stats uri /admin?stats
stats realm Haproxy\ Statistics
stats auth admin:admin
frontend www
bind *:80
mode http
acl apache hdr(HOST) apache.zone.com
acl nginx hdr(HOST) nginx.zone.com
use_backend apache.qkazone.com if apache
use_backend nginx.qkazone.com if nginx
backend apache.zone.com
balance roundrobin
mode http
{{range service "apache-php-80"}}
server apache {{.Address}}:{{.Port}} check {{end}}
backend nginx.zone.com
mode http
balance roundrobin
{{range service "nginx-80"}}
server nginx {{.Address}}:{{.Port}} check {{end}}
listen login
bind *:9999
mode tcp
balance roundrobin
{{range service "centos7"}}
server ssh {{.Address}}:{{.Port}} check {{end}}
|
4、配置consul-template haproxy 启动脚本 /etc/init.d/haproxy_ctmpl
|
1
2
3
4
5
6
7
8
9
10
11
12
13
14
15
16
17
18
19
20
21
22
23
24
25
26
27
28
29
30
31
32
33
34
35
36
37
|
#!/bin/bash
PATH=/usr/local/bin:/sbin:/usr/bin:/bin
EXEC=/usr/bin/consul-template
CONF="/opt/consul/conf/haproxy_ctmpl.json"
case "$1" in
start)
PID=$(ps -ef | grep -v grep | grep "$EXEC -config $CONF" | awk '{print $2}')
if [ -n "$PID" ]
then
echo "haproxy_ctmpl is running..."
else
echo "Starting haproxy_ctmpl server..."
$EXEC -config $CONF > /tmp/haproxy_ctmpl.out 2>&1 &
fi
;;
stop)
PID=$(ps -ef | grep -v grep | grep "$EXEC -config $CONF" | awk '{print $2}')
if [ -n "$PID" ]
then
echo "Stopping..."
kill -9 $PID
sleep 2
else
echo "haproxy_ctmpl exists, process is not running."
fi
;;
restart|force-reload)
${0} stop
${0} start
;;
*)
echo "Usage: /etc/init.d/tmpl {start|stop|restart|force-reload}" >&2
exit 1
esac
|
5、设置开机启动,启动
|
1
2
3
|
chmod +x haproxy_ctmpl
chkconfig haproxy_ctmpl on
service haproxy_ctmpl start
|
6、consul-template nginx配置 /opt/consul/conf/nginx_ctmpl.json
|
1
2
3
4
5
6
7
8
9
|
cat > /opt/consul/conf/nginx_ctmpl.json << EOF
consul = "127.0.0.1:8500"
template {
source = "/etc/nginx/conf.d/nginx_web.ctmpl"
destination = "/etc/nginx/conf.d/nginx_web.conf"
command = "/usr/sbin/nginx -s reload"
}
EOF
|
7、/etc/nginx/conf.d/nginx_web.ctmpl 配置
|
1
2
3
4
5
6
7
8
9
10
11
12
13
14
15
16
17
18
19
20
21
22
23
24
25
26
27
28
29
30
31
32
33
34
35
36
37
38
39
40
41
42
43
44
45
46
47
48
49
50
51
52
53
54
55
56
57
58
59
60
61
62
63
64
65
66
67
68
69
70
71
72
|
upstream apache {
ip_hash;
{{range service "apache-php-80"}}
server {{.Address}}:{{.Port}} fail_timeout=0;
{{end}}
keepalive 64;
}
server {
listen 80;
server_name apache.zone.com;
location / {
client_max_body_size 0;
proxy_connect_timeout 300s;
proxy_send_timeout 900;
proxy_read_timeout 900;
proxy_buffer_size 32k;
proxy_buffers 4 32k;
proxy_busy_buffers_size 64k;
proxy_redirect off;
proxy_hide_header Vary;
proxy_set_header Accept-Encoding '';
proxy_set_header Host $host;
proxy_set_header Referer $http_referer;
proxy_set_header Cookie $http_cookie;
proxy_set_header X-Real-IP $remote_addr;
proxy_set_header X-Forwarded-For $proxy_add_x_forwarded_for;
proxy_set_header Host $host;
proxy_set_header X-Forwarded-For $proxy_add_x_forwarded_for;
proxy_headers_hash_max_size 51200;
proxy_headers_hash_bucket_size 6400;
proxy_pass http://apache/;
}
}
upstream nginx {
ip_hash;
{{range service "nginx-80"}}
server {{.Address}}:{{.Port}} fail_timeout=0;
{{end}}
keepalive 64;
}
server {
listen 80;
server_name nginx.zone.com;
location / {
client_max_body_size 0;
proxy_connect_timeout 300s;
proxy_send_timeout 900;
proxy_read_timeout 900;
proxy_buffer_size 32k;
proxy_buffers 4 32k;
proxy_busy_buffers_size 64k;
proxy_redirect off;
proxy_hide_header Vary;
proxy_set_header Accept-Encoding '';
proxy_set_header Host $host;
proxy_set_header Referer $http_referer;
proxy_set_header Cookie $http_cookie;
proxy_set_header X-Real-IP $remote_addr;
proxy_set_header X-Forwarded-For $proxy_add_x_forwarded_for;
proxy_set_header Host $host;
proxy_set_header X-Forwarded-For $proxy_add_x_forwarded_for;
proxy_headers_hash_max_size 51200;
proxy_headers_hash_bucket_size 6400;
proxy_pass http://nginx/;
}
}
|
8、配置consul-template nginx启动脚本 /etc/init.d/nginx_ctmpl
|
1
2
3
4
5
6
7
8
9
10
11
12
13
14
15
16
17
18
19
20
21
22
23
24
25
26
27
28
29
30
31
32
33
34
35
36
37
|
#!/bin/bash
PATH=/usr/local/bin:/sbin:/usr/bin:/bin
EXEC=/usr/bin/consul-template
CONF="/opt/consul/conf/nginx_ctmpl.json"
case "$1" in
start)
PID=$(ps -ef | grep -v grep | grep "$EXEC -config $CONF" | awk '{print $2}')
if [ -n "$PID" ]
then
echo "haproxy_ctmpl is running..."
else
echo "Starting haproxy_ctmpl server..."
$EXEC -config $CONF > /tmp/nginx_ctmpl.out 2>&1 &
fi
;;
stop)
PID=$(ps -ef | grep -v grep | grep "$EXEC -config $CONF" | awk '{print $2}')
if [ -n "$PID" ]
then
echo "Stopping..."
kill -9 $PID
sleep 2
else
echo "haproxy_ctmpl exists, process is not running."
fi
;;
restart|force-reload)
${0} stop
${0} start
;;
*)
echo "Usage: /etc/init.d/tmpl {start|stop|restart|force-reload}" >&2
exit 1
esac
|
9、设置开机启动
|
1
2
3
|
chmod +x nginx_ctmpl
chkconfig nginx_ctmpl on
service nginx_ctmpl start
|
七、测试是否自动发现
|
1
2
|
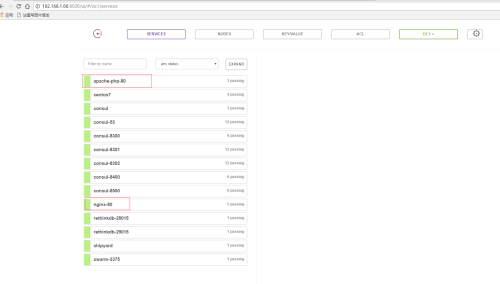
docker run -ti -d -p :80 eboraas/apache-php
docker run -d -ti -p :80 nginx
|
1、打开 http://192.168.1.66:8500/ui/#/dc1/services
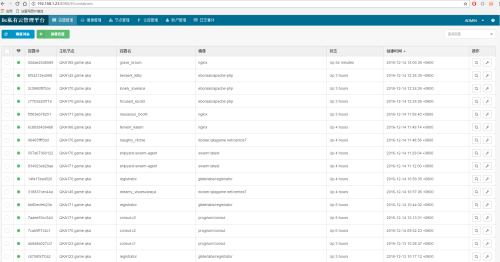
2、http://192.168.1.23:8080/#/containers
查看shipyard 管理平台
账号admin密码 shipyard
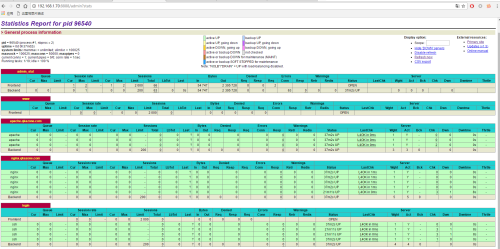
3、haproxy
http://192.168.1.70:8888/admin?stats
http://192.168.1.71:8888/admin?stats
账号:admin 密码admin
最后:注意事项:consul registrator 是基于端口发现的不映射端口是发现不了的
consul 服务挂了整个宿主机运行应用将不可见。registrator 是基于镜像名加端口服务
镜像名称为nginx 多端口暴露 对外发现的服务名称nginx-80 单个端口暴露就是镜像名称为服务名
像集群添加宿主机
consul registrator swarm-agent registrator 链接consul 端口请使用宿主机的consul 端口
使用其它机器端口如果其它机器挂了这台宿主机的应用不可被发现
本文出自 “小叶寒笑” 博客,请务必保留此出处http://juestnow.blog.51cto.com/1515305/1882708










 docker swarm 集群及可视化界面的安装及配置