本文将较为详细的介绍如何在.net下开发Windows服务程序,并将简要介绍一些开发中的调试技巧及后期的部署问题.
IDE:VS2005, DotNetFramework Version:2.0.50727
Windows服务程序通常是一种在OS的后台长期运行的程序,根据需要你可以设置为随服务器启动而同时启动等等,在传统的C/S结构的程序开发中,Windows服务更是以Server端普遍存在.在.NET应用程序中,无论是Winform下的应用还是ASP.NET,Windows服务也都非常重要,比如我们可以把一个.Net Remoting服务端封装在一个windows服务中,来达到稳定提供服务的目的.
切入正题,首先我们来了解如何在VS下开发基于.Net的windows服务.
实际上,在VS下建立一个windows服务程序非常的简单,微软帮我们做了80%的工作,我们所需要做的只是处理那20%的业务工作.
首先,我们建立一个Windows Service程序,VS提供了现成的项目模版,选择Files->New->Project->Windows->Windows Service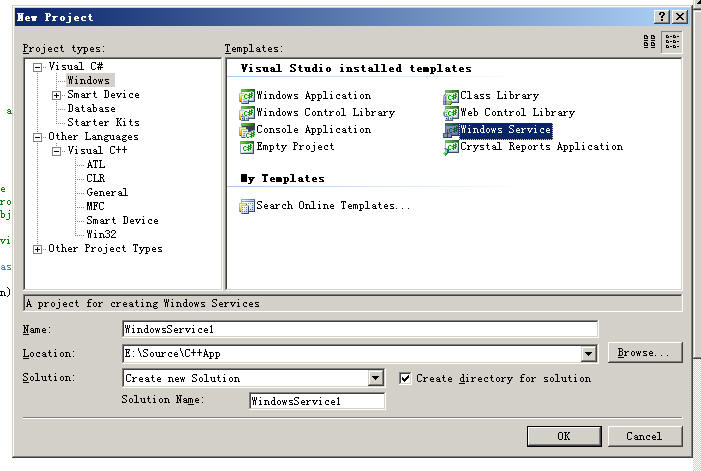
之后,你将获得两个文件Service组件和Program.cs.我们要建立服务的话,首先需要添加专用的安装组件,这步同样很简单,选择服务组件,并切换到设计模式,右键->Add Installer,生成了了安装文件,切换到设计模式,这里你将看到两个组件:ServiceInstaller和ProcessInstaller,这里没有太多需要说明的,大部分是对服务的名称,描述等信息的设置,只有2个地方需要注意下.一个是StartType,有三种选择自动,手动,禁用.如果想要自动启动,那么遍选择Automatic即可.另一个需要注意的属性是Account,选择用户,一般情况下,我们选择Local System即可.
到现在,如果我们想要建立一个服务,实际上已经结束了,只需要在服务组件的OnStart和OnStop等函数中加上个人的业务处理.在Program.cs文件中,是如下代码:
 static void Main()
 {
{ ServiceBase[] ServicesToRun; // More than one user Service may run within the same process. To add // another service to this process, change the following line to // create a second service object. For example, // // ServicesToRun = new ServiceBase[] {new Service1(), new MySecondUserService()}; //
 ServicesToRun = new ServiceBase[] { new Service1() }; ServiceBase.Run(ServicesToRun);
 }
}
这段代码用于启动服务.
接下来的工作就是安装服务.你可以通过制作安装包实现,或者直接通过命令行来执行安装.
当你编译完项目后,你可以在bin/debug目录下看到扩展名为.exe的可执行文件,这就是服务程序,但直接双击是无法运行的,你需要通过特定的工具来安装它,微软提供给我们的工具就是installutil.exe.这个程序位于%SystemRoot%\Microsoft.NET\Framework\/%Version%\,version指的是.net版本号.
安装一个服务程序,我们是在命令行内键入:installutil.exe 服务程序路径.如果是要删除某个服务则是installutil.exe /u 服务程序路径.
执行了安装操作后,我们去控制面版->管理工具->服务中就可以看到我们的服务程序了.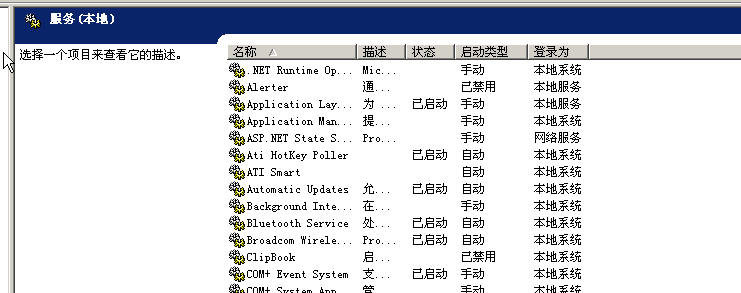
最后,谈谈调试中的技巧.
编写这种服务程序,调试起来非常的麻烦,而且每次有所变化后,还得频繁的去执行installutil和installutil /u命令,实际上,我们可以通过编写一些BuildEvents来大大简化这其中的烦琐工作.这里,我们在BuildEvents编写如下事件:
net stop YourServiceName
copy /y "$(TargetDir)" "$(ProjectDir)bin"
"%SystemRoot%\Microsoft.NET\Framework\v2.0.50727\InstallUtil.exe" /u $(ProjectDir)bin\$(TargetFileName)
"%SystemRoot%\Microsoft.NET\Framework\v2.0.50727\InstallUtil.exe" $(ProjectDir)bin\$(TargetFileName)
net start YourServiceName
简单解释下:
停止当前服务->把debug目录下所有东西copy到bin目录下->执行反安装操作->执行安装操作->启动服务.
最后把该事件设置为OnSuccessfulBuild即可.
由于是服务程序,如果想要直接debug比较的麻烦,可以通过附加进程来调试大多数代码,但是如果想要调试OnStart和OnStop方法.则只能通过其他的项目来调试.具体见这篇文章的介绍.http://leonkim.bokee.com/1857046.html
实际上,我们可以直接在OnStart()方法中通过EventLog.WriteEntry("Hi,I'm wiseman");来向事件查看器中写入一些你感兴趣的信息,很大程度上可以解决debug的问题.
本文到此结束,大致的介绍了下如何在.net下编写windows服务程序,以及一些相关的技巧.该文也是阅读我之后的某些文章需要掌握的知识,这个月我会尽量抽些时间多写几篇有关Windows服务和企业服务以及Remoting技术综合起来的应用的文章.
------------------------------------------------------------------------------------------------------
我们将研究如何创建一个作为Windows服务的应用程序。内容包含什么是Windows服务,如何创建、安装和调试它们。会用到System.ServiceProcess.ServiceBase命名空间的类。
Windows服务应用程序是一种需要长期运行的应用程序,它对于服务器环境特别适合。它没有用户界面,并且也不会产生任何可视输出。任何用户消息都会被写进Windows事件日志。计算机启动时,服务会自动开始运行。它们不要用户一定登录才运行,它们能在包括这个系统内的任何用户环境下运行。通过服务控制管理器,Windows服务是可控的,可以终止、暂停及当需要时启动。
Windows 服务,以前的NT服务,都是被作为Windows NT操作系统的一部分引进来的。它们在Windows 9x及Windows Me下没有。你需要使用NT级别的操作系统来运行Windows服务,诸如:Windows NT、Windows 2000 Professional或Windows 2000 Server。举例而言,以Windows服务形式的产品有:Microsoft Exchange、SQL Server,还有别的如设置计算机时钟的Windows Time服务。
我们即将创建的这个服务除了演示什么也不做。服务被启动时会把一个条目信息登记到一个数据库当中来指明这个服务已经启动了。在服务运行期间,它会在指定的时间间隔内定期创建一个数据库项目记录。服务停止时会创建最后一条数据库记录。这个服务会自动向Windows应用程序日志当中登记下它成功启动或停止时的记录。
Visual Studio .NET能够使创建一个Windows服务变成相当简单的一件事情。启动我们的演示服务程序的说明概述如下。
1. 新建一个项目
2. 从一个可用的项目模板列表当中选择Windows服务
3. 设计器会以设计模式打开
4. 从工具箱的组件表当中拖动一个Timer对象到这个设计表面上 (注意: 要确保是从组件列表而不是从Windows窗体列表当中使用Timer)
5. 设置Timer属性,Enabled属性为False,Interval属性30000毫秒
6. 切换到代码视图页(按F7或在视图菜单当中选择代码),然后为这个服务填加功能
在你类后面所包含的代码里,你会注意到你所创建的Windows服务扩充了System.ServiceProcess.Service类。所有以.NET方式建立的Windows服务必须扩充这个类。它会要求你的服务重载下面的方法,Visual Studio默认时包括了这些方法。
• Dispose – 清除任何受控和不受控资源(managed and unmanaged resources)
• OnStart – 控制服务启动
• OnStop – 控制服务停止
在这个例子中使用的数据库表是使用下面的T-SQL脚本创建的。我选择SQL Server数据库。你可以很容易修改这个例子让它在Access或任何你所选择的别的数据库下运行。
CREATE TABLE [dbo].[MyServiceLog] (
[in_LogId] [int] IDENTITY (1, 1) NOT NULL,
[vc_Status] [nvarchar] (40)
COLLATE SQL_Latin1_General_CP1_CI_AS NOT NULL,
[dt_Created] [datetime] NOT NULL
) ON [PRIMARY]
下面就是我命名为MyService的Windows服务的所有源代码。大多数源代码是由Visual Studio自动生成的。
using System;
using System.Collections;
using System.ComponentModel;
using System.Data;
using System.Data.SqlClient;
using System.Diagnostics;
using System.ServiceProcess;
namespace CodeGuru.MyWindowsService
{
public class MyService : System.ServiceProcess.ServiceBase
{
private System.Timers.Timer timer1;
/// <remarks>
/// Required designer variable.
/// </remarks>
private System.ComponentModel.Container components = null;
public MyService()
{
// This call is required by the Windows.Forms
// Component Designer.
InitializeComponent();
}
// The main entry point for the process
static void Main()
{
System.ServiceProcess.ServiceBase[] ServicesToRun;
ServicesToRun = new System.ServiceProcess.ServiceBase[]
{ new MyService() };
System.ServiceProcess.ServiceBase.Run(ServicesToRun);
}
/// <summary>
/// Required method for Designer support - do not modify
/// the contents of this method with the code editor.
/// </summary>
private void InitializeComponent()
{
this.timer1 = new System.Timers.Timer();
((System.ComponentModel.ISupportInitialize)
(this.timer1)).BeginInit();
//
// timer1
//
this.timer1.Interval = 30000;
this.timer1.Elapsed +=
new System.Timers.ElapsedEventHandler(this.timer1_Elapsed);
//
// MyService
//
this.ServiceName = "My Sample Service";
((System.ComponentModel.ISupportInitialize)
(this.timer1)).EndInit();
}
/// <summary>
/// Clean up any resources being used.
/// </summary>
protected override void Dispose( bool disposing )
{
if( disposing )
{
if (components != null)
{
components.Dispose();
}
}
base.Dispose( disposing );
}
/// <summary>
/// Set things in motion so your service can do its work.
/// </summary>
protected override void OnStart(string[] args)
{
this.timer1.Enabled = true;
this.LogMessage("Service Started");
}
/// <summary>
/// Stop this service.
/// </summary>
protected override void OnStop()
{
this.timer1.Enabled = false;
this.LogMessage("Service Stopped");
}
/*
* Respond to the Elapsed event of the timer control
*/
private void timer1_Elapsed(object sender,
System.Timers.ElapsedEventArgs e)
{
this.LogMessage("Service Running");
}
/*
* Log specified message to database
*/
private void LogMessage(string Message)
{
SqlConnection connection = null;
SqlCommand command = null;
try
{
connection = new SqlConnection(
"Server=localhost;Database=SampleDatabase;Integrated
Security=false;User Id=sa;Password=;");
command = new SqlCommand(
"INSERT INTO MyServiceLog (vc_Status, dt_Created)
VALUES ('" + Message + "',getdate())", connection);
connection.Open();
int numrows = command.ExecuteNonQuery();
}
catch( Exception ex )
{
System.Diagnostics.Debug.WriteLine(ex.Message);
}
finally
{
command.Dispose();
connection.Dispose();
}
}
}
}
Windows服务不同于普通Windows应用程序。不可能简简单单地通过运行一个EXE就启动Windows服务了。安装一个Windows服务应该通过使用.NET Framework提供的InstallUtil.exe来完成,或者通过诸如一个Microsoft Installer (MSI)这样的文件部署项目完成。
创建一个Windows服务,仅用InstallUtil程序去安装这个服务是不够的。你必须还要把一个服务安装程序添加到你的Windows服务当中,这样便于InstallUtil或是任何别的安装程序知道应用你服务的是怎样的配置设置。
1. 将这个服务程序切换到设计视图
2. 右击设计视图选择“添加安装程序”
3. 切换到刚被添加的ProjectInstaller的设计视图
4. 设置serviceInstaller1组件的属性:
1) ServiceName = My Sample Service
2) StartType = Automatic
5. 设置serviceProcessInstaller1组件的属性
1) Account = LocalSystem
6. 生成解决方案
在完成上面的几个步骤之后,会自动由Visual Studio产生下面的源代码,它包含于ProjectInstaller.cs这个源文件内。
using System;
using System.Collections;
using System.ComponentModel;
using System.Configuration.Install;
namespace CodeGuru.MyWindowsService
{
/// <summary>
/// Summary description for ProjectInstaller.
/// </summary>
[RunInstaller(true)]
public class ProjectInstaller :
System.Configuration.Install.Installer
{
private System.ServiceProcess.ServiceProcessInstaller
serviceProcessInstaller1;
private System.ServiceProcess.ServiceInstaller serviceInstaller1;
/// <summary>
/// Required designer variable.
/// </summary>
private System.ComponentModel.Container components = null;
public ProjectInstaller()
{
// This call is required by the Designer.
InitializeComponent();
// TODO: Add any initialization after the InitComponent call
}
#region Component Designer generated code
/// <summary>
/// Required method for Designer support - do not modify
/// the contents of this method with the code editor.
/// </summary>
private void InitializeComponent()
{
this.serviceProcessInstaller1 = new
System.ServiceProcess.ServiceProcessInstaller();
this.serviceInstaller1 = new
System.ServiceProcess.ServiceInstaller();
//
// serviceProcessInstaller1
//
this.serviceProcessInstaller1.Account =
System.ServiceProcess.ServiceAccount.LocalSystem;
this.serviceProcessInstaller1.Password = null;
this.serviceProcessInstaller1.Username = null;
//
// serviceInstaller1
//
this.serviceInstaller1.ServiceName = "My Sample Service";
this.serviceInstaller1.StartType =
System.ServiceProcess.ServiceStartMode.Automatic;
//
// ProjectInstaller
//
this.Installers.AddRange(new
System.Configuration.Install.Installer[]
{this.serviceProcessInstaller1, this.serviceInstaller1});
}
#endregion
}
}
现在这个服务已经生成,你需要把它安装好才能使用。下面操作会指导你安装你的新服务。
1. 打开Visual Studio .NET命令提示
2. 改变路径到你项目所在的bin\Debug文件夹位置(如果你以Release模式编译则在bin\Release文件夹)
3. 执行命令“InstallUtil.exe MyWindowsService.exe”注册这个服务,使它建立一个合适的注册项。
4. 右击桌面上“我的电脑”,选择“管理”就可以打计算机管理控制台
5. 在“服务和应用程序”里面的“服务”部分里,你可以发现你的Windows服务已经包含在服务列表当中了
6. 右击你的服务选择启动就可以启动你的服务了
在每次需要修改Windows服务时,这就会要求你卸载和重新安装这个服务。不过要注意在卸载这个服务前,最好确保服务管理控制台已经关闭,这会是一个很好的习惯。如果没有这样操作的话,你可能在卸载和重安装Windows服务时会遇到麻烦。仅卸载服务的话,可以执行相的InstallUtil命令用于注销服务,不过要在后面加一个/u命令开关。
从另外的角度度看,调试Windows服务绝不同于一个普通的应用程序。调试Windows服务要求的步骤更多。服务不能象你对普通应用程序做的那样,只要简单地在开发环境下执行就可以调试了。服务必须首先被安装和启动,这一点在前面部分我们已经做到了。为了便于跟踪调试代码,一旦服务被启动,你就要用Visual Studio把运行的进程附加进来(attach)。记住,对你的Windows服务做的任何修改都要对这个服务进行卸载和重安装。
为了调试程序,有些附加Windows服务的操作说明。这些操作假定你已经安装了这个Windows服务并且它正在运行。
1. 用Visual Studio装载这个项目
2. 点击“调试”菜单
3. 点击“进程”菜单
4. 确保 显示系统进程 被选
5. 在 可用进程 列表中,把进程定位于你的可执行文件名称上点击选中它
6. 点击 附加 按钮
7. 点击 确定
8. 点击 关闭
9. 在timer1_Elapsed方法里设置一个断点,然后等它执行
现在你应该对Windows服务是什么,以及如何创建、安装和调试它们有一个粗略的认识了。Windows服务的额处的功能你可以自行研究。这些功能包括暂停(OnPause)和恢复(OnContinue)的能力。暂停和恢复的能力在默认情况下没有被启用,要通过Windows服务属性来设置。
此内容由惯性聚合(RSS阅读器)自动聚合整理,仅供阅读参考。 原文来自 — 版权归原作者所有。