1 QPainter::Antialiasing // 反锯齿
2 QPainter::TextAntialiasing // 文字反锯齿
3 QPainter::SmoothPixmapTransform   // 采用平滑的Pixmap变换算法
设置
1 painter.setRenderHint(QPainter::Antialiasing, true);

绘图方法在上图已经非常清晰的展示了,方法参数也很简单,使用时一看便知。
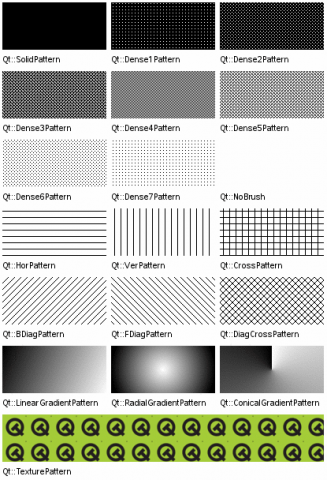
1)画刷风格
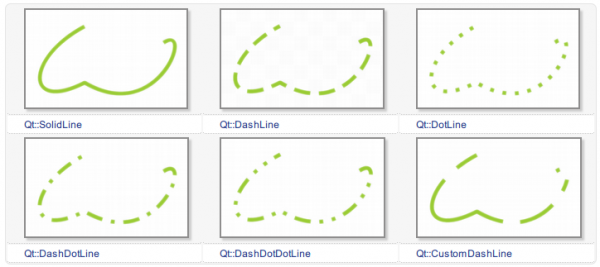
2)画笔风格
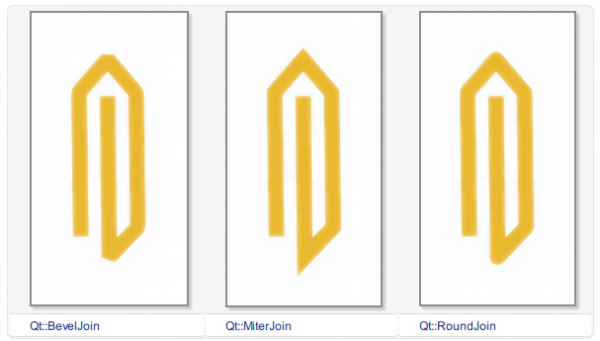
3)连接点风格
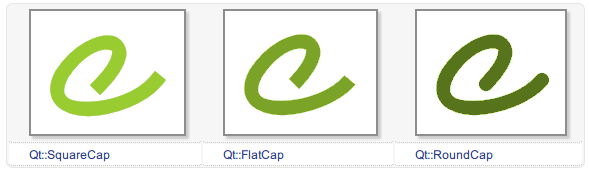
4)顶端风格
创建一个自定义的Widget:
// widget.h
#ifndef WIDGET_H
#define WIDGET_H

#include <QWidget>
#include <QPaintEvent>

class Widget : public QWidget
{
    Q_OBJECT

public:
    Widget(QWidget *parent = 0);
    ~Widget();

protected:
    // 重写基类的绘制方法
    void paintEvent(QPaintEvent *);
};

#endif // WIDGET_H
实现Widget:
// widget.cpp

#include "widget.h"
#include <QPainter>
#include <QPoint>

Widget::Widget(QWidget *parent)
    : QWidget(parent)
{}

Widget::~Widget()
{}

void Widget::paintEvent(QPaintEvent *event)
{
    // TODO: 在这里进行绘制

}
程序入口Main:
 1 // main.cpp
 2
 3 #include "widget.h"
 4 #include <QApplication>
 5
 6 int main(int argc, char *argv[])
 7 {
 8     QApplication a(argc, argv);
 9     Widget w;
10     w.show();
11
12     return a.exec();
13 }
好了,准备工作完成了。后面的绘制工作都会发生在 paintEvent 这个方法内。
 1 void Widget::paintEvent(QPaintEvent *event)
 2 {
 3     Q_UNUSED(event)
 4
 5     // this 表示在Widget部件内部绘制
 6     QPainter painter(this);
 7
 8     // 使用画笔,参数为:画刷,线宽,画笔风格,画笔端点,画笔连接风格
 9     QPen pen(Qt::green, 5, Qt::DotLine, Qt::RoundCap, Qt::RoundJoin);
10     painter.setPen(pen);
11
12     // 使用画笔画线
13     painter.drawLine(QPoint(0, 0), QPoint(100, 100));
14
15     // 画矩形,参数:x,y,w,h
16     painter.drawRect(110, 110, 100, 80);
17
18     // 绘制椭圆(圆),参数:x,y,w,h
19     painter.drawEllipse(20, 20, 100, 80);
20
21     // 绘制圆弧
22     {
23         QRectF rect(110.0, 80.0, 100.0, 80.0); //x,y,w,h
24         int startAngle = 30 * 16; //值为,实际角度 * 16
25         int spanAngle = 120 * 16;
26         painter.drawArc(rect, startAngle, spanAngle); // 参数:rect表示弧线所在的矩形,startAngle起始角度,spanAngle跨越角度
27     }
28
29     // 绘制扇形
30     {
31         QRectF rect_top(120.0, 20.0, 100.0, 100.0);
32         int startAngle = 0 * 16;  // 扇形起始角度
33         int spanAngle = 120 * 16;  // 扇形覆盖范围(120度的)
34         painter.drawPie(rect_top, startAngle, spanAngle);
35     }
36
37     // 绘制多边形
38     {
39         QPolygon pts;
40         pts.setPoints(3, 250,20, 300,80, 280,130); //第一个参数表示3个点,后面是三个点坐标
41         painter.drawConvexPolygon(pts);
42     }
43
44     // 绘制路径
45     {
46         QPainterPath path;
47         path.addEllipse(400, 100, 80, 80);//添加一个圆
48         path.addRect(400, 130, 100, 100); //添加一个矩形
49
50         // 使用笔刷,设置颜色和填充模式
51         QBrush brush(QColor(0,0,255), Qt::Dense4Pattern);
52         painter.setBrush(brush);
53         path.setFillRule(Qt::WindingFill); // 非零弯曲规则;此外还有 Qt::OddEventFil 奇偶填充规则
54
55         painter.drawPath(path);
56     }
57 }
注释很详细了,就不再进行说明,运行的效果如下图所示。

如果你觉得这样一点一点的绘制太慢,写代码的效率太低,那么推荐你试试这个第三方控件:QCustomPlot。让我们从此告别造轮子,专注业务需求本身。
此内容由惯性聚合(RSS阅读器)自动聚合整理,仅供阅读参考。 原文来自 — 版权归原作者所有。