Default firmware for this guide is:
2118it.bin
Version 20.00.07.00
Release date: 11-FEB-16
所有资源已转到百度盘:
链接: https://pan.baidu.com/s/1hsG9rXq 密码: vp4g
WARNING: If you have an Integrated, Mini or Mini Mono Perc H310 do NOT try to crossflash with these steps.
So this guide will be the update to my first guide… without double checking everything I’m pretty sure it’s almost identical except for the link to the ZIP file. So I’m not sure why I retyped all of this instead of just updating the ZIP file in the old guide. Anyway…. the difference between the old and new ZIP file is the sas2flsh and sas2flash versions. The default sas2flsh.exe and sas2flash.efi in this new ZIP file are p5 which allows you to pretty much overwrite/downgrade any firmware. This will help mainly those who were getting stuck on the H200 cards. I’ve also included driver, firmware and sas2flash folders that contain a wide array of sometimes hard to find versions.
If you’re just looking for a list of commands that need to be executed then check the very bottom of this page.
Things you’ll need:
- Bootable USB (link). You can follow this post on using Rufus to create a quick FreeDOS bootable USB Drive.
- For those with newer UEFI motherboards you’ll need bootx64.efi (link) (alternate link).
- You’ll want the version: Precompiled x86_64 UEFI Shell v1 Binary.
- This should already be included in the LSI-9211i8i.zip I’ve provided in the next link.
- LSI-9211-8i.zip (link). The main firmware file in this ZIP is P20. This has been updated to support the latest version of FreeNAS. The ZIP also contains versions of the tools that will make this process a bit easier. The default sas2flash tools are P05 which allow downgrading and flashing of non-compatible firmware in many cases.
- Thanks to mobilenvidia and Bryan Vyhmeister (brycv.com) for providing/finding a lot of the files and information used here.
- Both of these guys have provided great guides on flashing IBM M1015 cards and other great information.
- If you have a Dell Perc H310 and your computer won’t boot then you’ll need to cover PCIe pins B5 and B6. You can cover them with a thin piece of electrical tape. Thanks to Andy_Steb from AVS for sharing this tip he found.
- Make sure you don’t cover the A pins on the other side.
 B Pins that need to be covered
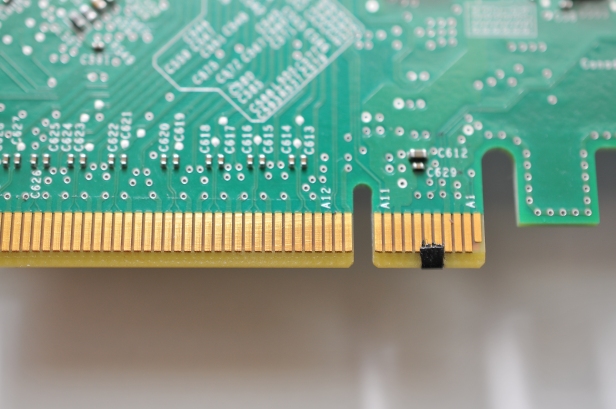 A Pins that should be left exposed
- Your card may have a sticker on it marked SAS Address. If it does then write this down so it’s easily accessible.
Moving on to the steps:
- First thing we need to do is prepare the USB drive.
- Once you’ve created the bootable USB drive in step 1 you want to copy the contents of LSI-9211-8i.zip onto the USB drive.
- The root of the USB drive should look like this:
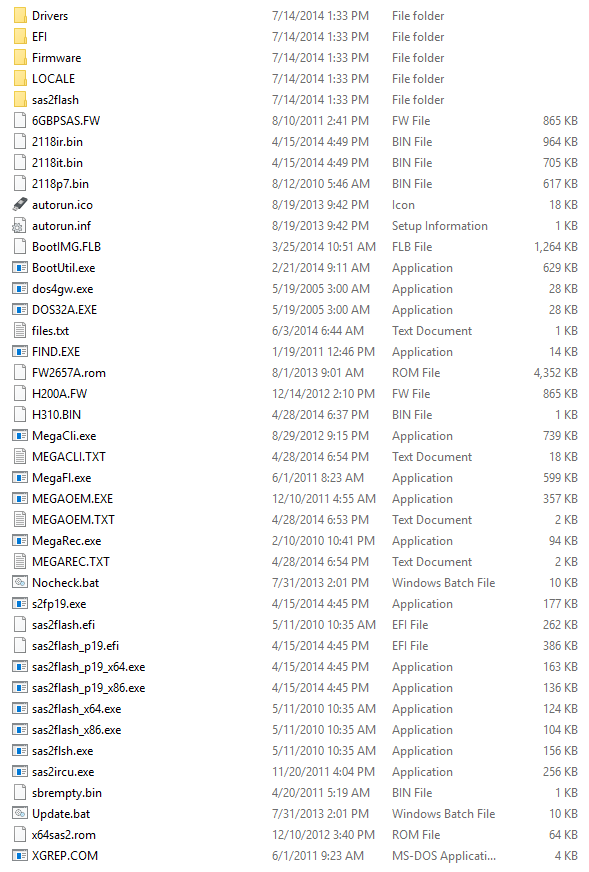
- Next we’ll want to reboot and boot into FreeDOS/MS-DOS.
- Next we can begin flashing the card.
- If your card doesn’t have a sticker with the SAS Address you should be able to follow these steps to obtain the address.
- If you have a Dell Perc H310 then follow these steps.
- If you have a Dell Perc H200 then follow the below steps. (If you have a UEFI motherboard then see the steps below for UEFI motherboards)
- Flash the card with the Dell 6gbps HBA Firmware.
- The steps for flashing the H310 and H200 will be the same.
megarec.exe -writesbr 0 sbrempty.bin
- If this command fails it should be safe to proceed to step 2.
megarec.exe -cleanflash 0- Reboot the computer and boot back into the USB drive.
sas2flsh.exe -o -f 6GBPSAS.fw If flashing a M1015 you can use the 2118p7.bin instead of the 6GBPSAS.FWs2fp19.exe -o -sasadd 500xxxxxxxxxxxxx (replace this address with the one you wrote down in the first steps).- Reboot the computer and boot back into the USB drive.
- Flash the card with the LSI 9211-8i Firmware.
- The same steps will flash the card to a LSI 9211-8i.
sas2flsh.exe -o -f 2118it.bin- It should ask you if you want to flash anyway. Type Y to proceed.
- Reboot the computer back into your OS. You may need to remove your USB drive if it was automatically booting.
- Alternatively you can use sas2flsh.exe to flash the 2118p7.bin and then use s2fp19.exe to flash the 2118it.bin. Depending on the revision of the card this method can provide cleaner output for the card details.
- If you’re running linux or BSD then you should be finished. If you’re running Windows 7/2008 R2 and possibly Windows 8.1 then you’ll want to update your drivers.
- Click this (link) to take you back to my previous guide on how to update the drivers.
UEFI Motherboards
- Now if you have a UEFI motherboard and received an error like this:
"ERROR: Failed to initialize PAL. Exiting program."
when trying to run sas2flsh then you’re going to have to run the flashing steps in an efi shell. All of the other instructions should work fine. When you reboot after running megarec -cleanflash 0 is when you’ll need to enter the efi shell.
- As noted above for the H200 you will need to run sas2flash from the UEFI shell in order to save the SAS Address.
- The EFI boot shell should already be on the USB drive.
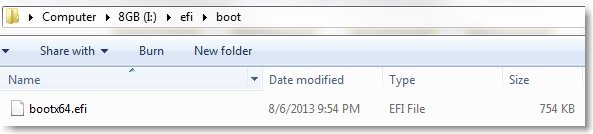
- After the
megarec -cleanflash 0 completes, instead of rebooting into the USB drive we’ll want to reboot into the UEFI shell.
- Using the same two UEFI BIOS configuration screens I’ll show you how to enter the UEFI shell.
Here is a quick summary of steps to reference:
H310 DOS:
megacli.exe -AdpAllInfo -aAll -page 20 Write down SAS address.megarec.exe -writesbr 0 sbrempty.bin If this fails move on to next step.megarec.exe -cleanflash 0 Reboot.sas2flsh.exe -o -f 6GBPSAS.fw Reboot.sas2flsh.exe -o -f 2118it.bin
- or sas2flsh.exe -0 -f 2118p7.bin, reboot, then s2fp19.exe -o -f 2118it.bin
s2fp19.exe -o -sasadd 500xxxxxxxxxxxxx
H200 DOS:
sas2flsh.exe -c 0 -list Write down SAS address.megarec.exe -writesbr 0 sbrempty.bin If this fails move on to next step.megarec.exe -cleanflash 0 Reboot.sas2flsh.exe -o -f 6GBPSAS.fw Reboot.sas2flsh.exe -o -f 2118it.bin
- or sas2flsh.exe -o -f 2118p7.bin, reboot, then s2fp19.exe -o -f 2118it.bin
s2fp19.exe -o -sasadd 500xxxxxxxxxxxxx
H310 UEFI:
- Run the following commands in the DOS prompt:
megacli.exe -AdpAllInfo -aAll -page 20 Write down SAS address.megarec.exe -writesbr 0 sbrempty.bin If this fails move on to next step.megarec.exe -cleanflash 0
- Reboot into UEFI shell and run the following commands:
sas2flash.efi -o -f 6GBPSAS.FW Reboot and return to UEFI shell.sas2flash.efi -o -f 2118it.bin
- or sas2flash.efi -o -f 2118p7.bin, reboot, then
sas2flash_p19.efi -o -f 2118it.bin
sas2flash_p19.efi -o -sasadd 500xxxxxxxxxxxxx
H200 UEFI:
- Boot into UEFI shell:
sas2flash.efi -c 0 -list Write down SAS address.
- Reboot into DOS prompt:
megarec.exe -writesbr 0 sbrempty.bin If this fails move on to next step.megarec.exe -cleanflash 0
- Reboot into UEFI shell:
sas2flash.efi -o -f 6GBPSAS.FW Reboot and return to UEFI shell.sas2flash.efi -o -f 2118it.bin
- or sas2flash.efi -o -f 2118p7.bin, reboot, then
sas2flash_p19.efi -o -f 2118it.bin
sas2flash_p19.efi -o -sasadd 500xxxxxxxxxxxxx
Please leave a comment if these instructions were helpful or if you found them to be too confusing. Thanks!



