









1. 确保安装epel
yum install -y epel-release
2. 按照《CentOS7.2部署node-mapnik》一文中的步骤,手动安装 gcc-6.2.0 和 boost-1.65.1
3. 按照官方文档安装MongoDB,请注意开启防火墙端口和设置SELinux相关选项,(本示例中创建了数据库 gis , dbOwner 用户名为 root ,密码为 111111 )
4. 安装编译工具及依赖项
yum install -y automake autoconf libtool cmake3 openssl-devel unzip
5. 下载解压 mongo-c-driver 源代码
wget https://github.com/mongodb/mongo-c-driver/releases/download/1.10.0/mongo-c-driver-1.10.0.tar.gztar -xzvf mongo-c-driver-1.10.0.tar.gz
cd mongo-c-driver-1.10.0
mkdir cmake-build && cd cmake-build
6. 编译安装
#注意后面是两个..(点号)
cmake3 -DENABLE_AUTOMATIC_INIT_AND_CLEANUP=OFF ..

make -j4

make installldconfig
7. 下载并解压 mongo-cxx-driver
wget https://github.com/mongodb/mongo-cxx-driver/archive/r3.2.0.zip

unzip r3.2.0.zipcd mongo-cxx-driver-r3.2.0
8. 编译安装
cd build

cmake3 -DCMAKE_BUILD_TYPE=Release -DBSONCXX_POLY_USE_BOOST=1 -DCMAKE_INSTALL_PREFIX=/usr/local ..

make -j8

make install
9. 添加 PKG_CONFIG_PATH 环境变量,使用 vim /etc/profile 打开文件,在最下面输入 export PKG_CONFIG_PATH=/usr/local/lib/pkgconfig ,然后 source /etc/profile 应用环境变量

10. 测试libmongocxx库
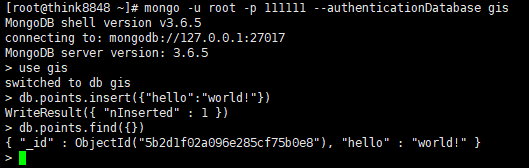
10.1 登录mongodb mongo -u <user> -p <password> --authenticationDatabase <dbname>
10.2 插入测试数据 db.points.insert({"hello": "world!"})
10.3 输入c++测试代码
#include <iostream>

#include <bsoncxx/json.hpp>

#include <mongocxx/instance.hpp>
#include <mongocxx/client.hpp>
#include <mongocxx/cursor.hpp>

int main(int, char**)
{
  mongocxx::instance instance{};
  mongocxx::client client{ mongocxx::uri {"mongodb://root:111111@192.168.1.67:27017/?authSource=gis"}};

  auto collection = client["gis"]["points"];

  auto cursor = collection.find({});

  for(auto &&doc : cursor)
  {
    std::cout << bsoncxx::to_json(doc) << std::endl;
  }
}
10.4 编译c++代码,生成测试程序
g++ -std=c++11 test.cpp -o test $(pkg-config --cflags --libs libmongocxx)
10.5 运行测试程序 ./test
运行结果如下:

----------------------2019.02.21----------------------
经验证:
MongoDB 4.0.6
mongo-c-driver-1.13.1
mongo-cxx-driver-r3.4.0
也可以使用此方法编译安装
此内容由惯性聚合(RSS阅读器)自动聚合整理,仅供阅读参考。 原文来自 — 版权归原作者所有。