






Selenium 由 Jason Huggins 于 2004 年发起,最初名为 JavaScript Testing Framework,后因受到希腊神话中“月亮女神 Selene”的启发而更名为 Selenium。它最初是为了解决网页自动化测试需求而诞生的开源工具,但因其能模拟真实浏览器操作(如点击、输入、滚动等),也被广泛用于网页数据爬取。爬虫工具有很多,例如 BeautifulSoup4,为什么选择自动化测试工具 Selenium 进行爬虫?目前绝大部分 Web 应用都使用 JavaScrip 动态加载数据,而 BeautifulSoup4 只能解析初始页面的 HTML 源码,对于动态加载的数据无法获取,因此使用 Selenium 模拟用户,完成数据加载的操作。
| 场景 | Selenium | BeautifulSoup4 |
|---|---|---|
| 动态网页数据爬取 | ✅ 必须使用,如单页应用、JavaScript 渲染内容。 | ❌ 无法直接处理,需结合其他工具(如 Selenium 获取动态内容后解析)。 |
| 静态网页数据提取 | ⚠️ 可用,但效率较低。 | ✅ 推荐,快速解析固定结构的 HTML/XML。 |
| 登录验证/表单提交 | ✅ 直接模拟用户输入和点击。 | ❌ 需结合 Requests 会话保持,但无法处理 JavaScript 验证。 |
| 跨浏览器兼容性测试 | ✅ 支持多浏览器并行测试(如通过 Selenium Grid)。 | ❌ 无此功能,仅解析 HTML。 |
创建 Python 虚拟环境后,执行命令安装 selenium 包。
pip install selenium
下面以 Edge 浏览器为例:
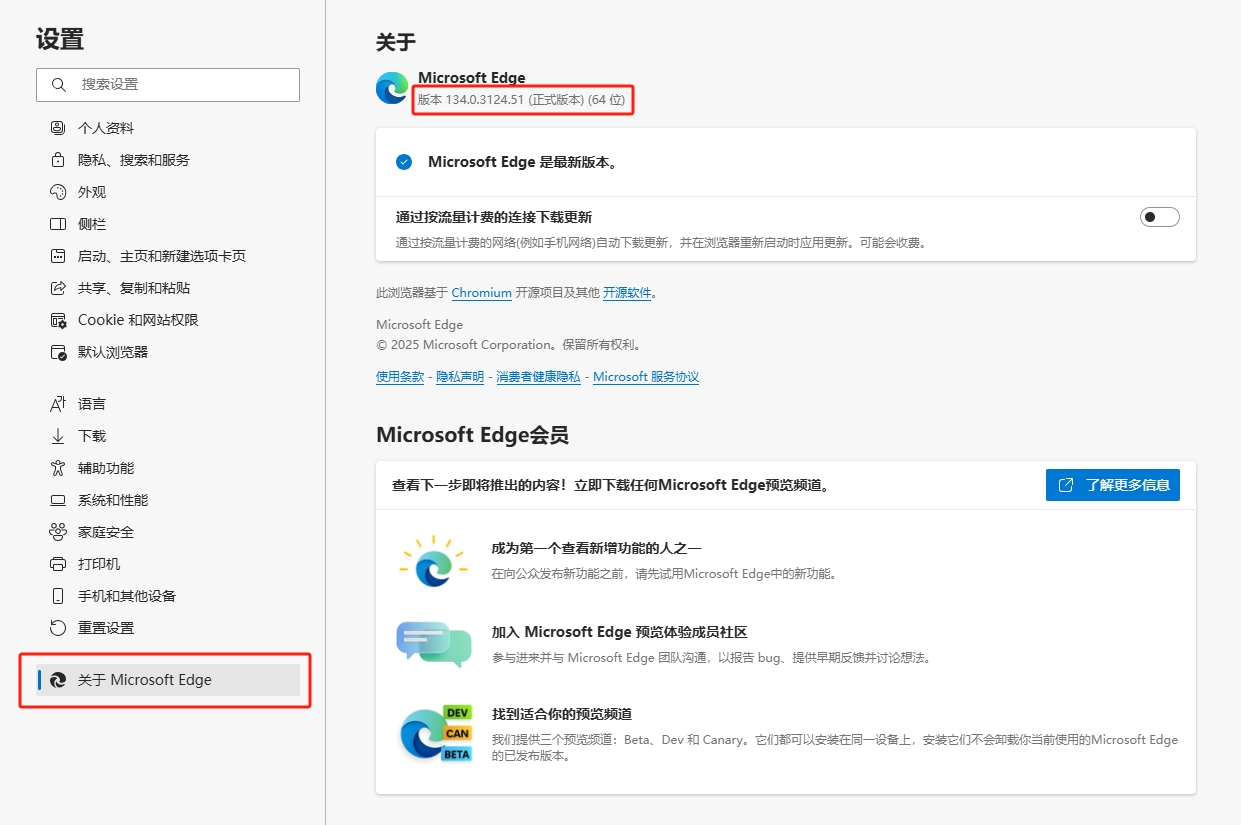

edgedriver.exe 放置在任意已知的目录中或添加到系统环境变量中。from selenium import webdriver
from selenium.webdriver.edge.service import Service
service = Service(executable_path='D:/msedgedriver.exe')
driver = webdriver.Edge(service=service)
WebDriverManager 自动管理驱动:# 安装 WebDriverManager
pip install webdriver-manager
# 使用代码自动下载驱动
from selenium import webdriver
from selenium.webdriver.edge.service import Service
from webdriver_manager.microsoft import EdgeChromiumDriverManager
service = Service(executable_path=EdgeChromiumDriverManager().install())
driver = webdriver.Edge(service=service)
from selenium import webdriver
from selenium.webdriver.edge.service import Service

service = Service(executable_path='D:/msedgedriver.exe')
driver = webdriver.Edge(service=service)
driver.get("https://www.baidu.com/")
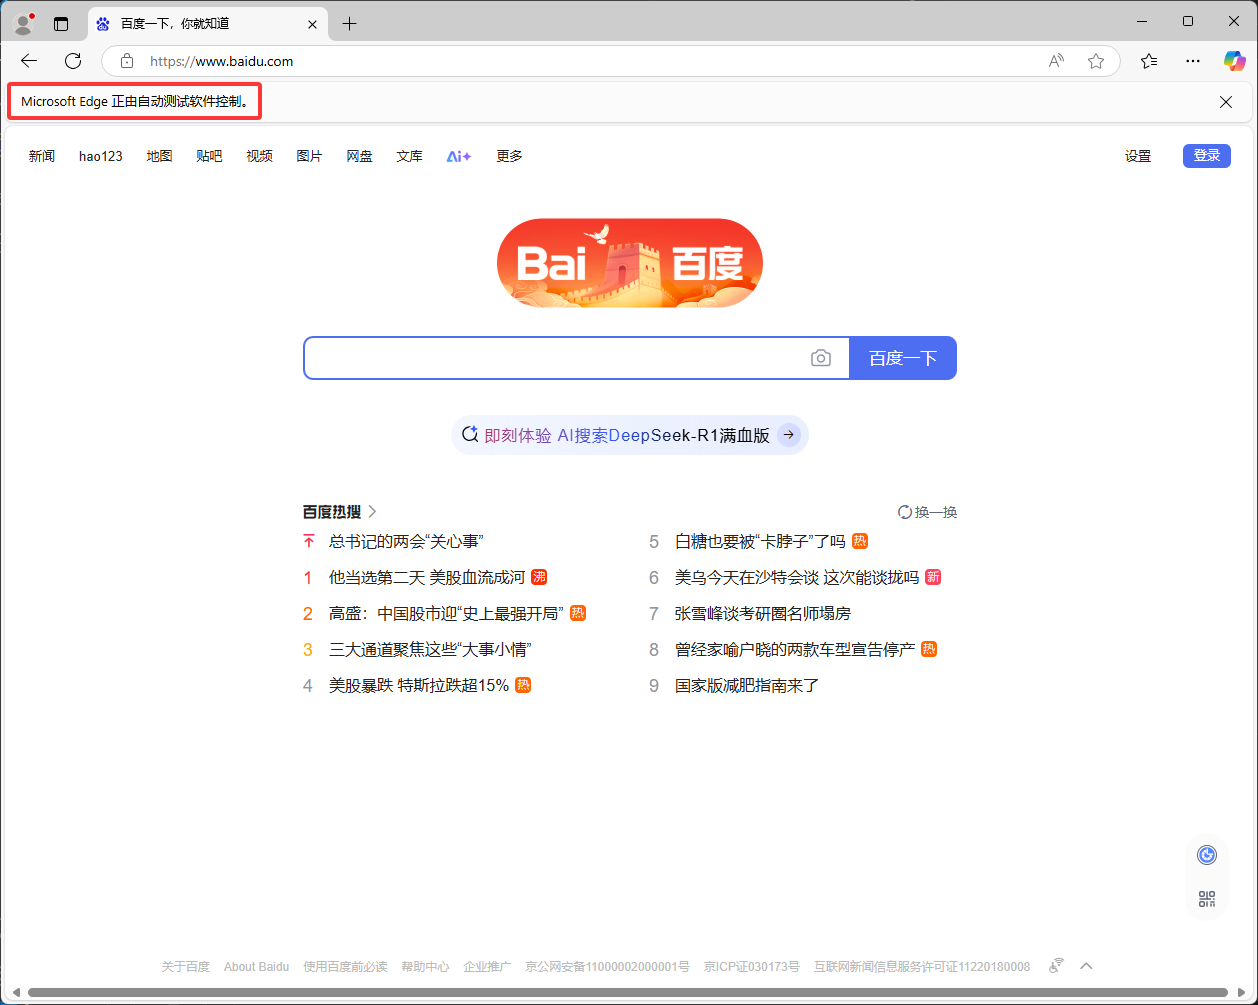
不管是爬虫或者是测试,获取到“感兴趣”的元素才能进行后续的操作。常见的定位方法有这样几种方式:
| 定位方式 | 语法示例 | 适用场景 |
|---|---|---|
| ID | driver.find_element(By.ID, "username") |
通过元素的 id 属性定位,唯一性高,但需要目标元素有 id |
| CSS 选择器 | driver.find_element(By.CSS_SELECTOR, ".login") |
通过 CSS 选择器定位,灵活,适合复杂结构 |
| XPath | driver.find_element(By.XPATH, "//button[@type='submit']") |
通过 XPath 路径定位,精准,但路径易变,维护成本高 |
from selenium.webdriver.common.by import By

element = driver.find_element(By.ID, "su")
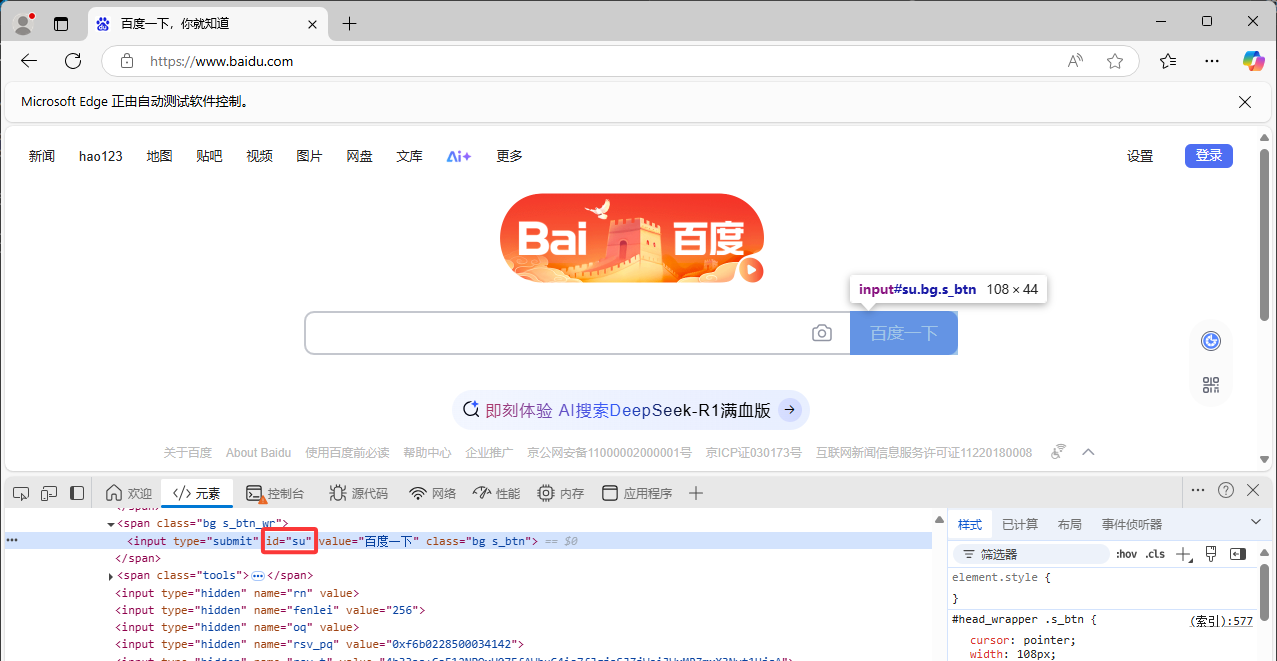
element = driver.find_element(By.CSS_SELECTOR, ".s_btn")
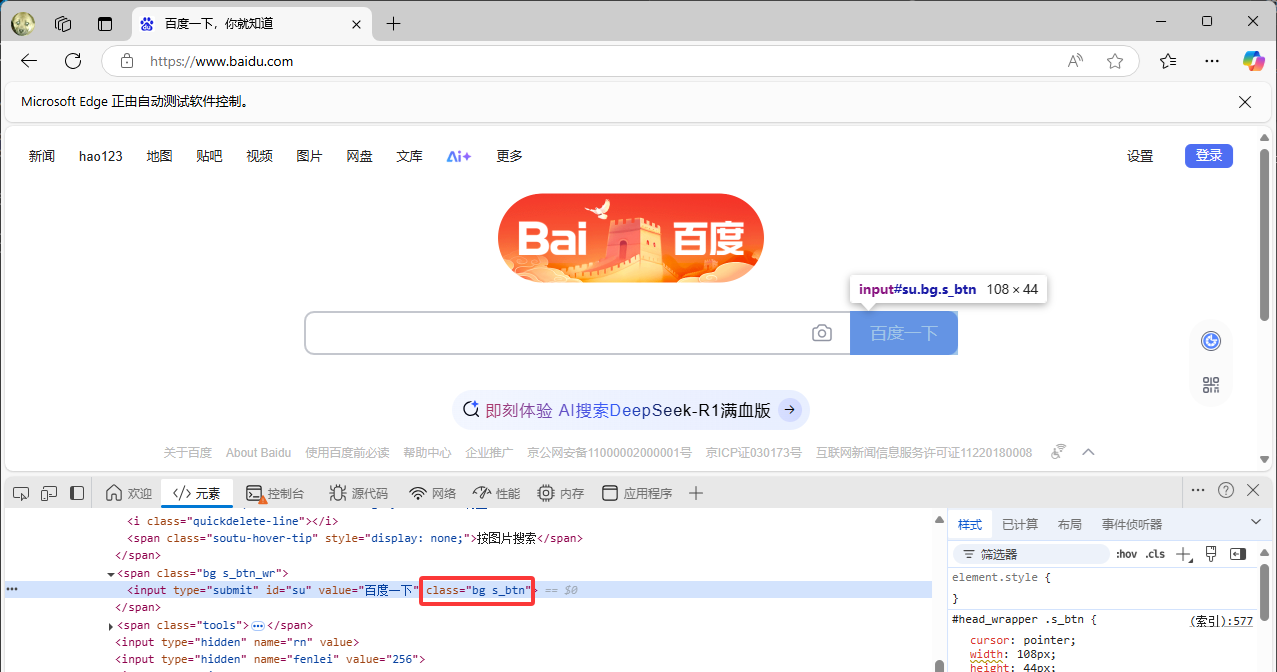
element = driver.find_element(By.XPATH, "//*[@id="su"]")
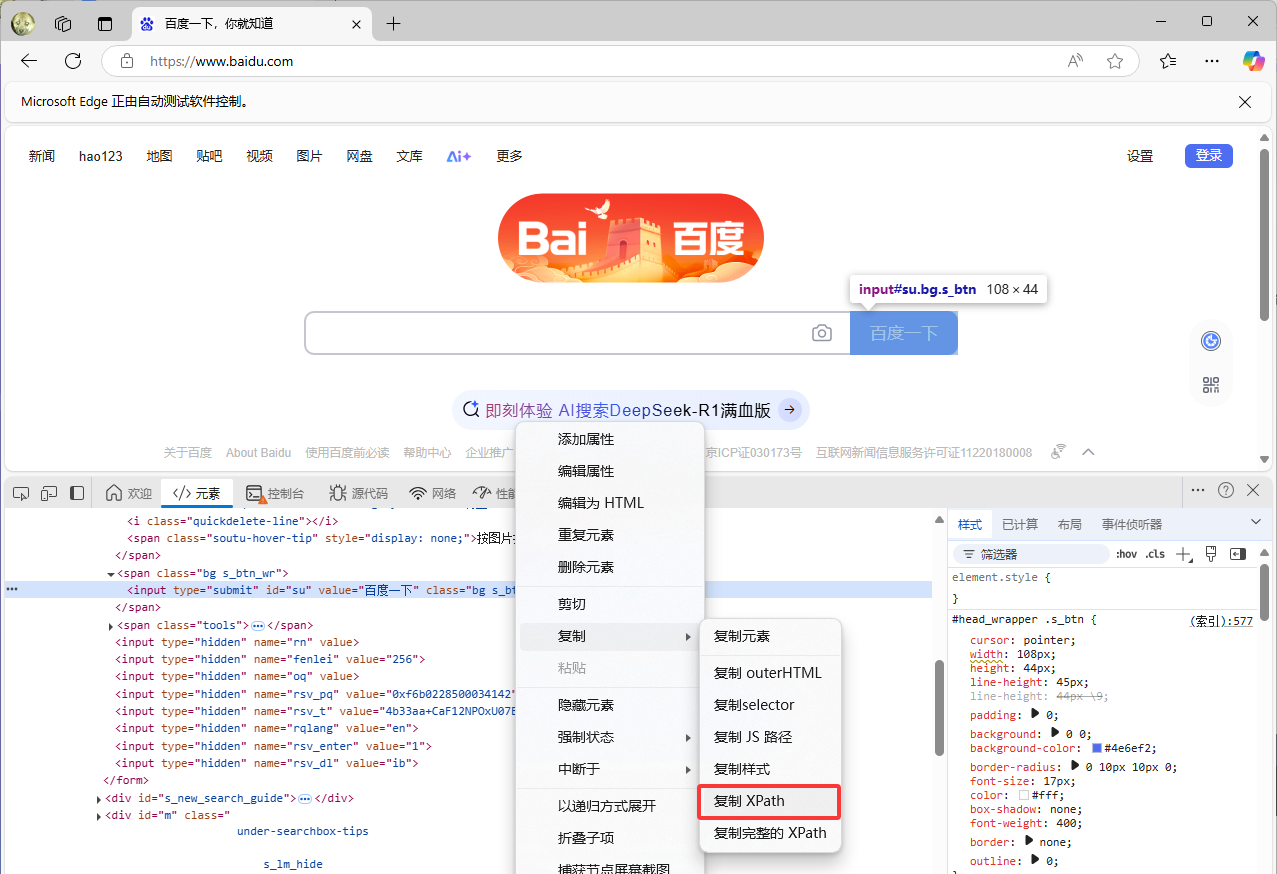
# 获取页面标题
title = driver.title
# 获取元素文本、属性
text = element.text
href = element.get_attribute("href")
# 输入文本
search_input = driver.find_element(By.ID, "kw")
search_input.clear()  # 清除原有内容
search_input.send_keys("电脑玩家张高兴")
# 点击按钮
search_btn = driver.find_element(By.ID, "su")
search_btn.click()

driver.implicitly_wait(10) # 等待 10 秒
Selenium 不会主动的切换窗口,要对新弹出的页面进行操作,需要先调用 switch_to 切换到该页面。
# 获取所有窗口,将页面切换到最新的窗口
windows = driver.window_handles
driver.switch_to.window(windows[-1])
有时网页数据是动态加载的,因此需要执行 JavaScript 代码,完成数据加载这一行为的触发。
# 模拟滚动到底部加载更多内容
driver.execute_script("window.scrollTo(0, document.body.scrollHeight);")
driver.quit()
ActionChains 是 Selenium 提供的一个低级用户交互模拟工具,用于执行复杂的鼠标和键盘操作。它通过构建一系列动作(如鼠标移动、点击、拖拽、键盘按键等)的队列,模拟真实用户的操作流程。
| 方法 | 功能 |
|---|---|
move_to_element(element) |
鼠标悬停在指定元素上 |
click(element) |
点击元素 |
click_and_hold(element) |
按住鼠标左键 |
context_click(element) |
右键点击元素 |
double_click(element) |
双击元素 |
drag_and_drop(source, target) |
拖拽元素到目标位置 |
move_by_offset(x, y) |
从当前位置移动鼠标到相对坐标(x,y) |
key_down(key, element) |
按下某个键(如 Keys.CONTROL),并保持按下状态 |
key_up(key, element) |
松开之前按下的键 |
send_keys(keys) |
向当前焦点元素发送按键 |
下面模拟用户用鼠标点击百度顶部菜单“更多”中的“翻译”条目。

from selenium.webdriver.common.action_chains import ActionChains
# 获取相关元素
menu = driver.find_element(By.CSS_SELECTOR, "#s-top-left > div")
item = driver.find_element(By.CSS_SELECTOR, "#s-top-more > div:nth-child(1) > a")
# 定义动作链
actions = ActionChains(driver)
actions.move_to_element(menu).pause(1).click(item).perform()  # pause(1) 悬停1秒后点击
from selenium.webdriver.common.keys import Keys
# 模拟 Ctrl+C
actions.key_down(Keys.CONTROL).send_keys('c').key_up(Keys.CONTROL).perform()
在使用 Selenium 时,有些时候会因为自动化请求而遇到各种问题,或者想优化爬虫脚本,Options 是一个非常重要的工具,用于定制浏览器的各种行为。
在服务器或无界面环境中运行爬虫,避免显式启动浏览器窗口,节省资源。
from selenium.webdriver.edge.options import Options

options = Options()
options.add_argument("--headless=new")
options.add_argument("--disable-gpu")   # 部分系统需禁用 GPU 避免报错

service = Service(executable_path='D:/msedgedriver.exe')
driver = webdriver.Edge(service=service, options=options)
网站存在弹窗广告、通知提示(如“允许通知”),干扰自动化操作。
options.add_argument("--disable-popup-blocking")  # 禁用弹窗拦截
options.add_argument("--disable-notifications")   # 禁用浏览器通知
options.add_argument("--proxy-server=http://127.0.0.1:8080")
访问的网站使用自签名证书或存在证书错误,导致浏览器报错。
options.add_argument("--ignore-certificate-errors")
浏览器默认安装的扩展(如广告拦截插件)干扰页面加载或元素定位。
options.add_argument("--disable-extensions")  # 禁用所有扩展
options.add_argument("--disable-extensions-except=/path/to/extension")  # 通过扩展 ID 禁用某个扩展
需要模拟特定分辨率或最大化窗口。
options.add_argument("--start-maximized")      # 启动时最大化窗口
options.add_argument("window-size=1920x1080")  # 设置固定窗口大小
options.add_argument("--user-agent=Mozilla/5.0 (Windows NT 10.0; Win64; x64) AppleWebKit/537.36 (KHTML, like Gecko) Chrome/116.0.0.0 Safari/537.36") # 设置User-Agent
options.add_argument("--disable-blink-features=AutomationControlled") # 禁用浏览器指纹
下面将使用 Selenium 库来爬取徐州工业职业技术学院网站上的新闻,并使用 jsonlines 库将爬取的数据输出为 .jsonl 文件。通过这个例子,可以学习到如何使用 Selenium 进行网页抓取、页面滚动控制、元素检查以及如何递归地遍历网站的所有链接。
is_valid(): 检查URL是否属于目标站点的一部分。is_element(): 判断指定元素是否存在。smooth_scrol(): 控制页面平滑滚动,帮助加载所有动态内容。fetch_page_content(url): 获取并返回指定URL的内容。parse_articles_and_links(url): 解析页面中的文章信息和内部链接。crawl(url): 主爬虫逻辑,递归调用自身处理新发现的链接。通过这些函数,实现了从目标网站上自动提取新闻文章的功能,并将结果保存至本地文件。
对于每篇文章,脚本会提取标题、作者、日期和正文内容,并将其格式化后保存到 .jsonl 文件中。这种方法非常适合处理大量数据,因为 .jsonl 文件允许逐行添加记录,而不需要一次性加载整个文件。
with jsonlines.open(os.path.join(file_path, 'articles.jsonl'), mode='a') as f:
    f.write(article)
在这个脚本中,crawl() 函数是核心部分,它负责从一个起始 URL 开始,递归地探索并抓取整个网站的内容,从一个页面开始,提取其所有链接,并对每个新发现的有效链接重复这一过程,直到没有新的链接为止。
def crawl(url):
    """爬取页面"""
    html_content = fetch_page_content(url)
    if not html_content:
        return
    links = parse_articles_and_links(url)
    for link in links:
        crawl(link)  # 递归调用自身处理新链接
在 crawl 函数内部,首先获取当前页面的内容(fetch_page_content),然后分析页面以提取文章信息和所有内部链接(parse_articles_and_links)。对于每一个新找到的有效链接,都会再次调用 crawl 函数进行处理。这样就形成了一个递归的过程,每次调用都进一步深入网站的一个新区域。当某个页面被访问过(存储在 visited_urls 列表中),或者没有更多的有效链接可探索时,对应的 crawl 调用就会结束,程序返回到上一级调用继续执行,直到最初的调用也完成为止。
from selenium import webdriver
from selenium.webdriver.edge.service import Service
from selenium.webdriver.common.by import By
from urllib.parse import urljoin, urlparse
import os
import jsonlines
import re
import time

file_path = "output"
start_url = "https://www.xzcit.cn/"
visited_urls = []  # 已经访问过的URL
articles = []

service = Service(executable_path='D:/msedgedriver.exe')
driver = webdriver.Edge(service=service)

def is_valid(url):
    """检查URL是否属于目标站点"""
    parsed = urlparse(url)
    return bool(parsed.netloc) and 'www.xzcit.cn' in url

def is_element(by, value):
    """检查元素是否存在"""
    try:
        driver.find_element(by, value)
    except:
        return False
    return True

def smooth_scrol(scroll_step=350, wait_time=0.1):
    """
    按照指定步长和等待时间进行页面滚动。
    scroll_step: 每次滚动的像素数
    wait_time: 每次滚动间的等待时间
    """
    driver.execute_script("window.scrollTo({top: 0});")
    # 获取当前文档高度
    last_height = driver.execute_script("return document.body.scrollHeight")
    while True:
        for i in range(0, last_height, scroll_step):
            driver.execute_script(f"window.scrollTo(0, {i});")
            time.sleep(wait_time)  # 控制滚动速度
        new_height = driver.execute_script("return document.body.scrollHeight")
        if new_height == last_height:
            break
        last_height = new_height

def fetch_page_content(url):
    """获取页面内容"""
    if url in visited_urls:
        return None

    print(f"Crawling: {url}")
    visited_urls.append(url)
    try:
        driver.get(url)
    except:
        return None

    smooth_scrol()

    html_content = driver.page_source
    return html_content if html_content else None

def parse_articles_and_links(url):
    """提取文章信息和内部链接"""
    links = []

    try:
        if is_element(By.CLASS_NAME, 'article'):
            title = driver.find_element(By.CLASS_NAME, 'arti_title').text
            body = driver.find_element(By.CLASS_NAME, 'entry')
            author = driver.find_element(By.CLASS_NAME, 'arti_publisher').text.replace('作者:', '')
            dateStr = driver.find_element(By.CLASS_NAME, 'arti_update').text.replace('日期:', '')
            date = time.strftime('%Y年%#m月%#d日', time.strptime(dateStr, '%Y-%m-%d'))
            content = ''
            for p in body.find_elements(By.TAG_NAME, 'p'):
                if p.text != '':
                    content += p.text + '\n'
            content = "".join(re.split('\xa0| ', content))

            if content != '':
                article = {'date': date, 'author': author, 'title': title, 'content': content}
                articles.append(article)
                print(article)
                with jsonlines.open(os.path.join(file_path, 'articles.jsonl'), mode='a') as f:
                    f.write(article)
    except Exception as e:
        print("发生异常:", repr(e))

    # 提取页面中的所有链接
    for a in driver.find_elements(By.TAG_NAME, 'a'):
        link = a.get_attribute("href")
        full_link = urljoin(url, link)
        if is_valid(full_link) and full_link not in visited_urls and full_link not in links :
            links.append(full_link)
            print(full_link)

    return links

def crawl(url):
    """爬取页面"""
    html_content = fetch_page_content(url)
    if not html_content:
        return

    links = parse_articles_and_links(url)

    for link in links:
        crawl(link)  # 递归调用自身处理新链接

if __name__ == '__main__':
    if not os.path.exists(file_path):
        os.makedirs(file_path)

    crawl(start_url)
    driver.quit()
此内容由惯性聚合(RSS阅读器)自动聚合整理,仅供阅读参考。 原文来自 — 版权归原作者所有。