


惯性聚合 高效追踪和阅读你感兴趣的博客、新闻、科技资讯
阅读原文 在惯性聚合中打开

推荐订阅源

B
Blog RSS Feed
L
LangChain Blog
博客园_首页
量子位
Stack Overflow Blog
Stack Overflow Blog
F
Fortinet All Blogs
S
Secure Thoughts
P
Privacy & Cybersecurity Law Blog
H
Help Net Security
T
Threatpost
N
Netflix TechBlog - Medium
Cyberwarzone
Cyberwarzone
P
Proofpoint News Feed
C
Cisco Blogs
G
Google Developers Blog
The GitHub Blog
The GitHub Blog
MyScale Blog
MyScale Blog
让小产品的独立变现更简单 - ezindie.com
I
InfoQ
Cisco Talos Blog
Cisco Talos Blog
A
Arctic Wolf
freeCodeCamp Programming Tutorials: Python, JavaScript, Git & More
cs.AI updates on arXiv.org
C
CERT Recently Published Vulnerability Notes
U
Unit 42
博客园 - 三生石上(FineUI控件)
Recent Commits to openclaw:main
C
CXSECURITY Database RSS Feed - CXSecurity.com
Security Latest
Security Latest
WordPress大学
WordPress大学
T
Tailwind CSS Blog
OSCHINA 社区最新新闻
OSCHINA 社区最新新闻
D
Docker
C
Check Point Blog
TaoSecurity Blog
TaoSecurity Blog
Project Zero
Project Zero
www.infosecurity-magazine.com
SecWiki News
SecWiki News
F
Full Disclosure
S
Security @ Cisco Blogs
T
Tor Project blog
V
V2EX
Y
Y Combinator Blog
S
SegmentFault 最新的问题
cs.CL updates on arXiv.org
GbyAI
GbyAI
B
Blog
Security Archives - TechRepublic
V
Visual Studio Blog
酷 壳 – CoolShell
酷 壳 – CoolShell

博客园 - 编程我的一切

Apache Hop实战:Windows平台MySQL数据迁移的深度排错与性能调优 线程与进程的区别与联系:操作系统入门详解(含 Python 示例) 打破同源枷锁:深入理解 postMessage 跨域通信机制 三大搜索引擎 URL 推送 API 详解:百度、必应、谷歌 PandasAI:当数据分析遇上自然语言处理 Windows 左ctrl和左alt键互换 Bootstrap下拉菜单、按钮式下拉菜单 SSM三大框架的运行流程、原理、核心技术详解 app启动速度怎么提升? canvas画布基本知识点总结 SSM框架整合(Spring + SpringMVC + MyBatis) Lambda入门 Spring boot+CXF开发WebService Demo HTML5中的Web Notification桌面通知 Open3d之交互式可视化 Python3列表、元组及之间的区别和转换 Java 字符串简介 Shell从入门到精通 基于go-cqhttp实现QQ机器人
行为识别TSM训练ucf101数据集
编程我的一切 · 2021-02-08 · via 博客园 - 编程我的一切

序言

最近有个行为检测的需求,打算用行为识别做,纯小白入这个方向,啃了两周的TSM原理和源码,训练好自己的数据集后,发现好像没法应用到自己的需求场景??玛德!算了,还是要记录一下。原理就没别要讲了,网上很多,感兴趣的可以自己去搜。

一、数据准备

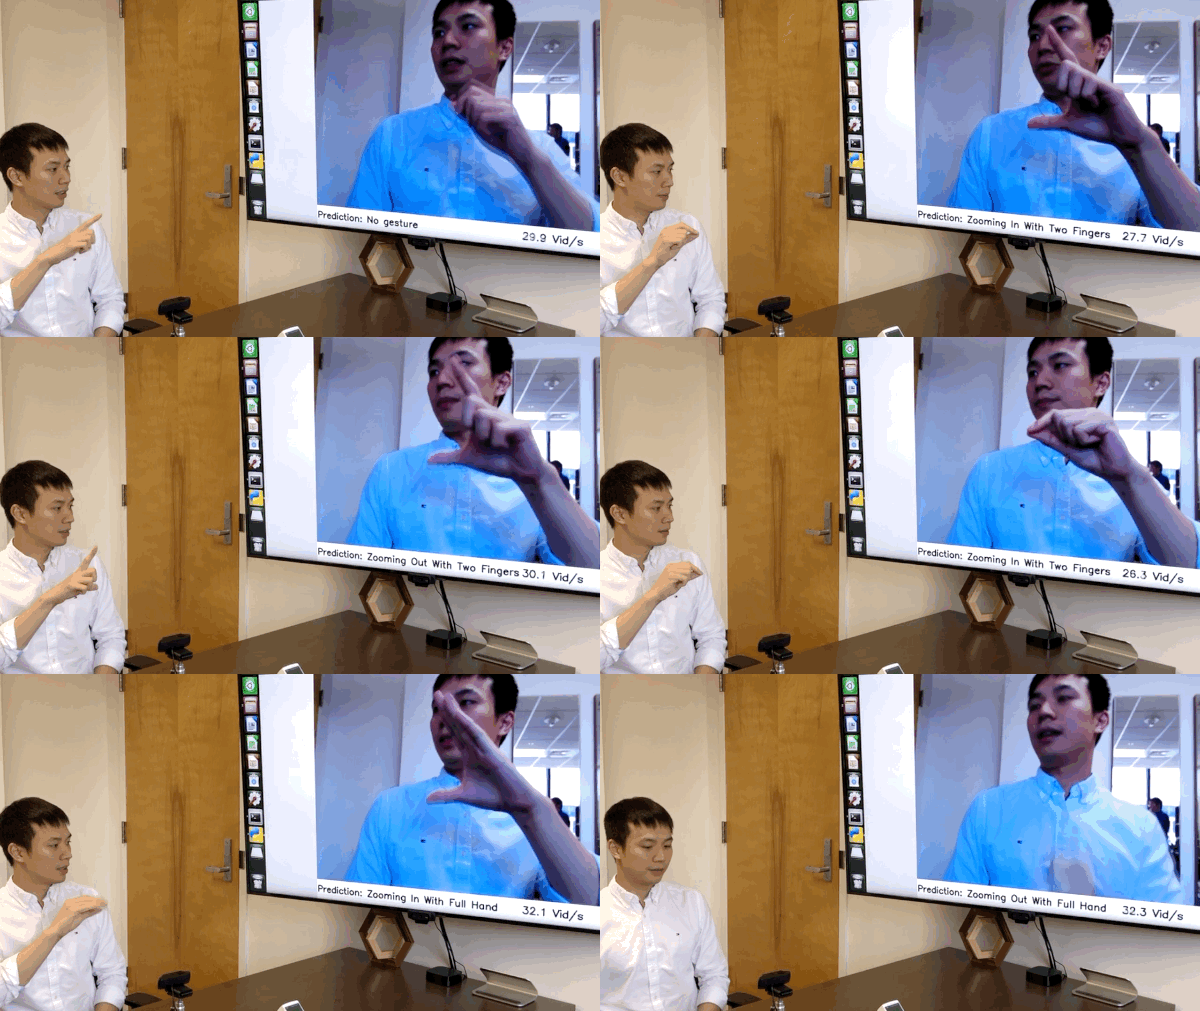
首先把代码git下来temporal-shift-module,然后作者提供了一个mobilenetv2版本的手势识别在线demo,使用了tvm推理,在Jeston Nano能够达到实时,看着还不错的样子,赶紧试一下,可是我没有nano怎么办?没关系,修改一下。
在这里插入图片描述
该demo放在online_demo目录中的main.py文件,可是没有nano,又不想安装tvm怎么办?问题不大,修改一下,用pytorch推理!把改下的模型下载下来,README.md中有提供下载链接,推荐使用迅雷下载。在noline_demo下新建一个demo.py文件,将tvm的那部分推理换成pytorch的推理即可,基于main.py修改后的代码如下:

import torch
from online_demo.mobilenet_v2_tsm import MobileNetV2
import cv2
import numpy as np
import torchvision
from PIL import Image
import time

SOFTMAX_THRES = 1
HISTORY_LOGIT = True
REFINE_OUTPUT = True

shift_buffer = [torch.zeros([1, 3, 56, 56]),
                torch.zeros([1, 4, 28, 28]),
                torch.zeros([1, 4, 28, 28]),
                torch.zeros([1, 8, 14, 14]),
                torch.zeros([1, 8, 14, 14]),
                torch.zeros([1, 8, 14, 14]),
                torch.zeros([1, 12, 14, 14]),
                torch.zeros([1, 12, 14, 14]),
                torch.zeros([1, 20, 7, 7]),
                torch.zeros([1, 20, 7, 7])]


class GroupScale(object):
    """ Rescales the input PIL.Image to the given 'size'.
    'size' will be the size of the smaller edge.
    For example, if height > width, then image will be
    rescaled to (size * height / width, size)
    size: size of the smaller edge
    interpolation: Default: PIL.Image.BILINEAR
    """

    def __init__(self, size, interpolation=Image.BILINEAR):
        self.worker = torchvision.transforms.Scale(size, interpolation)

    def __call__(self, img_group):
        return [self.worker(img) for img in img_group]


class GroupCenterCrop(object):
    def __init__(self, size):
        self.worker = torchvision.transforms.CenterCrop(size)

    def __call__(self, img_group):
        return [self.worker(img) for img in img_group]


class Stack(object):

    def __init__(self, roll=False):
        self.roll = roll

    def __call__(self, img_group):
        if img_group[0].mode == 'L':
            return np.concatenate([np.expand_dims(x, 2) for x in img_group], axis=2)
        elif img_group[0].mode == 'RGB':
            if self.roll:
                return np.concatenate([np.array(x)[:, :, ::-1] for x in img_group], axis=2)
            else:
                return np.concatenate(img_group, axis=2)


class ToTorchFormatTensor(object):
    """ Converts a PIL.Image (RGB) or numpy.ndarray (H x W x C) in the range [0, 255]
    to a torch.FloatTensor of shape (C x H x W) in the range [0.0, 1.0] """

    def __init__(self, div=True):
        self.div = div

    def __call__(self, pic):
        if isinstance(pic, np.ndarray):
            

在这里插入图片描述
个人隐私打个码,不得不吐槽的是,效果真的不太行。。。。我想说的是这个demo也太辣鸡了吧,虽然不知道作者是咋训练的,亦或是因为我pytorch推理的原因哪里没设置好,如果有按照教程用tvm推理测试的带佬,效果可以评论区告知一下。好了,不纠结这个了,进入正题!

二、数据准备

我的数据是按照ucf101的格式准备的,如果手头上没有数据的同学,建议从ucf101中抽出10个类简单训练一下,没必要用全部的101个类,因为一会抽帧抽出来的图片实在是太多了!!全部的话得有150万+。

很头大的是,程序里面没有提供ucf101格式的数据准备脚本!!可是我踏马没有接触过行为识别啊,完全不知道数据该怎么准备!!靠!硬着头皮翻了很多不同模型的行为识别模型的代码,慢慢的整理,终于整出来了,妈卖批。首先看下ucf101下下来后的文件结构:
在这里插入图片描述
其实就是101的文件夹,每个文件夹里面有每个动作的短视频。类似于
在这里插入图片描述
这是数据文件,还需要标签文件,官方划分训练集和测试集的txt文件:
在这里插入图片描述
因为这里只提取了10个类,提取了前十个类的视频文件,并且修改label里面的标签,将后91个类别的标签信息去掉。在tools文件夹中新建一个文件夹,取名vid2img_ucf101.py,代码如下(需要安装ffmpeg,因为要用它来抽帧,这个自行百度就好,比较简单):

from __future__ import print_function, division
import os
import sys
import subprocess

def class_process(dir_path, dst_dir_path, class_name):
  class_path = os.path.join(dir_path, class_name)
  if not os.path.isdir(class_path):
    return

  dst_class_path = os.path.join(dst_dir_path, class_name)
  if not os.path.exists(dst_class_path):
    os.mkdir(dst_class_path)

  for file_name in os.listdir(class_path):
    if '.avi' not in file_name:
      continue
    name, ext = os.path.splitext(file_name)
    dst_directory_path = os.path.join(dst_class_path, name)

    video_file_path = os.path.join(class_path, file_name)
    try:
      if os.path.exists(dst_directory_path):
        if not os.path.exists(os.path.join(dst_directory_path, 'image_00001.jpg')):
          subprocess.call('rm -r \"{}\"'.format(dst_directory_path), shell=True)
          print('remove {}'.format(dst_directory_path))
          os.mkdir(dst_directory_path)
        else:
          continue
      else:
        os.mkdir(dst_directory_path)
    except:
      print(dst_directory_path)
      continue
    cmd = 'ffmpeg -i \"{}\" -vf scale=-1:480 \"{}/image_%05d.jpg\"'.format(video_file_path, dst_directory_path)
    print(cmd)
    subprocess.call(cmd, shell=True)
    print('\n')

if __name__=="__main__":
  dir_path = sys.argv[1]      

运行命令,如果没有报错的话,要等比较久:

python tools/vid2img_ucf101.py 视频路径 抽帧后图片存放路径

抽完后,再继续新建一个gen_label_ucf101.py文件,内容如下,一些路径自己修改,需要注意的是数据生成是在windows上,所以在linux的话.split(’\’)可能要修改一下:

import os
import glob
import fnmatch
import random

root = r"/ssd1/cai/TSM-action/UCF101/jpg/"      

最后得到六个txt文件如下,这里只用到了split_1.txt的即可,其他的可以删掉:
在这里插入图片描述
每个文件的格式如下,图片路径、帧数、类别:
在这里插入图片描述

三、配置修改

修改以下配置,在ops/dataset_config.py中修改为自己文件的路径:
在这里插入图片描述

其中ROOT_DATASET为图片的总路径,与train_split_1.txt衔接的完整的图片路径,需要自己修改。

配置完成后下载相应的预训练权重,运行训练命令:

python main.py ucf101 RGB --arch resnet --num_segment 8 --gd 20 --lr 0.001 --lr_steps 10 20 --epochs 25 --batch-size 16 -j 16 --dropout 0.8 --consensus_type=avg --eval-freq=1 --shift --shift_div=8 --shift_place=blockres --tune_from=pretrained/TSM_kinetics_RGB_resnet50_shift8_blockres_avg_segment8_e50.pth

python main.py ucf101 RGB --arch mobilenetv2 --num_segment 8 --gd 20 --lr 0.001 --lr_steps 10 20 --epochs 25 --batch-size 16 -j 16 --dropout 0.8 --consensus_type=avg --eval-freq=1 --shift --shift_div=8 --shift_place=blockres --tune_from=pretrained/TSM_kinetics_RGB_mobilenetv2_shift8_blockres_avg_segment8_e100_dense.pth

看到如下界面的话,训练开始;
在这里插入图片描述

不过这里可能会遇到个问题,如果使用mobilenetv2的预训练权重加载不上,在main文件中,将这部分替换一下,大概在97行左右:

    if args.tune_from:
        print(("=> fine-tuning from '{}'".format(args.tune_from)))
        sd = torch.load(args.tune_from)
        sd = sd['state_dict']
        if args.arch == "mobilenetv2":
            model_dict = model.module.state_dict()
        else:
            model_dict = model.state_dict()
        replace_dict = []
        for k, v in sd.items():
            if k not in model_dict and k.replace('.net', '') in model_dict:
                print('=> Load after remove .net: ', k)
                replace_dict.append((k, k.replace('.net', '')))
        for k, v in model_dict.items():
            if k not in sd and k.replace('.net', '') in sd:
                print('=> Load after adding .net: ', k)
                replace_dict.append((k.replace('.net', ''), k))

        for k, k_new in replace_dict:
            sd[k_new] = sd.pop(k)
        keys1 = set(list(sd.keys()))
        keys2 = set(list(model_dict.keys()))

        set_diff = (keys1 - keys2) | (keys2 - keys1)

        print('#### Notice: keys that failed to load: {}'.format(set_diff))
        if args.dataset not in args.tune_from:  

在这里插入图片描述

最后训练完了,精度还不错,百分之99点多,可是要怎么输入视频测试呢??这就是这个程序里面最操蛋的地方!!连个纯视频输入的demo都没有,又要自己写,不得不说这个代码看了我两周,写的太乱了,看的我脑阔疼,要放假了,下回再说。