










1. 一台公网服务器(需要不被服务商限制发件收件的,也就是端口25、110、143、465、587、993、995不被限制),如有防火墙或安全组需要把这些端口开放
2. 一个域名,最好是com cn org的一级域名
3. 域名备案(如果服务器是国外的则不需要备案)
选择域名,如abc.com
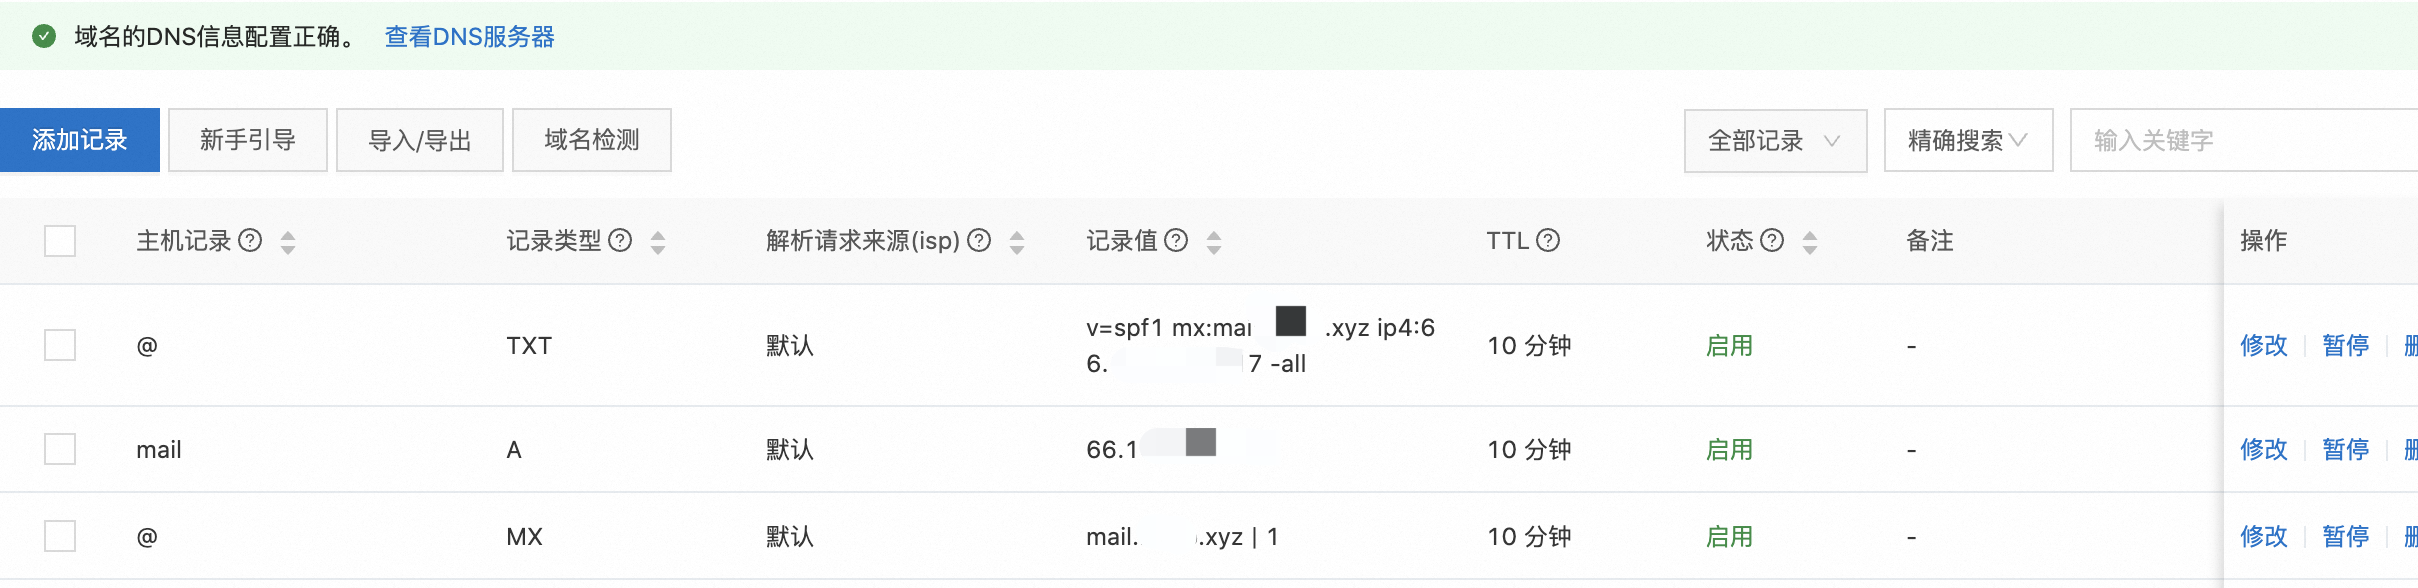
①. 添加MX记录
- 记录类型:MX
- 主机记录:@
- 记录值:mail.abc.com
- MX优先级:1
②添加A记录
- 记录类型:A
- 主机记录:mail
- 记录值:服务器IP
- TTL:10分钟
③添加SPF记录
- 记录类型:TXT
- 主机记录:@
- 记录值:v=spf1 mx:mail.abc.com ip4:服务器IP -all
- TTL:10分钟
最后完成如下图
yum update -y
yum -y install postfix dovecot  cyrus-sasl
(1). 创建证书
[root@mail ~]# cd

# 生成私钥
[root@mail ~]# openssl genrsa -des3 -out server.key 2048
Enter pass phrase:    #输入密码
Verifying - Enter pass phrase:  #重复输入密码

#下面这个步骤是删除server.key中的密码
[root@mail ~]# openssl rsa -in server.key -out server.key.insecure
Enter pass phrase for server.key:  #输入刚才设置的密码
writing RSA key

#重命名证书
[root@mail ~]# mv server.key server.key.secure
[root@mail ~]# mv server.key.insecure server.key

# 生成CSR(证书签名请求)
[root@mail ~]# openssl req -new -key server.key -out server.csr
Enter pass phrase for server.key: #输入刚才设置的密码
You are about to be asked to enter information that will be incorporated into your certificate request.
What you are about to enter is what is called a Distinguished Name or a DN.
There are quite a few fields but you can leave some blank
For some fields there will be a default value,
If you enter '.', the field will be left blank.
-----
Country Name (2 letter code) [XX]:CN #国家简称
State or Province Name (full name) []:Beijing #省
Locality Name (eg, city) [Default City]:Beijing  #城市
Organization Name (eg, company) [Default Company Ltd]:OPS  #公司名
Organizational Unit Name (eg, section) []:OPS   #部门名
Common Name (eg, your name or your server's hostname) []:mail.abc.com
Email Address []:admin@abc.com
Please enter the following 'extra' attributes
to be sent with your certificate request
A challenge password []:  #直接按Enter
An optional company name []:  #直接按Enter

#生成自签名证书
[root@mail ~]# openssl x509 -req -days 3650 -in server.csr -signkey server.key -out server.crt
Enter pass phrase for server.key:  #直接按Enter
Certificate request self-signature ok
subject=C = CN, ST = Beijing, L = Beijing, O = OPS, OU = OPS, CN = mail.abc.com, emailAddress = admin@abc.com
Getting Private key

#设置权限
[root@mail ~]# chmod 400 server.*
(2). 创建完成把证书拷贝到系统证书目录
# 创建目录
mkdir -p /etc/ssl/private/
# 拷贝
sudo cp server.crt /etc/ssl/certs
sudo cp server.key /etc/ssl/private
(1). 修改主配置
vim /etc/postfix/main.cf

# 修改以下项,注释的解开,不要有重复项
# 设置为 mail.域名
myhostname = mail.abc.com
# 设置为 域名
mydomain = abc.com
# 往外发邮件的邮件域
myorigin = $mydomain
#监听的网卡
inet_interfaces = all
inet_protocols = ipv4
#服务的对象
mydestination = $myhostname, $mydomain, localhost.$mydomain, localhost
#邮件存放的目录
home_mailbox = Maildir/

# 新添加以下配置
#--------自定义(下面可以复制粘贴到文件最后面,用于设置服务器验为主,第一行设置发送附件大小)
#message_size_limit = 100000
smtpd_sasl_auth_enable = yes
smtpd_sasl_security_options = noanonymous,noplaintext
mynetworks = 127.0.0.0/8
smtpd_recipient_restrictions = permit_mynetworks,permit_sasl_authenticated,reject_unauth_destination

smtpd_sasl_type = dovecot
smtpd_sasl_path = private/auth
smtpd_sasl_local_domain = $myhostname
smtpd_sasl_tls_security_options = noanonymous
broken_sasl_auth_clients = yes

relayhost =
smtpd_relay_restrictions = permit_mynetworks permit_sasl_authenticated defer_unauth_destination
smtpd_use_tls = yes
smtpd_tls_cert_file = /etc/ssl/certs/server.crt
smtpd_tls_key_file = /etc/ssl/private/server.key
smtpd_tls_security_level = may
smtp_tls_note_starttls_offer = yes
smtpd_tls_loglevel = 1
smtpd_tls_received_header = yes
smtpd_tls_auth_only = yes
(2). 配置开启smtps
vim /etc/postfix/master.cf

# 分别把下列配置前面的#去掉
smtps     inet  n       -       n       -       -       smtpd
  -o smtpd_tls_wrappermode=yes
  -o smtpd_sasl_auth_enable=yes
  -o smtpd_recipient_restrictions=permit_sasl_authenticated,reject
  -o milter_macro_daemon_name=ORIGINATING
(3). 最后检查Postfix配置是否正确
(1). 修改主配置文件
vim /etc/dovecot/dovecot.conf

# 注释的解开注释,不要有重复项
protocols = imap pop3 lmtp
listen = *, ::

# 以下内容添加到文件最后
mail_location = maildir:~/Maildir
(2). 设置邮箱目录
vim /etc/dovecot/conf.d/10-mail.conf

# 设置mail_location为
mail_location = maildir:~/Maildir
(3). 配置SSL证书
vim /etc/dovecot/conf.d/10-ssl.conf

====================
ssl_cert = </etc/dovecot/private/dovecot.pem
ssl_key = </etc/dovecot/private/dovecot.key
改成
ssl_cert = </etc/ssl/certs/server.crt
ssl_key = </etc/ssl/private/server.key
====================
(4). 配置sasl认证以及SSL端口
vim /etc/dovecot/conf.d/10-master.conf

====================
  # Postfix smtp-auth
  unix_listener /var/spool/postfix/private/auth {
    mode = 0660
    user = postfix
    group = postfix
  }

====================
  inet_listener imap {
    #port = 143
  }
改成
  inet_listener imap {
    #port = 143
    port = 0
  }
====================
service pop3-login {
  inet_listener pop3 {
    #port = 110
  }
}
改成
service pop3-login {
  inet_listener pop3 {
    #port = 110
    port = 0
  }
}
====================
(5). 配置认证
vim /etc/dovecot/conf.d/10-auth.conf

auth_mechanisms = plain  改成  auth_mechanisms = plain login
(6). 配置dovecot服务消除master.pid报错
vim /usr/lib/systemd/system/dovecot.service

# Type=forking后添加
ExecStartPost=/bin/sh -c 'chown root:dovecot /var/run/dovecot/master.pid'

# 加载系统服务
systemctl daemon-reload
sudo yum install -y rsyslog
# 设置开机自启动
sudo systemctl enable rsyslog
# 启动
sudo systemctl start rsyslog

#后续查看邮件服务日志方式(需要重启postfix和dovecot)
tail -f /var/log/maillog
(1). 启动并设置开机自启
#启动
sudo systemctl start postfix
sudo systemctl start dovecot

#设置开机自启动
sudo systemctl enable postfix
sudo systemctl enable dovecot
后续需要重启命令为
sudo systemctl restart postfix
sudo systemctl restart dovecot
查看运行状态命令为
sudo systemctl status postfix
sudo systemctl status dovecot
(2). 查看服务端口启动是否完整
netstat -lntp
如图25 465 993 995端口正常启动

sudo yum install -y mailx

#======测试发件======
echo '搭建邮件服务器成功啦!!!' | mail -s '通知!' xxx@qq.com
(1). 创建账号
useradd -m 用户名
passwd 用户名
# 输入密码
# 确认密码
(2). 验证账号
sudo doveadm auth test 用户名
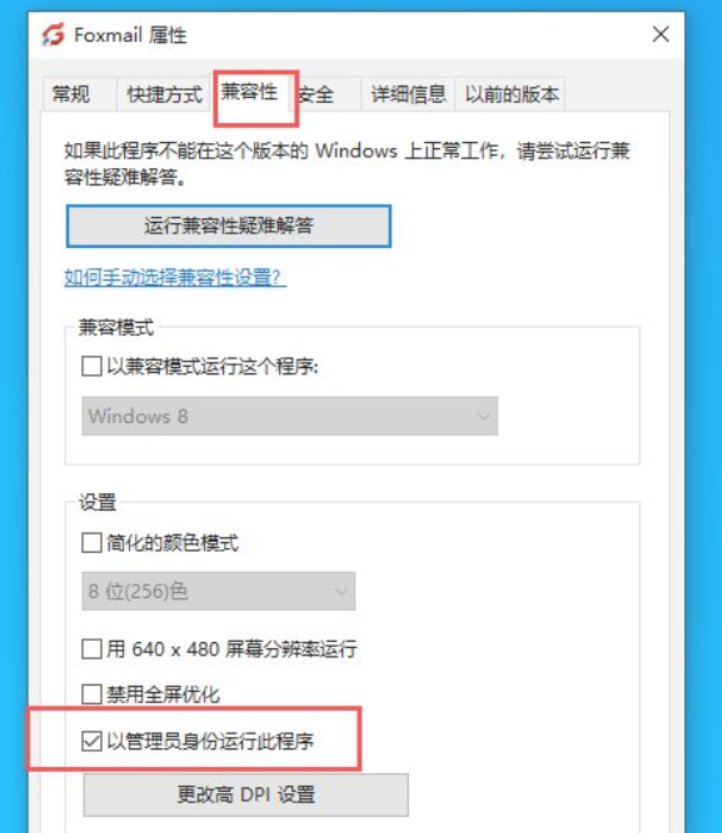
首先找到Foxmail快捷方式,右键属性。
找到兼容性,并且在下方找到“以管理员身份运行此程序”,勾选,确定
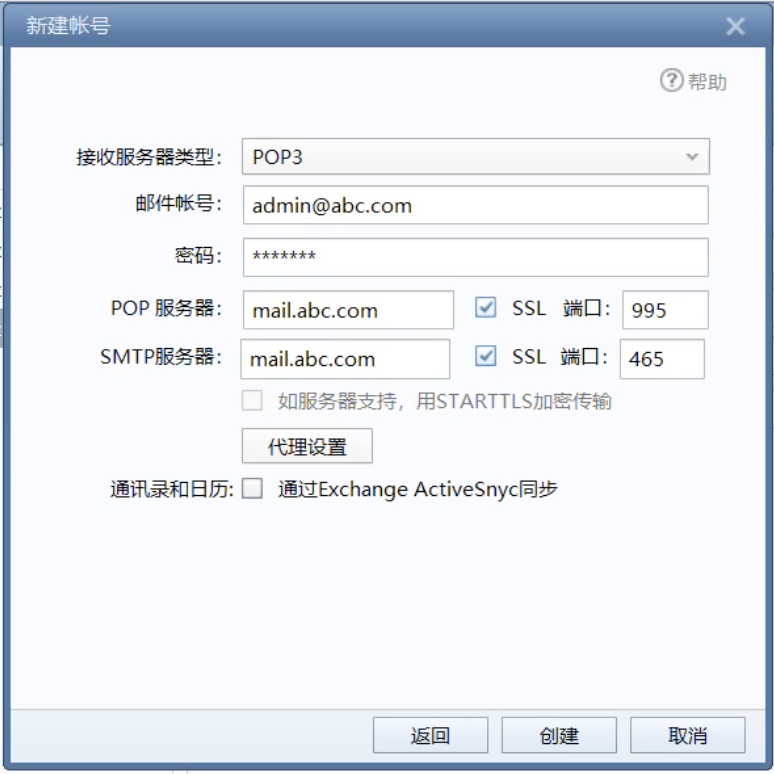
打开Foxmail,新建账号 => 其它邮箱 => 手动设置 => POP3
邮件账号:账号@abc.com
密码:xxxxxx
POP服务器:mail.abc.com SSL 995(勾选)
SMTP服务器:mail.abc.com SSL 465(勾选)
注:虽然发件服务(SMTP)启用了SSL走的端口是465,但是实测25端口还得开放,不然无法接收外部邮件
ubuntu系统参考:https://www.cnblogs.com/007sx/p/18347813
此内容由惯性聚合(RSS阅读器)自动聚合整理,仅供阅读参考。 原文来自 — 版权归原作者所有。