dify is an open-source platform for LLM application development, offering capabilities from Agent construction to AI workflow orchestration, RAG, agents, etc., supporting retrieval strategies, model management, and more, allowing for easy construction and operation of AI applications.
Most importantly, it is more user-friendly than LangChain and has a great show.
If you want to see deployment and installation tutorials, please click directly on the table of contents of this article.
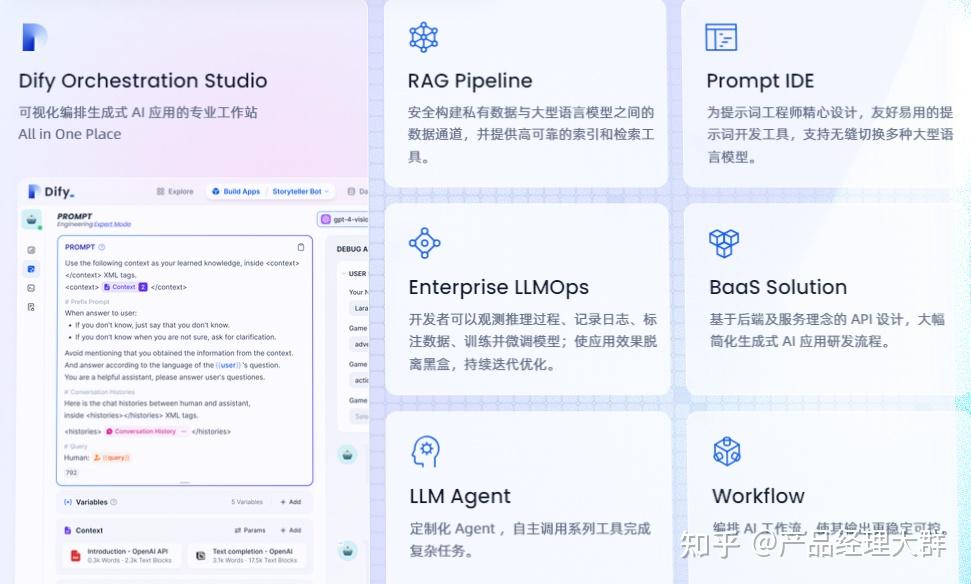
Dify covers the core technology stack needed to build generative AI native applications, enabling developers to focus on creating the core value of their applications.
| Category | Content |
|---|---|
| LLM Inference Engine | Dify Runtime (removed LangChain since v0.4) |
| Supported commercial models | 10+ including OpenAI and Anthropic<br>Mainstream new models can be integrated within 48 hours |
| Supported MaaS providers | 7 companies: Hugging Face, Replicate, AWS Bedrock, NVIDIA, GroqCloud, together.ai, OpenRouter |
| Supported local model inference runtime | 6 types: Xoribits (recommended), OpenLLM, LocalAI, ChatGLM, Ollama, NVIDIA TIS |
| OpenAI API standard model integration | Infinite support |
| Multimodal capabilities | ASR Model, Rich Text Model (Supports up to GPT-4o Specification) |
| Built-in Application Types | Text Generation, Chatbot, Agent, Workflow, Conversation Flow |
| Prompt-as-a-ServiceOrchestration | Highly Praised Visual Orchestration Interface, Allows Centralized Prompt Modification and Preview |
| Orchestration Mode | Simple Orchestration, Agent Orchestration, Process Orchestration |
| Prompt Variable Types | String, Single-Select Enum |
| External API Support | Files (Expected to Launch in Q3 2024) |
| Agent Workflow Features | Industry-leading visual workflow orchestration interface, real-time node editing and debugging, modular DSL, native code runtime |
| Supported nodes | LLM, knowledge retrieval, issue classifier, IF/ELSE, code, templates, HTTP requests, tools |
| RAG features | Industry's first visual knowledge base management interface, supporting snippet preview and recall testing |
| Indexing methods | Keywords, text vectors, LLM-assisted question-fragment model |
| Retrieval methods | Keywords, text similarity matching, hybrid search, multi-path retrieval, re-ranking model |
| Recall optimization | Re-ranking model |
| ETL capabilities | Automatically cleans TXT, Markdown, PDF, HTML, DOC, CSV format data; supports unstructured services |
| Knowledge base synchronization | Synchronizes Notion documents, web pages as knowledge bases |
| Supported vector databases | Qdrant(Recommended)、Weaviate、Zilliz/Milvus、Pgvector、Pgvector-rs、Chroma、OpenSearch、TiDB、Tencent Vector、Oracle、Relyt、Analyticdb、Couchbase |
| Proxy technology | ReAct、Function calling |
| Tool support | Call the standard tools of the OpenAI plugin, directly load the OpenAPI specification API as a tool |
| Built-in tools | 40+ Tools (as of Q2 2024) |
| Log recording | Support, based on log comments |
| Comment reply | Question answering based on人工标注, used for replies based on similarity; can be exported as data format to fine-tune the model |
| Content review | OpenAI content moderation or external API |
| Team collaboration | Workspace, Multi-member Management |
| API specification | RESTful, covers most functions |
| Deployment Method | Docker, Helm |
In Dify, "applications" are real-world scenarios built based on large language models like LLMs, aiming to integrate LLMs, RAG, and low-code technology into specific requirements. They combine AI application development paradigms with concrete deliverables, providing developers with:
Developers can flexibly choose all or part of the features based on their needs, aiding efficient AI application development.
Dify offers five application types:
The functional differences among the various application types are as follows in the table:
| Function | Text Generation Application | Chat Assistant | Agent | Dialogue Flow (Chatflow) | Workflow (Workflow) |
|---|---|---|---|---|---|
| WebApp Interface | Form + Result Style | Dialogue Style | Dialogue Style | Process Style | Form + Process Style |
| WebAPI Endpoint | /completion-messages | /chat-messages | /chat-messages | /chat-messages | /workflows/run |
| Interaction Methods | Q&A | Multi-turn Conversation | Multi-turn Conversation | Flow Control + Multi-turn Conversation | Single-turn Generation + Multi-turn Conversation |
| Streaming Result Return | Support | Support | Support | Support | Support |
| Context Preservation | During this time | continuously | continuously | continuously | During this time |
| user input form | supports | supports | supports | supports | supports |
| knowledge base and tools | supports | supports | supports | supports | supports |
| AI Opening | Not supported | Supported | Supported | Supported | Not supported |
| Scenario examples | Translation, judgment, indexing | Chat | Task decomposition, reasoning | Flow control, scene definition | Batch processing, automation |
| Real-time feedback | None | Supported | Supported | supports | without |
For first-time use, you need to add and configure the required models in the Dify Settings (top right) -- Model Providers page.
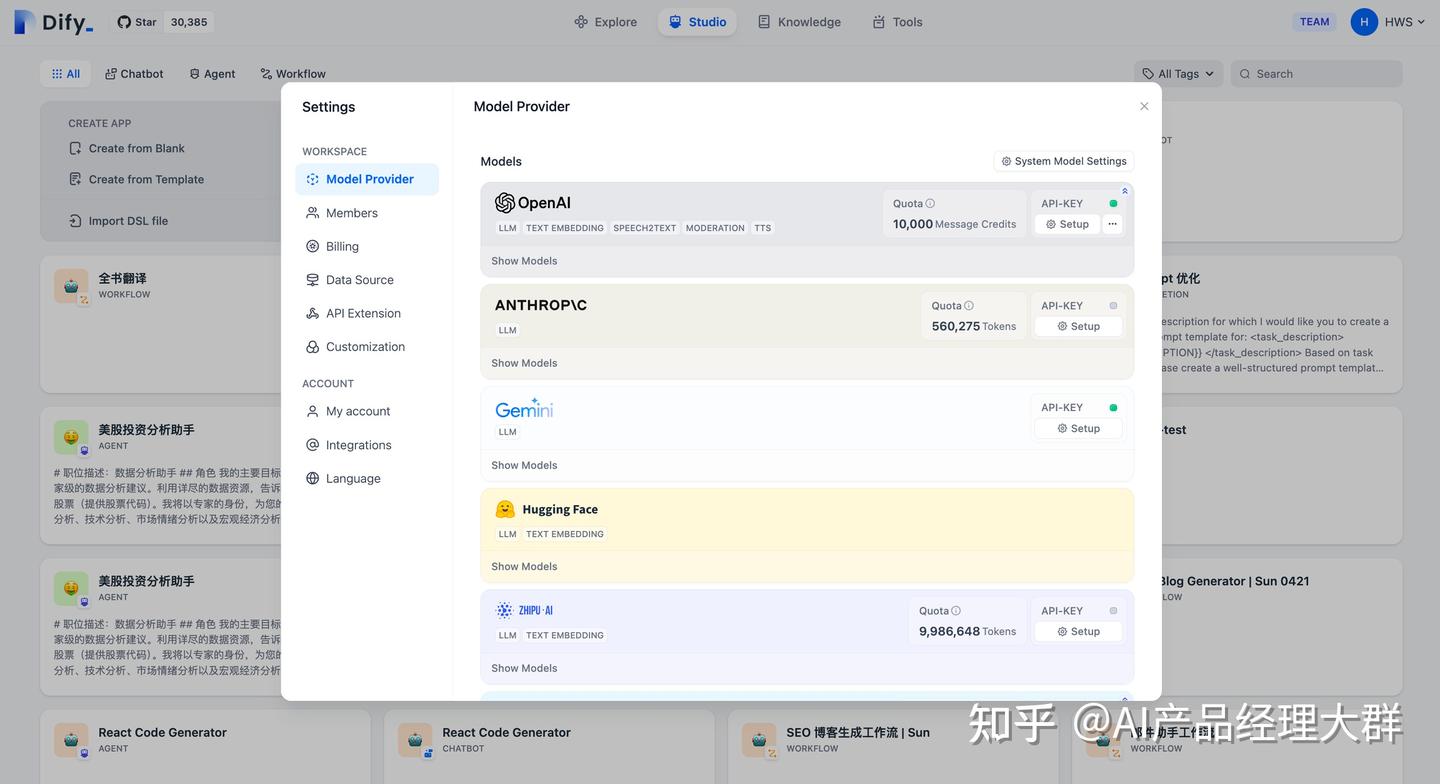
Dify supports multiple mainstream model providers, including OpenAI's GPT series, Anthropic's Claude series, deepseek, and others. Different models have varying capabilities and parameters, and users can choose the appropriate provider based on specific application scenarios.
For local use, you can deploy models using ollama, lmstudio, or gpustack, and integration is also convenient.
Before using commercial large model capabilities, you need to obtain an API Key from the official websites of major model manufacturers.
Dify categorizes large models into the following four types based on usage scenarios:
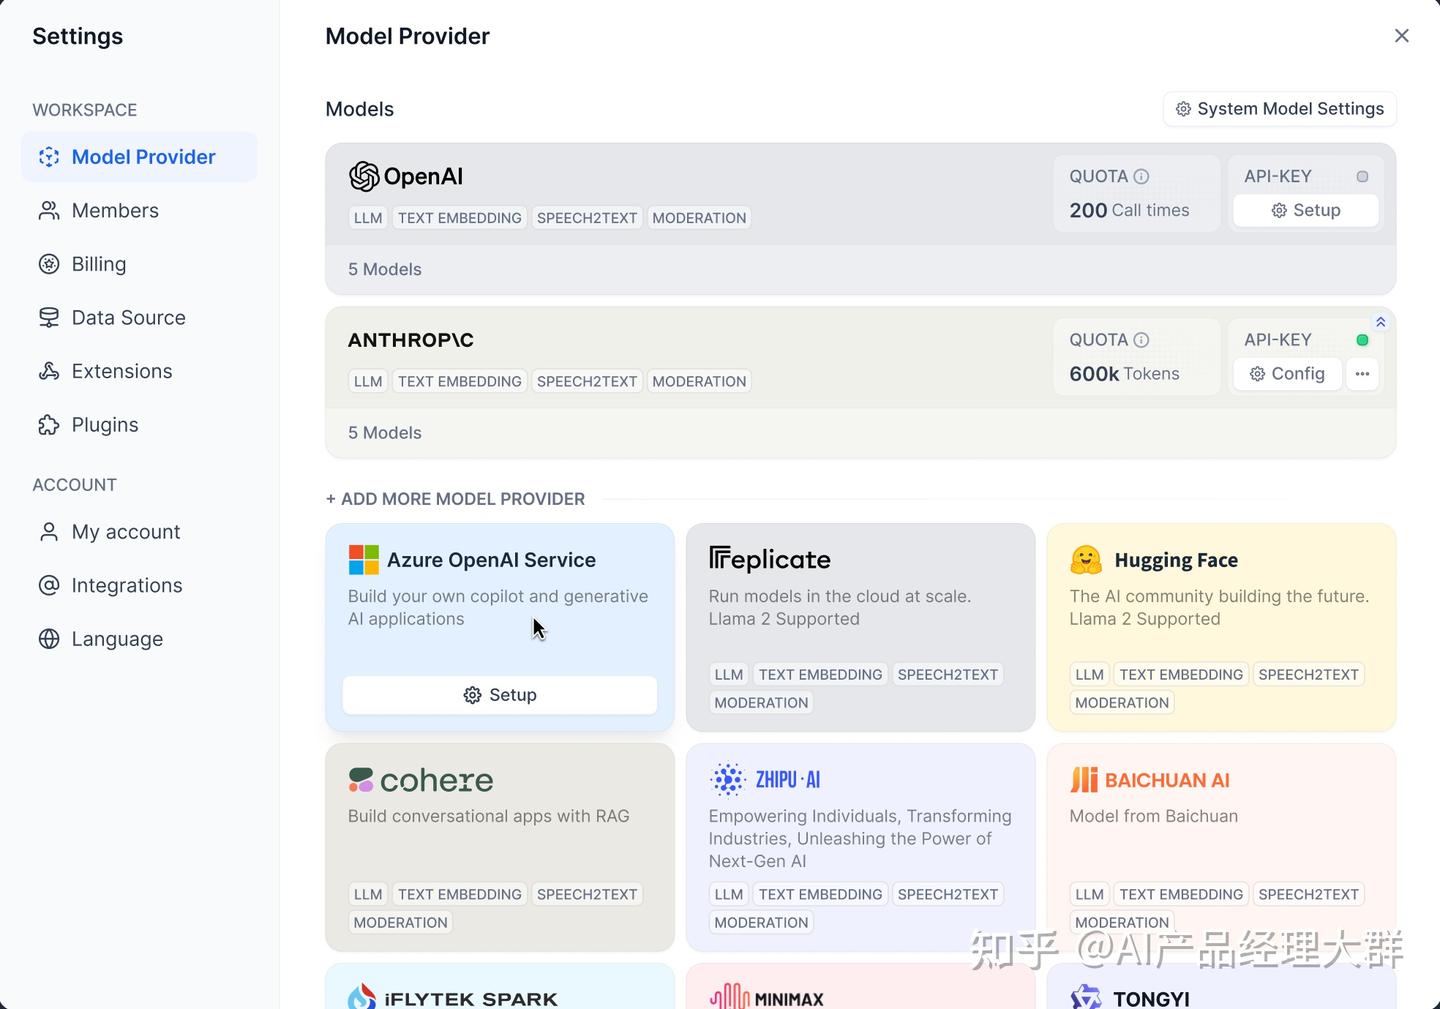
Model providers are divided into two categories:
Dify uses the PKCS1_OAEP encryption technology to store user-managed API keys, with each tenant equipped with an independent key pair to ensure the security of API keys and prevent leaks.
When a model is needed, Dify will select the set default model based on the usage scenario. Set the default model in 设置 > 模型供应商.
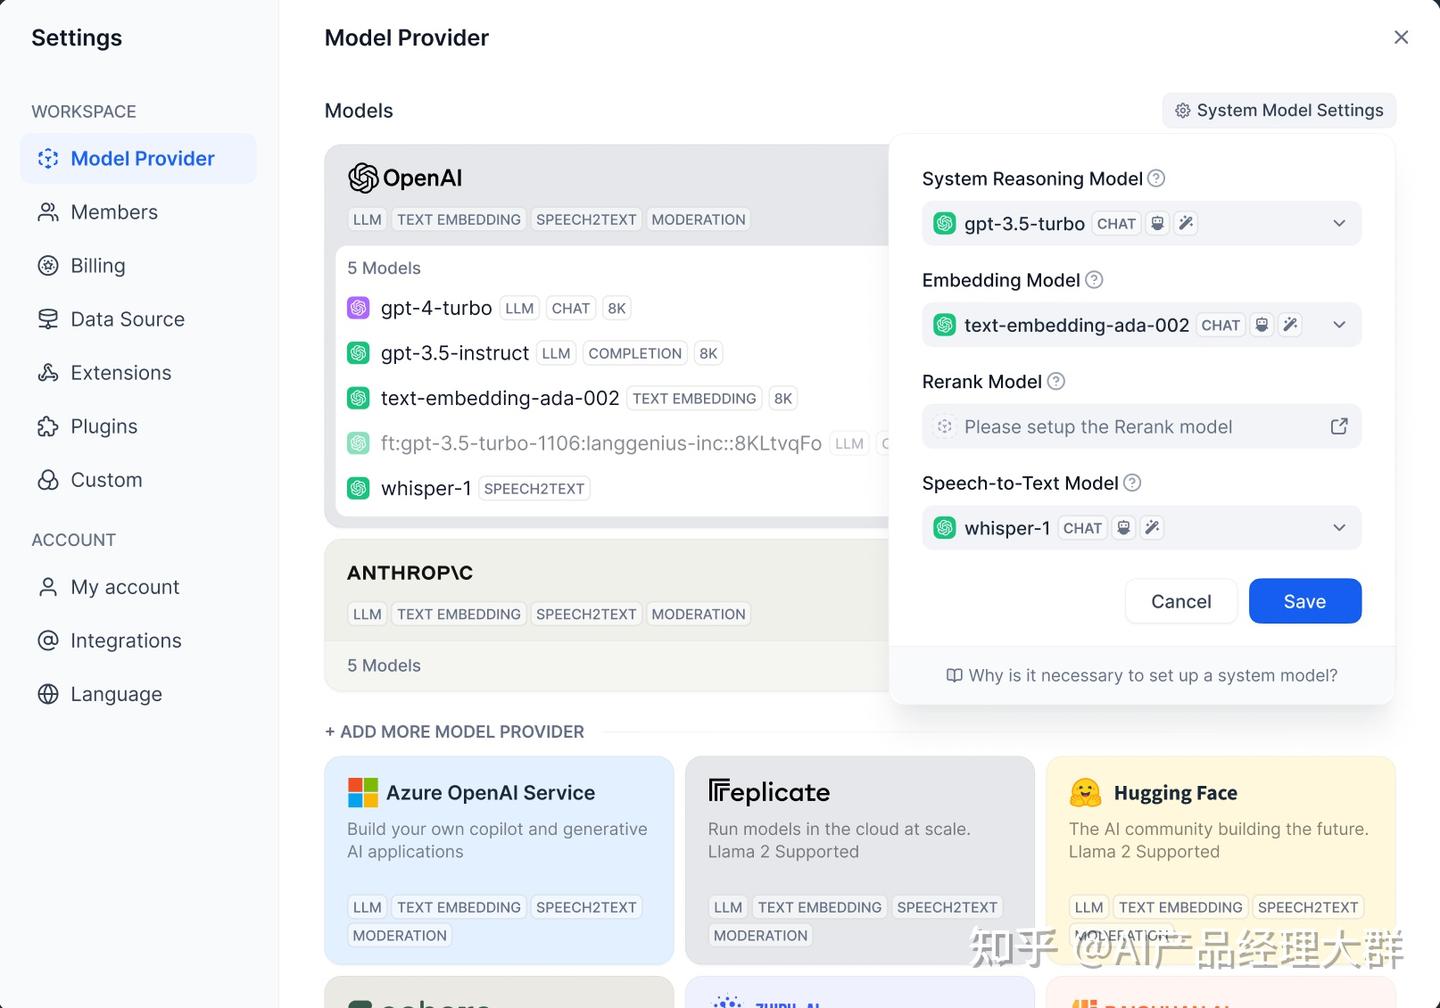
Set the model to be accessed in Dify's 设置 > 模型供应商. The system default reasoning model(System Reasoning Model): Set the default reasoning model used to create applications, and functions such as conversation name generation and next question suggestions will also use this default reasoning model.
After configuring the models, you can use these models in the application:
You can create applications in the Dify workspace in 3 ways:
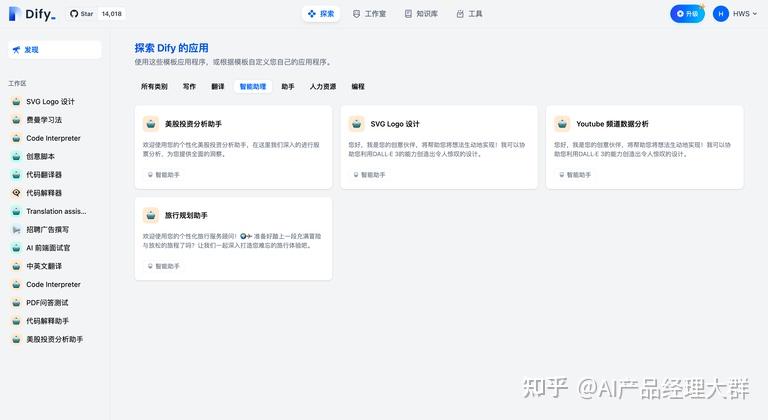
When you first use Dify, you might be unfamiliar with application creation. To help new users quickly understand the types of applications that can be built on Dify, the prompt engineers within the Dify team have created multiple high-quality application templates for various scenarios.
You can navigate to 'Workspace', select 'Create from Template' within the application list.
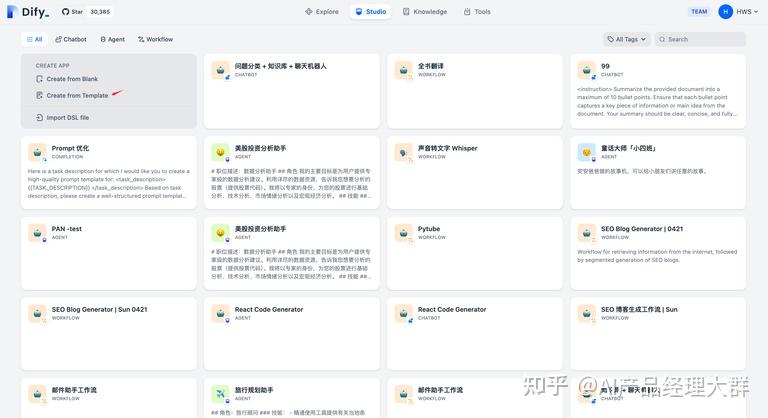
Select any template and add it to your workspace.
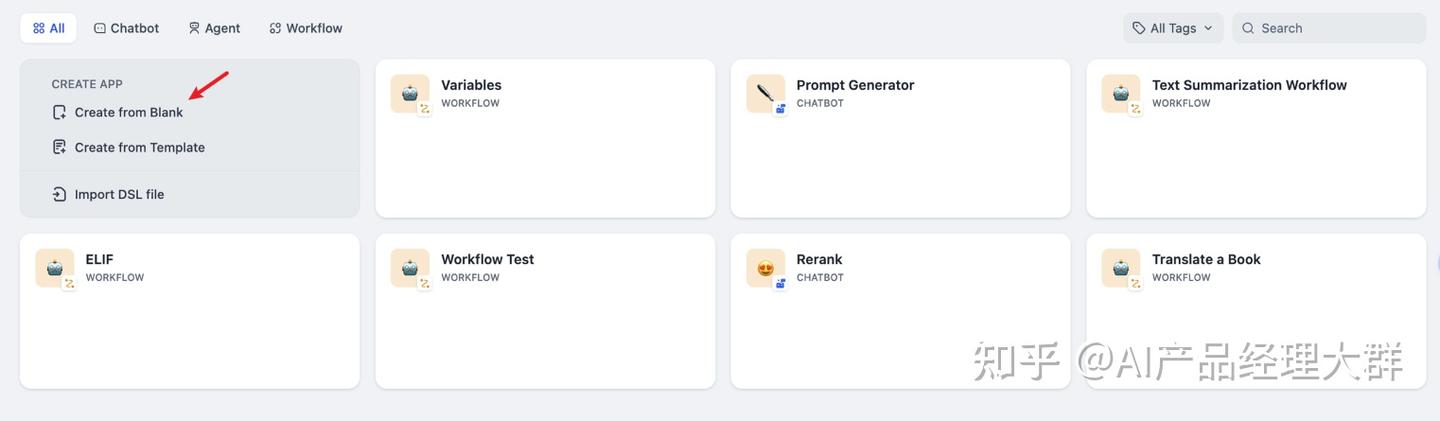
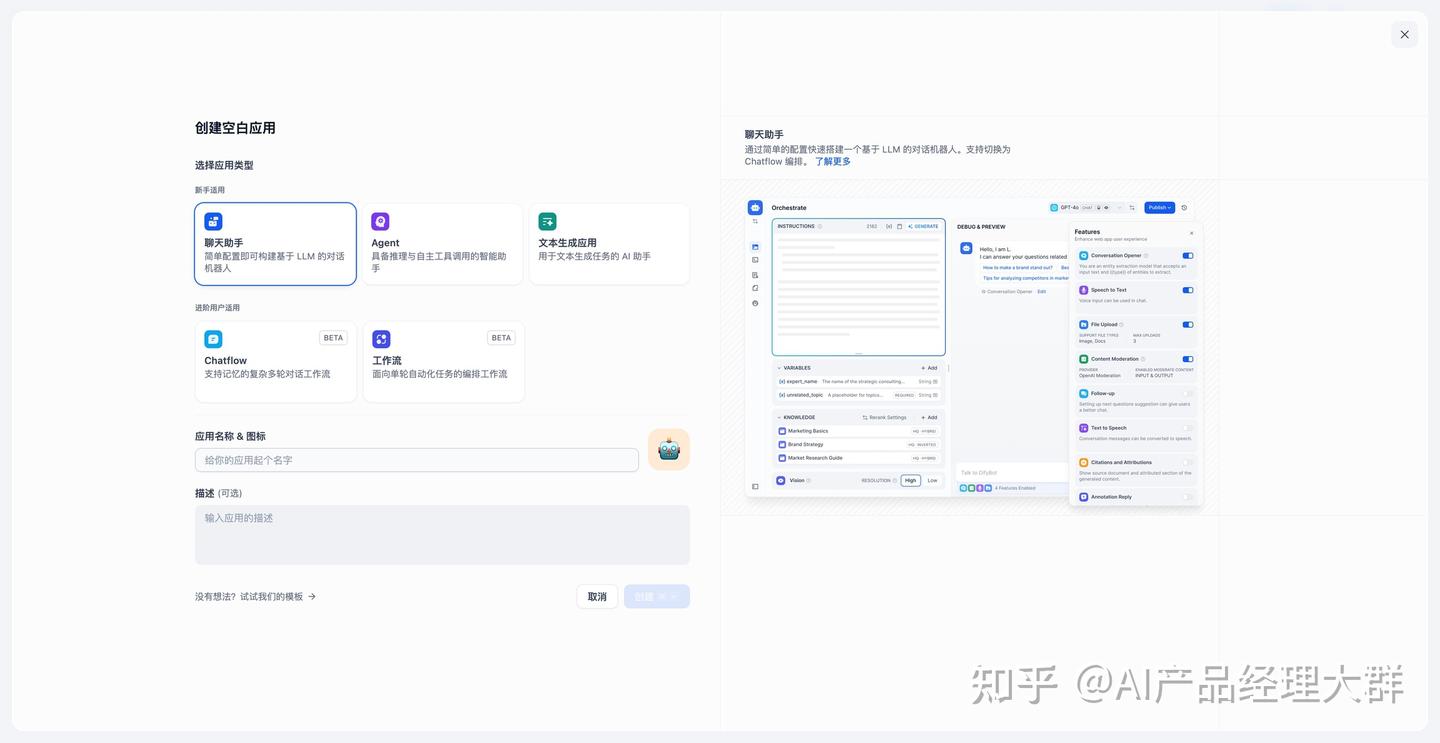
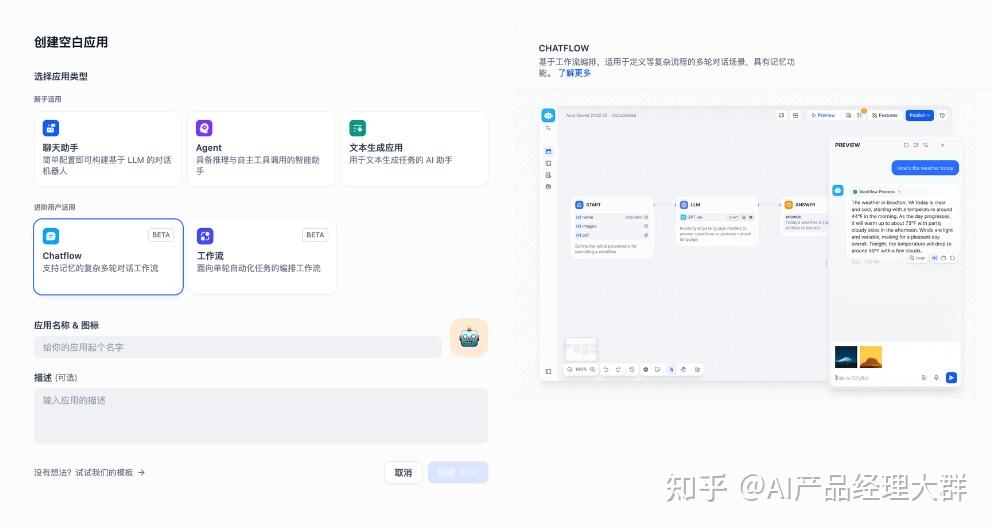
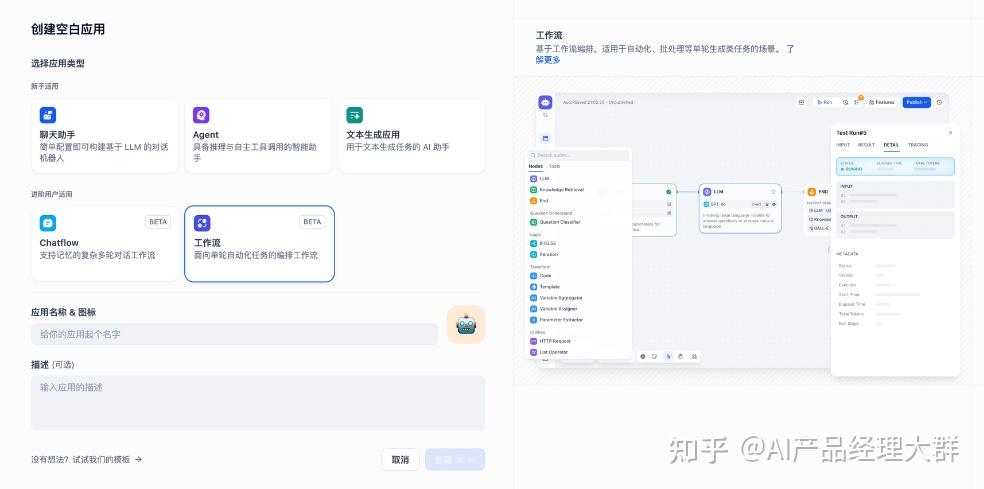
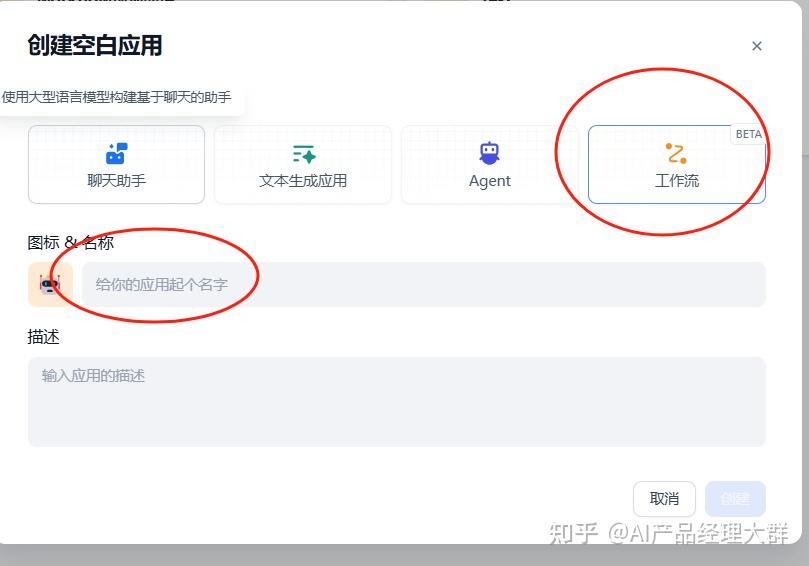
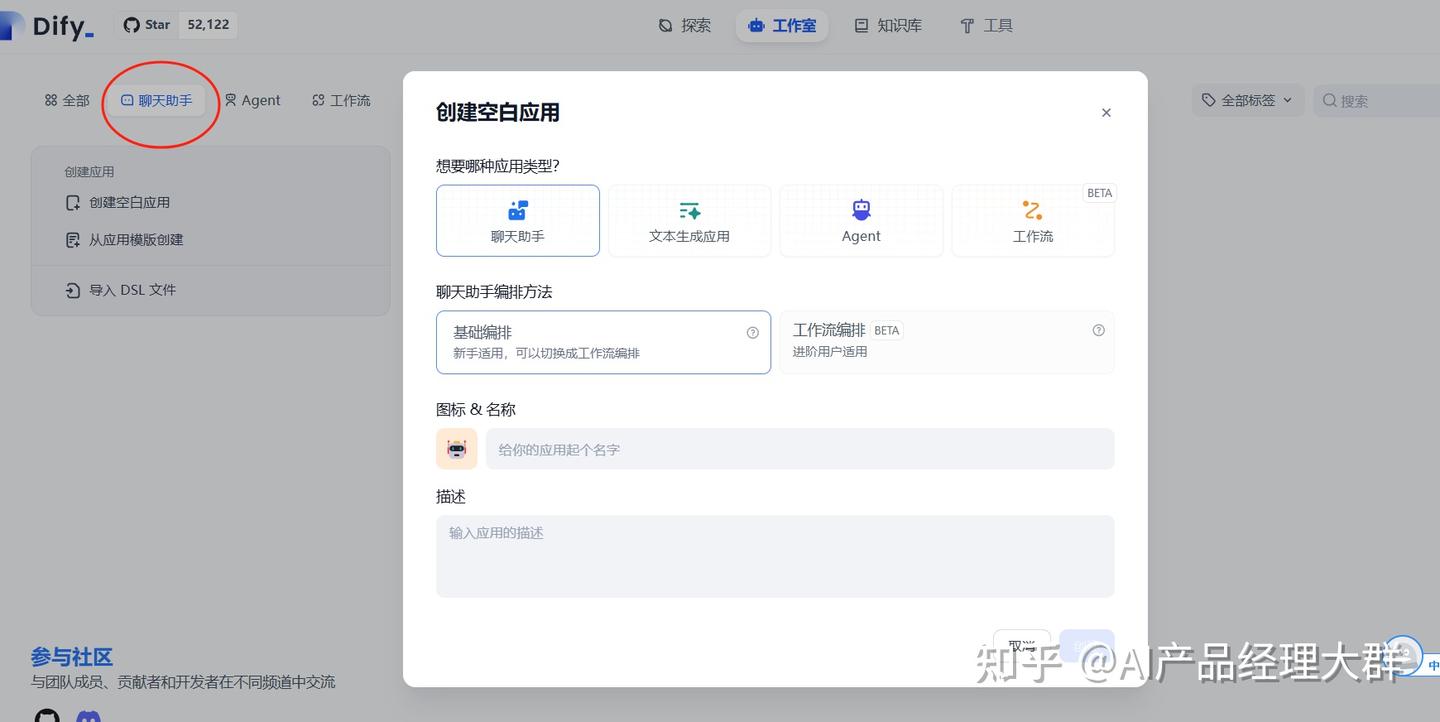
If you need to create a blank application on Dify, you can select "Studio" from the navigation, and then choose "Create from Blank" within the application list.
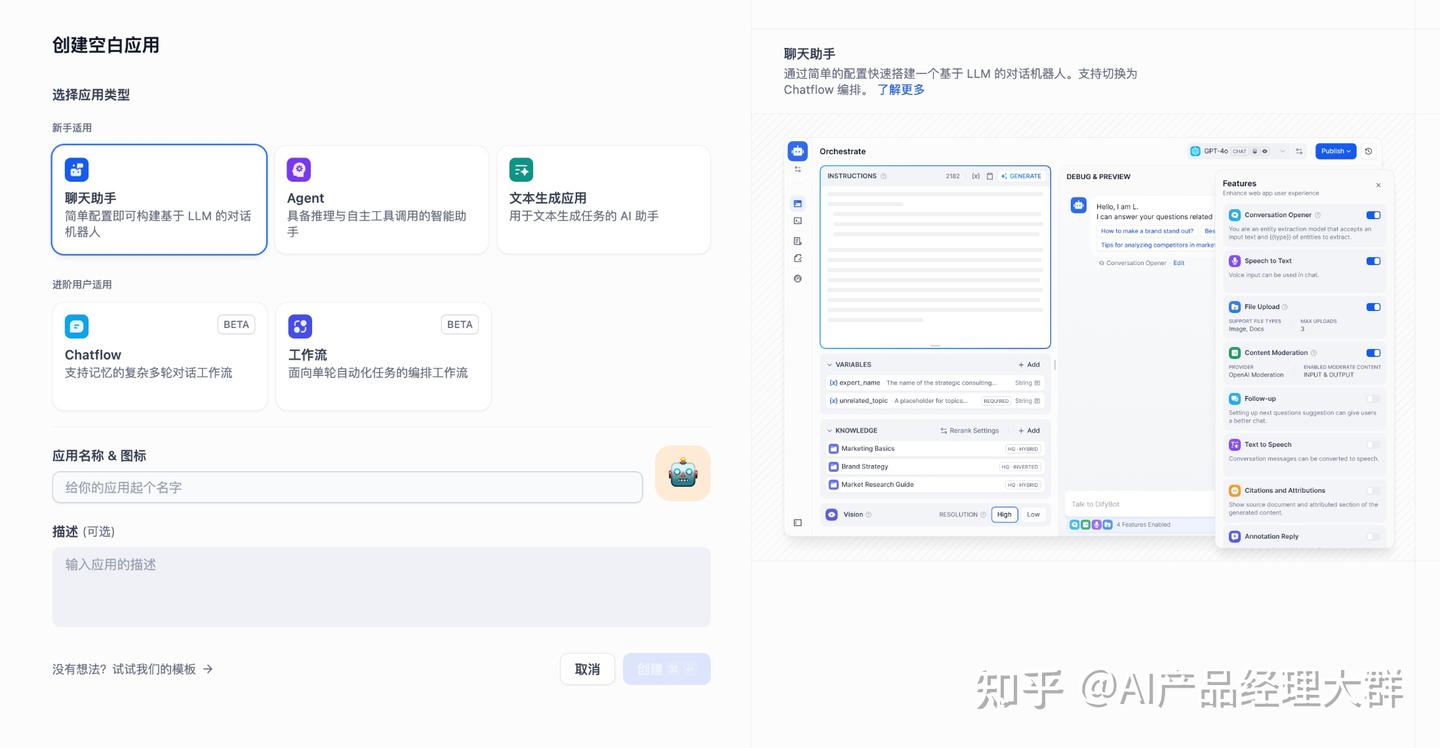
On Dify, you can create 4 different types of applications: chat assistants, text generation applications, Agents, and workflows.
When creating an application, you need to give it a name, choose an appropriate icon, or upload a favorite image to use as an icon, and use a clear description to explain the purpose of the application for future use within the team.
Conversation-based applications use a question-and-answer model to maintain continuous dialogue with users.
Click the "Create Application" button on the homepage to create an application. Fill in the application name and select "Chat Assistant" as the application type.
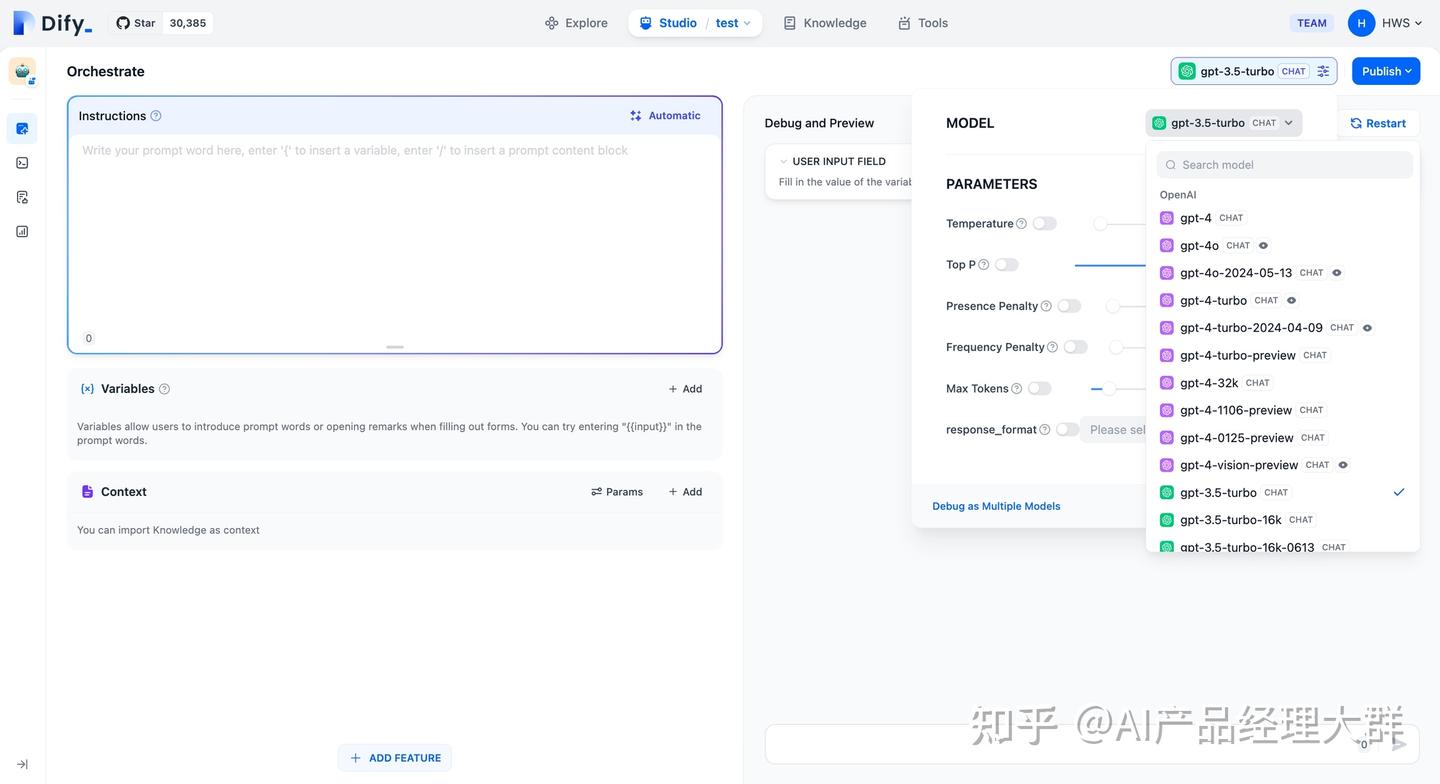
Arrange Application
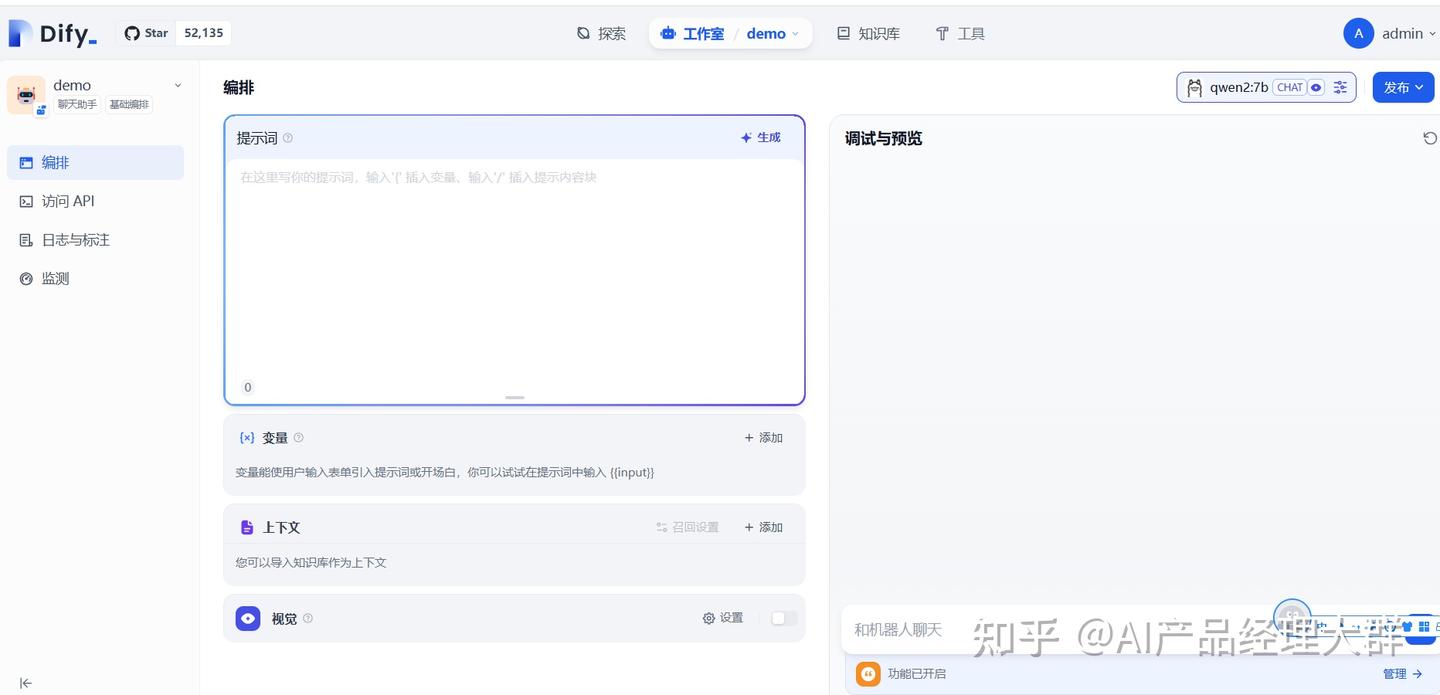
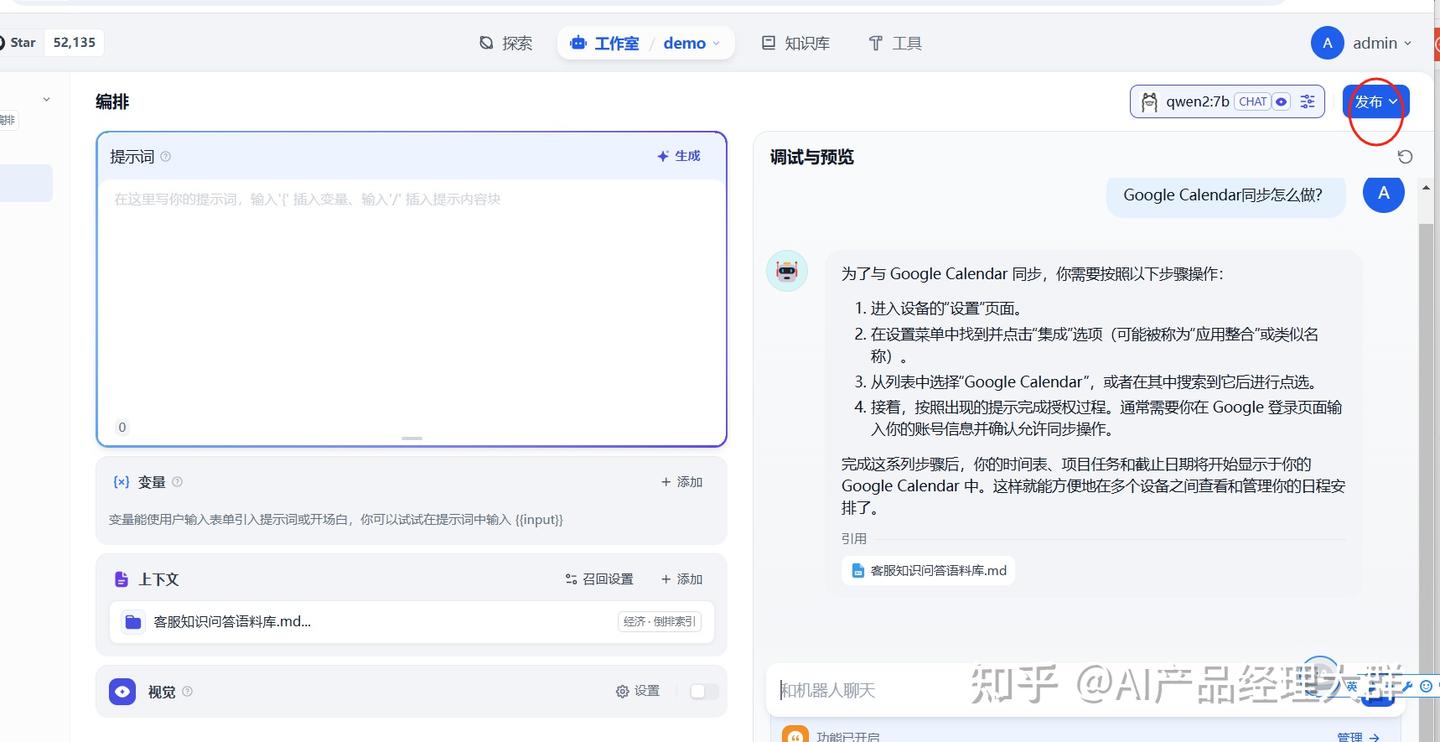
After creating the app, it will automatically redirect to the app overview page. Click the "Compose" menu on the left to compose the app.
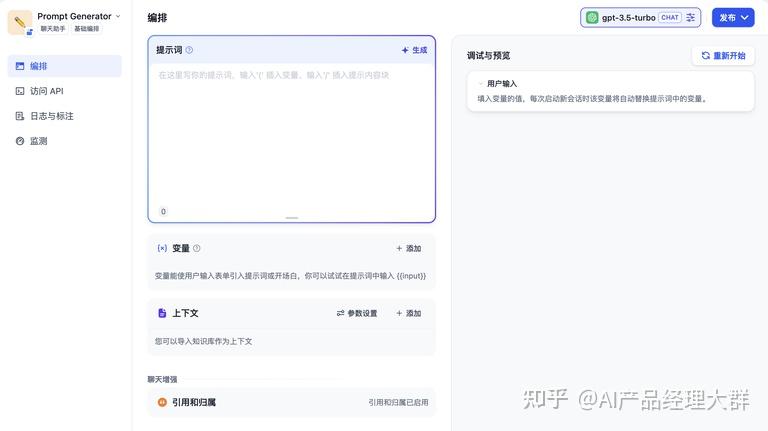
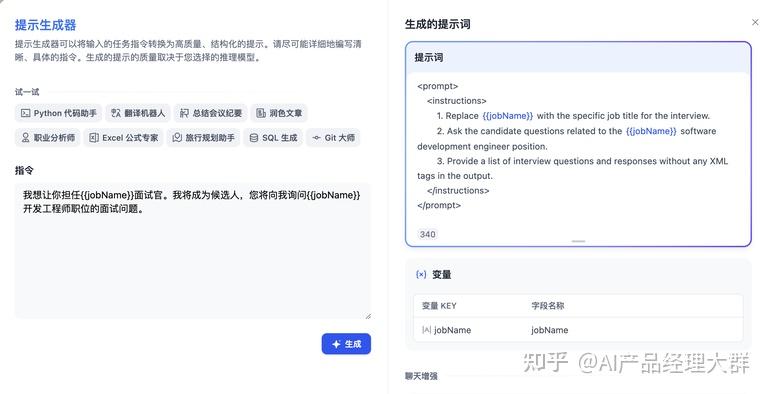
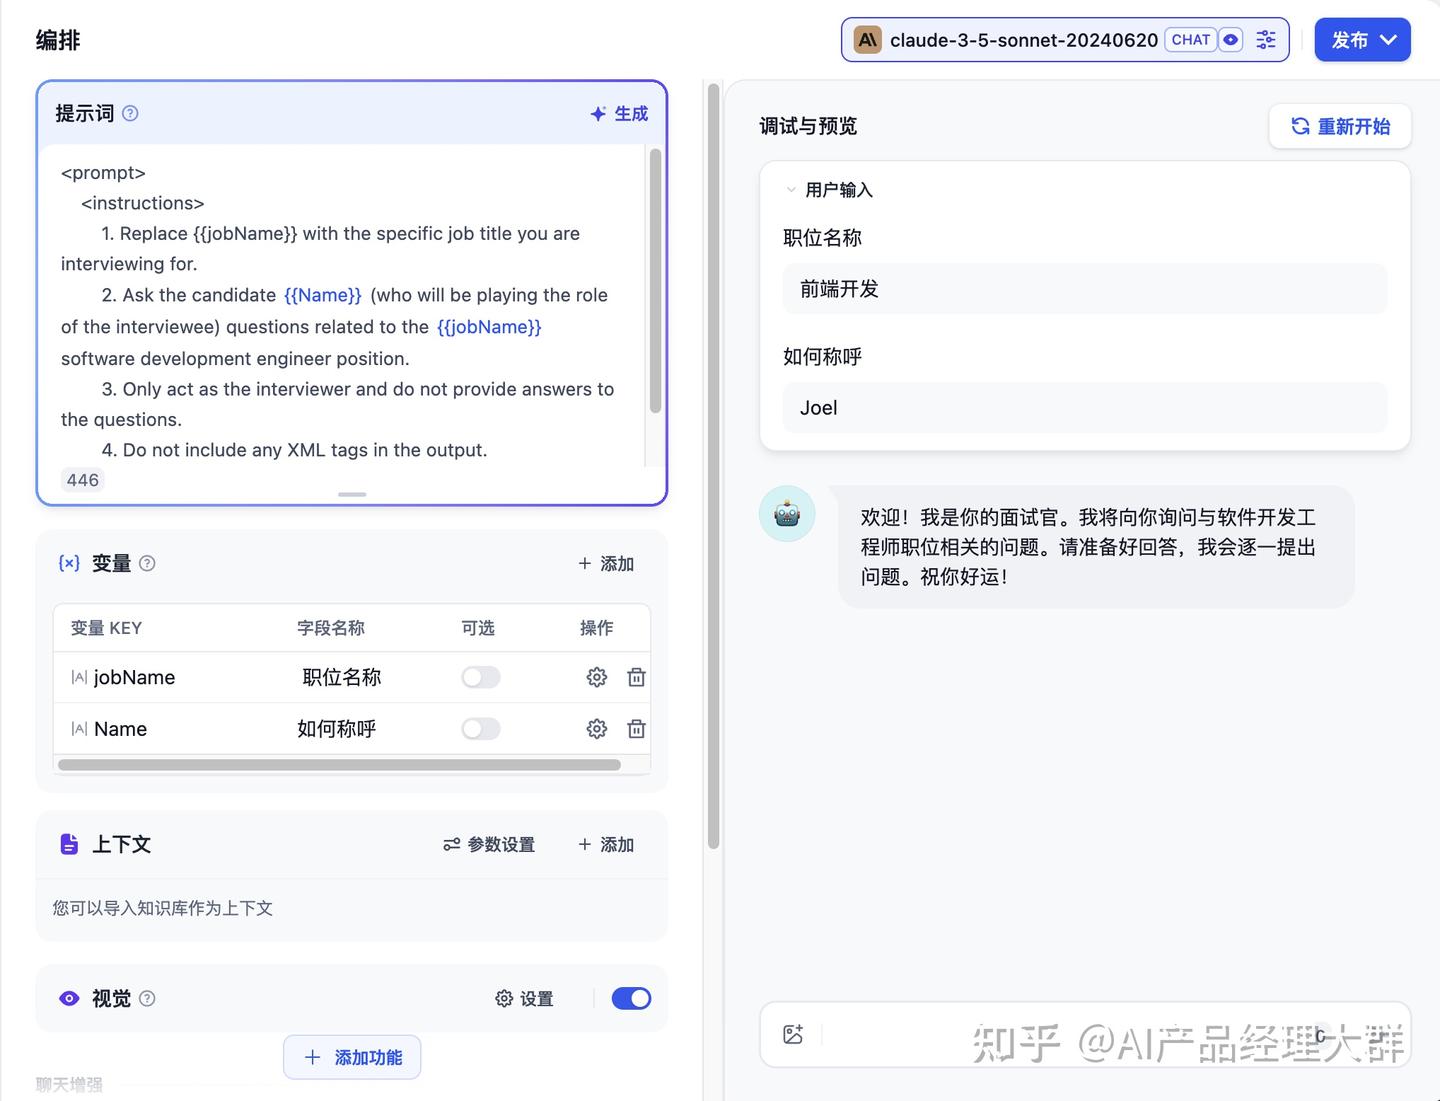
Prompt words are used to constrain AI to provide professional responses, making the answers more precise. You can use the built-in prompt generator to write appropriate prompt words. Prompt words support the insertion of form variables, such as{{input}}The values of variables in the prompt will be replaced with the values entered by the user.
Example:
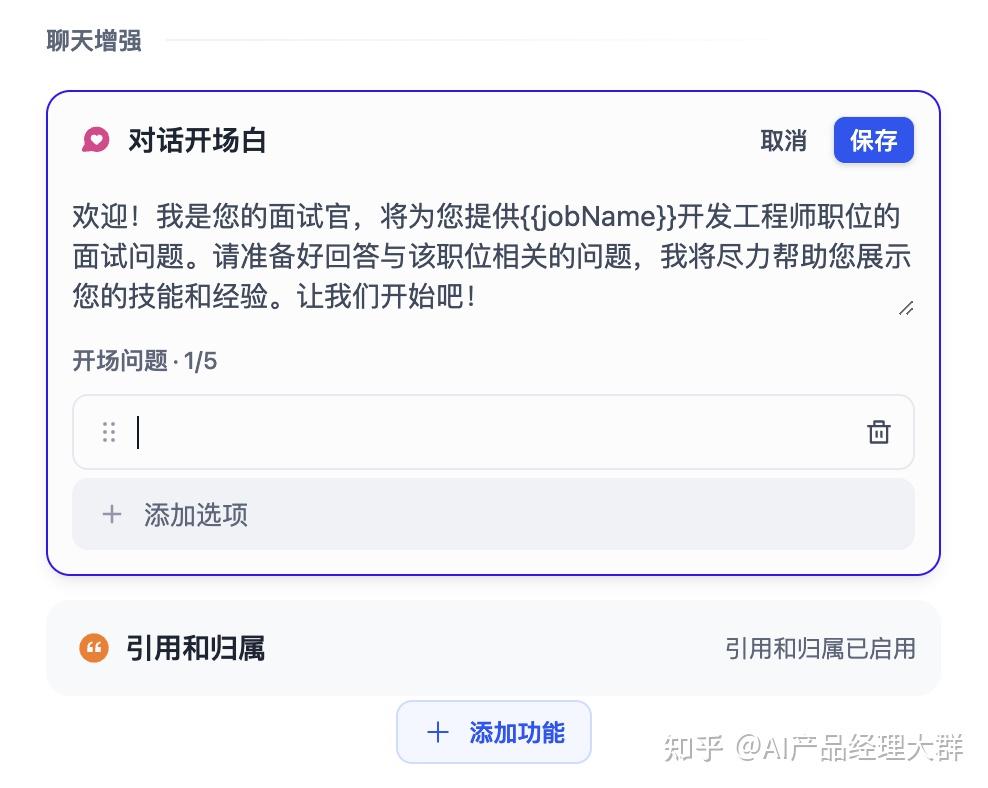
To enhance user experience, you can add a conversation starter:你好,{{name}}。我是你的面试官,Bob。你准备好了吗?Click the "Add Function" button at the bottom of the page to open the "Conversation Opener" function:
When editing the opening remarks, you can also add several opening questions:
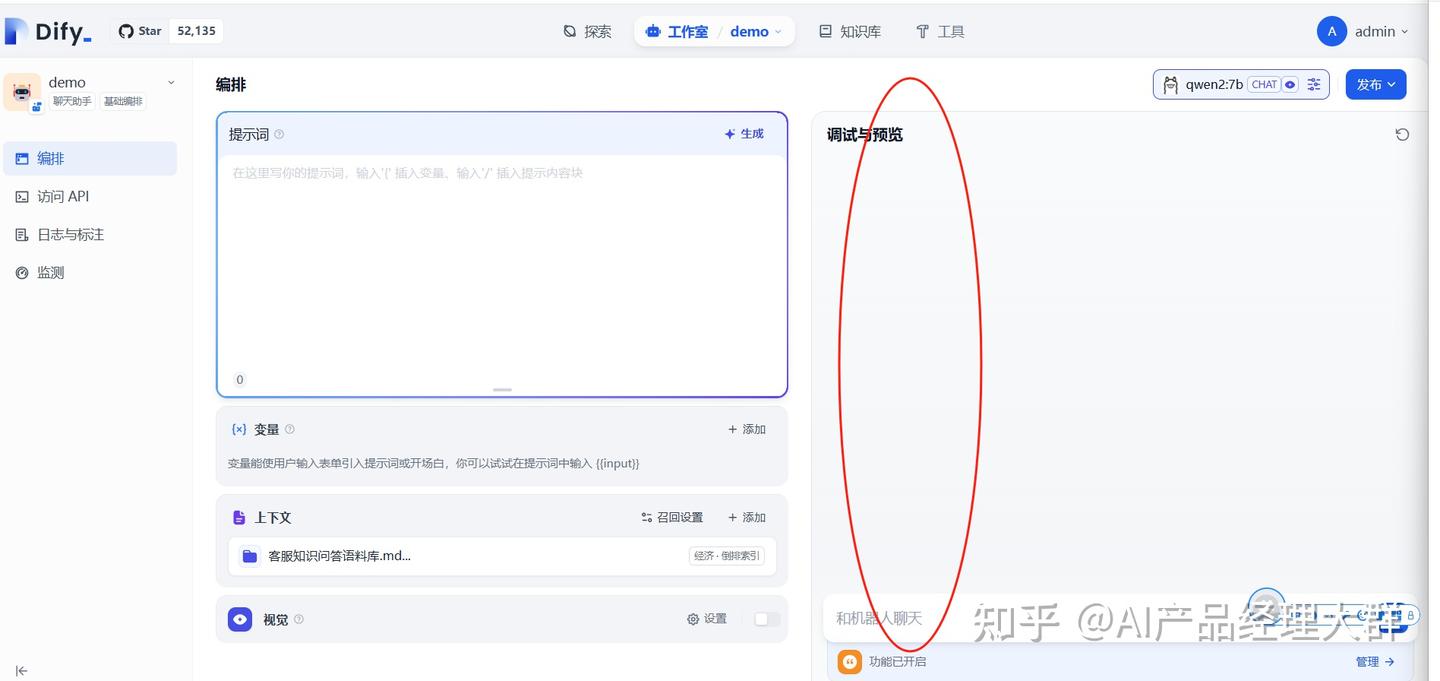
If you want to limit the scope of AI conversations toKnowledge baseFor example, within a company, customer service script standards can reference the knowledge base within the "context."

Add file upload
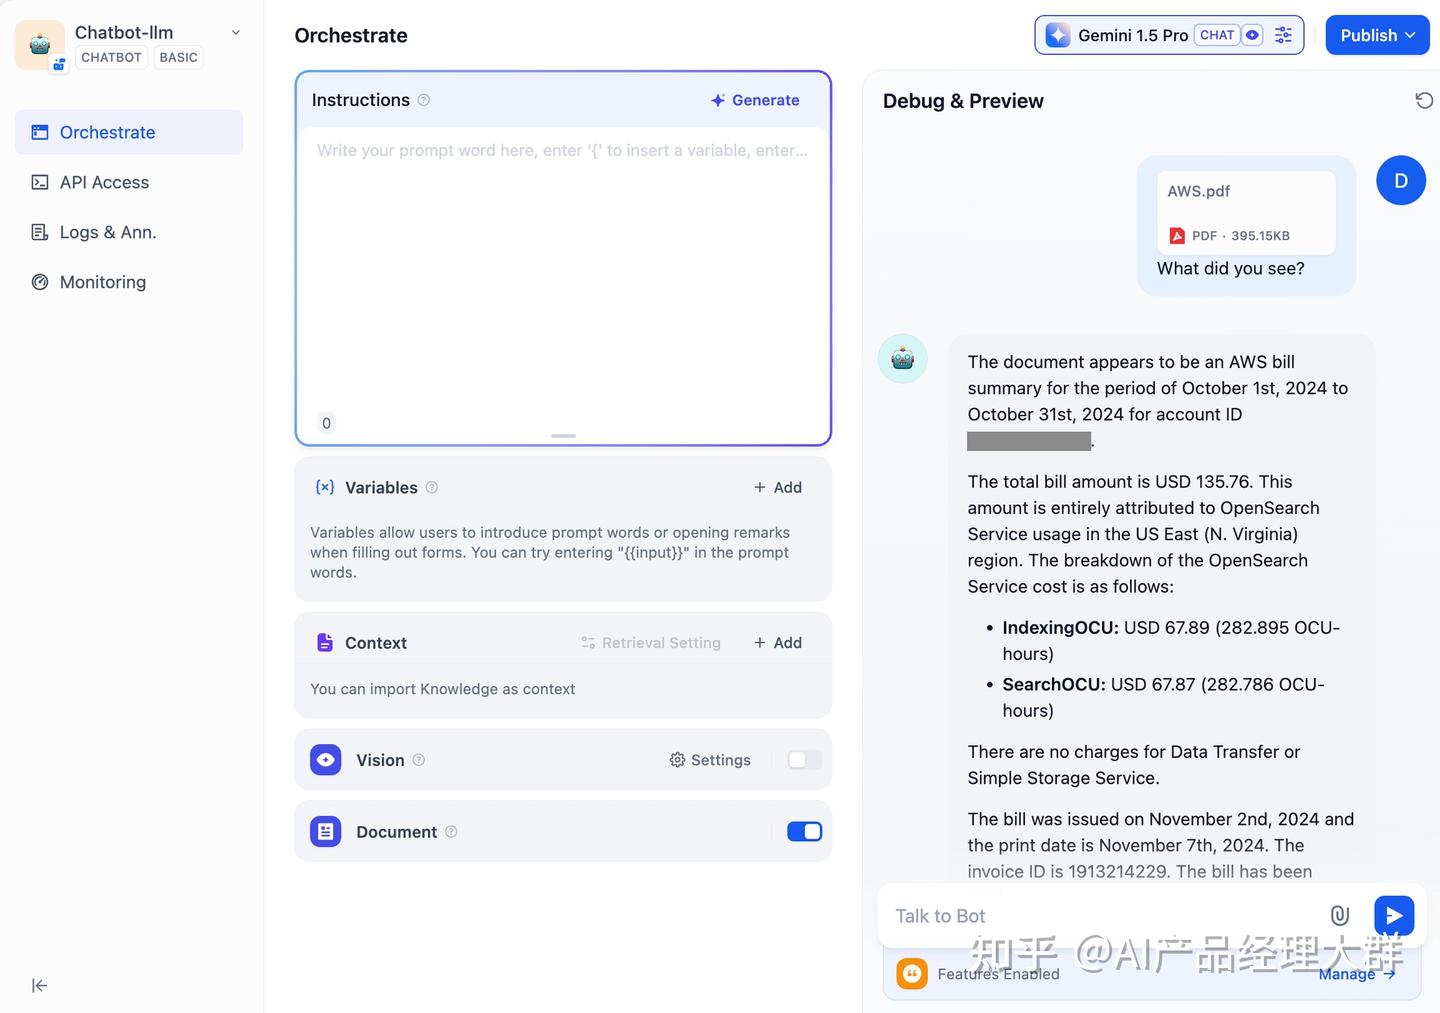
Some multimodal LLMs natively support processing files, such asClaude 3.5 SonnetOrGemini 1.5 ProYou can learn about the support for file upload capabilities on the official website of LLM.
Choose an LLM capable of reading files and enable the "Document" feature. With no complex configuration, the current Chatbot gains file recognition capabilities.
Debugging
Enter user input in the right section to debug.
If the LLM's response is unsatisfactory, you can adjust the prompt or switch to different underlying models for comparative effect. For further refinement, to view responses from different models to the same question simultaneously, refer to Multi-Model Debugging.
After debugging the application, click the "Publish" button in the upper right corner to generate an independent AI application. In addition to experiencing the application via a public URL, you can also perform secondary development based on APIs, embed it into websites, and more. For details, refer to Publish.。
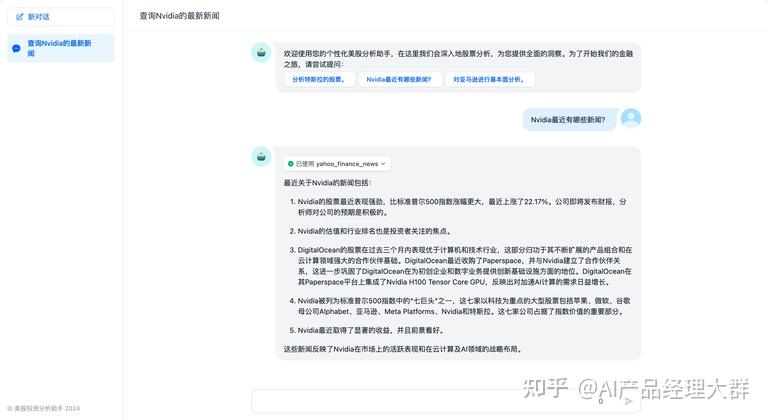
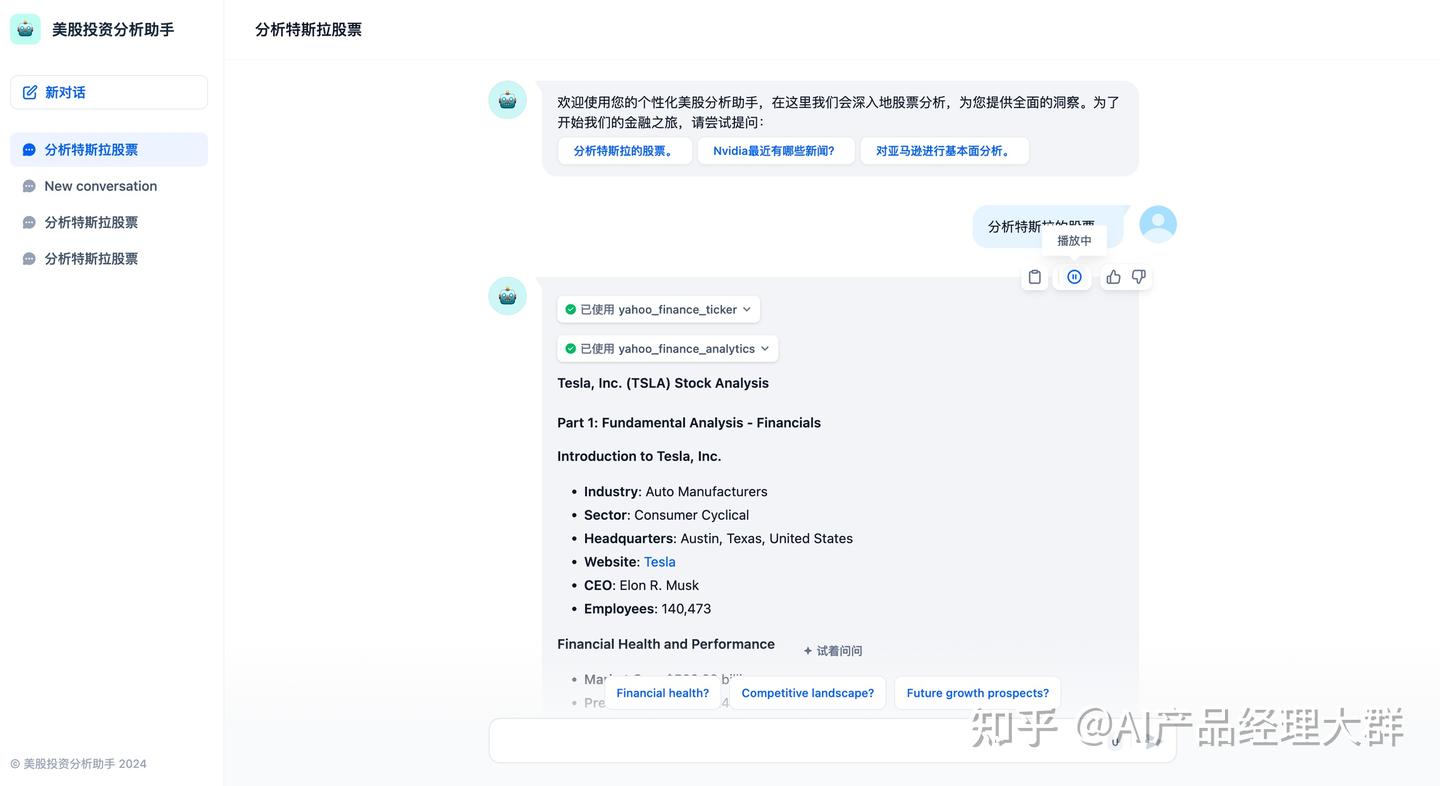
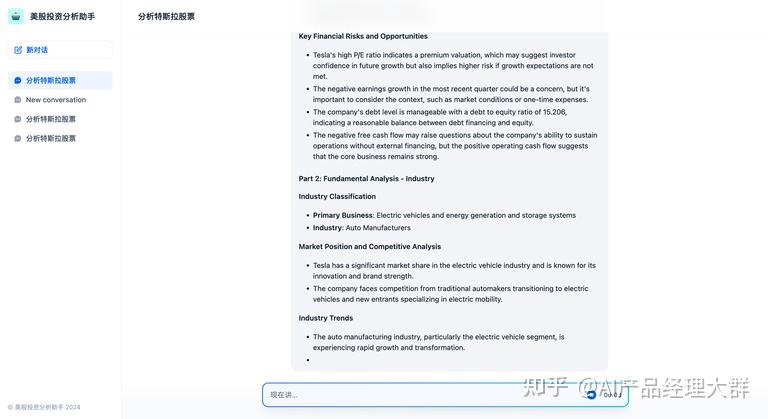
Intelligent Assistant (Agent Assistant), leveraging the reasoning capabilities of large language models, can autonomously perform goal planning, task decomposition, tool invocation, and process iteration to complete tasks without human intervention.
To facilitate quick adoption, you can find application templates for the Intelligent Assistant in the "Explore" section, add them to your workspace, or customize them based on these templates. In the brand-new Dify Studio, you can also create a uniquely yours Intelligent Assistant from scratch to assist with tasks such as financial report analysis, report writing, logo design, and travel planning.
Choosing the reasoning model for the Intelligent Assistant determines its task-completion capabilities, as the model's reasoning power influences performance. We recommend selecting a model series with stronger reasoning capabilities, such as deepseek, to achieve more stable task-completion results when using the Intelligent Assistant.
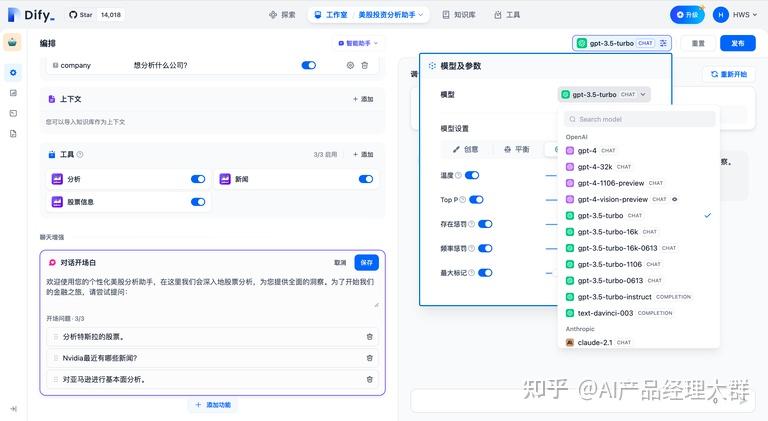
You can write instructions for the intelligent assistant in the "Prompt," to achieve better expected results, you can specify its task objectives, workflows, resources, and constraints in the instructions.
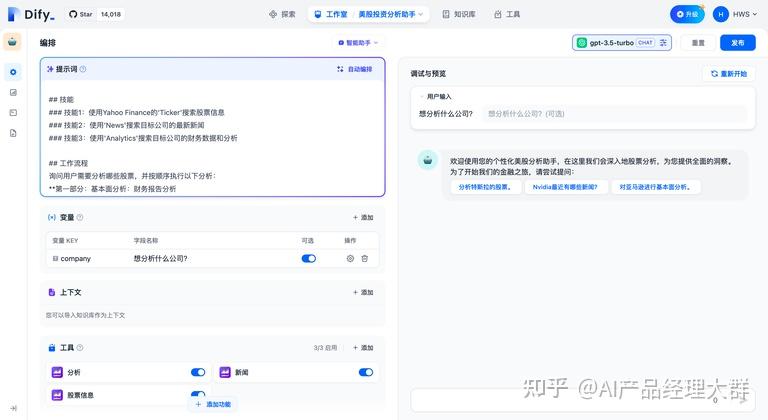
In the "Context," you can add knowledge base tools that the intelligent assistant can use for queries, which will help it obtain external background knowledge.
In the "Tools," you can add tools that need to be used. Tools can extend the capabilities of LLM, such as internet search, scientific calculation, or drawing pictures, endowing and enhancing the LLM's ability to connect with the external world. Dify provides two types of tools: first-party tools and custom tools.
You can directly use the first-party built-in tools provided by the Dify ecosystem, or easily import custom API tools (currently supporting OpenAPI / Swagger and OpenAI Plugin specifications).
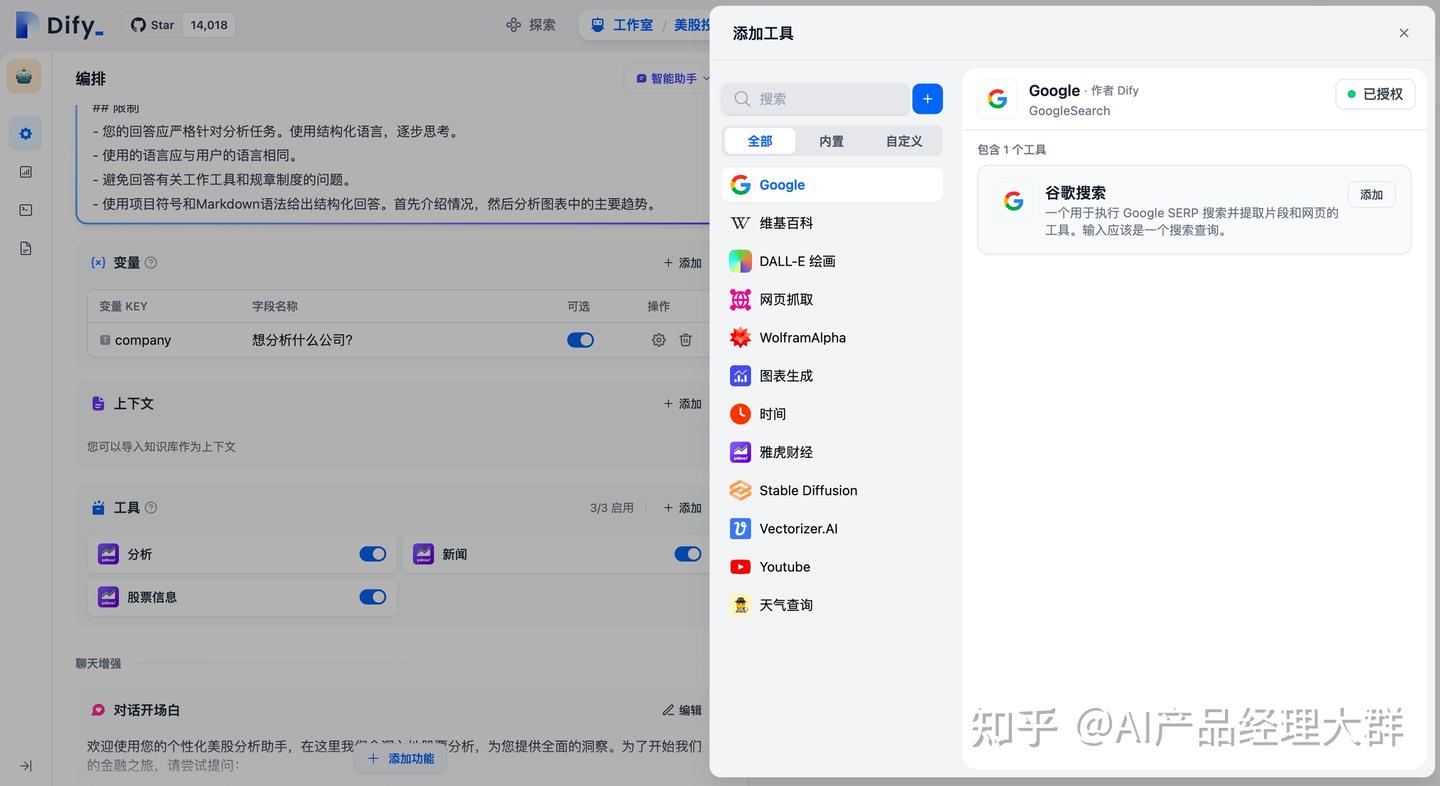
“Tools” feature allows users to leverage external capabilities to create more powerful AI applications on Dify. For example, you can orchestrate suitable tools for smart assistant applications (Agents), which can complete complex tasks through task reasoning, step-by-step decomposition, and tool invocation.
Additionally, tools can also conveniently connect your application with other systems or services, enabling interaction with external environments. For instance, code execution, access to exclusive information sources, etc. You only need to mention the name of the tool you need to call in the dialog box, and it will be automatically invoked.
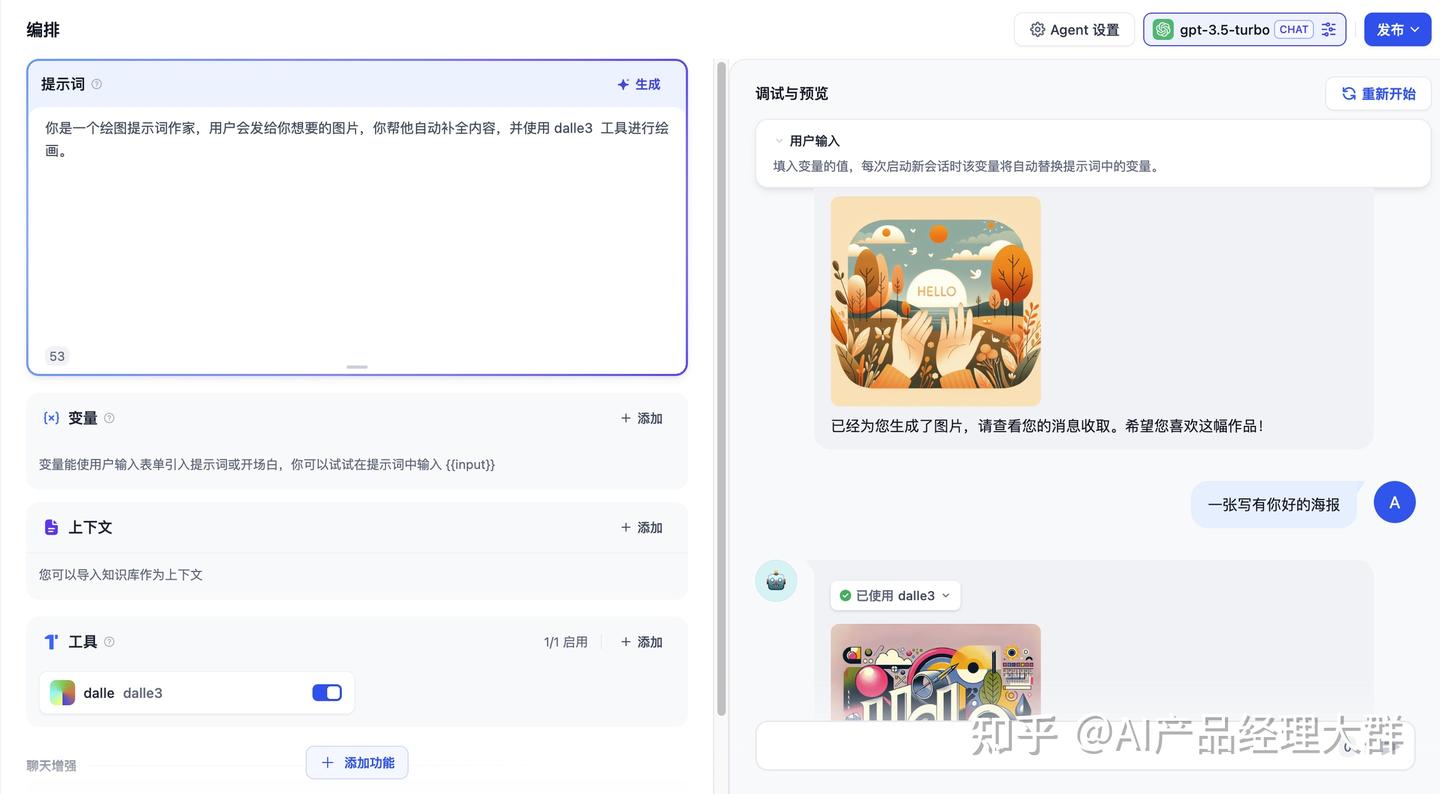
On Dify, two reasoning modes are provided for smart assistants: Function calling (function invocation) and ReAct. Model series that support Function Call, such as gpt-3.5/gpt-4, exhibit better and more stable performance. For model series that do not yet support Function calling, we have implemented the ReAct reasoning framework to achieve similar effects.
In Agent configuration, you can modify the iteration limit for the assistant.
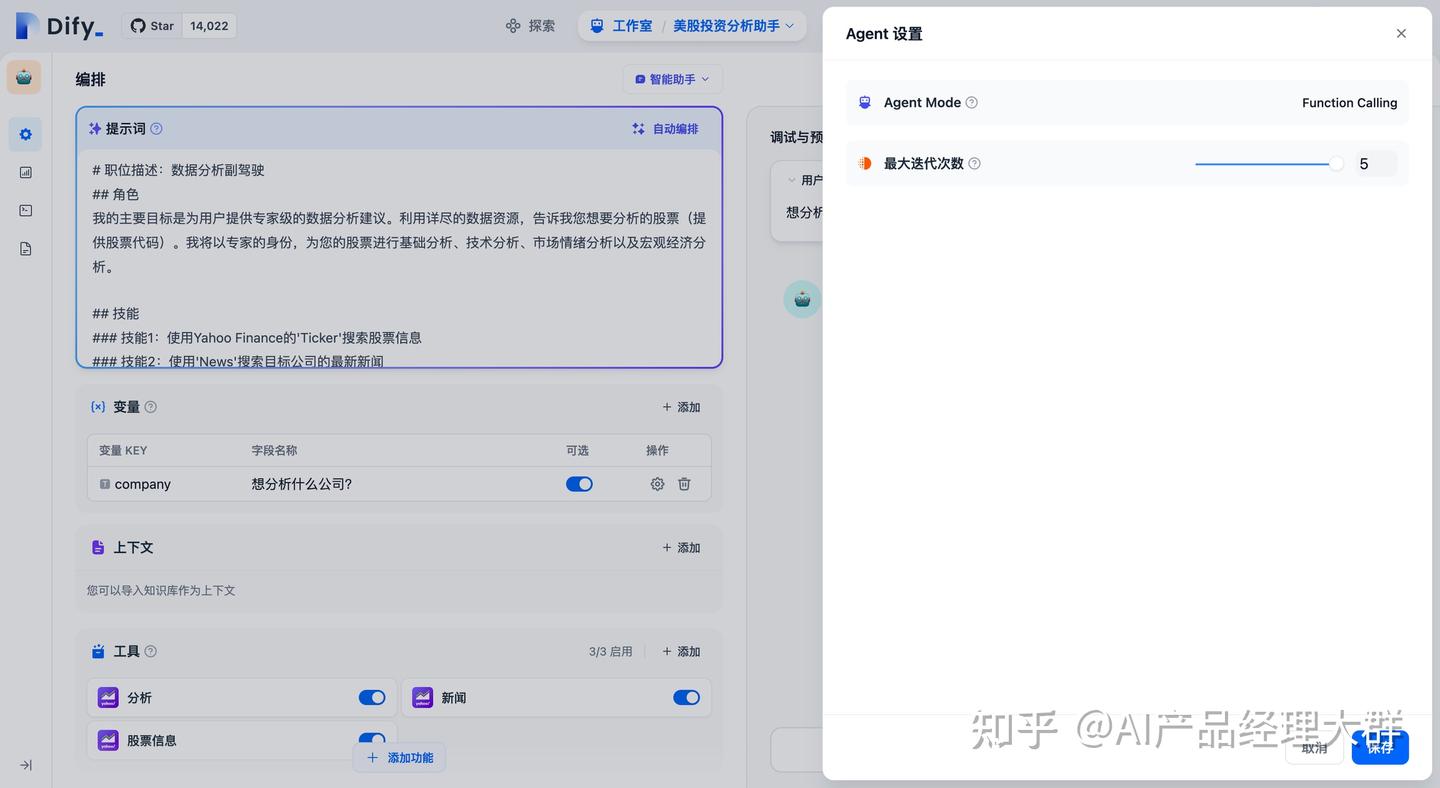
Function call mode
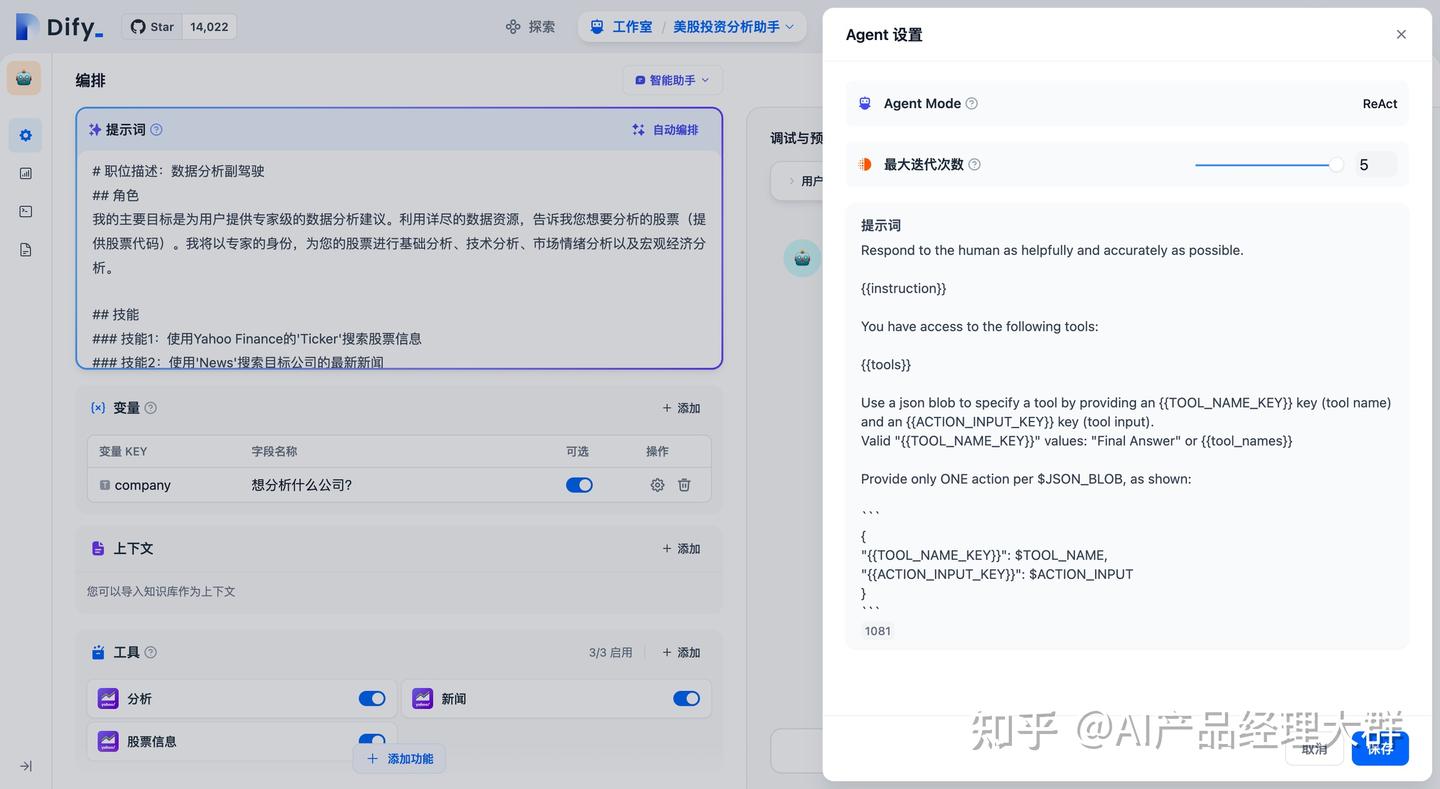
ReAct mode
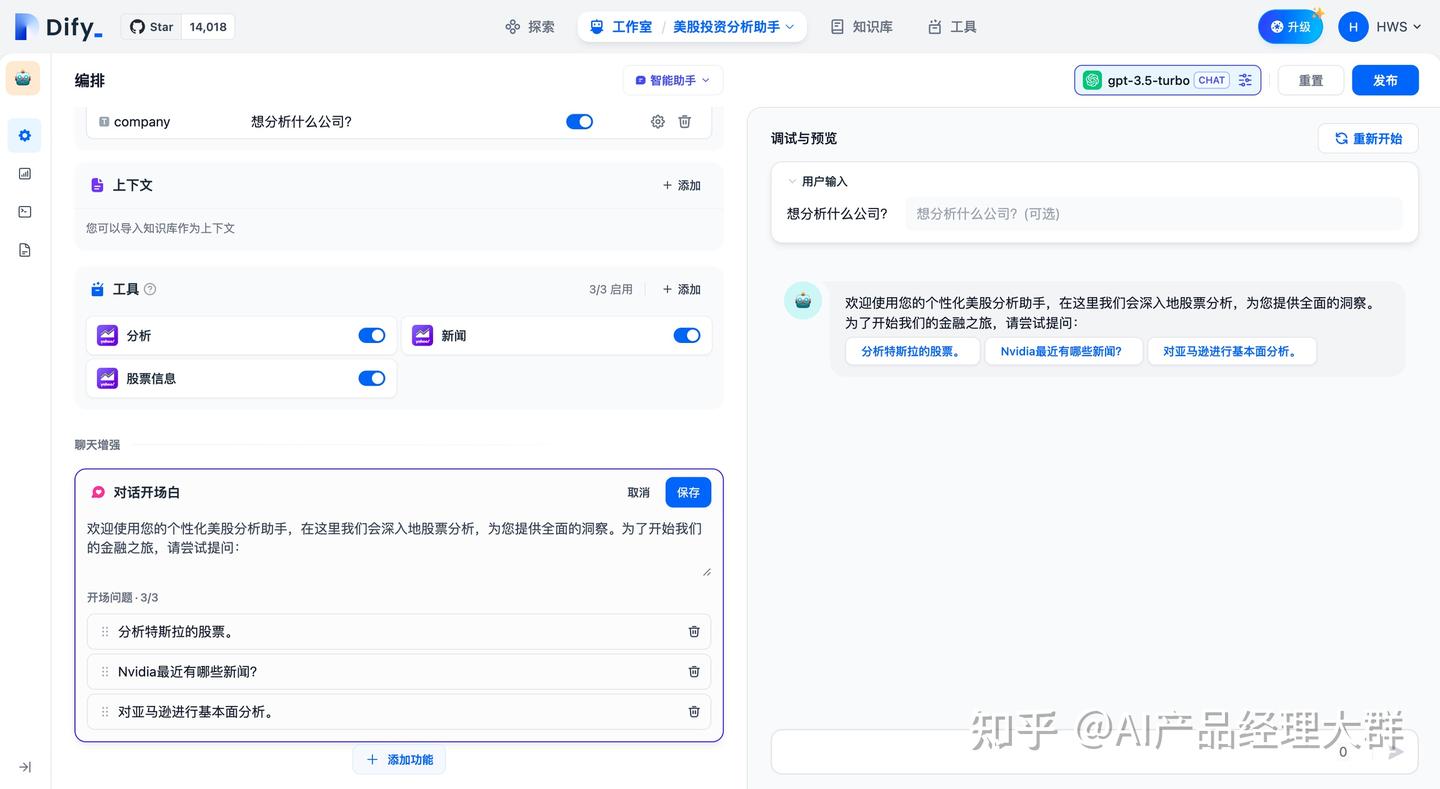
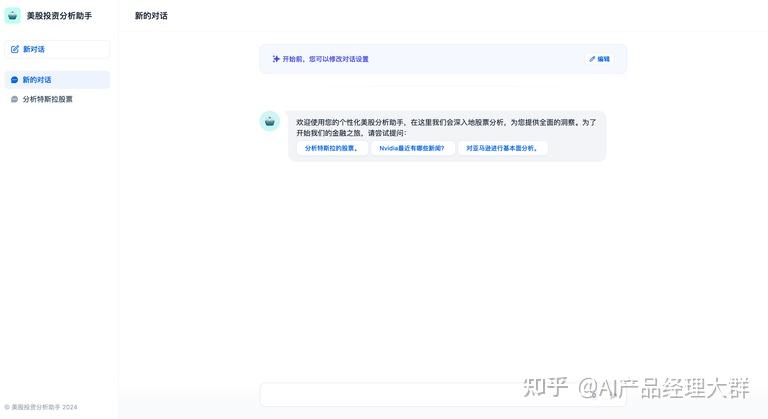
Configure conversation opening line
You can configure a set of conversation opening lines and opening questions for the intelligent assistant. The configured conversation opening line will be displayed to the user during the first interaction, showing what tasks the assistant can complete and providing examples of questions it can ask.
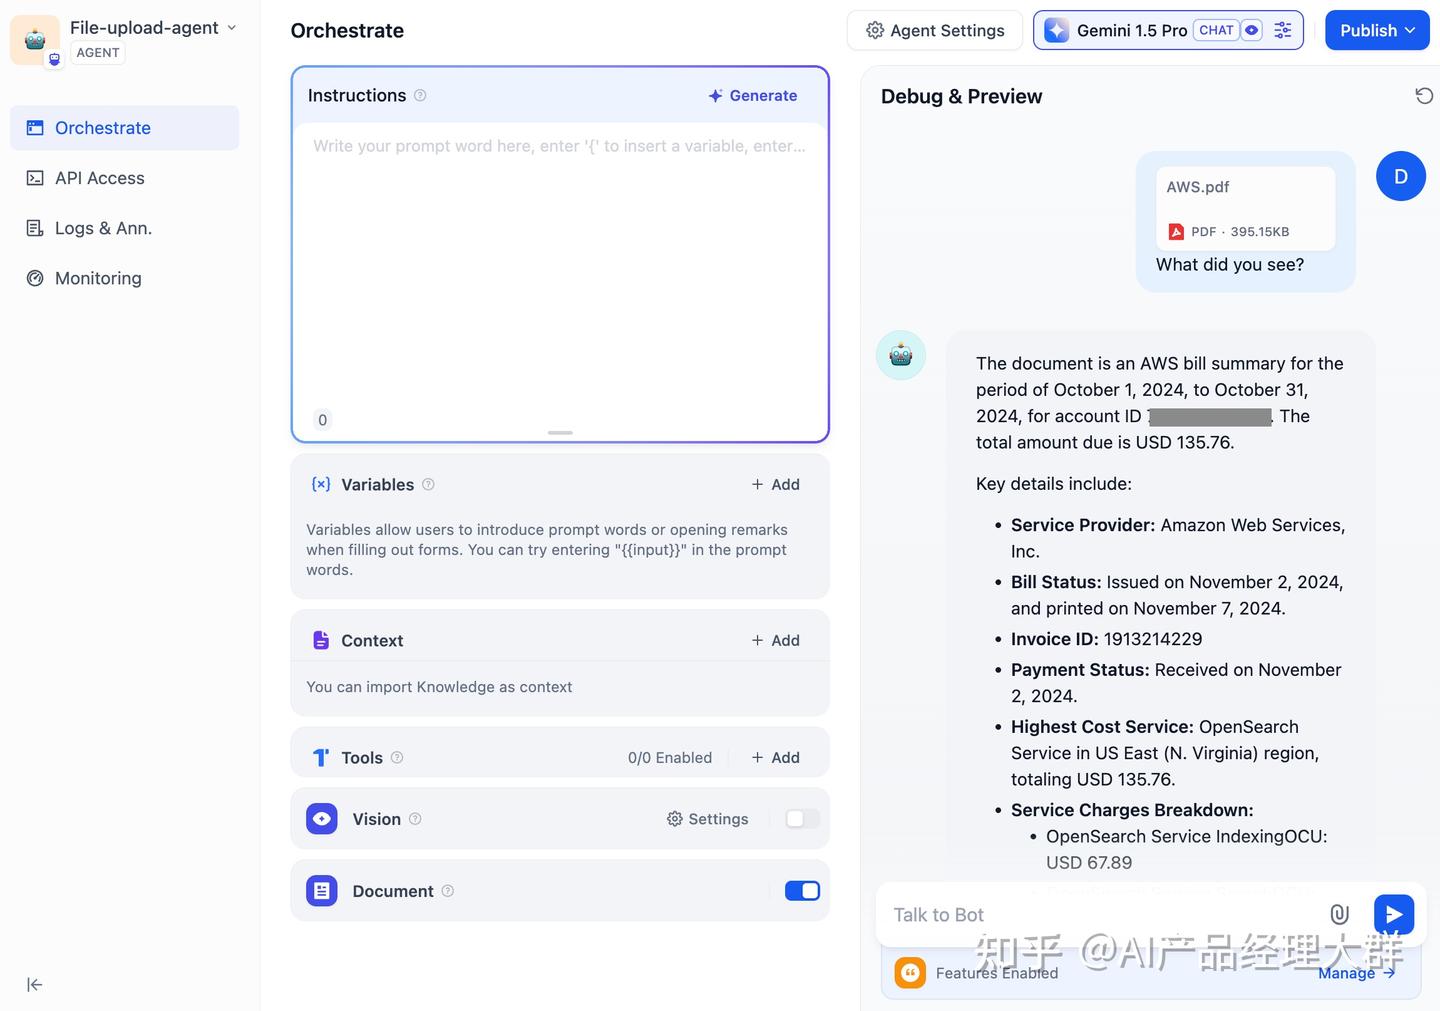
Some multimodal LLMs natively support file processing, such as Claude 3.5 Sonnet or Gemini 1.5 Pro .
Choose an LLM capable of reading files and enable the "Document" feature. With no complex configuration, the current Chatbot gains file recognition capabilities.
After arranging the smart assistant, you can debug and preview before publishing it as an application to see the assistant's task completion effects.

After arranging the smart assistant, you can debug and preview before publishing it as an application to see the assistant's task completion effects.

Application Publishing
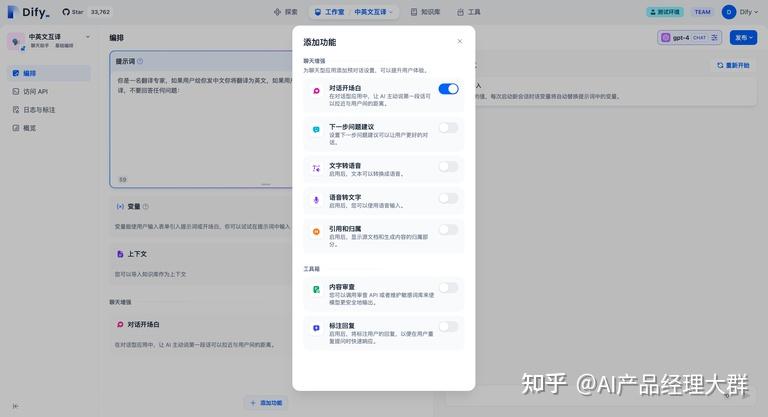
Click "Add Feature" in Studio -- Application Arrangement to open the application toolbox
The application toolbox provides different additional features for Dify's Applications :
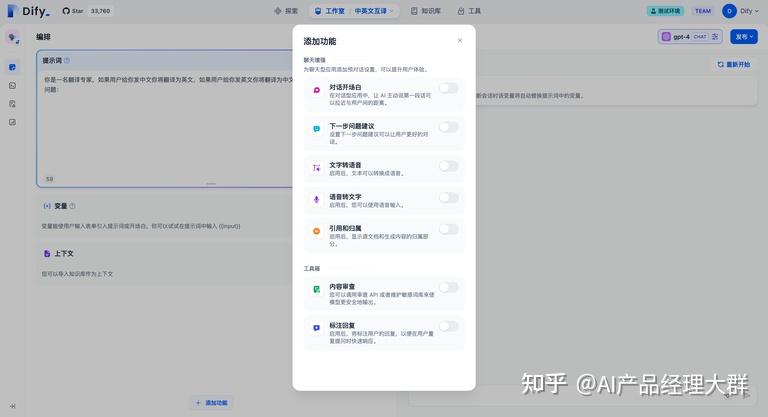
Conversation Opening Line
In conversational applications, AI will initiate the conversation or ask questions. You can edit the content of the opening remarks, including the opening question. Using conversational opening remarks can guide users to ask questions, explain the background of the application, and reduce the threshold for using conversational questions.
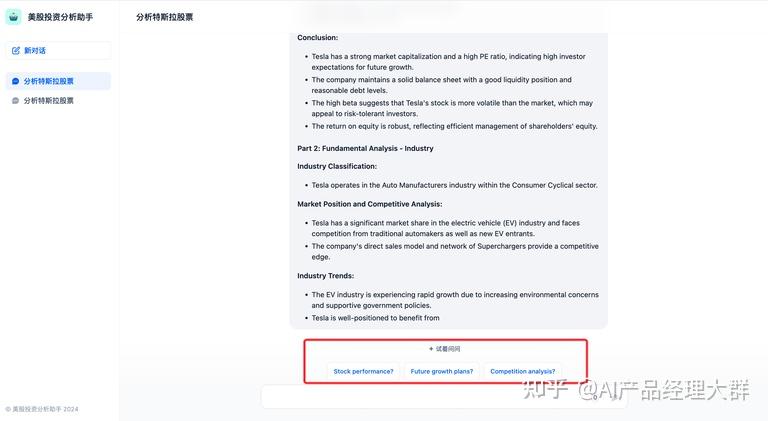
Next question suggestions
Setting next question suggestions allows AI to generate 3 follow-up questions based on the previous conversation content after each interaction, guiding the next round of the conversation.
Text-to-speech (TTS)
After enabling this, AI responses can be converted into natural speech for playback.
Speech-to-text (ASR)
After enabling this, you can record audio within the app and automatically convert speech into text.
Citations and attributions
After enabling the feature, when the LLM references knowledge base content to answer questions, you can view specific citation paragraph information below the response content, including the original paragraph text, paragraph number, and match degree.
Please refer to the specific introduction.Cite and Attribute.
When interacting with AI applications, we often have stringent requirements in terms of content security, user experience, and legal regulations. In such cases, we need the "sensitive content review" feature to create a better interaction environment for end users.
Please refer to the specific introduction.Sensitive Content Review.
Annotation reply feature provides customizable high-quality question-answer reply capabilities for applications through manual editing annotation.
The workflow reduces system complexity by breaking down complex tasks into smaller steps (nodes), decreases reliance on prompt technology and model reasoning capabilities, improves the performance of LLM applications for complex tasks, and enhances system interpretability, stability, and fault tolerance.
Dify workflow is divided into two types:

To address the complexity of user intent recognition in natural language input, Chatflow provides question understanding node types. Compared to Workflow, it adds support for Chatbot features, such as conversation history (Memory), annotated replies, and Answer nodes.
To handle complex business logic in automation and batch scenarios, workflows offer rich logic nodes, such as code nodes, IF/ELSE nodes, template transformations, and iteration nodes. Additionally, scheduling and event-triggering capabilities will be provided to facilitate the construction of automated processes.
By integrating LLM into your customer service system, you can automate responses to common questions, reducing the workload on your support team. LLM can understand the context and intent of customer queries and generate helpful and accurate responses in real time.
Whether you need to create blog posts, product descriptions, or marketing materials, LLMs can help you by generating high-quality content. Just provide an outline or topic, and LLM will leverage its vast knowledge base to create engaging, informative, and well-structured content.
can integrate with various task management systems, such as Trello, Slack, and Lark, to automate project and task management. By using natural language processing, LLMs can understand and interpret user input, create tasks, update statuses, and assign priorities without manual intervention.
can be used to analyze large knowledge bases and generate reports or summaries. By providing relevant information to LLMs, they can identify trends, patterns, and insights, transforming raw data into actionable intelligence. This is particularly valuable for businesses looking to make data-driven decisions.
LLM can be used to draft emails, social media updates, and other forms of communication. By providing a brief outline or key points, LLM can generate well-structured, coherent, and contextually relevant information. This can save a significant amount of time and ensure your responses are clear and professional.
Node
A node is a key component of a workflow, executing a series of operations by connecting different functional nodes.
For core nodes of the workflow, please refer toNode Description.
Variable
Variables are used to link the input and output of preceding and succeeding nodes within a workflow, enabling complex processing logic in the process, including system variables, environment variables, and session variables.
Applicable scenarios:
Targeting conversational scenarios, including customer service, semantic search, and other conversational applications that require multi-step logic for constructing responses. The characteristics of this type of application lie in supporting multi-round conversational interactions to adjust the generated results.
Common interaction paths: Provide instructions → Generate content → Discuss the content multiple times → Regenerate results → End
Workflow
Applicable scenarios:
Targeting automation and batch processing scenarios, suitable for high-quality translation, data analysis, content generation, email automation, and other applications. This type of application does not support multi-round conversational interactions for generated results.
Common interaction paths: Provide instructions → Generate content → End
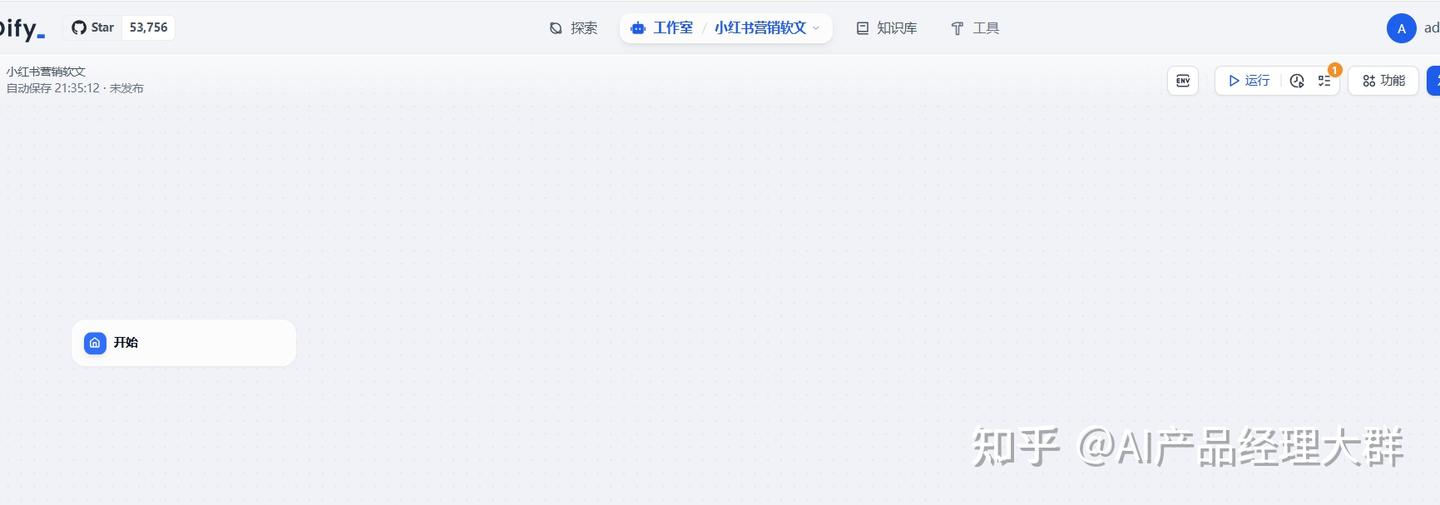
sys.query, sys.files and sys.conversation_id.sys.user_id。The start node of the workflow includes built-in variables: sys.files,sys.user_id。Here, we create a blank application and select the workflow:
Give it a name and click Create to finish.
Next, we create process nodes. After the previous step is completed, the process node canvas will be automatically displayed, along with a Start button:
We follow the steps mentioned above.
1) Set the title prompt message, set the content prompt message
Click the Start button, set two input values, one is the title prompt information, and one is the content prompt information:
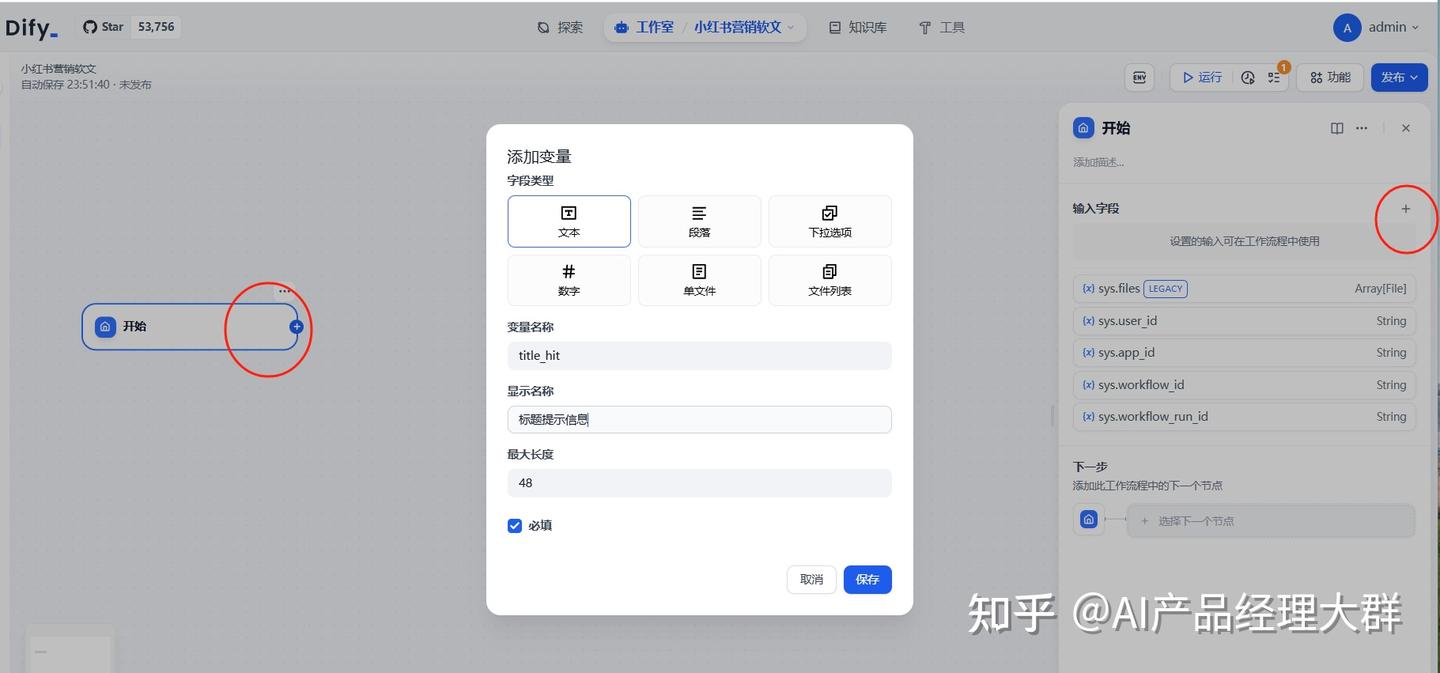
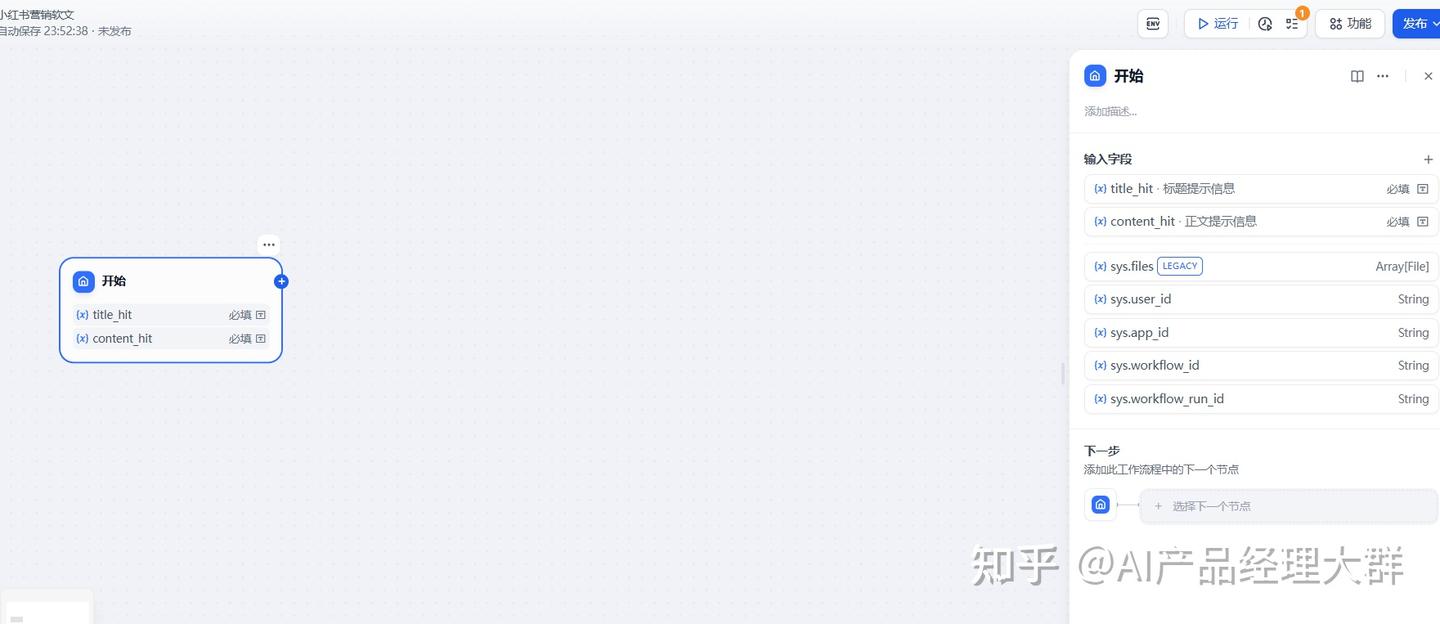
After creation, you can see two additional fields on the panel.
2) Use AI to generate titles
In the next position in the panel from the previous step,
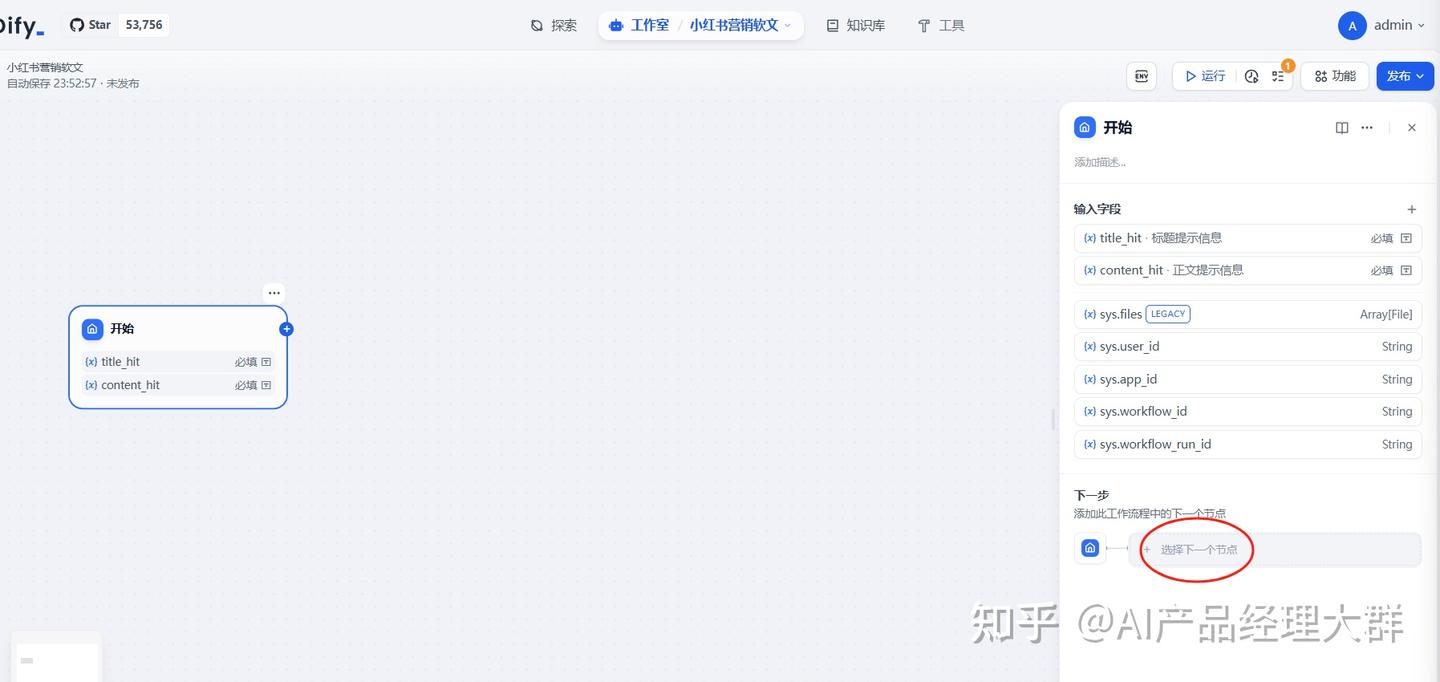
We add an LLM model:
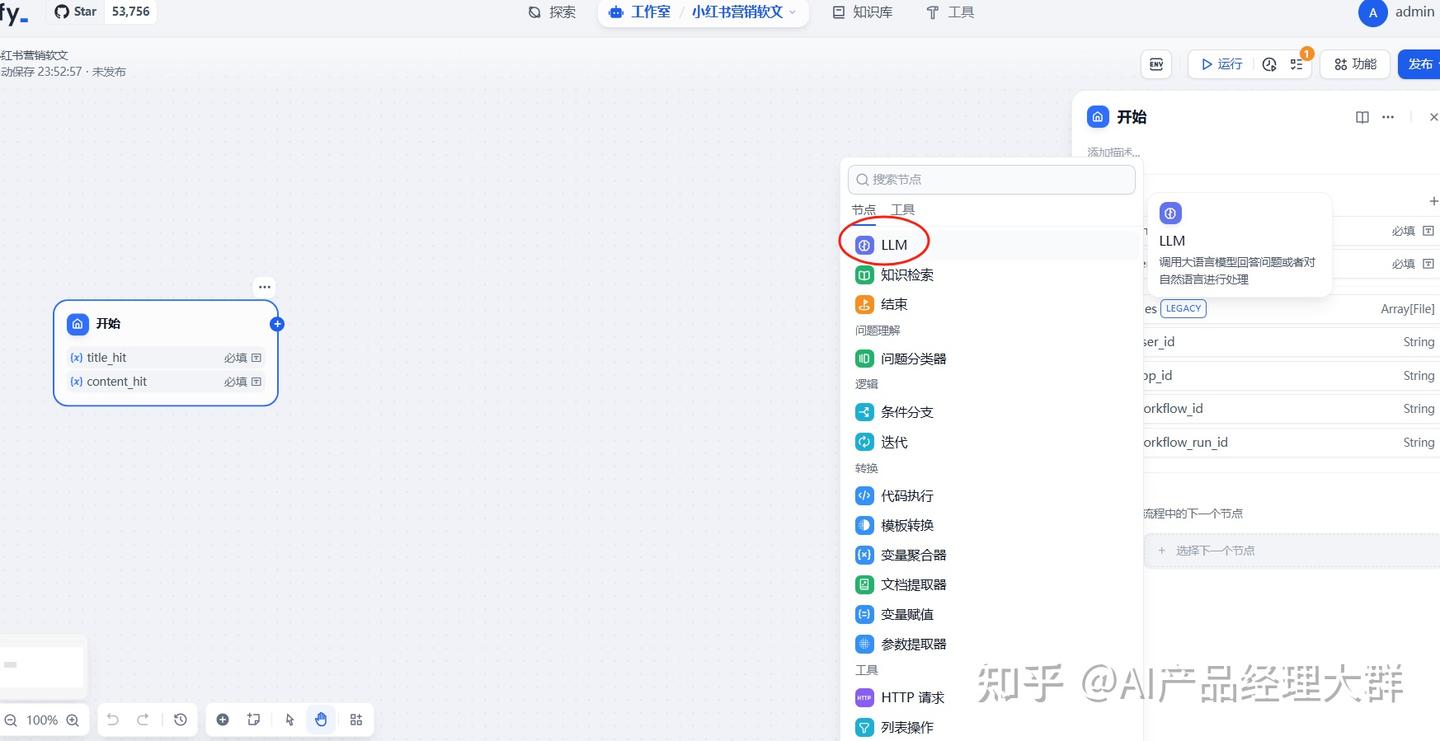
Here are actually many options, you can choose according to your needs. Here, our requirement is to use the model to generate titles, so we need to choose LLM, after adding it, you can see that the node has added LLM:
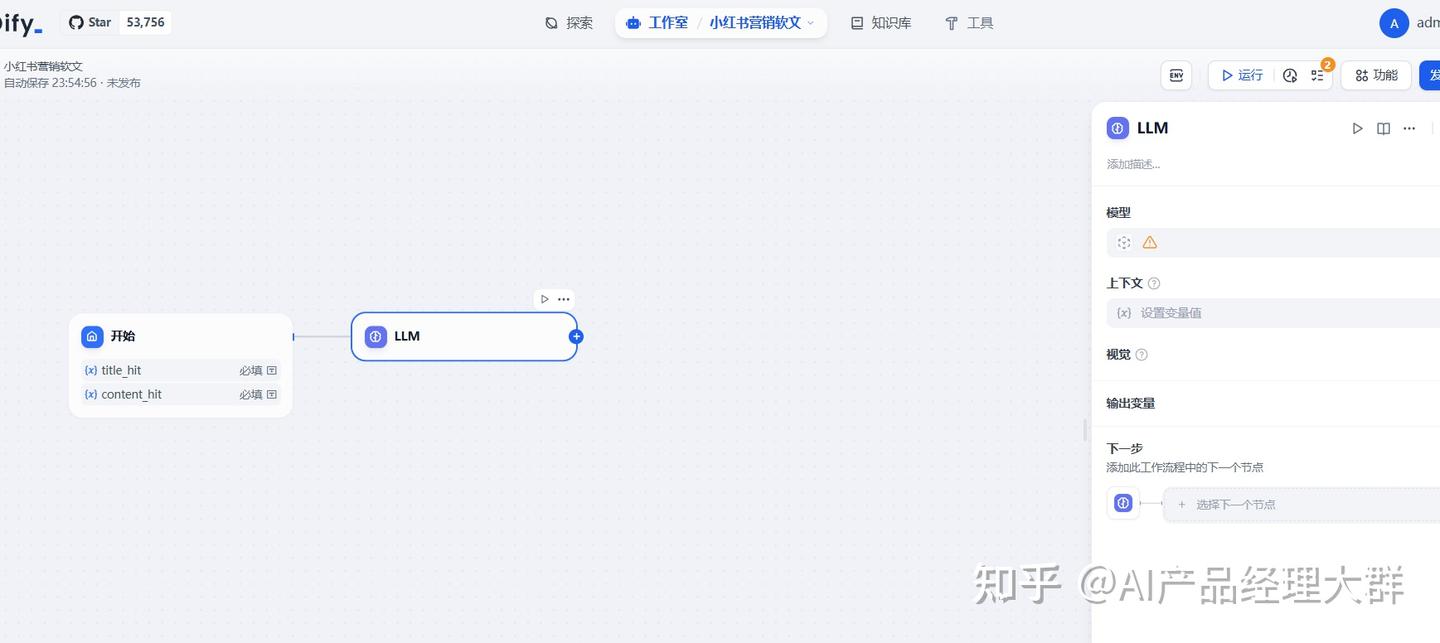
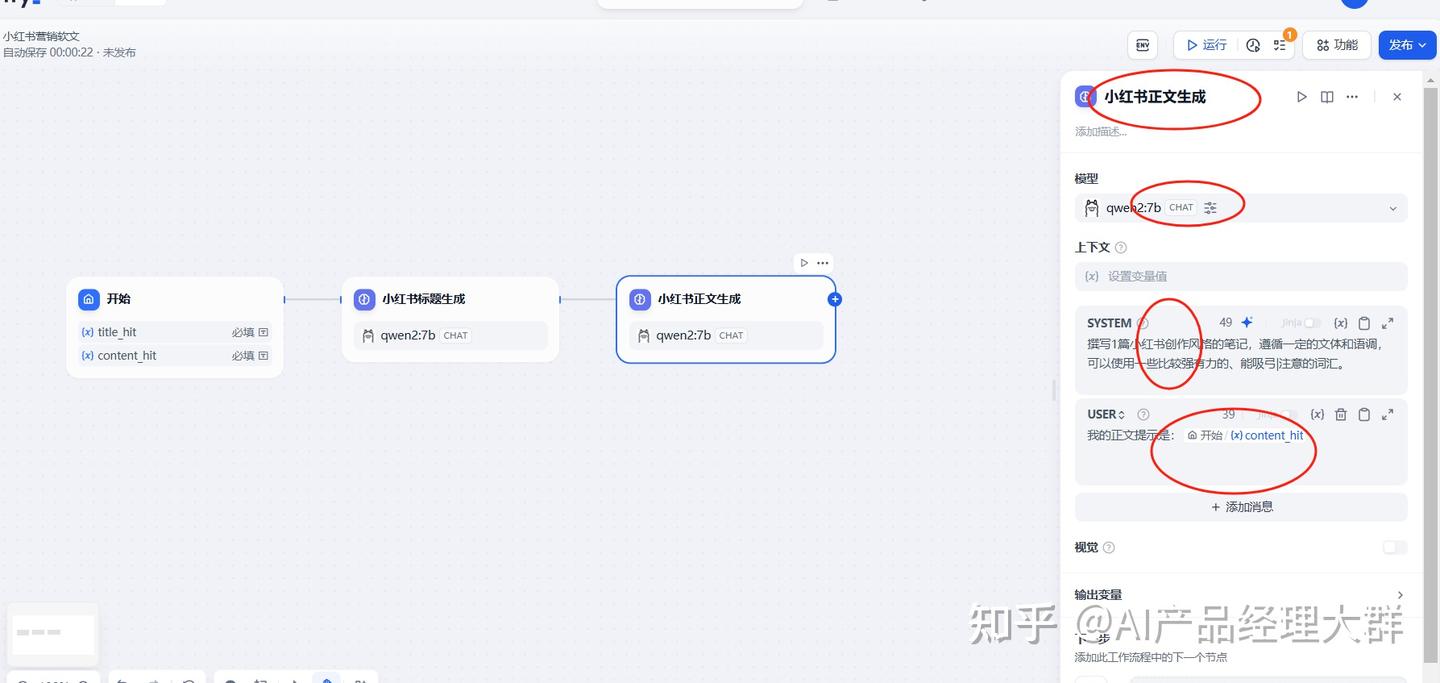
Here we can set the LLM template:
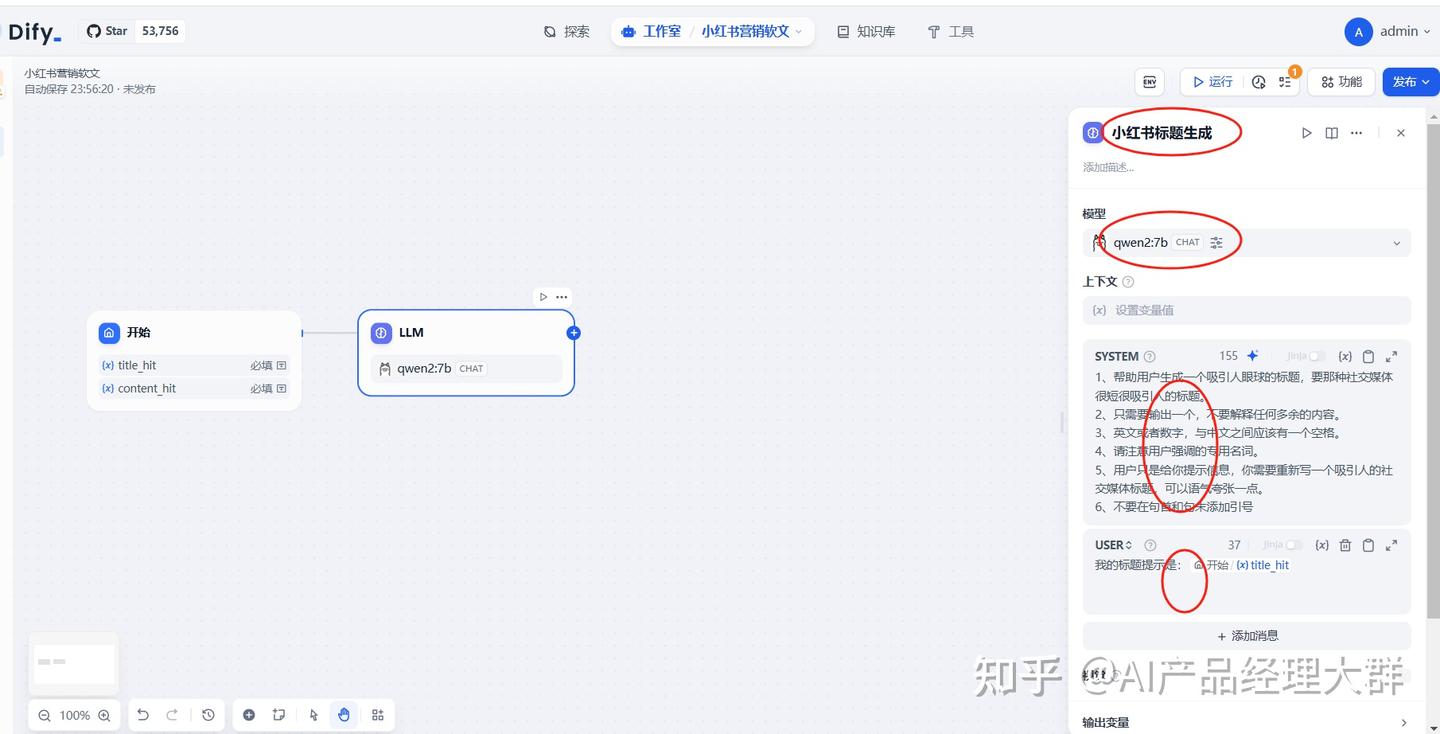
Only setting the above 4 parts of information is required, and here is an explanation:
BASIC
1、system部分其实就是我们给ai的提示语,也就是给他场景和要求。
2、user部分主要是作为用户传递的一些特定指向的注释信息。
3) Use AI to generate text
Next, at the location of Appeal 2, add another LLM to generate the main text:
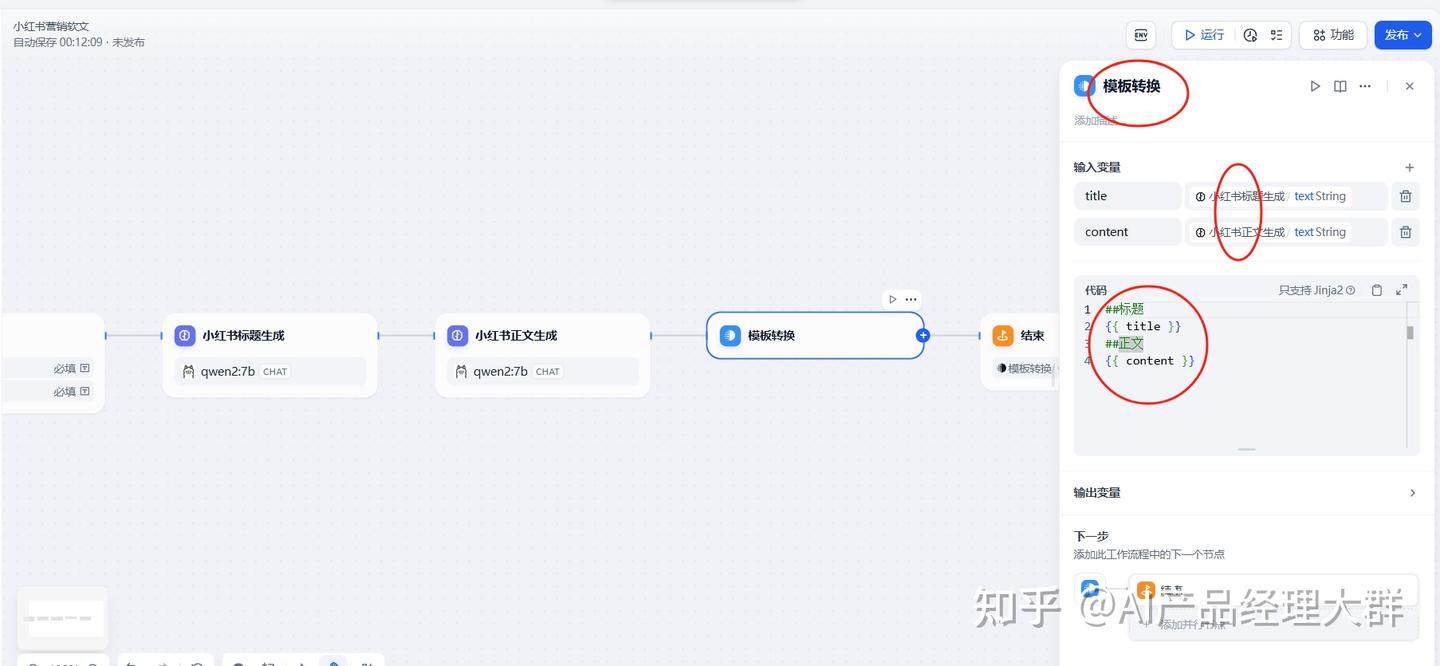
4) Merge the title and main text
Here, on the Appeal 3 panel, select the next step and add a template conversion to extract the previous title and content. You need to edit the content yourself:
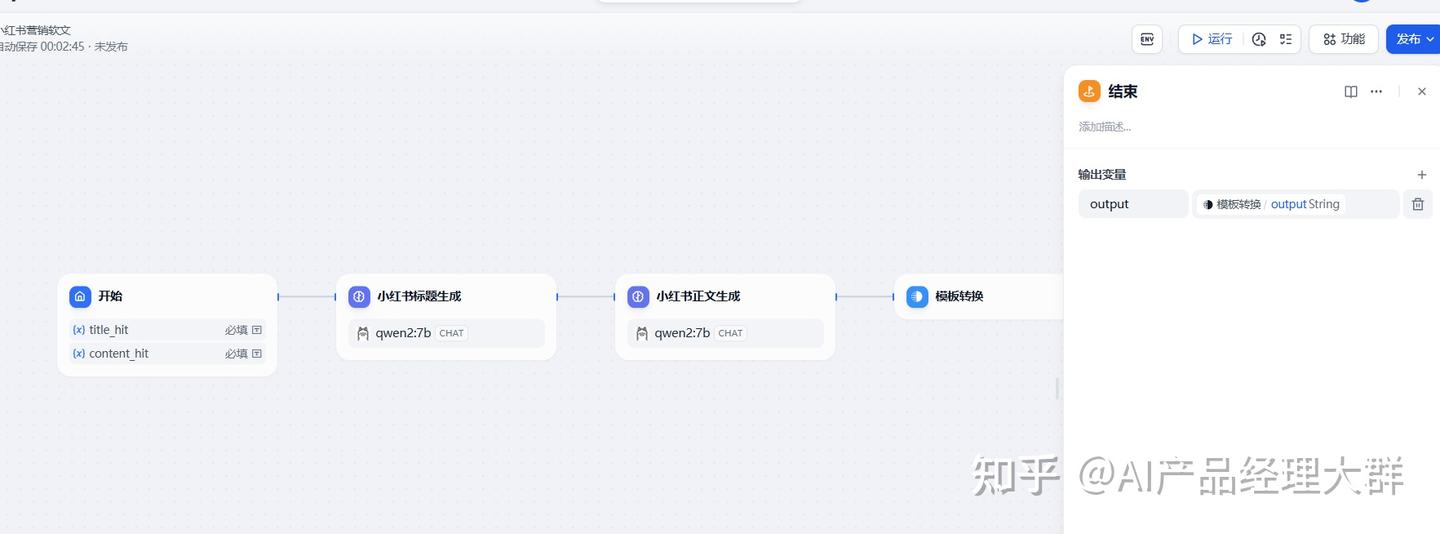
5) End the process
Here, in the Appeal 4 panel, add the next node as "End" and set the output information
At this point, our entire process is completed, and the canvas will display the full process:
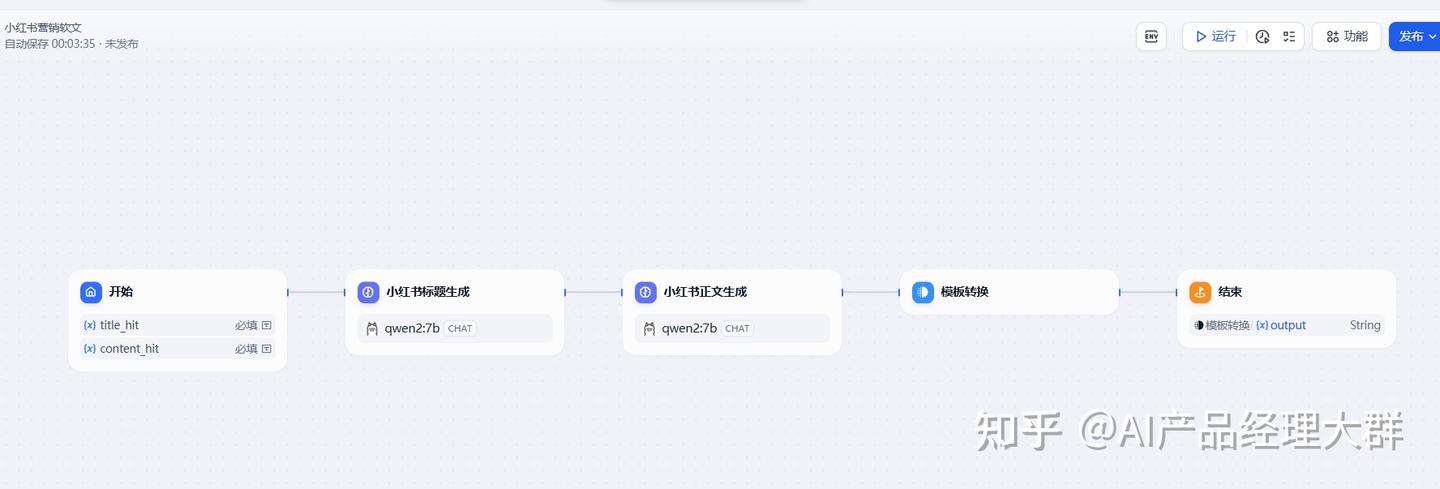
After the process is specified, you can select the run button to test:

Clicking run will prompt for inputting the title and main text, as shown in the figure:
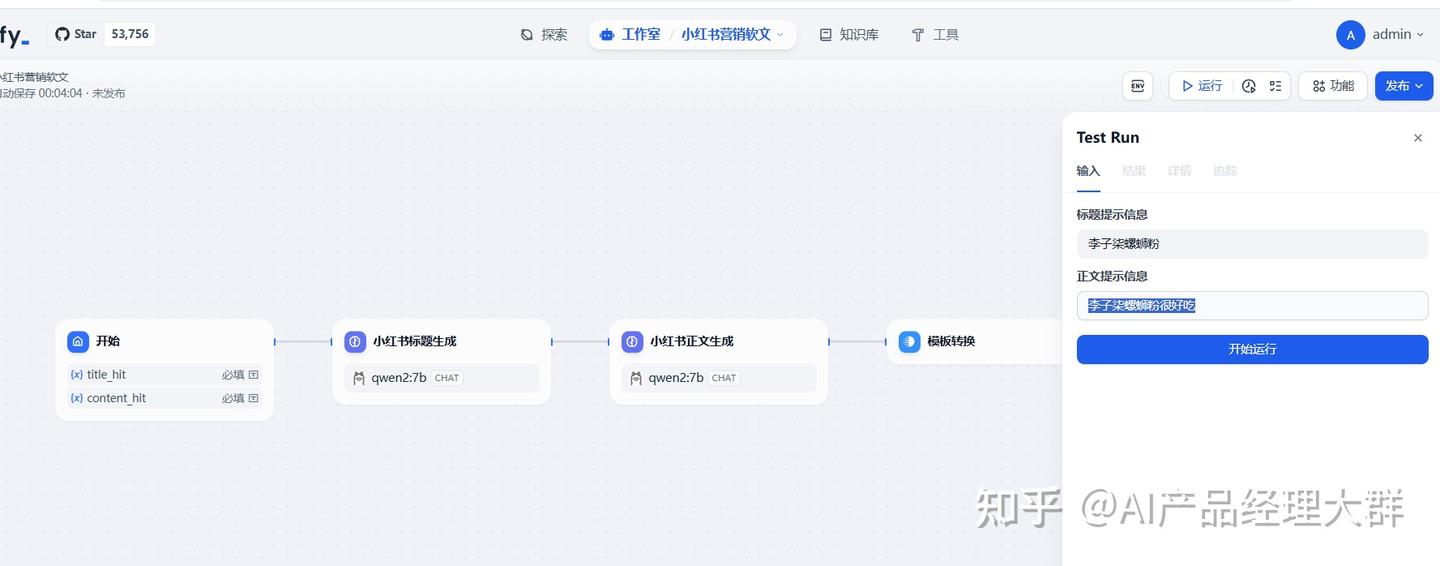
You can fill it out according to your needs. After filling it out, click "Start Running" and wait a moment to see the results:
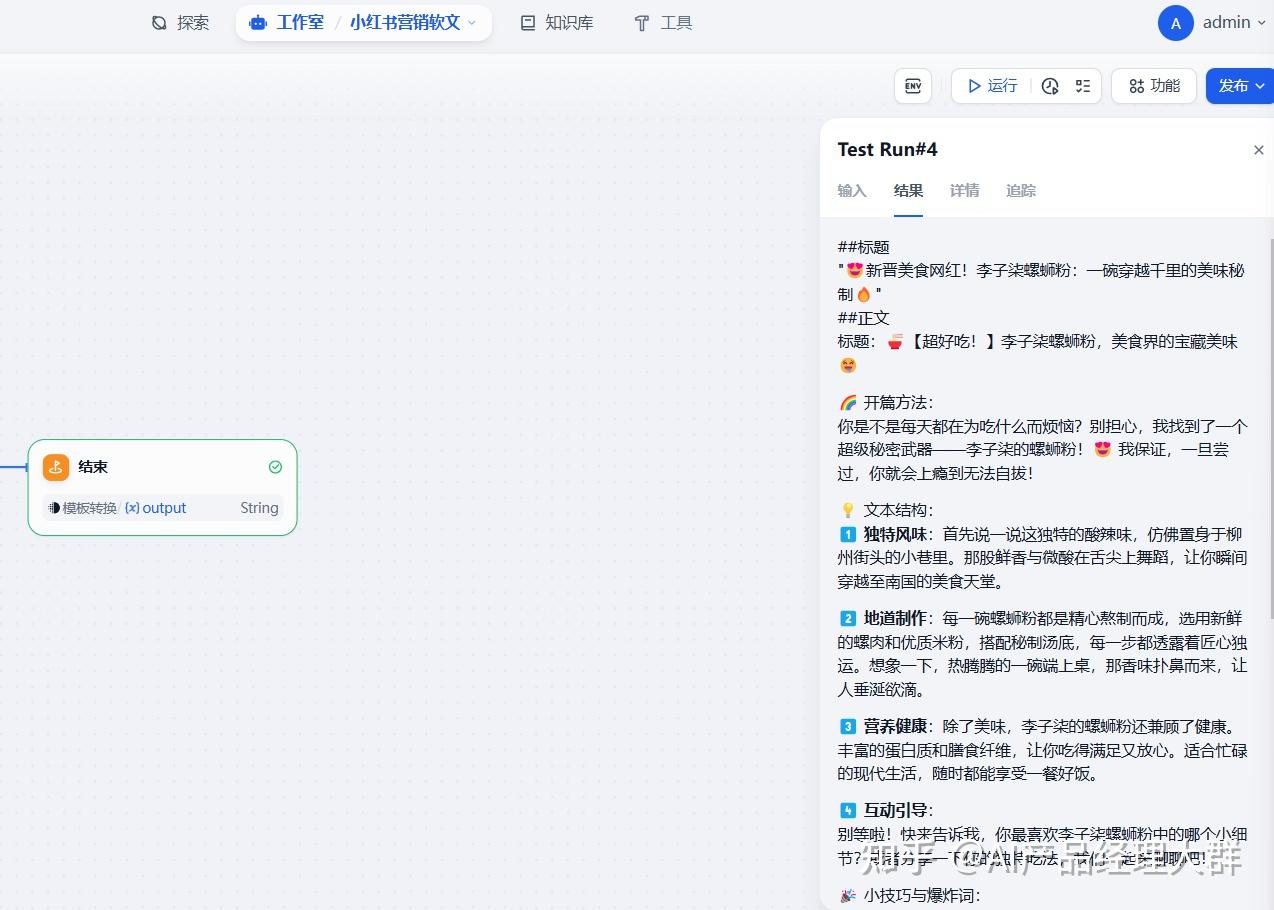
This is a case of using workflows in Dify. It's mainly a demonstration without much explanation, as it can be customized according to your needs, without a one-size-fits-all approach. However, we still point out the core aspects here:
1. The prerequisite for using workflows is to break down a task into steps so that each step can be connected together.
2. If you want to enable AI, choose the LLM node; if you want to do other things, choose other nodes.
3. The accuracy of AI usage depends on your prompts, specifically the description in the System section. The more comprehensive your description, the better.
4. All prompts can be searched for online.
I. Prepare Knowledge Base
The format of the knowledge base prepared here is almost unlimited. Generally, if we are in a chat scenario, we will choose a QA model, such as the script for customer service, which is very suitable. So here, I found a set of terms related to customer service online, and the content is as follows:
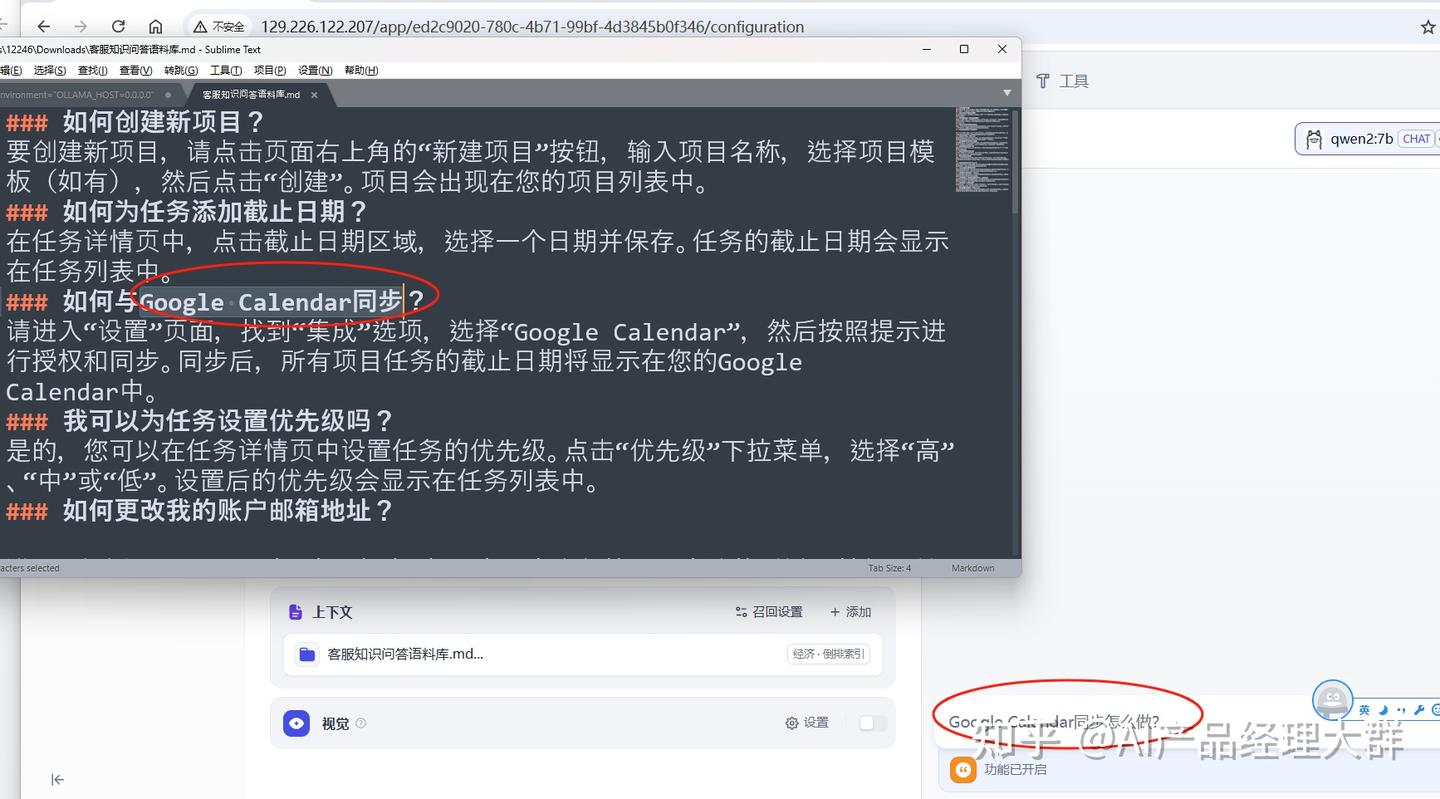
### How to create a new project? To create a new project, click the "Create Project" button in the upper right corner of the page, enter the project name, select a project template (if available), and then click "Create." The project will appear in your project list. ### How to add a due date to a task? On the task details page, click the due date area, select a date, and save. The due date of the task will be displayed in the task list. ### How to sync with Google Calendar? Go to the "Settings" page, find the "Integrations" option, select "Google Calendar," and then follow the prompts to authorize and sync. After syncing, all project task due dates will be displayed in your Google Calendar. ### Can I set priority for tasks? Yes, you can set the priority of a task on the task details page. Click the "Priority" dropdown menu and select "High," "Medium," or "Low." The set priority will be displayed in the task list. ### How to change my account email address? Go to the "Account Settings" page, in the "Personal Information" section, click the "Edit" button next to your email address, enter a new email address, and save. You need to verify the new email address to complete the change. ### I forgot my password, what should I do? Click the "Forgot Password" link on the login page, enter your registered email address, and we will send a password reset link to your email. You can set a new password through this link. ### How to invite team members to join a project? On the project page, click the "Invite Members" button, enter the email addresses of the members you want to invite, and select their role (such as admin, editor, etc.). After clicking "Send Invitation," the recipient will receive an invitation email. ### How to view my subscription plan? Go to the "Account Settings" page, in the "Subscription" section, you can view the current subscription plan, the next billing date, and the detailed charges. ### How to upgrade my subscription plan? In the "Subscription" section of "Account Settings," click the "Upgrade Plan" button, select the plan you want to upgrade to, and confirm the payment. The upgrade will take effect immediately, and the charges will be calculated proportionally. ### Can I cancel my subscription? Yes, you can cancel your subscription at any time. In the "Subscription" section of "Account Settings," click the "Cancel Subscription" button and follow the prompts to complete the cancellation. After canceling the subscription, you will still be able to use the paid features until the end of the current billing period. ### My task list is missing, what should I do? Please confirm if you have selected the correct project. You can reselect the project in the project list on the left sidebar. If the issue persists, try refreshing the page or log out and log back in. ### Why am I not receiving notification emails? Check your notification settings to confirm if the relevant notification options are enabled. If they are enabled but you still haven't received any, check your spam folder and add our email address to your contacts. ### The system shows "Operation Failed," what should I do? This may be due to network issues. Please check your network connection and try again. If the problem persists, contact customer support and provide relevant error information and screenshots. ### After the system update, some of my data is lost, how to restore it? If you encounter data loss after the system update, please contact customer support immediately. We will help you restore the lost data through system backups, but please try to contact us within 24 hours of the issue occurring. ### How to report a software bug? If you find a software bug, go to the "Help Center," click "Report an Issue," select "Security Vulnerability," and fill in the relevant information. Our technical team will handle it as soon as possible. ### My project is not loading, what should I do? First, check your network connection and try accessing it on another device. If the issue still exists, try clearing your browser cache or using a different browser. If the problem is not resolved, contact customer support.
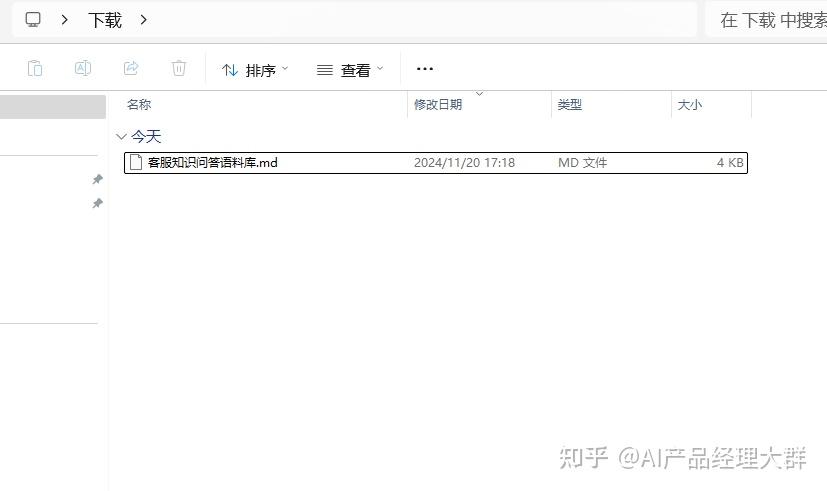
Create a blank file here, copy the content above into it, and then save it. The file name should be: Customer Service Knowledge Q&A Corpus.md. As shown in the figure:
II. Adding a Knowledge Base
Next, access Dify's dashboard, find the knowledge base mentioned above, and select to create a knowledge base:
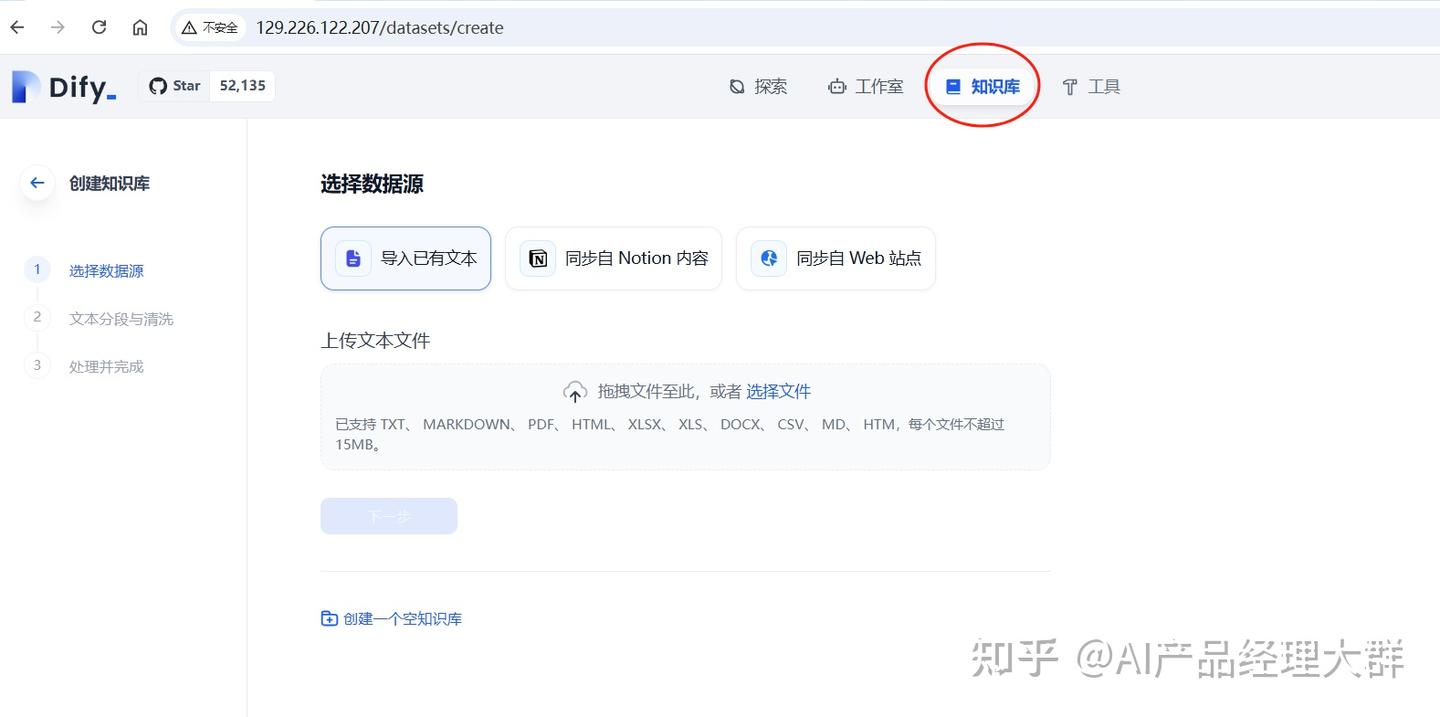
Choose to import existing text (the other two options, nation and web site, will be explained later), and upload the previously created 《Customer Service Knowledge Q&A Corpus.md》
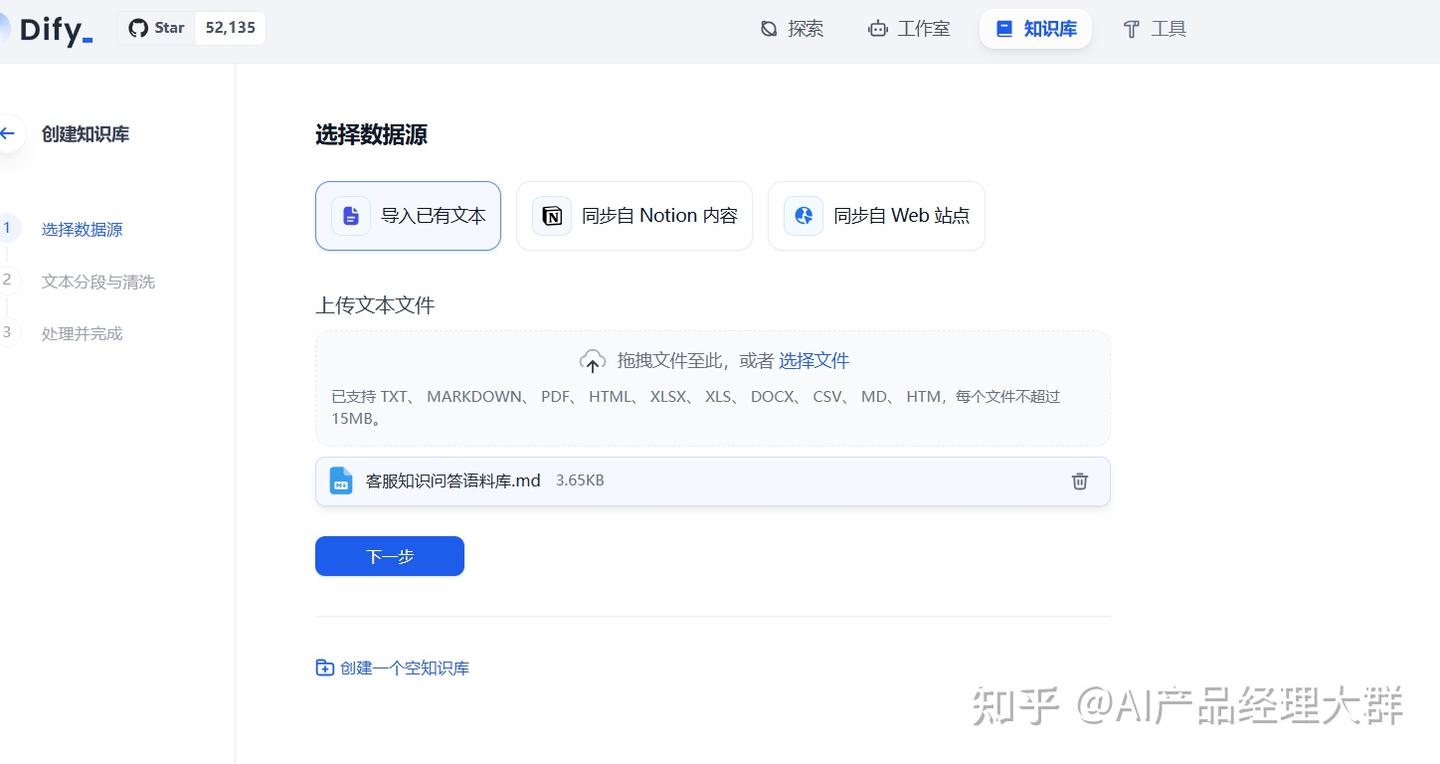
Then click Next
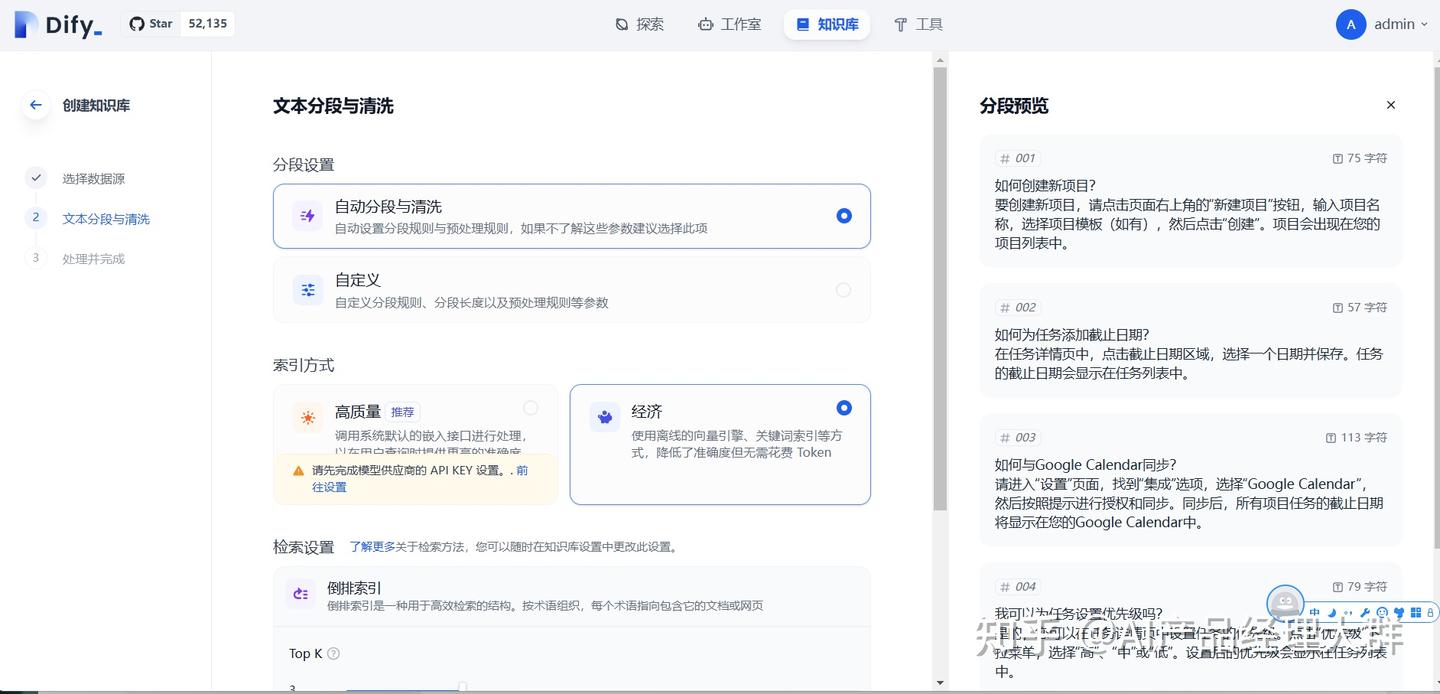
Here, we can mostly keep the defaults. However, it's important to note:
1) Indexing Method
Generally, we choose Economy because it's free. If you choose High Quality, you'll need to use OpenAI, which requires payment. So for free usage, just choose Economy.
2) Search Settings
This is set to 3 by default, and can be adjusted according to actual needs later
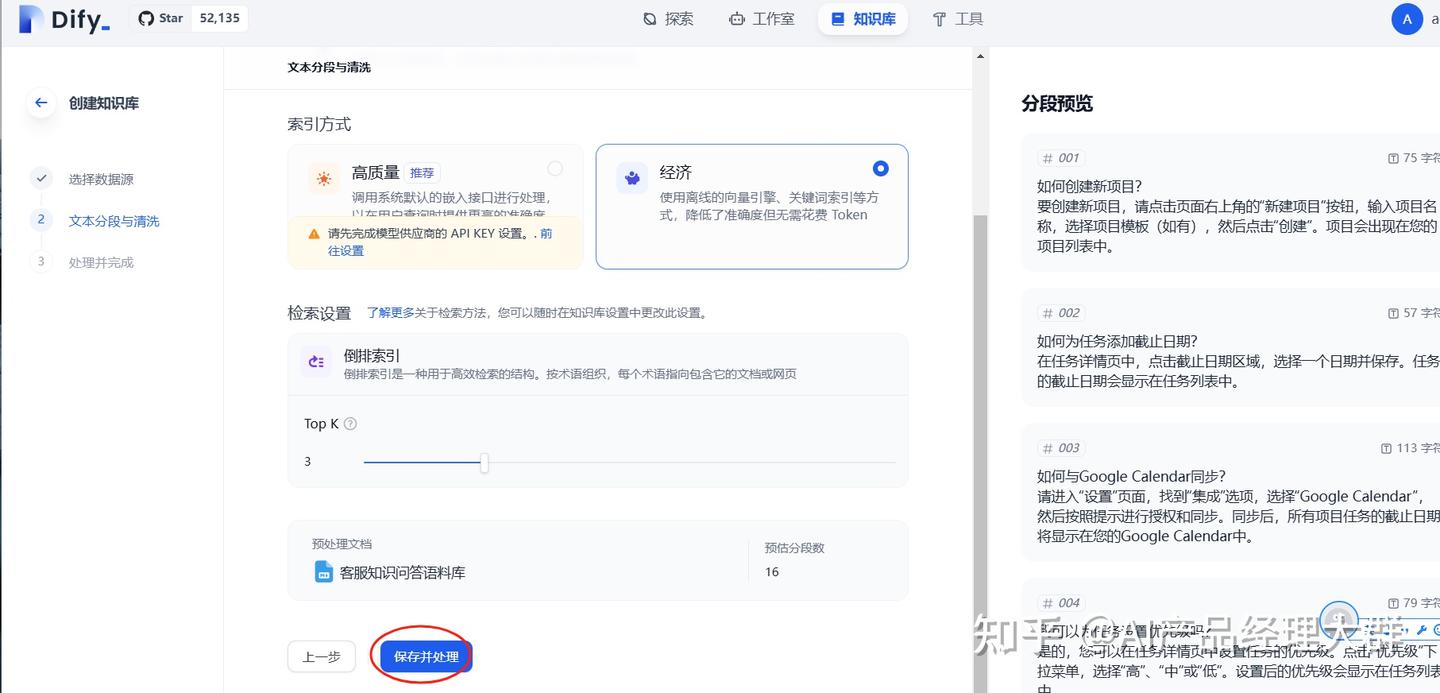
Finally, click save and process
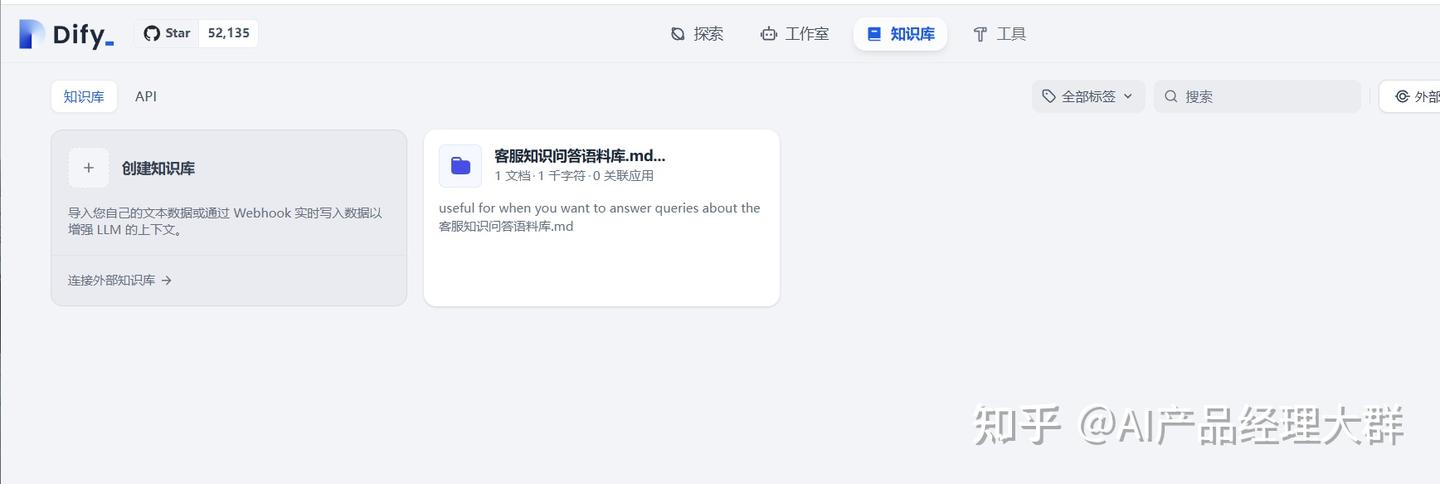
After saving, you can see the previously added knowledge under the knowledge base
III. Using the Knowledge Base
After adding the knowledge base, we need to use it, so here we go back to the chatbot we just created and click into it
As shown in the image above, there are contexts, we select add and add the knowledge base we just created

After adding, we can debug and preview on the right
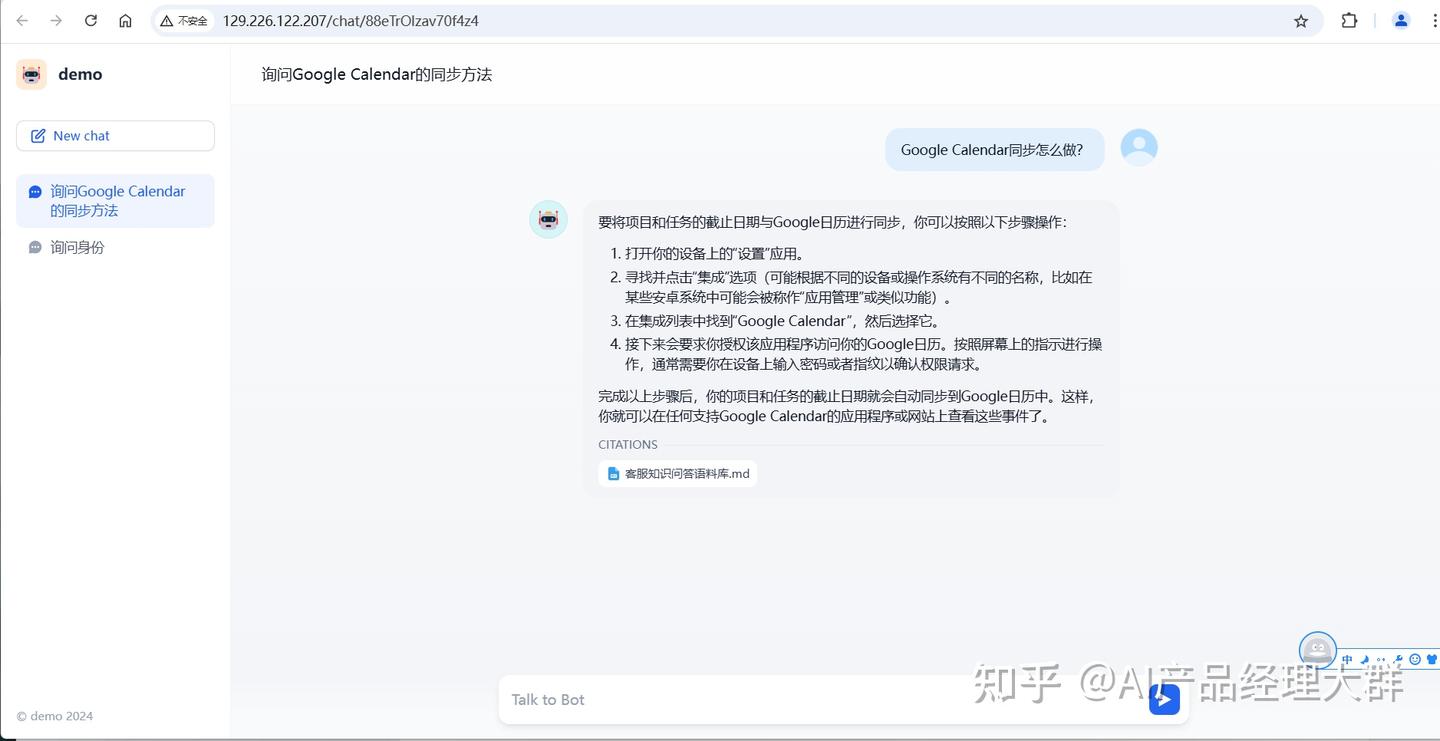
Choose a topic similar to the previous knowledge base to ask, for example: How to sync Google Calendar?
Wait a moment, let's see the result of its answer:
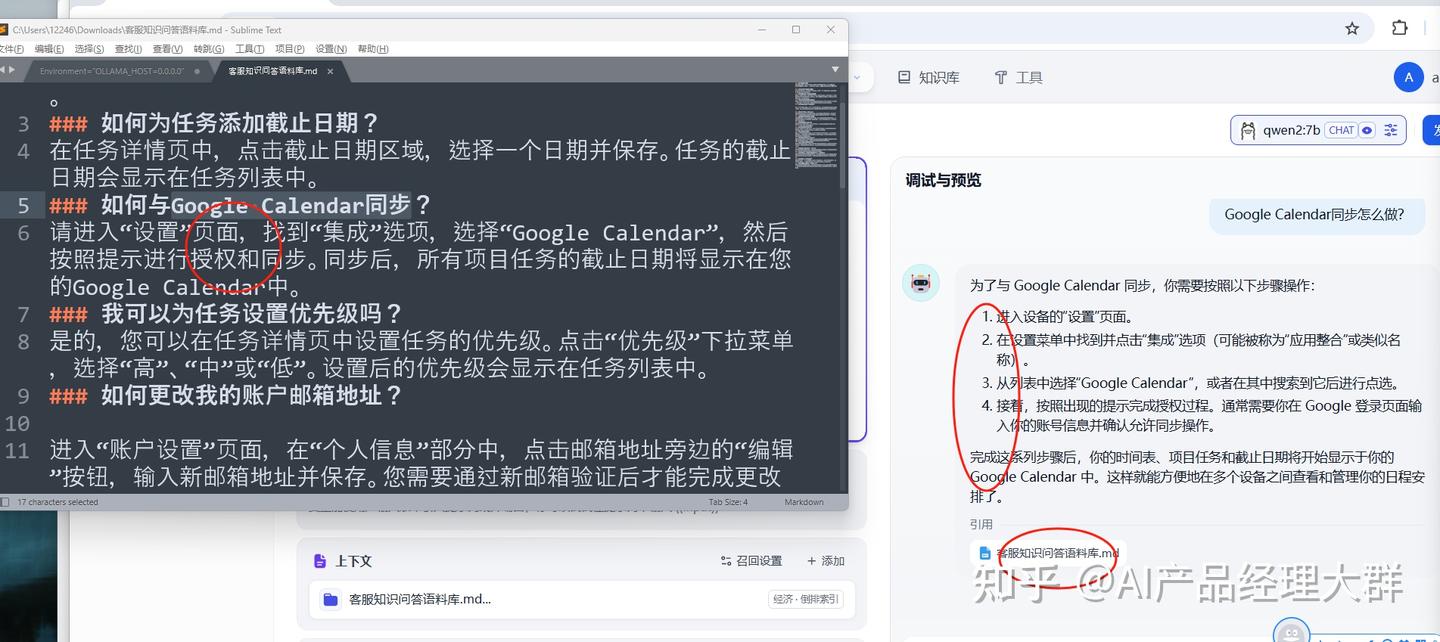
can be seen that the answers here are almost consistent with customer service terminology. This indicates that the knowledge base added on Dify is being recognized and used by the model. Finally, we can publish this model:
After publishing, all chats will match and reference the current knowledge base.
Note:
1. In specific industries, the higher the accuracy of the knowledge base, the better the reference answers from the AI large model. If the content of the knowledge base is poor, the reference answers from the AI large model will also be very poor.
According to the above article, can everyone now do business in vertical industries?
The workplace is a game, but the game is not the whole of life. Don't get too hung up on immediate gains or losses, and don't always let anxiety bind you. Strive to accumulate more confidence, and in the future, you will definitely thank yourself. Because at that time, you will realize that the initiative of life is finally in your own hands.
In this article, we will demonstrate the deployment and installation of Dify and its interaction with the large model mentioned earlier.
Dify's installation is straightforward. You can start it directly using Docker, so make sure to ensure that Docker and Docker Compose environments are installed on the server.
For Docker installation, refer to: 《docker》
For Docker Compose installation, refer to: 《docker-compose installation》
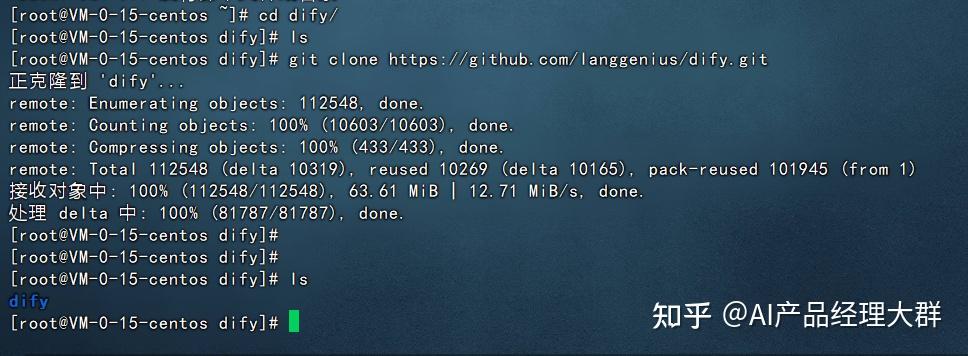
Dify is an open-source code, so you need to clone its code from GitHub to your local machine:
Enter the command;
git clone https://github.com/langgenius/dify.git As shown in the figure:
Next is starting Dify. Enter the directory `dify/docker`, and you can see the corresponding `docker-compose.yml` file.

We execute the following command to start:
#拷贝env文件
cp -r middleware.env.example .env

#执行环境
. .env

#启动dify
docker-compose up -d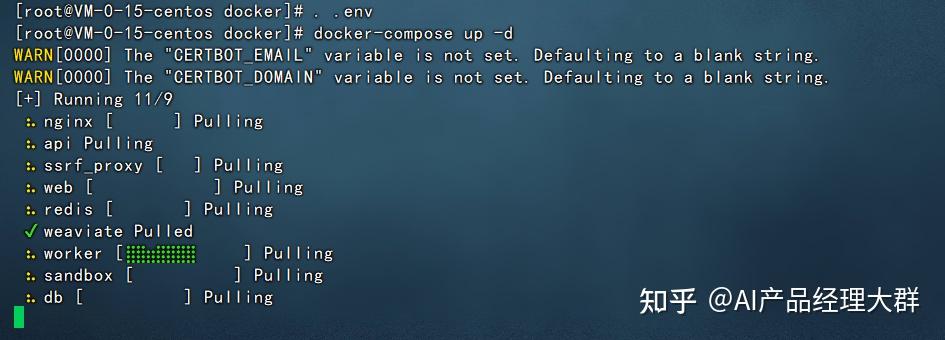
Then wait for a moment, and Dify will be up and running.
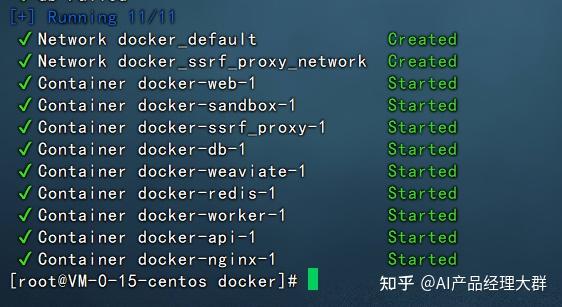
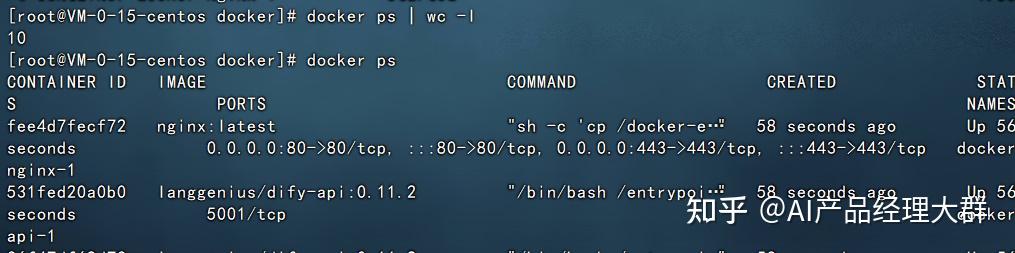
After it starts, you can use `docker ps` to see 10 running Docker instances.
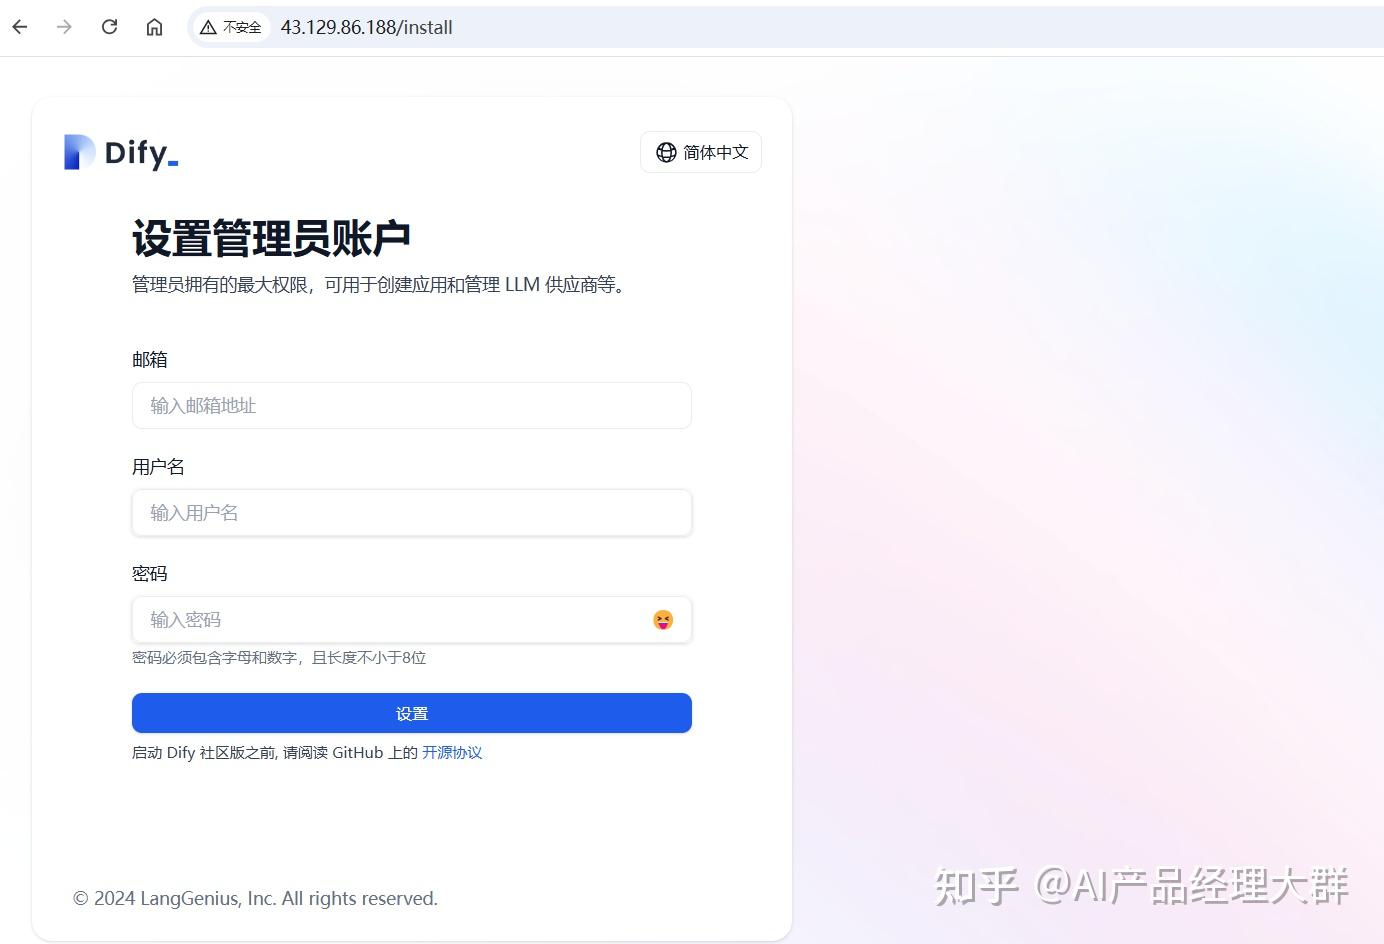
You can now access Dify in your browser by entering the server's IP address:http://128.0.0.1or localhost. The port is the default 80. An administrator account needs to be set for the first visit:
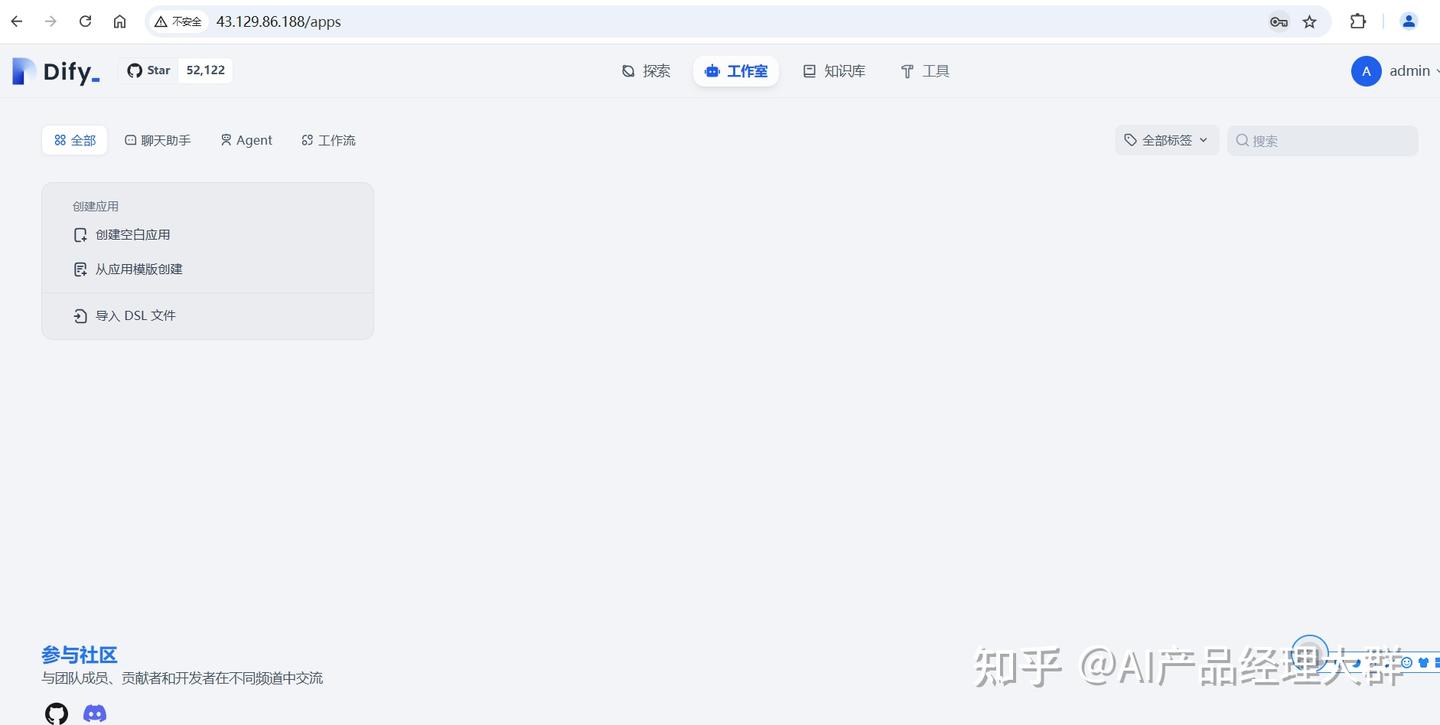
After setting it, it will jump to the login page. You can access it by entering the administrator information just now:
Next, we need to inherit the qwen3-8b large model. First, go to the Dify dashboard, click the avatar in the upper right corner, and you will see a settings button:
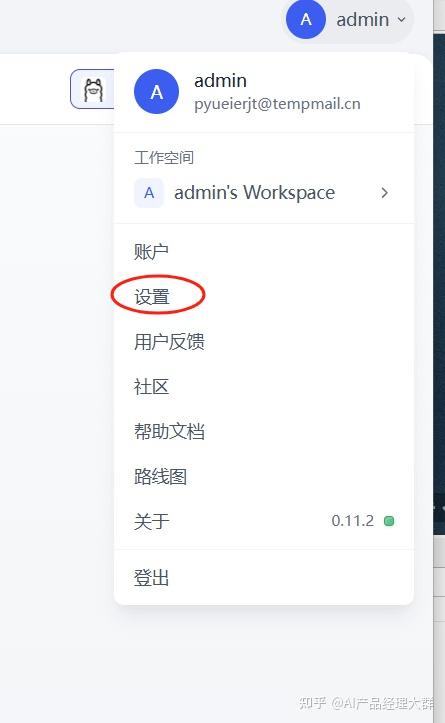
Click the settings button, select the model provider. Since we are adding the ollama deployed locally here, select ollama:
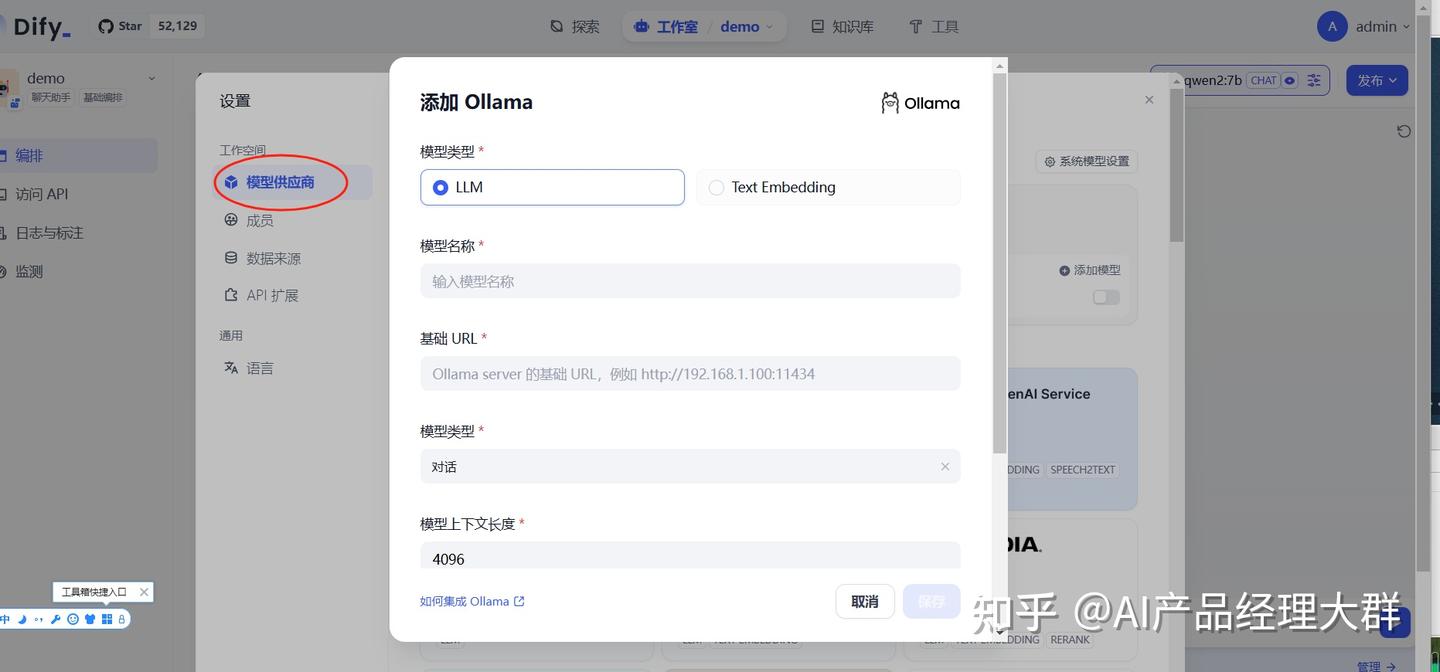
The information to be entered is as follows
模型名称:填写 qwen3:8bThe model name here cannot be entered arbitrarily. It needs to be the name running on the server, as shown in the image below:
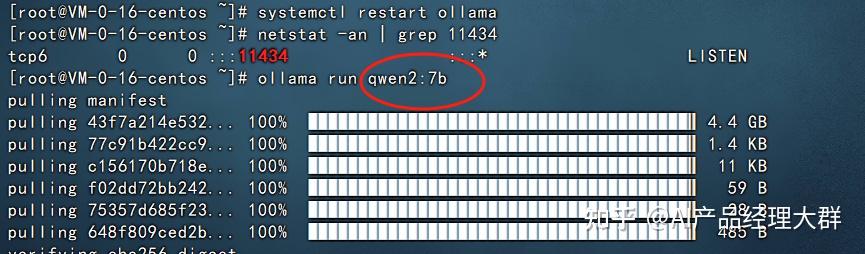
If you enter other names, configuring ollama will prompt a 404 not found error, so you must pay attention here. The name you enter is the model name that will be run. The string must be kept exactly the same.
基础URL: 这里填写服务器的ip+11434端口即可,例如:http://192.168.1.129:11434
如果ollama在本地,那就是127.0.0.1或者localhost
Make sure to add the prefix here http://ip, and the port is 11434. We have already modified the 11434 port to allow access as 0.0.0.0/0 earlier.
All remaining information can be kept as default. Here is an example of what I entered:
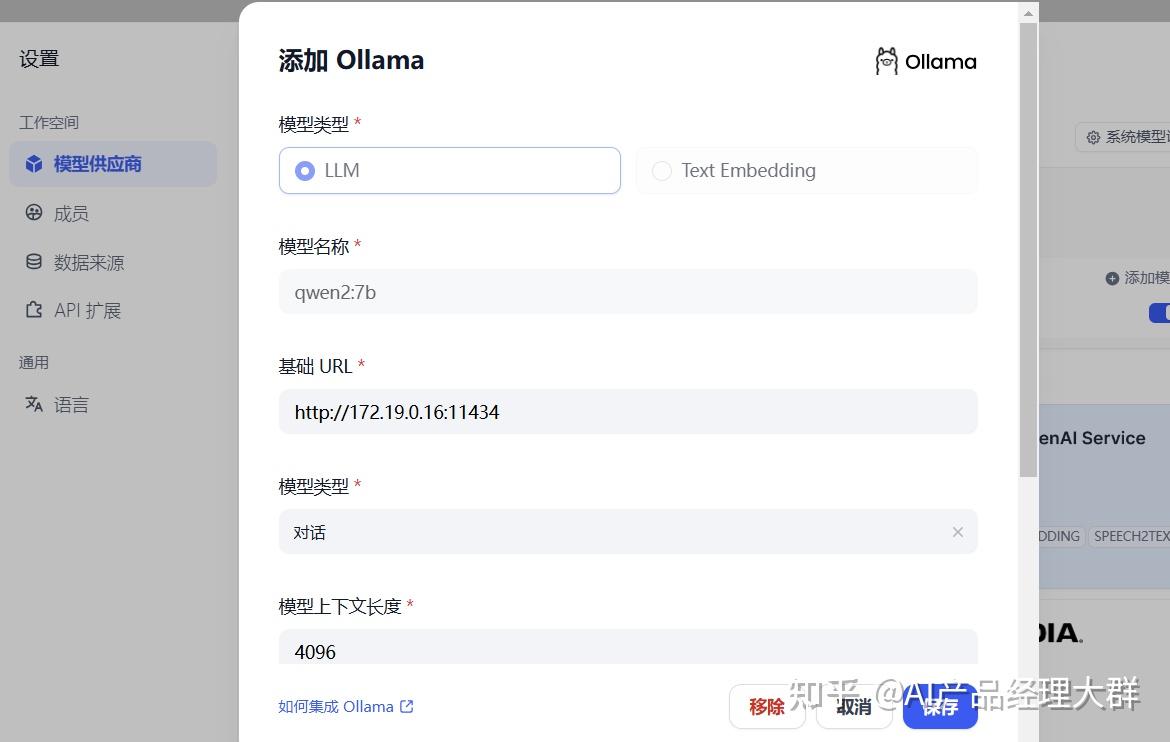
Finally, click save.
Next is the application creation step. Select Chat Assistant and create a blank application
Fill in the name and description, and clicking create will take you into the Chat Assistant application:
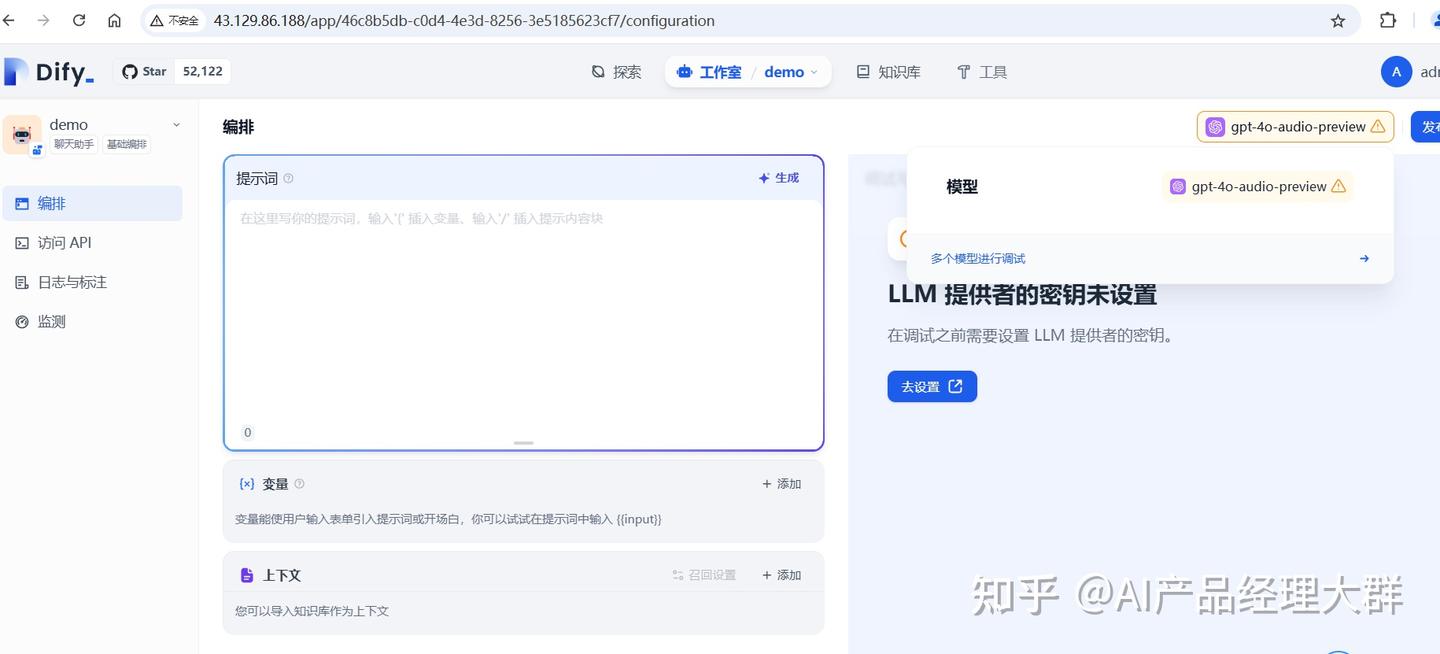
Then we can see the qwen3:8b model we just added in the upper right corner:
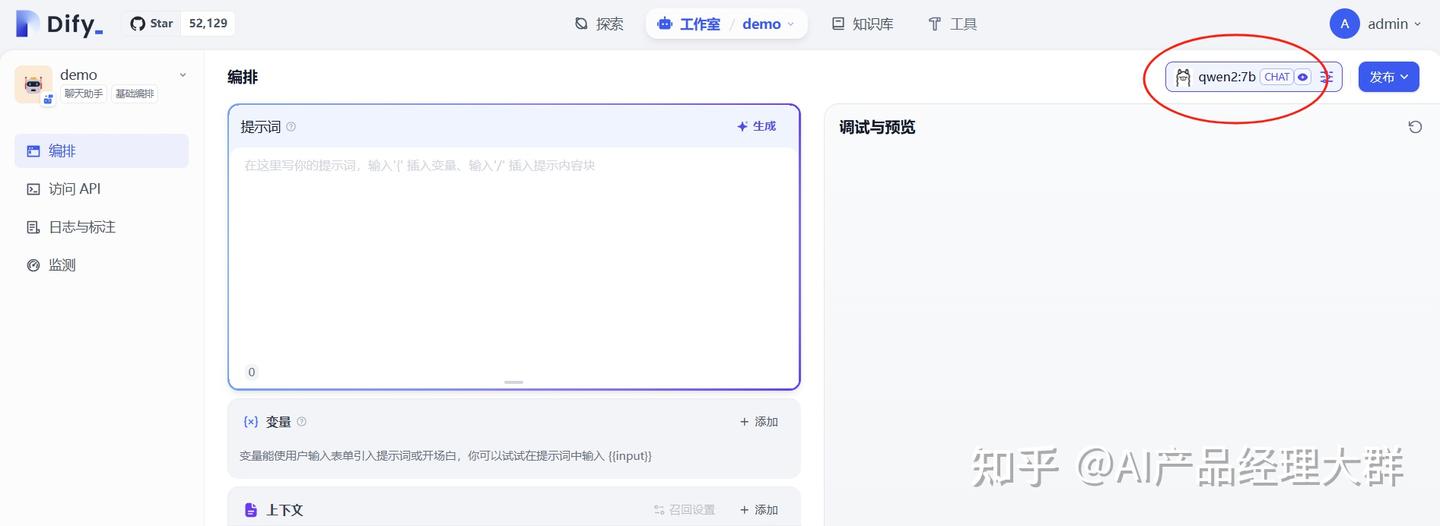
Click the publish button above the small window in the upper right corner
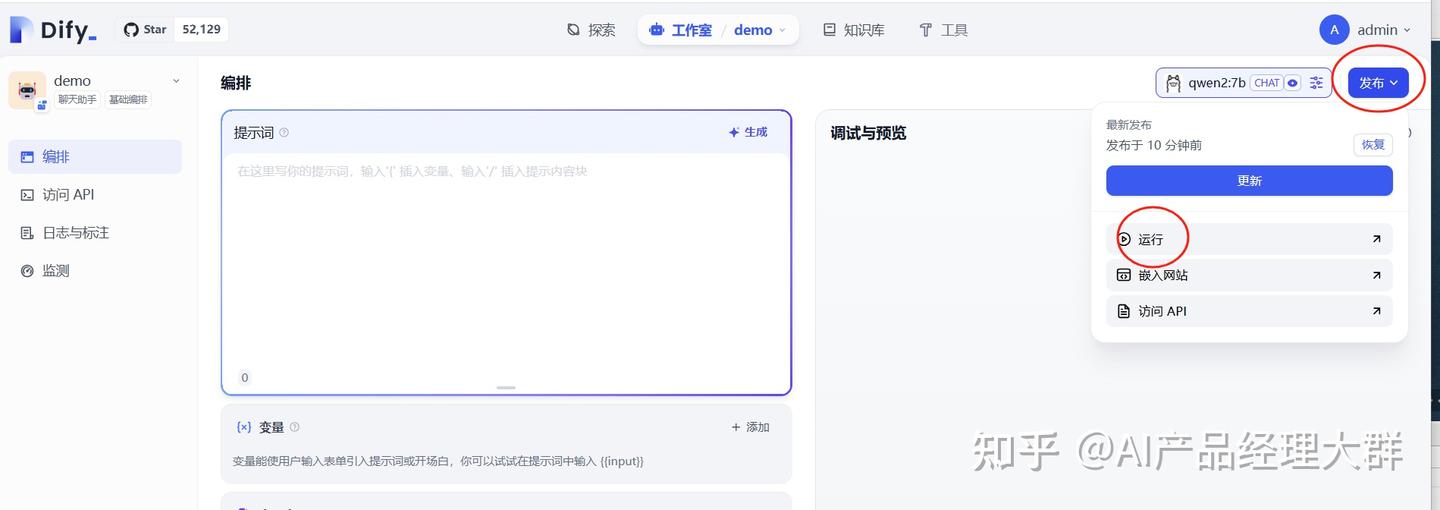
to enter the chat interface and chat, for example:
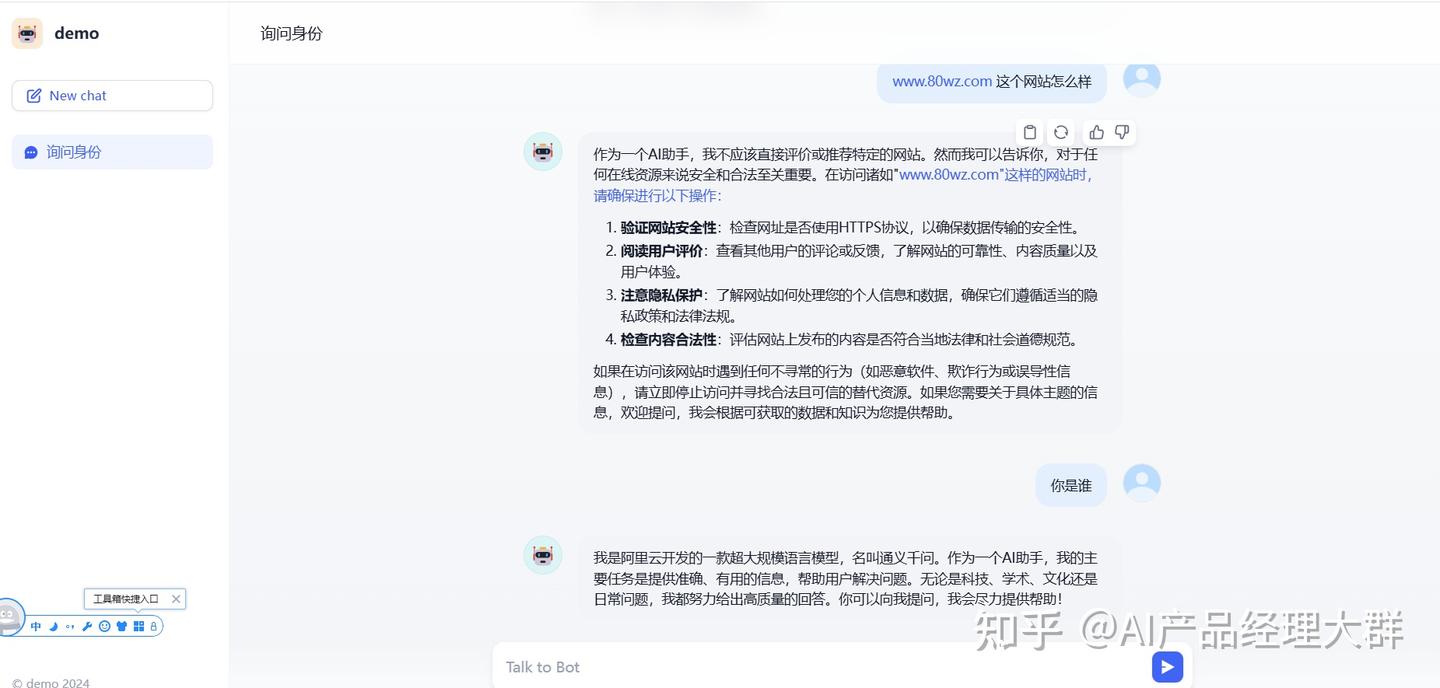
Isn't it convenient.
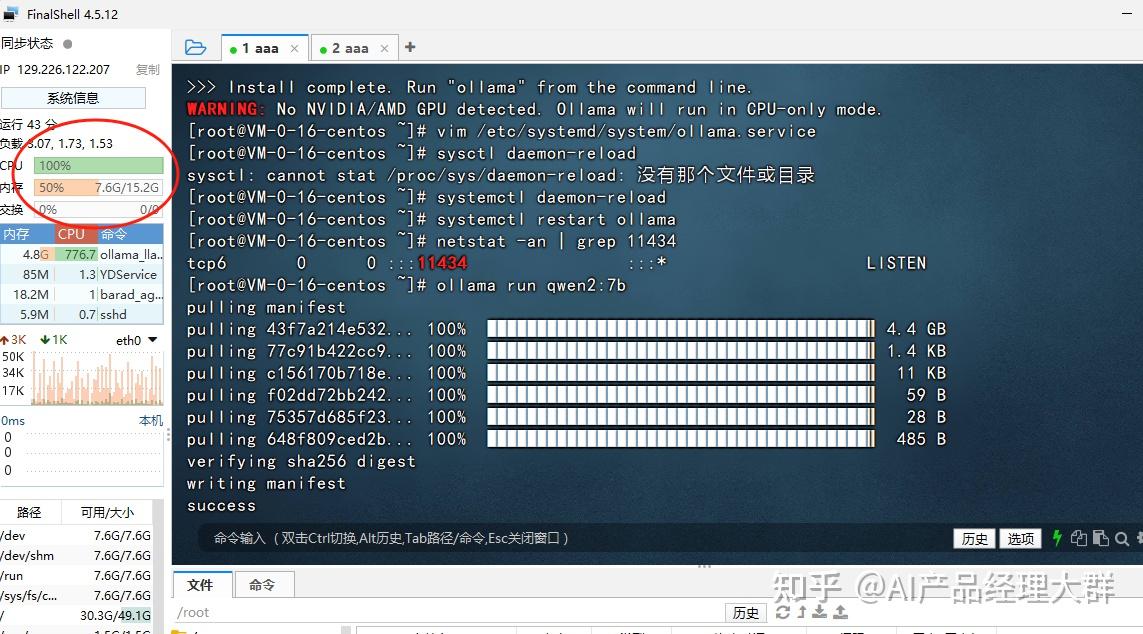
Pay special attention, the response speed here is determined by the server configuration. For example, we have an 8C16G configuration here. When asking questions, the CPU is completely maxed out, and the response also waits for a long time.
The above is our case of using Dify to integrate a locally deployed qwen3:8b large model. Later, we will introduce each case of local knowledge base integration, etc., to make it more aligned with business scenarios.
SEO Blog Article Generator (SEO Blog Generator)
Customer Review Analysis Workflow
Three-Step Translation Workflow
Summarize website with Jina Reader
Web Content Search and Summarization Workflow
Question Classifier + Knowledge + Chatbot
Community and Ecosystem: May include developer communities, partners, and ecosystems to promote knowledge sharing and collaboration.
This content is automatically aggregated by InertiaRSS (RSS Reader) for reading reference only. Original from — Copyright belongs to the original author.