












未来主体是传统行业利用互联网技术,以云端用人工智能的方式处理大数据。从早期的All In One(所有应用部署在一台机器上)的简单应用,到后期集群、高可用、缓存、消息队列、配置中心、主从分离、负载均衡、大数据存储等尖端技术的复杂应用,对运维的技术专业度和综合度技能要求越来越高,运维交付的标准不再是以天为单位,而是以分钟为单位。我们需要一套自动化管理工具来帮助运维更高质量、更有效的完成手头工作,以证明运维能创造的价值不止于此,生活不止眼前的苟且,还有诗和远方。
运维自动化目标:将日常重复性的工作通过规则设定使其遵循预先既定规则,在指定的范围时间内自动化运行。但整个过程无需人工参与。
Ansible是帮助运维人员实现自动化的最重要的工具之一。
Ansible名字来源于其作者喜欢的一本书《安德的游戏》,该书中Ansible是一种能跨越时空的即时通信工具,使用Ansible可以在相距数光年的距离远程实时控制前线的舰队战斗。
Ansible是越来越火的一款运维自动化工具,其主要功能是帮助运维实现IT工作的自动化、降低人为操作失误、提高业务自动化率、提升运维工作效率,常用于软件部署自动化、配置自动化、管理自动化、系统化开发任务、持续集成、零宕机平滑升级等。
Ansible是一款极其简单的IT自动化工具。Ansible操作极其简单,功能却非常丰富,其自身内置的模块数量达五百多个,主要包括:
Ansible没有客户端,底层通信依赖于系统软件,Linux系统基于OpenSSH通信,Windows系统基于Powershell,管理端必须是Linux系统,使用者认证通过后在管理节点通过Ansible工具调用各应用模块将指令推送至管理端执行,并在执行完毕后自动删除产生的临时文件。
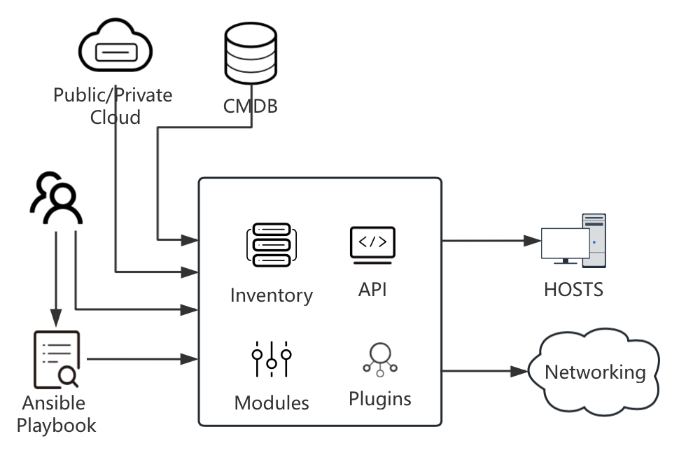
Ansible整个工作流程中大致有三类角色:
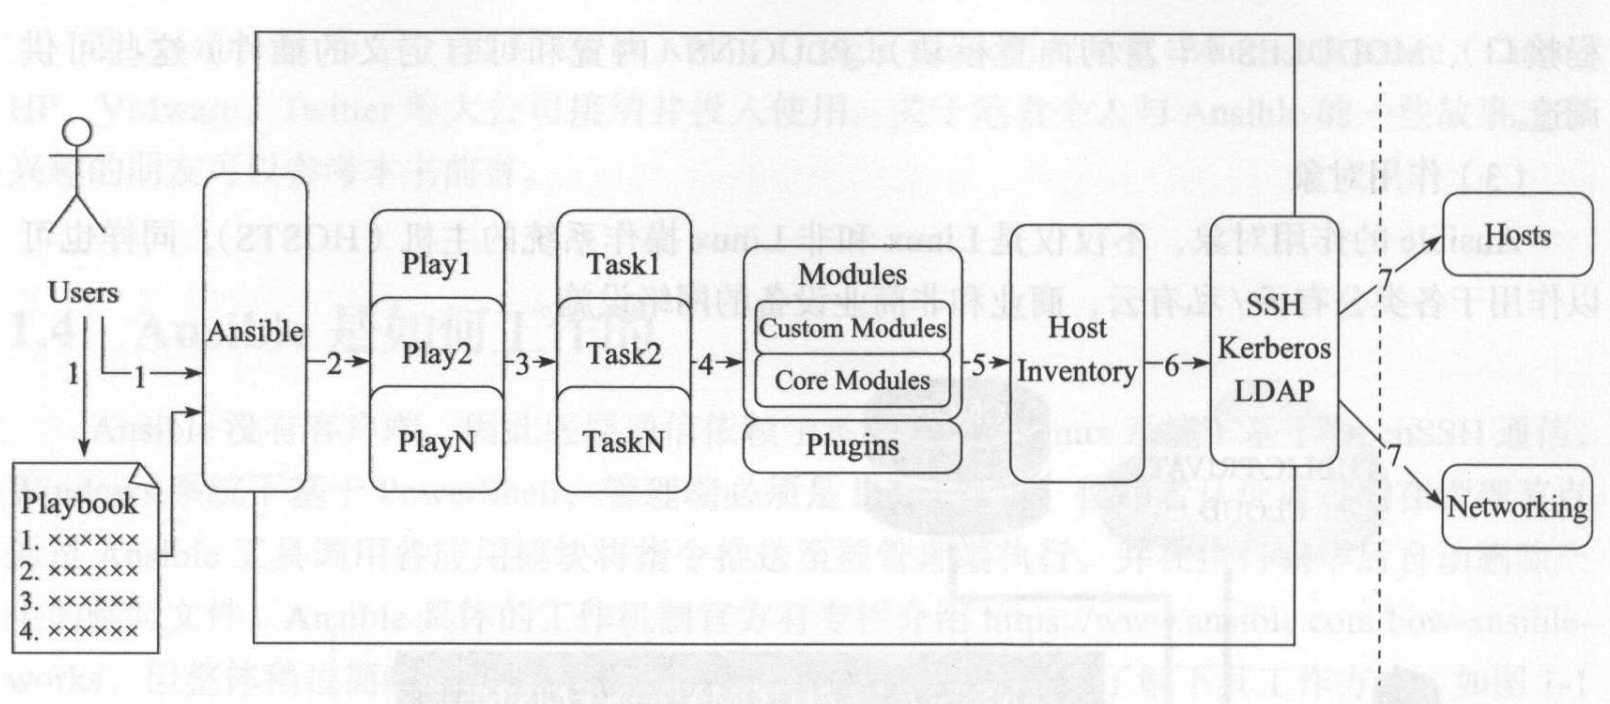
从Ansible 1.3版本开始,默认使用OpenSSH通信方式(底层基于SSH协议,window基于Powershell协议),支持密码和SSH认证
pip安装方式:
// 安装python
yum install python-pip python-devel -y

// 安装gcc glibc开发环境
yum install gcc glibc-devel zlib-devel rpm-build openssl-devel -y

// 升级pip
pip install --upgrade pip

// 安装ansible
pip install ansible -upgrade
yum安装方式
rpm
yum install ansible -y
安装完后,查看ansible版本号,如果有正确返回,则表示安装成功
[root@192-168-158-100-RedHat-7 ansible]# ansible --version
ansible 2.9.27
  config file = /etc/ansible/ansible.cfg
  configured module search path = [u'/root/.ansible/plugins/modules', u'/usr/share/ansible/plugins/modules']
  ansible python module location = /usr/lib/python2.7/site-packages/ansible
  executable location = /usr/bin/ansible
  python version = 2.7.5 (default, Nov 14 2023, 16:14:06) [GCC 4.8.5 20150623 (Red Hat 4.8.5-44)]
使用命令rpm -ql ansible可以查看Ansible的安装目录,该输出较多,但大致可以分为以下几个目录:
Ansible自身配置文件只有一个,默认存放于/etc/ansible/ansible.cfg路径,Ansible命令执行时,会依次从当前命令执行路径、当前用户家目录、默认安装路径寻找ansible.cfg配置文件,找到哪个就用哪个
[defaults]
# some basic default values...
#inventory      = /etc/ansible/hosts                              # 主机清单
#library        = /usr/share/my_modules/                       # 库文件地址
#module_utils   = /usr/share/my_module_utils/
#remote_tmp     = ~/.ansible/tmp                                # 远程主机临时文件存放目录
#local_tmp      = ~/.ansible/tmp                                  # 本地临时文件存放目录
#plugin_filters_cfg = /etc/ansible/plugin_filters.yml
#forks          = 5                                                        # 并发数
#poll_interval  = 15
#sudo_user      = root
#ask_sudo_pass = True
#ask_pass      = True
#transport      = smart
#remote_port    = 22
#module_lang    = C
#module_set_locale = False
# plays will gather facts by default, which contain information about
# the remote system.
#
# smart - gather by default, but don't regather if already gathered
# implicit - gather by default, turn off with gather_facts: False
# explicit - do not gather by default, must say gather_facts: True
#gathering = implicit
# This only affects the gathering done by a play's gather_facts directive,
# by default gathering retrieves all facts subsets
# all - gather all subsets
# network - gather min and network facts
# hardware - gather hardware facts (longest facts to retrieve)
# virtual - gather min and virtual facts
# facter - import facts from facter
# ohai - import facts from ohai
# You can combine them using comma (ex: network,virtual)
# You can negate them using ! (ex: !hardware,!facter,!ohai)
# A minimal set of facts is always gathered.
#gather_subset = all
# some hardware related facts are collected
# with a maximum timeout of 10 seconds. This
# option lets you increase or decrease that
# timeout to something more suitable for the
# environment.
# gather_timeout = 10
# Ansible facts are available inside the ansible_facts.* dictionary
# namespace. This setting maintains the behaviour which was the default prior
# to 2.5, duplicating these variables into the main namespace, each with a
# prefix of 'ansible_'.
# This variable is set to True by default for backwards compatibility. It
# will be changed to a default of 'False' in a future release.
# ansible_facts.
# inject_facts_as_vars = True
# additional paths to search for roles in, colon separated
#roles_path    = /etc/ansible/roles
# uncomment this to disable SSH key host checking
#host_key_checking = False
# change the default callback, you can only have one 'stdout' type  enabled at a time.
#stdout_callback = skippy
## Ansible ships with some plugins that require whitelisting,
## this is done to avoid running all of a type by default.
## These setting lists those that you want enabled for your system.
## Custom plugins should not need this unless plugin author specifies it.
# enable callback plugins, they can output to stdout but cannot be 'stdout' type.
#callback_whitelist = timer, mail
# Determine whether includes in tasks and handlers are "static" by
# default. As of 2.0, includes are dynamic by default. Setting these
# values to True will make includes behave more like they did in the
# 1.x versions.
#task_includes_static = False
#handler_includes_static = False
# Controls if a missing handler for a notification event is an error or a warning
#error_on_missing_handler = True
# change this for alternative sudo implementations
#sudo_exe = sudo
# What flags to pass to sudo
# WARNING: leaving out the defaults might create unexpected behaviours
#sudo_flags = -H -S -n
# SSH timeout
#timeout = 10
# default user to use for playbooks if user is not specified
# (/usr/bin/ansible will use current user as default)
#remote_user = root
# logging is off by default unless this path is defined
# if so defined, consider logrotate
#log_path = /var/log/ansible.log
# default module name for /usr/bin/ansible
#module_name = command
# use this shell for commands executed under sudo
# you may need to change this to bin/bash in rare instances
# if sudo is constrained
#executable = /bin/sh
# if inventory variables overlap, does the higher precedence one win
# or are hash values merged together?  The default is 'replace' but
# this can also be set to 'merge'.
#hash_behaviour = replace
# by default, variables from roles will be visible in the global variable
# scope. To prevent this, the following option can be enabled, and only
# tasks and handlers within the role will see the variables there
#private_role_vars = yes
# list any Jinja2 extensions to enable here:
#jinja2_extensions = jinja2.ext.do,jinja2.ext.i18n
# if set, always use this private key file for authentication, same as
# if passing --private-key to ansible or ansible-playbook
#private_key_file = /path/to/file
# If set, configures the path to the Vault password file as an alternative to
# specifying --vault-password-file on the command line.
#vault_password_file = /path/to/vault_password_file
# format of string {{ ansible_managed }} available within Jinja2
# templates indicates to users editing templates files will be replaced.
# replacing {file}, {host} and {uid} and strftime codes with proper values.
#ansible_managed = Ansible managed: {file} modified on %Y-%m-%d %H:%M:%S by {uid} on {host}
# {file}, {host}, {uid}, and the timestamp can all interfere with idempotence
# in some situations so the default is a static string:
#ansible_managed = Ansible managed
# by default, ansible-playbook will display "Skipping [host]" if it determines a task
# should not be run on a host.  Set this to "False" if you don't want to see these "Skipping"
# messages. NOTE: the task header will still be shown regardless of whether or not the
# task is skipped.
#display_skipped_hosts = True
# by default, if a task in a playbook does not include a name: field then
# ansible-playbook will construct a header that includes the task's action but
# not the task's args.  This is a security feature because ansible cannot know
# if the *module* considers an argument to be no_log at the time that the
# header is printed.  If your environment doesn't have a problem securing
# stdout from ansible-playbook (or you have manually specified no_log in your
# playbook on all of the tasks where you have secret information) then you can
# safely set this to True to get more informative messages.
#display_args_to_stdout = False
# by default (as of 1.3), Ansible will raise errors when attempting to dereference
# Jinja2 variables that are not set in templates or action lines. Uncomment this line
# to revert the behavior to pre-1.3.
#error_on_undefined_vars = False
# by default (as of 1.6), Ansible may display warnings based on the configuration of the
# system running ansible itself. This may include warnings about 3rd party packages or
# other conditions that should be resolved if possible.
# to disable these warnings, set the following value to False:
#system_warnings = True
# by default (as of 1.4), Ansible may display deprecation warnings for language
# features that should no longer be used and will be removed in future versions.
# to disable these warnings, set the following value to False:
#deprecation_warnings = True
# (as of 1.8), Ansible can optionally warn when usage of the shell and
# command module appear to be simplified by using a default Ansible module
# instead.  These warnings can be silenced by adjusting the following
# setting or adding warn=yes or warn=no to the end of the command line
# parameter string.  This will for example suggest using the git module
# instead of shelling out to the git command.
# command_warnings = False
# set plugin path directories here, separate with colons
#action_plugins     = /usr/share/ansible/plugins/action
#become_plugins     = /usr/share/ansible/plugins/become
#cache_plugins      = /usr/share/ansible/plugins/cache
#callback_plugins   = /usr/share/ansible/plugins/callback
#connection_plugins = /usr/share/ansible/plugins/connection
#lookup_plugins     = /usr/share/ansible/plugins/lookup
#inventory_plugins  = /usr/share/ansible/plugins/inventory
#vars_plugins       = /usr/share/ansible/plugins/vars
#filter_plugins     = /usr/share/ansible/plugins/filter
#test_plugins       = /usr/share/ansible/plugins/test
#terminal_plugins   = /usr/share/ansible/plugins/terminal
#strategy_plugins   = /usr/share/ansible/plugins/strategy
# by default, ansible will use the 'linear' strategy but you may want to try
# another one
#strategy = free
# by default callbacks are not loaded for /bin/ansible, enable this if you
# want, for example, a notification or logging callback to also apply to
# /bin/ansible runs
#bin_ansible_callbacks = False
# don't like cows?  that's unfortunate.
# set to 1 if you don't want cowsay support or export ANSIBLE_NOCOWS=1
#nocows = 1
# set which cowsay stencil you'd like to use by default. When set to 'random',
# a random stencil will be selected for each task. The selection will be filtered
# against the `cow_whitelist` option below.
#cow_selection = default
#cow_selection = random
# when using the 'random' option for cowsay, stencils will be restricted to this list.
# it should be formatted as a comma-separated list with no spaces between names.
# NOTE: line continuations here are for formatting purposes only, as the INI parser
#       in python does not support them.
#cow_whitelist=bud-frogs,bunny,cheese,daemon,default,dragon,elephant-in-snake,elephant,eyes,\
#              hellokitty,kitty,luke-koala,meow,milk,moofasa,moose,ren,sheep,small,stegosaurus,\
#              stimpy,supermilker,three-eyes,turkey,turtle,tux,udder,vader-koala,vader,www
# don't like colors either?
# set to 1 if you don't want colors, or export ANSIBLE_NOCOLOR=1
#nocolor = 1
# if set to a persistent type (not 'memory', for example 'redis') fact values
# from previous runs in Ansible will be stored.  This may be useful when
# wanting to use, for example, IP information from one group of servers
# without having to talk to them in the same playbook run to get their
# current IP information.
#fact_caching = memory
#This option tells Ansible where to cache facts. The value is plugin dependent.
#For the jsonfile plugin, it should be a path to a local directory.
#For the redis plugin, the value is a host:port:database triplet: fact_caching_connection = localhost:6379:0
#fact_caching_connection=/tmp
# retry files
# When a playbook fails a .retry file can be created that will be placed in ~/
# You can enable this feature by setting retry_files_enabled to True
# and you can change the location of the files by setting retry_files_save_path
#retry_files_enabled = False
#retry_files_save_path = ~/.ansible-retry
# squash actions
# Ansible can optimise actions that call modules with list parameters
# when looping. Instead of calling the module once per with_ item, the
# module is called once with all items at once. Currently this only works
# under limited circumstances, and only with parameters named 'name'.
#squash_actions = apk,apt,dnf,homebrew,pacman,pkgng,yum,zypper
# prevents logging of task data, off by default
#no_log = False
# prevents logging of tasks, but only on the targets, data is still logged on the master/controller
#no_target_syslog = False
# controls whether Ansible will raise an error or warning if a task has no
# choice but to create world readable temporary files to execute a module on
# the remote machine.  This option is False by default for security.  Users may
# turn this on to have behaviour more like Ansible prior to 2.1.x.  See
# https://docs.ansible.com/ansible/become.html#becoming-an-unprivileged-user
# for more secure ways to fix this than enabling this option.
#allow_world_readable_tmpfiles = False
# controls the compression level of variables sent to
# worker processes. At the default of 0, no compression
# is used. This value must be an integer from 0 to 9.
#var_compression_level = 9
# controls what compression method is used for new-style ansible modules when
# they are sent to the remote system.  The compression types depend on having
# support compiled into both the controller's python and the client's python.
# The names should match with the python Zipfile compression types:
# * ZIP_STORED (no compression. available everywhere)
# * ZIP_DEFLATED (uses zlib, the default)
# These values may be set per host via the ansible_module_compression inventory
# variable
#module_compression = 'ZIP_DEFLATED'
# This controls the cutoff point (in bytes) on --diff for files
# set to 0 for unlimited (RAM may suffer!).
#max_diff_size = 1048576
# This controls how ansible handles multiple --tags and --skip-tags arguments
# on the CLI.  If this is True then multiple arguments are merged together.  If
# it is False, then the last specified argument is used and the others are ignored.
# This option will be removed in 2.8.
#merge_multiple_cli_flags = True
# Controls showing custom stats at the end, off by default
#show_custom_stats = True
# Controls which files to ignore when using a directory as inventory with
# possibly multiple sources (both static and dynamic)
#inventory_ignore_extensions = ~, .orig, .bak, .ini, .cfg, .retry, .pyc, .pyo
# This family of modules use an alternative execution path optimized for network appliances
# only update this setting if you know how this works, otherwise it can break module execution
#network_group_modules=eos, nxos, ios, iosxr, junos, vyos
# When enabled, this option allows lookups (via variables like {{lookup('foo')}} or when used as
# a loop with `with_foo`) to return data that is not marked "unsafe". This means the data may contain
# jinja2 templating language which will be run through the templating engine.
# ENABLING THIS COULD BE A SECURITY RISK
#allow_unsafe_lookups = False
# set default errors for all plays
#any_errors_fatal = False
[privilege_escalation]
#become=True
#become_method=sudo
#become_user=root
#become_ask_pass=False
[ssh_connection]
# ssh arguments to use
# Leaving off ControlPersist will result in poor performance, so use
# paramiko on older platforms rather than removing it, -C controls compression use
#ssh_args = -C -o ControlMaster=auto -o ControlPersist=60s
# The base directory for the ControlPath sockets.
# This is the "%(directory)s" in the control_path option
#
# Example:
# control_path_dir = /tmp/.ansible/cp
#control_path_dir = ~/.ansible/cp
# The path to use for the ControlPath sockets. This defaults to a hashed string of the hostname,
# port and username (empty string in the config). The hash mitigates a common problem users
# found with long hostnames and the conventional %(directory)s/ansible-ssh-%%h-%%p-%%r format.
# In those cases, a "too long for Unix domain socket" ssh error would occur.
#
# Example:
# control_path = %(directory)s/%%h-%%r
#control_path =
# Enabling pipelining reduces the number of SSH operations required to
# execute a module on the remote server. This can result in a significant
# performance improvement when enabled, however when using "sudo:" you must
# first disable 'requiretty' in /etc/sudoers
#
# By default, this option is disabled to preserve compatibility with
# sudoers configurations that have requiretty (the default on many distros).
#
#pipelining = False
# Control the mechanism for transferring files (old)
#   * smart = try sftp and then try scp [default]
#   * True = use scp only
#   * False = use sftp only
#scp_if_ssh = smart
# Control the mechanism for transferring files (new)
# If set, this will override the scp_if_ssh option
#   * sftp  = use sftp to transfer files
#   * scp   = use scp to transfer files
#   * piped = use 'dd' over SSH to transfer files
#   * smart = try sftp, scp, and piped, in that order [default]
#transfer_method = smart
# if False, sftp will not use batch mode to transfer files. This may cause some
# types of file transfer failures impossible to catch however, and should
# only be disabled if your sftp version has problems with batch mode
#sftp_batch_mode = False
# The -tt argument is passed to ssh when pipelining is not enabled because sudo
# requires a tty by default.
#usetty = True
# Number of times to retry an SSH connection to a host, in case of UNREACHABLE.
# For each retry attempt, there is an exponential backoff,
# so after the first attempt there is 1s wait, then 2s, 4s etc. up to 30s (max).
#retries = 3
[accelerate]
#accelerate_port = 5099
#accelerate_timeout = 30
#accelerate_connect_timeout = 5.0
# The daemon timeout is measured in minutes. This time is measured
# from the last activity to the accelerate daemon.
#accelerate_daemon_timeout = 30
# If set to yes, accelerate_multi_key will allow multiple
# private keys to be uploaded to it, though each user must
# have access to the system via SSH to add a new key. The default
# is "no".
#accelerate_multi_key = yes
[colors]
#highlight = white
#verbose = blue
#warn = bright purple
#error = red
#debug = dark gray
#deprecate = purple
#skip = cyan
#unreachable = red
#ok = green
#changed = yellow
#diff_add = green
#diff_remove = red
#diff_lines = cyan
前面提到了,ansible相关命令的可执行文件均放在/usr/bin/目录下,如下:
[root@192-168-158-100-RedHat-7 ansible-2.9.27]# ll /usr/bin/ | grep 'ansible'
lrwxrwxrwx    1 root root          20 Jul 26  2023 ansible -> /usr/bin/ansible-2.7
lrwxrwxrwx    1 root root          20 Jul 26  2023 ansible-2 -> /usr/bin/ansible-2.7
-rwxr-xr-x    1 root root        5933 Jan 16  2022 ansible-2.7
lrwxrwxrwx    1 root root           7 Jul 26  2023 ansible-config -> ansible
-rwxr-xr-x    1 root root       13432 Jan 16  2022 ansible-connection
lrwxrwxrwx    1 root root          28 Jul 26  2023 ansible-console -> /usr/bin/ansible-console-2.7
lrwxrwxrwx    1 root root          28 Jul 26  2023 ansible-console-2 -> /usr/bin/ansible-console-2.7
lrwxrwxrwx    1 root root           7 Jul 26  2023 ansible-console-2.7 -> ansible
lrwxrwxrwx    1 root root          24 Jul 26  2023 ansible-doc -> /usr/bin/ansible-doc-2.7
lrwxrwxrwx    1 root root          24 Jul 26  2023 ansible-doc-2 -> /usr/bin/ansible-doc-2.7
lrwxrwxrwx    1 root root           7 Jul 26  2023 ansible-doc-2.7 -> ansible
lrwxrwxrwx    1 root root          27 Jul 26  2023 ansible-galaxy -> /usr/bin/ansible-galaxy-2.7
lrwxrwxrwx    1 root root          27 Jul 26  2023 ansible-galaxy-2 -> /usr/bin/ansible-galaxy-2.7
lrwxrwxrwx    1 root root           7 Jul 26  2023 ansible-galaxy-2.7 -> ansible
lrwxrwxrwx    1 root root           7 Jul 26  2023 ansible-inventory -> ansible
lrwxrwxrwx    1 root root          29 Jul 26  2023 ansible-playbook -> /usr/bin/ansible-playbook-2.7
lrwxrwxrwx    1 root root          29 Jul 26  2023 ansible-playbook-2 -> /usr/bin/ansible-playbook-2.7
lrwxrwxrwx    1 root root           7 Jul 26  2023 ansible-playbook-2.7 -> ansible
lrwxrwxrwx    1 root root          25 Jul 26  2023 ansible-pull -> /usr/bin/ansible-pull-2.7
lrwxrwxrwx    1 root root          25 Jul 26  2023 ansible-pull-2 -> /usr/bin/ansible-pull-2.7
lrwxrwxrwx    1 root root           7 Jul 26  2023 ansible-pull-2.7 -> ansible
lrwxrwxrwx    1 root root          26 Jul 26  2023 ansible-vault -> /usr/bin/ansible-vault-2.7
lrwxrwxrwx    1 root root          26 Jul 26  2023 ansible-vault-2 -> /usr/bin/ansible-vault-2.7
lrwxrwxrwx    1 root root           7 Jul 26  2023 ansible-vault-2.7 -> ansible
大致分为以下几类:
1) ansible命令
日常工作中使用率非常高的命令之一,主要在非固化需求、临时一次性操作、二次开发接口调用场景下使用。命令格式如下:
ansible <host-pattern> [option]
表示inventory中定义的主机或主机组,该参数不可省略
[option]表示该选项的参数任选其一,具体选项可以使用man ansible命令查看
[root@192-168-158-100-RedHat-7 ansible-2.9.27]# ansible all -m win_ping
192.168.158.104 | SUCCESS => {
    "changed": false,
    "ping": "pong"
}
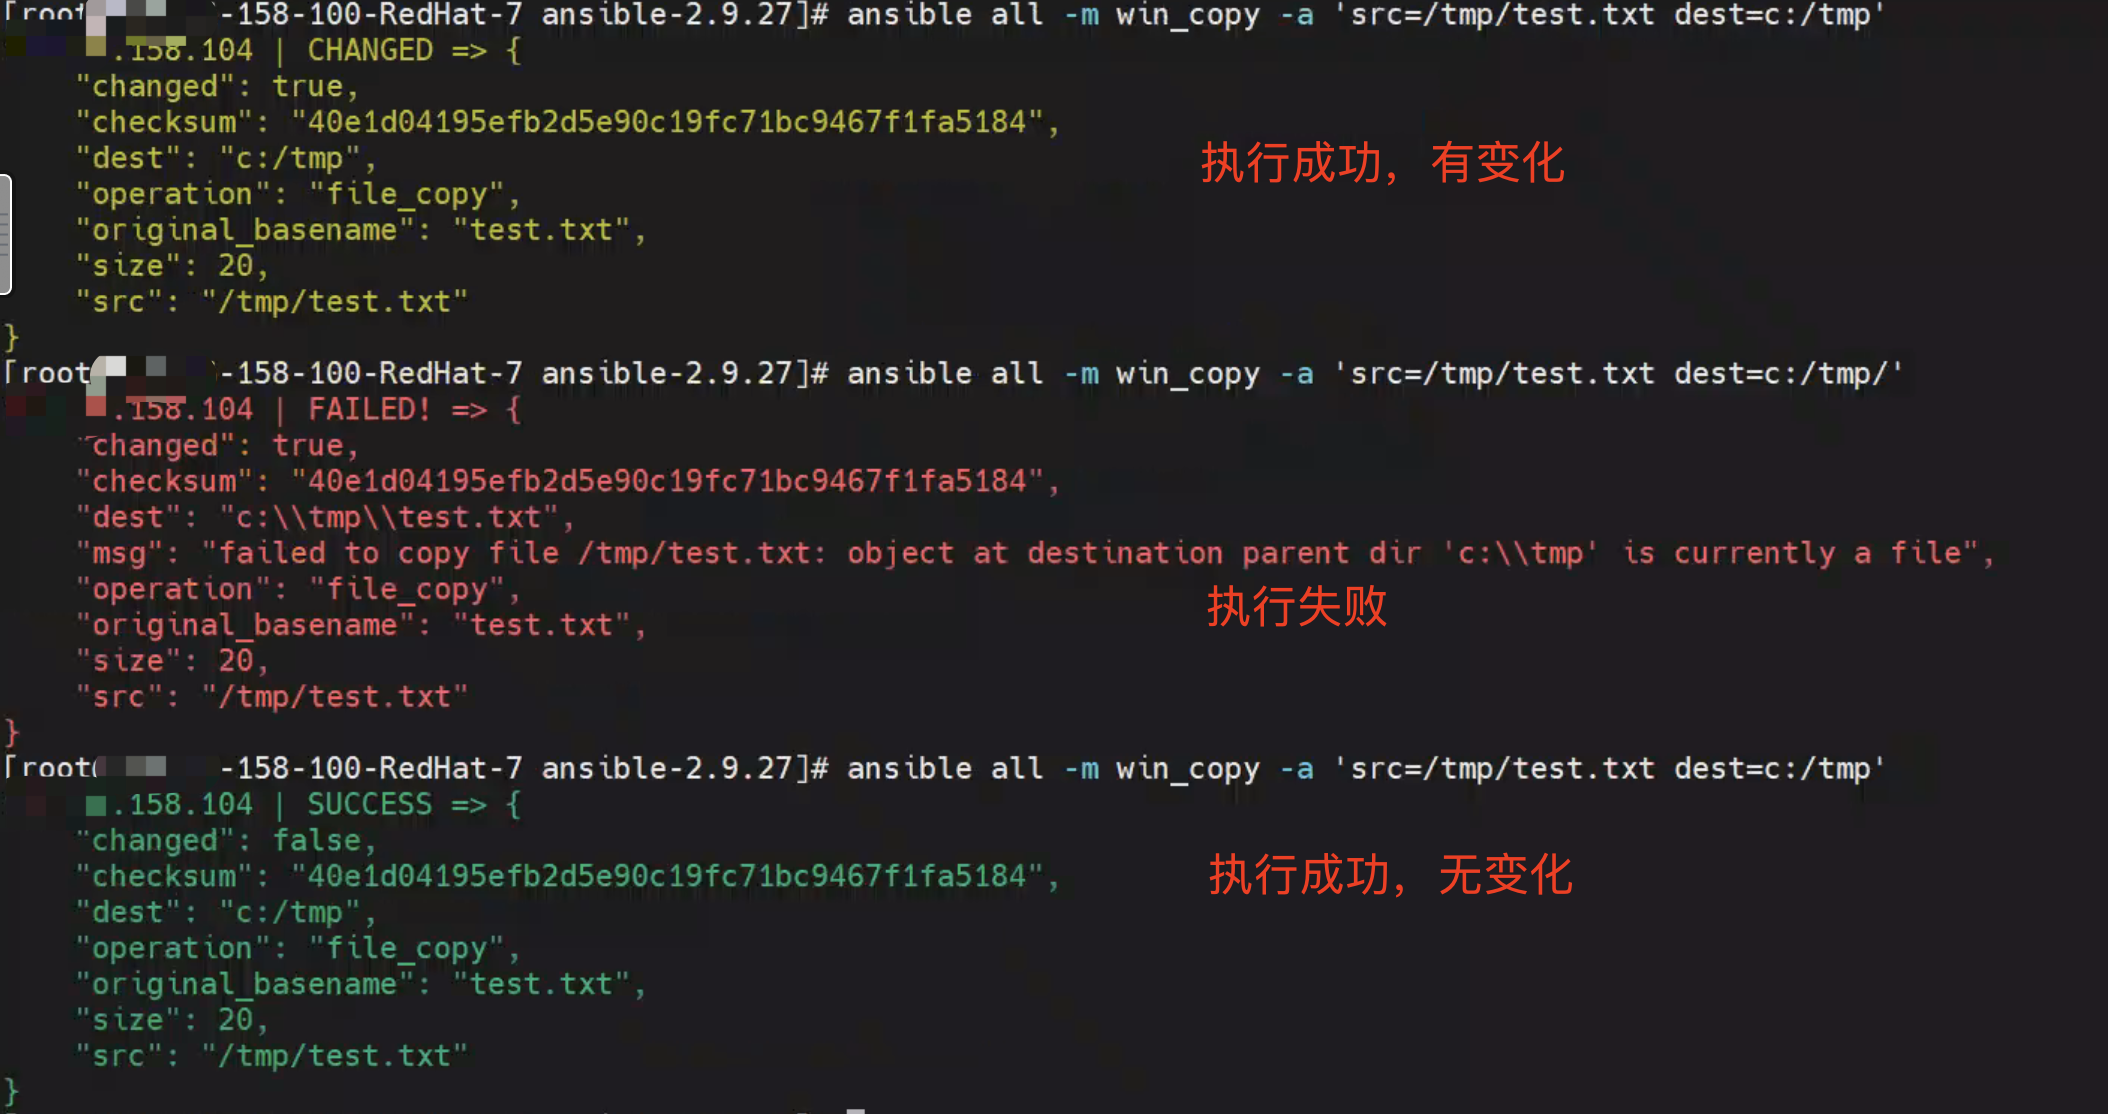
ansible命令输出用红绿黄来区分执行结果成功与失败
2) ansible-doc命令
ansible-doc可以查看ansible各个模块的文档说明,功能类似于man命令
ansible支持的window模块大多以“win_”开头
//查看ansible各个模块,可以看到ansible支持的windows模块大多以"win_"开头,例如,linux中使用的ping模块,windows中为win_ping
ansible-doc -l
//查看某个具体的模块
ansible-doc win_ping
3) ansible-galaxy命令
模块管理器,类似python中的pip,可以根据安装量和下载量等信息,查找和安装相应的roles
ansible-galaxy [init|info|list|install|remove] [options]....
4) ansible-playbook命令
通过预先编写好的playbook文件实现批量管理,要实现的功能与命令ansible一样,可以理解为按一定条件组成的ansible任务集
5) ansible-pull命令
ansible的另外一种工作模式,默认为push模式
6) ansible-vault命令
用于配置文件加密,如果编写的playbook文件中有敏感信息,可以使用ansible-valut进行加密解密,防止他人随意查看
[root@192-168-158-100-RedHat-7 ansible-2.9.27]# ansible-vault encrypt test.yaml
New Vault password:
Confirm New Vault password:
Encryption successful
[root@192-168-158-100-RedHat-7 ansible-2.9.27]# cat test.yaml
$ANSIBLE_VAULT;1.1;AES256
36353131383762396361623833653734356261666435633335636338333834393535353839383962
6237316263616662336161353433643435663737323431350a626338393561623639653961656238
66663031626464343661393732633264366265653734363139343330396430386364343232366138
3430326166326336630a343062623461633862366266363963376231343732623861666336326533
65346363386338636161613833646137306562636566633434373037313630636161
[root@192-168-158-100-RedHat-7 ansible-2.9.27]# ansible-vault decrypt test.yaml
Vault password:
Decryption successful
Inventory是ansible管理主机信息的配置文件,默认存放于/etc/ansible/hosts。Ansible在使用时通过-i或者--inventory-file来制定文件读取,如ansible -i /etc/ansible/hosts webs -m ping,如果只有一个Inventory时可以不用指定路径,默认读取/etc/ansible/hosts。inventory可以同时存在多个,而且支持动态生成。
Inventory配置文件遵循ini文件风格,中括号里的字符为组名,并且支持将同一个主机同时归并到多个不同的组中。若主机使用了非默认的ssh端口,还可以在主机名称之后使用冒号加端口号来标明
#“#”开头的行表示该行为注释行,即当时行的配置不生效
# Inventory 可以直接为 IP 地址
192.168.37.149# Inventory 同样支持 Hostname 的方式,后跟冒号加数字表示端口号,默认 22 号端口ntp.magedu.com:2222
nfs .magedu.com
# 中括号内的内容表示一个分组的开始,紧随其后的主机均属于该组成员,空行后的主机亦属于该组,即web2.magedu.com这台主机也属于[websevers]组
[websevers]
web1 .magedu.com
web[10:20].magedu.com #[10:20]表示10~20 之间的所有数字(包括10和20),即表示 web10.magedu.com、web11.magedu.com……web20.magedu.com 的所有主机
web2 .magedu.com[dbservers]
db-a.magedu.com
db-[b:f].magedu.com #[b:f]表示b到f之间的所有数字(包括b和f),即表示 db-b.magedu.com、db-e.magedu.com…db-f.magedu.com的所有主机
[webservers]
web1.magedu.com http_port=808 maxRequestsPerchild=801 #自定义http_port 的端口号为808,配置maxRequestsPerchild为801
[groupservers]
webl .magedu.com
web2 .magedu.com

[groupservers:vars]
ntp_server=ntp.magedu.com #定义groupservers 组中所有主机ntp_server 值为 ntp.magedu.com
nfs_server=nfs.magedu.com #定义groupservers 组中所有主机nfs_server 值为 nfs.magedu.com
[apache]
httpdl.magedu.com
httpd2.magedu.com

[nginx]
ngx1.magedu.com
ngx2.magedu.com

[webservers:children]
apache
nginx

[webservers:vars]
ntp_server=ntp.magedu.com
此内容由惯性聚合(RSS阅读器)自动聚合整理,仅供阅读参考。 原文来自 — 版权归原作者所有。