


0、安装anaconda (无需参考pycharm使用)
1、查看当前的虚拟环境
conda env list
标注了*号的为当前环境,如果没有 * 号则需要cmd中切换到自定义环境
2、创建虚拟环境
conda create -n yidaqi python==3.8.5
3、激活虚拟环境,也就是进入我们创建好的虚拟环境。
conda activate yidaqi
CondaError: Run 'conda init' before 'conda activate'
解决方法:
第一步:执行初始化命令
conda init cmd.exe
第二步:关闭当前终端,重新打开一个新的终端(必须重启!)
第三步:重新执行激活命令
conda activate yidaqi
4、退出当前环境
conda deactivate
5、删除某一个自己创建过的环境
conda remove -n yidaqi --all
6、复制之前的虚拟环境的东西到另一个虚拟环境里面
conda create -n new_yidaqi --clone yidaqi
7、查看当前所有的环境
conda info -e
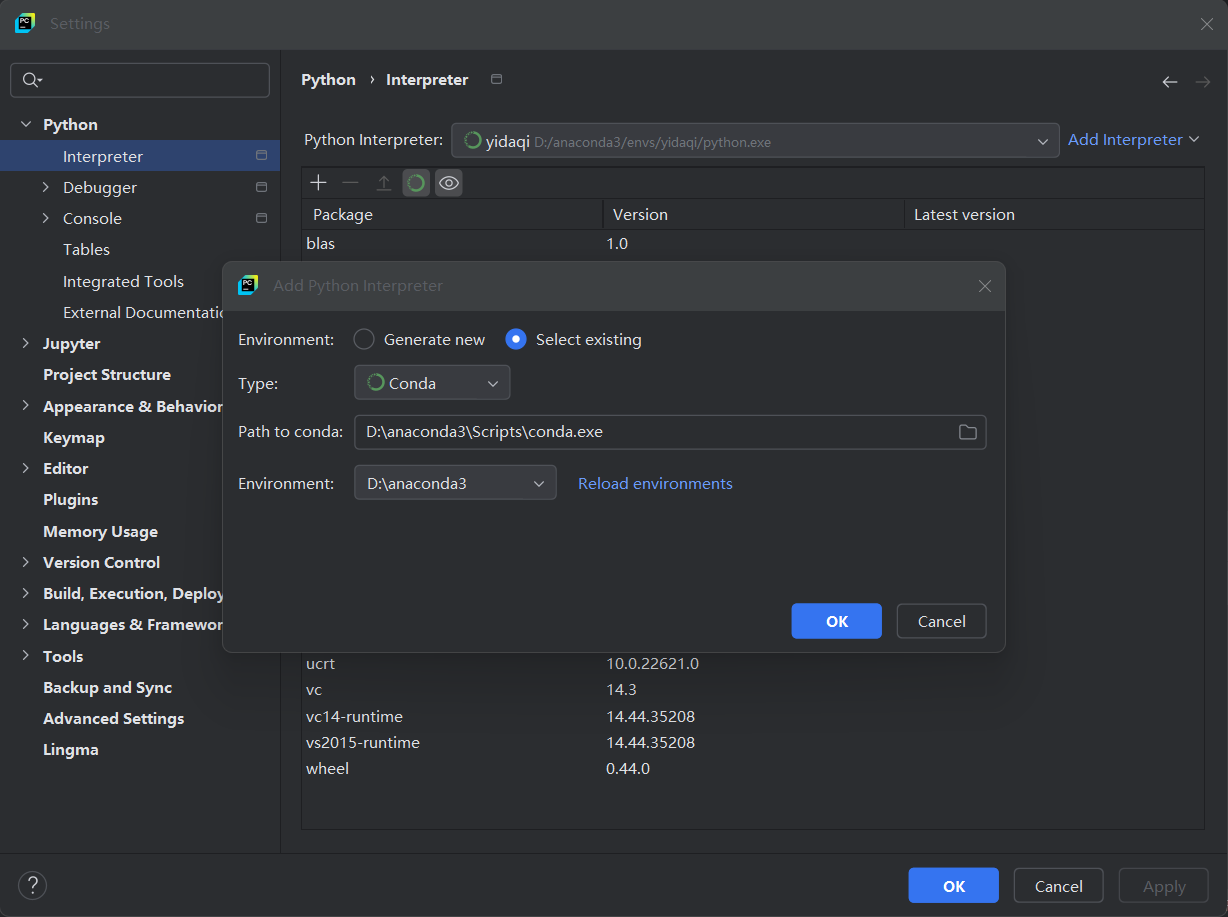
1.选择interpreter 2.选择add Interpreter 3.Select existing 4.Type 选择Conda 5.Environment 选择yidaqi
# 导入 NumPy 库,通常简写为 np
import numpy as np

# ==================== 1. 数组创建 ====================

# 从 Python 列表创建一维数组
arr1 = np.array([1, 2, 3, 4, 5])
print("创建的数组:", arr1)

# 从嵌套列表创建二维数组(3行3列)
arr2 = np.array([[1, 2, 3],
                 [4, 5, 6],
                 [7, 8, 9]])
print("创建的数组:", arr2)

# ==================== 2. 数组属性 ====================

# .shape:返回数组在每个维度上的大小(元组形式)
print("数组的维度(形状):", arr2.shape)  # (3, 3)

# .dtype:返回数组元素的数据类型(默认整数为 int64)
print("数组的数据类型:", arr2.dtype)

# .size:返回数组中元素的总个数(= 所有维度相乘)
print("数组的元素个数:", arr2.size)  # 9

# .itemsize:返回每个元素占用的字节数(int64 占 8 字节)
print("数组的元素大小(字节):", arr2.itemsize)

# 直接修改 shape 属性可改变数组维度(元素总数必须不变)
arr2.shape = (1, 9)  # 将 3x3 变为 1x9
print("改变数组的维度(reshape in-place):", arr2)

# ==================== 3. 常用数组创建函数 ====================

# np.arange(start, stop, step):生成等差序列(左闭右开)
print("使用 arange 创建数组(步长0.1):\n", np.arange(0, 1, 0.1))

# np.linspace(start, stop, num):在区间内均匀生成 num 个点(包含两端)
print("使用 linspace 创建数组(5个点):\n", np.linspace(0, 1, 5))

# np.logspace(start, stop, num):在对数尺度上生成等比数列(10^start 到 10^stop)
print("使用 logspace 创建数组(对数等分):\n", np.logspace(0, 2, 5))  # 即 1 到 100

# np.zeros(shape):创建全 0 数组
print("使用 zeros 创建数组(2行3列):\n", np.zeros((2, 3)))

# np.ones(shape):创建全 1 数组
print("使用 ones 创建数组(2行3列):\n", np.ones((2, 3)))

# np.eye(N):创建 N×N 的单位矩阵(主对角线为1,其余为0)
print("使用 eye 创建数组(3×3单位阵):\n", np.eye(3))

# np.diag(v):以向量 v 为对角线创建对角矩阵
print("使用 diag 创建数组(对角矩阵):\n", np.diag([1, 2, 3, 4]))

# ==================== 4. 数据类型转换 ====================

# 标量类型转换示例(NumPy 提供精确类型控制)
print('整型 → 浮点型:', np.float64(42))
print('浮点型 → 整型:', np.int8(42.0))      # 注意:会截断小数部分
print('非零整型 → 布尔型:', np.bool_(42))    # 非零为 True
print('零 → 布尔型:', np.bool_(0))          # 零为 False
print('布尔 True → 浮点型:', np.float_(True))   # True → 1.0
print('布尔 False → 浮点型:', np.float_(False)) # False → 0.0

# ==================== 5. 结构化数组(复合数据类型)====================

# 定义结构化 dtype:类似数据库表或 C 语言 struct
df = np.dtype([
    ("name", np.str_, 40),     # 商品名:Unicode 字符串,最长40字符
    ("numitems", np.int64),    # 数量:64位整数
    ("price", np.float64)      # 价格:64位浮点数
])

# 创建结构化数组(每条记录是一个元组)
data = np.array([("苹果", 100, 5.99), ("香蕉", 200, 3.49)], dtype=df)
print("商品名称:", data["name"])   # 按字段名访问
print("商品价格:", data["price"])
print('结构化数据类型定义:', df)

# ==================== 6. 随机数组生成 ====================

# np.random.random(size):生成 [0,1) 均匀分布的随机浮点数
print('生成100个[0,1)随机数:', np.random.random(100))

# np.random.randn(d0, d1, ...):生成标准正态分布(均值0,方差1)
print('生成10×5的标准正态分布随机数:\n', np.random.randn(10, 5))

# np.random.randint(low, high, size):生成 [low, high) 的随机整数
print('生成2×5的[0,10)随机整数:\n', np.random.randint(0, 10, size=[2, 5]))

# ==================== 7. 一维数组索引与切片 ====================

arr = np.arange(10)  # [0,1,...,9]
print('数组初始值:', arr)

print('整数索引(取第5个元素):', arr[5])           # 5
print('切片 [3:5):', arr[3:5])                     # [3, 4]
print('省略起始 [:5]:', arr[:5])                   # [0,1,2,3,4]
print('负索引(最后一个):', arr[-1])               # 9

# 切片赋值(会修改原数组,因为切片是视图)
arr[2:4] = 100, 101
print('切片赋值后:', arr)                          # [0,1,100,101,4,...]

print('带步长切片 [1:-1:2]:', arr[1:-1:2])         # 从索引1到倒数第1,步长2
print('负步长切片 [5:1:-2]:', arr[5:1:-2])         # 倒序取:5 → 101

# ==================== 8. 二维数组索引与切片 ====================

arr = np.array([
    [1, 2, 3, 4, 5],
    [4, 5, 6, 7, 8],
    [7, 8, 9, 10, 11]
])
print('创建的二维数组为:\n', arr)

print('取第0行,第3~4列(不包含5):', arr[0, 3:5])        # [4,5]
print('取第1行及以后,第2列及以后:\n', arr[1:, 2:])       # [[6,7,8],[9,10,11]]
print('取所有行的第2列:', arr[:, 2])                      # [3,6,9]

# 花式索引(高级索引):用整数列表指定行列(一一对应)
#  arr[[0,1,2], [1,2,3]]对应(0,1),(1,2) (2,3)
print('花式索引(对角线变体):', arr[[0, 1, 2], [1, 2, 3]])  # [2,6,10]

# 行切片 + 列花式索引
print('取第1、2行,第0、2、3列:\n', arr[1:, (0, 2, 3)])

# 布尔索引:用布尔数组筛选行
mask = np.array([True, False, True])  # 推荐直接用 bool,而非 np.bool_(已弃用)
print('布尔索引(第0、2行)的第2列:', arr[mask, 2])        # [3,9]

# ==================== 9. 数组变形与平展 ====================

arr = np.arange(12)  # 一维 [0..11]
print('创建的一维数组:', arr)

# .reshape():返回新形状的数组(不改变原数组)
reshaped = arr.reshape(3, 4)
print('转置结果(实际是 reshape):\n', reshaped)
print('新数组的维度:', reshaped.ndim)  # 2

# 平展(降为一维)
print('ravel()(返回视图,若可能):', arr.reshape(3,4).ravel())
print('flatten()(总是返回副本):', arr.reshape(3,4).flatten())
print('flatten(order="F")(按列优先):', arr.reshape(3,4).flatten('F'))

# ==================== 10. 数组合并与分割 ====================

# 创建两个 3×4 数组
arr1 = np.arange(12).reshape(3, 4)
arr2 = arr1 * 3
print('数组1:\n', arr1)
print('数组2(arr1×3):\n', arr2)

# 横向拼接(列方向)
print('横向组合(hstack):\n', np.hstack((arr1, arr2)))
print('横向组合(concatenate axis=1):\n', np.concatenate((arr1, arr2), axis=1))

# 纵向拼接(行方向)
print('纵向组合(concatenate axis=0):\n', np.concatenate((arr1, arr2), axis=0))

# 创建 4×4 数组用于切割
arr = np.arange(16).reshape(4, 4)
print('待切割数组:\n', arr)

# 横向切割(按列分2份)
print('横向切割(hsplit):', np.hsplit(arr, 2))  # 返回两个 4×2 数组

# 纵向切割(按行分2份)
print('纵向切割(vsplit):', np.vsplit(arr, 2))  # 返回两个 2×4 数组
此内容由惯性聚合(RSS阅读器)自动聚合整理,仅供阅读参考。 原文来自 — 版权归原作者所有。