









平台
我自己的 Linux 安装工具
基础工具1
基础工具
man-db 或者 manpage 都可以
xf86-video-intel -- 可参考 arch xorg 官方文档 安装和是的驱动程序
xorg-xinit -- startx 脚本
#!/bin/bash

echo '... update bt trackerlist'
cd ~/CC/software/trackerslist
git pull;

tvTrackerList=''
tvTrackerArr=$(cat trackers_best_ip.txt | grep -E "\S+")
for track in ${tvTrackerArr}
do
    # echo ${tvTrackerList}
    if [ "${tvTrackerList}" = "" ]; then
        tvTrackerList=${track}
    else
        tvTrackerList=${tvTrackerList},${track}
    fi
done
tvTrackerList="bt-tracker=${tvTrackerList}"
sed -i "s#bt-tracker=.*#${tvTrackerList}#g" ~/config/aria2/aria2.conf
echo "${tvTrackerList}"

aria2c --conf-path=$HOME/config/aria2/aria2.conf >> /tmp/ariac.log &
sleep 1;
cd ~/CC/software/webui-aria2;
node node-server.js &> /tmp/webui.log &
开发工具
archlinux-java 进行切换
java-environment-common --
java-runtime-common --
gradle --
编辑器/IDE
Music
优秀的开发库
我自己的 python 库
以下是我 pip 的配置:
❯ cat ~/.pip/pip.conf
[global]
    index-url = https://pypi.tuna.tsinghua.edu.cn/simple/
以下爱是我常用的一些安装包:
pip install --break-system-packages requestpip install --break-system-packages numpypip install --break-system-packages pandapip install --break-system-packages matplotlibpip install --break-system-packages nltkpip install --break-system-packages seabornpip install --break-system-packages scipypip install --break-system-packages cv2pip install --break-system-packages sphinxpip install --break-system-packages pyserialpip install --break-system-packages pyautoguiArchlinux
Q&A
sudo rm -rf /etc/pacman.d/gnupg/*
sudo pacman-key --init
sudo pacman-key --populate archlinux
sudo pacman-key --refresh-keys, 这一步骤可能会花费你几分钟到几十分钟的时间
sudo pacman -S freerdp ( ubuntu 安装 sudo apt install freerdp2-x11 )
xfreerdp /v:1.2.3.4 /u:Administrator /p:PASSWORD
cd /tmp/; git clone https://aur.archlinux.org/deepin-screenshot-copy-patch.git; cd /tmp/deepin-screenshot-copy-patch; makepkg -si
参考链接
ubuntu
Q&A
查看当前安装的包dpkg -l,卸载软件时卸载之依赖包(如果此依赖包还被其他依赖,将不被卸载),请使用 aptitude 命令(其中 remove 是删除软件以及其依赖,purge,删除软件,以及其依赖,以及其配置文件), apt-get 的 autoremove 参数也可以用来卸载当前指定包以及其依赖。但真心不好用,参考一下 aptitude , pacman 就知道。不过 ubuntu 上的包资源很全面。
kali Linux
Q&A
apt-get update; apt-get upgrade
deb http://mirrors.ustc.edu.cn/kali kali-rolling main non-free contrib
deb-src http://mirrors.ustc.edu.cn/kali kali-rolling main non-free contrib
apt-get update; apt-get install -y virtualbox-guest-x11; reboot, 参考 此处
参考文档
raspberry pi
Q&A
# 编辑 `/etc/apt/sources.list` 文件,删除原文件所有内容,用以下内容取代:
deb http://mirrors.tuna.tsinghua.edu.cn/raspbian/raspbian/ buster main non-free contrib rpi
deb-src http://mirrors.tuna.tsinghua.edu.cn/raspbian/raspbian/ buster main non-free contrib rpi

# 编辑 `/etc/apt/sources.list.d/raspi.list` 文件,删除原文件所有内容,用以下内容取代:
deb http://mirrors.tuna.tsinghua.edu.cn/raspberrypi/ buster main ui
sudo raspi-config,然后顺着下面的步骤设置就可以了: Select : 5 Interfacing Options Configure connections to peripherals --> Select : P1 Camera Enable/Disable connection to the Raspberry Pi Camera --> Select yes --> sudo reboot
raspistill -o image.jpg, 该命令会在当前目录保存一个从摄像头撷取的一张图片,并保存到 image.jpg 中。
/etc/modules-load.d/modules.conf 里面添加一行 bcm2835-v4l2,然后重启,就可以了。(这句话意思是在系统启动之后会加载这个文件中模块名,加载模块会在 /lib/modules 中。)
# sudo vim /etc/modules-load.d/modules.conf

    # 在文尾添加下面这行
    bcm2835-v4l2

# find /lib/modules/ -name "*bcm2835-v4l2*"

    /lib/modules/4.9.35+/kernel/drivers/media/platform/bcm2835/bcm2835-v4l2.ko
    /lib/modules/4.9.35-v7+/kernel/drivers/media/platform/bcm2835/bcm2835-v4l2.ko
apt-get install exfat-fuse
apt-get install ntfs-3g
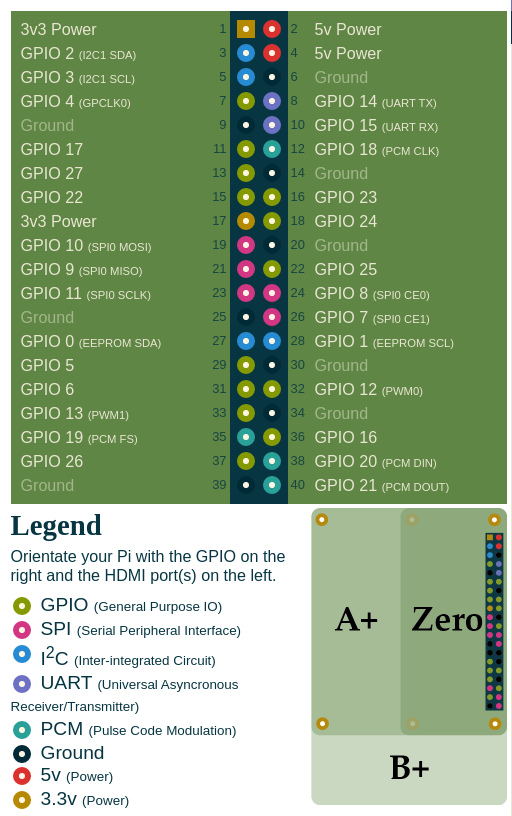
参考资料
系统命令
init System
systemctl start service_name --> 开启服务
systemctl stop service_name --> 关闭服务
systemctl restart service_name --> 重启服务
systemctl status service_name --> 查看服务的运行状态
systemctl enable service_name --> 将服务设置为启动
systemctl disable service_name --> 将服务取消开机启动
systemctl is-enabled( is-active, is-failed ) service_name --> 查看服务是否启用(是否为激活/运行状态,是否出现错误)
systemctl show service_name --> 查看服务的配置详细信息
systemctl list-units --> 列出所有运行中单元
systemctl list-unit-files --> 列举所有(包括运行和未运行的)的单元
systemctl --failed --> 列举所有运行失败的单元
systemctl mask( unmask ) service_name --> 屏蔽(显示)服务
systemctl kill service_name --> 杀死服务
systemctl show -p CPUShares service_name --> 获取当前服务的 cpu 分配额
systemctl set-property service_name CPUShares=2000 --> 将某个服务的 CPU 分配额设置成 2000 (一般默认是 1024)
systemctl list-dependencies service_name --> 查看某个服务的依赖性
systemd-analyze critical-chain sevice_name --> 查看某个服务的关键链(如果不知道这是什么最好的办法就是动手测试,并 google )
systemd-cgls --> 按照等级,列举出控制组
systemd-cgtop --> 按CPU、内存、输入和输出列出控制组
systemctl rescue --> 进入系统救援模式
systemctl emergency --> 进入系统紧急模式
systemctl get-default --> 列举出当前的运行等级
systemctl isolate runlevel5.target --> 启动运行等级(5,图形模式)(PS:以此类推)
systemctl set-default runlevel(x:3,5...).target --> 设置默认运行等级
systemctl reboot --> 重启
systemctl halt --> 停止
systemctl suspend --> 挂起
systemctl hibernate --> 休眠(PS:休眠和混合睡眠都要求系统拥有 swap 分区,而且大小与内存一样大)
systemctl hybrid-sleep --> 混合睡眠
使用心得
优化命令行用户交互体验
下面介绍一些简单的方法,可以在特定情况下提升命令行的体验,尤其是在服务器多人协作场景下:
/etc/samba/smb.conf

[share]
   comment = A Shared Directory
   path = /home/share
   valid users = share
   public = no
   writable = yes
   max connections = 3
/etc/security/limits.conf 中添加类似如下限制:
限制 User1 的并发为 10
User1      hard    maxlogins>      5

例子限制所有用户并发为 5
*      hard    maxlogins>      5
nicemonitor.sh
#!/bin/bash

start_server(){
while true
do
        # 将特殊线程,以及编译线程优先级调低
        ps -aux | grep -E "vscode|netdata|make|cmake|build|javac" | awk '{print $2}' | while read P
        do
                renice +5 ${P};
        done

        # 把 ssh 服务,以及用户常见长时应用优先级提高
        ps -aux | grep -E "ssh" | awk '{print $2}' | while read P
        do
                renice -5 ${P};
        done

        if [ -f /tmp/xxxxxxroottask ]; then
                rm /tmp/xxxxxxroottask && sync
                break;
        fi
        sleep 10
done
}

if [ "$1" = "start" ]; then
        start_server
elif [ "$1" = "shutdown" ]; then
        touch /tmp/xxxxxxroottask
fi
/etc/systemd/system/nicemonitor.service
[Unit]
Description=Ensure system stable runtime
After=network.target

[Service]
User=root
Group=root
ExecStart=/root/bin/roottask.sh start
ExecStop=/root/bin/roottask.sh shutdown
Restart=always

[Install]
WantedBy=multi-user.target
为服务器添加一个用户
以下是我司方便给用户开账户的脚本,实际使用中用户密码不应该这么简陋, 谨慎参考 :
#!/bin/bash

echo "Please input user name:"
read NAME

IS_EXIST=$(cat /etc/passwd | grep "${NAME}")

if [ "${IS_EXIST}" = "" ]; then
    echo "USERNAME: ${NAME}"
else
    echo "This man is exist, please select another one"
    echo "/etc/passwd -> ${IS_EXIST}"
    exit -1
fi

echo "Please input select user base home dir:"
echo "1. /home"
echo "2. /home2"
echo "3. /home3"
echo "4. /home4"
read HOME_DIR

case ${HOME_DIR} in
1|/home)
    HOME_DIR="/home"
    ;;
2|/home2)
    HOME_DIR="/home2"
    ;;
3|/home3)
    HOME_DIR="/home3"
    ;;
4|/home4)
    HOME_DIR="/home4"
    ;;
*)
    echo "Not this option"
    exit -1
    ;;
esac

SMB_CONFIG_CONTENT="[${NAME}]\n   comment = A Shared Directory\n   path = ${HOME_DIR}/${NAME}\n   valid users = ${NAME}\n   public = no\n   writable = yes\n   max connections = 10\n"

echo "---"
echo "USER --> ${NAME}"
echo "PASSWORD --> ${NAME}"
echo "HOME_DIR --> ${HOME_DIR}"
echo "SAMBA PASSWORD --> ${NAME}"

echo "--- SMB CONFIG"
echo -e "${SMB_CONFIG_CONTENT}"

useradd -d ${HOME_DIR}/${NAME} -m -p $(openssl passwd -1 ${NAME}) -s /bin/bash ${NAME}
smbpasswd -a ${NAME} -w ${NAME}
echo -e "${SMB_CONFIG_CONTENT}" >> /etc/samba/smb.conf
systemctl  restart smbd
mount nfs 失败
mount nfs 失败
解决 mount nfs 的时候出现 mount: wrong fs type, bad option, bad superblock on **** 的问题。
安装 nfs-utils 。
窗口管理器 awesome 中配置 PrtScr 键值功能
pacman -S scrotpacman -S xorg-xevKeyPress event, serial 33, synthetic NO, window 0x2400001,
root 0x1a1, subw 0x0, time 58322539, (691,875), root:(692,916),
state 0x0, keycode 107 (keysym 0xff61, Print), same_screen YES,
XLookupString gives 0 bytes:
XmbLookupString gives 0 bytes:
XFilterEvent returns: False
~/.config/awesome/rc.lua )中配置该功能即可:
263 globalkeys = gears.table.join(
...
383     awful.key({ }, "Print", function (),
384         awful.util.spawn("scrot -e 'mv $f ~/Pictures/ 2> /dev/null'") end)
...
oh_my_zsh 中的配置
以下是我的 ~/.zshrc 的配置
export ZSH=/home/mojies/.oh-my-zsh
ZSH_THEME=mikeh
plugins=(git)
source $ZSH/oh-my-zsh.sh

alias vi='vim -O'
alias CP='rsync -avh --progress -v --links'
alias gitd='git difftool'
alias rm.origin='/usr/bin/rm'
alias rm='trash-put'
alias rm.ls='trash-list'
alias rm.rm='trash-rm'
alias rm.recovery='trash-restore'
alias rm.empty='trash-empty'
alias g++11='g++ -std=c++11'
alias g++14='g++ -std=c++14'
alias g++17='g++ -std=c++17'
alias g++20='g++ -std=c++2a'
alias top='glances'
alias AS='android-studio'
alias df='duf'

# awsome need pull up startx first
isrunning startx; if [ $? -ne 0 ]; then startx;  fi

export WORKON_HOME='~/.virtualenvs'
source /usr/bin/virtualenvwrapper.sh
zsh_autosuggestion
一个在命令行自动补全命令的工具, 建议终端开 256 色
释放内存缓存操作
echo 1 > /proc/sys/vm/drop_caches 释放页缓存
echo 2 > /proc/sys/vm/drop_caches 释放 dentries 和 inode 缓存
echo 3 > /proc/sys/vm/drop_caches 释放所有缓存(以上三种)
p10k(Powerlevel10k)一个非常棒的 zsh 主题
借用他们的原话是:
Powerlevel10k is a theme for Zsh. It emphasizes speed, flexibility and out-of-the-box experience.
给大家展示一下效果图:
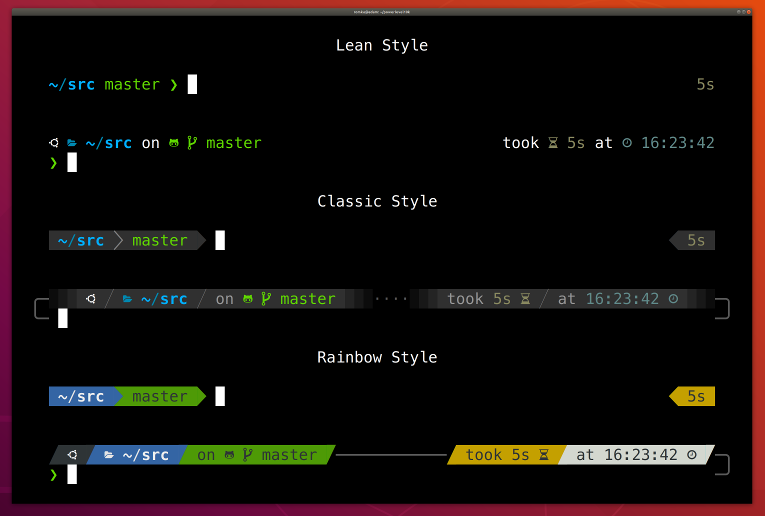
参考资料
Linux 性能优化
概念
操作系统层级 系统调用 多任务处理 进程 进程属性
虚拟内存 全局文件系统 文件系统权限 设备文件 缓冲区高速缓存
换页虚拟内存 按需换页 快文件系统(fast file system, FFS) TCL/IP 协议栈
套接字 VFS NFS 页缓存 统一页缓存 slab 分配器
DFS DTrace( atrace, eBPF ) 资源 fork
CPU 调度级别 I/O 调度级别 TCP 拥塞 Overcommit Futex
巨型页 Oprofile RCU epoll 模块 I/O 调度 DebugFs
Cpusets 自愿内核抢占 inotify blktree splice 延时审计
IO 审计 DynTicks SLUB CFS cgroups latencytop
Tracepoints perf 透明巨型页 Uprobs KVM
功能, 操作, CPU 模式, 配置, 指标, 日志,
版本, Bugs List, 社区, 书, 专家
/proc/${PID}/oom_score_adj, 数值越小,说明等级越重要,数值范围 [-17, 15], 当值为 -17 的时候该进程将不会纳入 oom 的考量范围。
/proc/${PID}/oom_score
linux/mm/oom_kill.c
man syscalls 可以查看系统支持的系统调用,在用 man ${func} 可以查看用法,其次还可参考 《UNIX 环境高级编程》 或者内核源码
taskset -pc 2-3 1234 将进程号为 1234 的 进程绑定到 2-3 号 CPU 上
sched.h,
使用 extern long sched_getaffinity(pid_t pid, struct cpumask *mask); 来获取进程被固定到那些 CPU 上,
使用 extern long sched_setaffinity(pid_t pid, const struct cpumask *new_mask); 将进程固定到某些 CPU 上,
其中 pid 为进程号,如果你设置为 0, 则设置默认为当前进程,
cpumask 被定义为 typedef struct cpumask { DECLARE_BITMAP(bits, NR_CPUS); } cpumask_t;,
而 DECLARE_BITMAP 又被定义为 #define DECLARE_BITMAP(name,bits) unsigned long name[BITS_TO_LONGS(bits)],
不同内核版本之间有不同的区别,具体请参考 include/linux/sched.h。
pthread.h 中的 pthread_setaffinity_np 方法,使用方式和进程的类似,
请直接查询 pthread.h 头文件。
scheduler/sched-deadline.txt 给出的一个例子,也可以参考: https://man7.org/linux/man-pages/man7/cpuset.7.html
    mkdir /dev/cpuset
    mount -t cgroup -o cpuset cpuset /dev/cpuset
    cd /dev/cpuset
    # 创建一个名为 cpu0 的 cpuset
    mkdir cpu0
    # 指定该 cpuset 中包含哪些 cpu, 也可以 1-3 的方式指定该 cpuset 包含 [1,2,3],
    # 具体的格式也在 scheduler/sched-deadline.txt 文档中
    echo 0 > cpu0/cpuset.cpus
    # 指定 cpuset 的 memory node
    echo 0 > cpu0/cpuset.mems //

    # 指定为 1 之后各兄弟间 cpuset 中指定的 cpu 资源不能互相冲突
    echo 1 > cpuset.cpu_exclusive
    # 指定为 1 之后将允许内核在该 set 中对进程自动做负载均衡
    echo 0 > cpuset.sched_load_balance
    echo 1 > cpu0/cpuset.cpu_exclusive
    echo 1 > cpu0/cpuset.mem_exclusive
    # 将指定进程划到该 cpuset
    echo $$ > cpu0/tasks
    # 请参考 https://github.com/scheduler-tools/rt-app
    rt-app -t 100000:10000:d:0 -D5 (it is now actually superfluous to specify
    task affinity)
 The first testing application is called rt-app and can be used to
 start multiple threads with specific parameters. rt-app supports
 SCHED_{OTHER,FIFO,RR,DEADLINE} scheduling policies and their related
 parameters (e.g., niceness, priority, runtime/deadline/period). rt-app
 is a valuable tool, as it can be used to synthetically recreate certain
 workloads (maybe mimicking real use-cases) and evaluate how the scheduler
 behaves under such workloads. In this way, results are easily reproducible.
 rt-app is available at: https://github.com/scheduler-tools/rt-app.
getconf PAGE_SIZE
perf stat -e dTLB-loads,dTLB-load-misses,iTLB-loads,iTLB-load-misses -p $PID
cpuid | grep -i tlb 获取 TLB size
echo ${Value} > /proc/sys/vm/min_free_kbytes, value 是数值,单位为 KB, 因此如果你填写 1024 那么阈值就是 1M
echo 3 > /proc/sys/vm/drop_caches
procs -----------memory---------- ---swap-- -----io---- -system-- ------cpu-----
r  b   swpd   free   buff  cache   si   so    bi    bo   in   cs us sy id wa st
1  0      0 5464424 186244 3845832    0    0     0    24 1167 3385  4  3 93  0  0

r: 正在运行中的线程
b: 处于不可中断睡眠的线程数
swpd: 可用的虚拟内存(即你最开始创建系统时分配的 swap 分区的可用内存数)
free: 包括页缓存,空闲链表在内的可用内存(KB)
buff: 被用来当作 buffer 的内存
cache: 被用来当作 cache 的内存
si: 从内存换入的内存数
so: 从内存换出的内存数
bi: 从块设备读取的数据大小
bo: 向块设备写入的数据大小
in: 每秒的中断次数,包含时钟中断(即每秒 100HZ 或者 1000HZ 的中断)
cs: 每秒上下文切换次数
us: 非内核代码运行耗时
sy: 内核代码运行耗时
id: 空闲时间(us + sy + id 一般等于 100%, 这里会对 CPU 做核平均)
wa: IO wait
st: 其他虚拟系统的耗时操作(一般你的机器是虚拟机,就会存在该字段)
echo 1 > /proc/sys/vm/drop_caches
echo 2 > /proc/sys/vm/drop_caches
echo 3 > /proc/sys/vm/drop_caches
posix_fadvise(fd, offset, len, advice), 其中 advice 用来指定应用层对待该指定区域的策略,内核会根据这些策略选择缓存方式
POSIX_FADV_SEQUENTIAL   数据会以顺序的方式访问
POSIX_FADV_RANDOM       数据会以随机的方式访问
POSIX_FADV_NOREUSE      数据不会被重用
POSIX_FADV_WILLNEED     数会在不远的将来重用
POSIX_FADV_DONTNEED     数据不会在不远的将来重用
madvise(addr, len, advice), 其中 advice 用来指定应用层对待该指定区域的策略,内核会根据这些策略选择缓存方式
MADV_RANDOM             数据会以顺序的方式访问
MADV_SEQUENTIAL         数据会以随机的方式访问
MADV_WILLNEED           数会在不远的将来重用
MADV_DONTNEED           数据不会在不远的将来重用
gdb
vmstat
mpstat
iostat
netstat
sar
top
atop
pmap
tcpdump
blktrace
perf
pstack
pstrace
strace
Oprofile
iperf3
介绍
iPerf3 是一种用于主动测量 IP 网络上可实现的最大带宽的工具。 它支持多种参数的调试,如 timing, buffers, protocols( TCP, UDP, IPv4 / IPv6 的 SCTP )。 对于每个测试,它都会报告带宽、丢包率和一些其他的参数。 这是一个新的实现,它与原始 iPerf 不共享任何代码,也不向后兼容。 iPerf was orginally developed by NLANR/DAST. iPerf3 is principally developed by ESnet / Lawrence Berkeley National Laboratory. It is released under a three-clause BSD license。 详细信息参考: iperf3 官网
iperf3 支持测试 TCP 的带宽, MSS/MTU, 另外还支持调整 socket buffer 和的窗口大小。对于 UDP, 支持测量带宽,丢包率, delay/jitter, 以及多播能力。
其支持多种客户端可以直接再官网上下载 bin 文件或者自行编译: Windows, Linux, Android, MacOS X, FreeBSD, OpenBSD, NetBSD, VxWorks, Solaris,...
参数列表
Linux 端支持的参数列表和 Windows 端支持的参数列表是不一样的,而这里仅仅支持常用的一些,对于各个平台的差异还请自己查询官方文档。
下面介绍以 server 模式运行时的独有参数:
下面介绍以 Client 模式运行时的独有参数:
-t
-t 和 -n 两个参数
--tos
下面介绍共有的一些参数:
使用方法
以下例子测试 TCP 传输性能,并在统计数据中去除前几秒的影响。
// ---------------------------------------------------------------------------------> SERVER PART
pi@raspberrypi:~ $ iperf3 -s
-----------------------------------------------------------
Server listening on 5201
-----------------------------------------------------------

// ---------------------------------------------------------------------------------> CLIENT PART
$ ./iperf3.exe -c  172.16.20.74 -p 5201 -b 10M -O 3 --get-server-output
Connecting to host 172.16.20.74, port 5201
[  4] local 10.1.114.200 port 10908 connected to 172.16.20.74 port 5201
[ ID] Interval           Transfer     Bandwidth
[  4]   0.00-1.00   sec  1.25 MBytes  10.5 Mbits/sec                  (omitted)
[  4]   1.00-2.00   sec   512 KBytes  4.19 Mbits/sec                  (omitted)
[  4]   2.00-3.00   sec   384 KBytes  3.15 Mbits/sec                  (omitted)
[  4]   0.00-1.00   sec   512 KBytes  4.19 Mbits/sec
[  4]   1.00-2.00   sec   512 KBytes  4.19 Mbits/sec
[  4]   2.00-3.00   sec   512 KBytes  4.20 Mbits/sec
[  4]   3.00-4.00   sec   384 KBytes  3.14 Mbits/sec
[  4]   4.00-5.00   sec  0.00 Bytes  0.00 bits/sec
[  4]   5.00-6.00   sec   128 KBytes  1.05 Mbits/sec
[  4]   6.00-7.00   sec   512 KBytes  4.20 Mbits/sec
[  4]   7.00-8.00   sec   256 KBytes  2.10 Mbits/sec
[  4]   8.00-9.00   sec   896 KBytes  7.35 Mbits/sec
[  4]   9.00-10.00  sec   640 KBytes  5.24 Mbits/sec
- - - - - - - - - - - - - - - - - - - - - - - - -
[ ID] Interval           Transfer     Bandwidth
[  4]   0.00-10.00  sec  4.25 MBytes  3.56 Mbits/sec                  sender
[  4]   0.00-10.00  sec  4.17 MBytes  3.50 Mbits/sec                  receiver

Server output:
-----------------------------------------------------------
Server listening on 5201
-----------------------------------------------------------
Accepted connection from 10.1.114.200, port 10907
[  5] local 172.16.20.74 port 5201 connected to 10.1.114.200 port 10908
[ ID] Interval           Transfer     Bitrate
[  5]   0.00-1.00   sec  1.02 MBytes  8.53 Mbits/sec                  (omitted)
[  5]   1.00-2.00   sec   549 KBytes  4.49 Mbits/sec                  (omitted)
[  5]   2.00-3.00   sec   426 KBytes  3.49 Mbits/sec                  (omitted)
[  5]   0.00-1.00   sec   443 KBytes  3.63 Mbits/sec
[  5]   1.00-2.00   sec   492 KBytes  4.03 Mbits/sec
[  5]   2.00-3.00   sec   531 KBytes  4.34 Mbits/sec
[  5]   3.00-4.00   sec   369 KBytes  3.03 Mbits/sec
[  5]   4.00-5.00   sec  62.7 KBytes   514 Kbits/sec
[  5]   5.00-6.00   sec   118 KBytes   969 Kbits/sec
[  5]   6.00-7.00   sec   590 KBytes  4.84 Mbits/sec
[  5]   7.00-8.00   sec   171 KBytes  1.40 Mbits/sec
[  5]   8.00-9.00   sec   909 KBytes  7.44 Mbits/sec
[  5]   9.00-10.00  sec   580 KBytes  4.75 Mbits/sec
[  5]  10.00-10.08  sec  4.28 KBytes   436 Kbits/sec
- - - - - - - - - - - - - - - - - - - - - - - - -
[ ID] Interval           Transfer     Bitrate
[  5]   0.00-10.08  sec  4.17 MBytes  3.47 Mbits/sec                  receiver


iperf Done.
下面的例子用于测试 UDP 传输性能,并评估环境中的丢包率:
$ ./iperf3.exe -c  172.16.20.74 -p 5201 -b 10M -u --get-server-output
Connecting to host 172.16.20.74, port 5201
[  4] local 10.1.114.200 port 63273 connected to 172.16.20.74 port 5201
[ ID] Interval           Transfer     Bandwidth       Total Datagrams
[  4]   0.00-1.00   sec  1.09 MBytes  9.10 Mbits/sec  139
[  4]   1.00-2.00   sec  1.27 MBytes  10.7 Mbits/sec  163
[  4]   2.00-3.00   sec  1.18 MBytes  9.90 Mbits/sec  151
[  4]   3.00-4.00   sec  1.24 MBytes  10.4 Mbits/sec  159
[  4]   4.00-5.00   sec  1.10 MBytes  9.25 Mbits/sec  141
[  4]   5.00-6.00   sec  1.20 MBytes  10.0 Mbits/sec  153
[  4]   6.00-7.00   sec  1.16 MBytes  9.76 Mbits/sec  149
[  4]   7.00-8.00   sec  1.30 MBytes  10.9 Mbits/sec  167
[  4]   8.00-9.00   sec  1.12 MBytes  9.37 Mbits/sec  143
[  4]   9.00-10.00  sec  1.23 MBytes  10.3 Mbits/sec  157
- - - - - - - - - - - - - - - - - - - - - - - - -
[ ID] Interval           Transfer     Bandwidth       Jitter    Lost/Total Datagrams
[  4]   0.00-10.00  sec  11.9 MBytes  9.97 Mbits/sec  1.460 ms  919/1516 (61%)
[  4] Sent 1516 datagrams

Server output:
-----------------------------------------------------------
Server listening on 5201
-----------------------------------------------------------
Accepted connection from 10.1.114.200, port 11025
[  5] local 172.16.20.74 port 5201 connected to 10.1.114.200 port 63273
[ ID] Interval           Transfer     Bitrate         Jitter    Lost/Total Datagrams
[  5]   0.00-1.00   sec  1.08 MBytes  9.04 Mbits/sec  0.987 ms  0/138 (0%)
[  5]   1.00-2.00   sec   432 KBytes  3.54 Mbits/sec  1.479 ms  88/142 (62%)
[  5]   2.00-3.00   sec   400 KBytes  3.28 Mbits/sec  1.317 ms  103/153 (67%)
[  5]   3.00-4.00   sec   408 KBytes  3.34 Mbits/sec  1.539 ms  101/152 (66%)
[  5]   4.00-5.00   sec   400 KBytes  3.28 Mbits/sec  0.851 ms  103/153 (67%)
[  5]   5.00-6.00   sec   400 KBytes  3.28 Mbits/sec  0.989 ms  103/153 (67%)
[  5]   6.00-7.00   sec   400 KBytes  3.28 Mbits/sec  1.466 ms  102/152 (67%)
[  5]   7.00-8.00   sec   400 KBytes  3.28 Mbits/sec  1.183 ms  103/153 (67%)
[  5]   8.00-9.00   sec   400 KBytes  3.28 Mbits/sec  5.698 ms  99/149 (66%)
[  5]   9.00-10.00  sec   392 KBytes  3.21 Mbits/sec  1.384 ms  107/156 (69%)
[  5]  10.00-10.34  sec  40.0 KBytes   953 Kbits/sec  1.460 ms  10/15 (67%)
- - - - - - - - - - - - - - - - - - - - - - - - -
[ ID] Interval           Transfer     Bitrate         Jitter    Lost/Total Datagrams
[  5]   0.00-10.34  sec  4.66 MBytes  3.78 Mbits/sec  1.460 ms  919/1516 (61%)  receiver


iperf Done.
内核配置
给内核添加 nfs 启动文件系统( 以下部分的修改针对 3.0.8 内核 )
make menuconfig之后修改下列内容。
    File systems  --->
        [*] Network File Systems  --->
            [*]   NFS client support
            [ ]     NFS client support for NFS version 3
            [ ]     NFS client support for NFS version 4
            [*]   Root file system on NFS
    [*] Networking support  --->
        Networking options  --->
        [*]   IP: kernel level autoconfiguration
        [*]     IP: DHCP support
        [*]     IP: BOOTP support
        [*]     IP: RARP support
内核和 busybox 支持 telnet 登陆。
./arch/x86/entry/syscalls/syscall_64.tbl
include/linux/syscalls.h
kernel 目录下,如 ./kernel/sys.c
include/linux/syscalls.h 中,如 #define SYSCALL_DEFINE1(name, ...) SYSCALL_DEFINEx(1, _##name, __VA_ARGS__)
vmstat 中的 in interrupt 字段为周期内全局中断次数,而 cs context switch 则为周期内上下文切换的次数(包括进程和线程)
pidstat -w, 其中 cswch 表示自愿上下文切换次数(voluntary context switches)
而 nvcswch 为非自愿上下文切换(non voluntary context switches)的次数。
    Device Drivers  --->
    Character devices-->
    [*] Legacy (BSD) PTY support
    (256) Maximum number of legacy PTY in use
    Busybox Settings  --->
        General Configuration  --->
            [*] Use the devpts filesystem for Unix98 PTYs

    Login/Password Management Utilities  --->
        [*] login
        [*]   Run logged in session in a child process
        [*]   Support for login scripts
        [*]   Support for /etc/nologin
        [*]   Support for /etc/securetty

    Networking Utilities  --->
        [*] inetd
        [*]   Support echo service
        [*]   Support discard service
        [*]   Support time service
        [*]   Support daytime service
        [*]   Support chargen service
        [*]   Support RPC services

        [*] telnet
        [*]   Pass TERM type to remote host
        [*]   Pass USER type to remote host
        [*] telnetd
        [*]   Support standalone telnetd (not inetd only)
        [*]     Support -w SEC option (inetd wait mode)
    echo -e '\npts/0\npts/1\npts/2\npts/3\npts/4\npts/5\npts/6\npts/7\n' > /etc/securetty; cat /etc/securetty
    echo 'telnet 23/tcp' > /etc/services
    echo 'telnet stream tcp nowait root /sbin/telnetd' > telnetd
    telnetd
    注意:(一下某些注意的项因博主在配置时已经存在,或者不需要,因此没有给出详细的配置方法,需要自行查找解决方法)
    1. 取消busybox telnet 登录时的密码问题:
    配置 busybox
    Login/Password Management Utilities  --->
    [ ] login

    2. /etc 目录下下面的文件必不可少
    fstab
    service
    inetd.conf
    passwd

    3. fstab 中需要自动挂载 /dev/pts
    none /dev/pts devpts mode=0622 0 0

    4. /dev/ptmx 设备节点需要存在

    5. 遇到配置不过的时候建议借助 syslogd
    先在 busybox 配置支持
    然后运行 syslogd -n -m 0 -L & 即可将log 信息打印到串口终端
打开 coredump 调试接口
    step one:
    # meke menuconfig
    General setup  --->
        -*- Configure standard kernel features (expert users)  --->
            [*]   Enable ELF core dumps

    step two:
    # make menuconfig
    Executable file formats  --->
        [*] Kernel support for ELF binaries
        [*] Write ELF core dumps with partial segments
ulimit -c unlimited 以接触内核创建文件大小的限制。一般来说 core 这个生成文件与可执行文件在同一个位置(使用 cat /proc/sys/kernel/core_pattern 可以查看/设置 coredump 文件的生成位置),但是当程序中用到了 chdir 的时候,core 文件会转移到 change 的那个目录去,因此我们最好设置一下文件生成到固定的位置。如我们想将生成的 coredump 文件放到 /tmp/core 这个文件中,则可以在系统启动的时候执行,echo "/tmp/core" > /proc/sys/kernel/core_pattern。但这样又会存在一个问题,如果多个程序,或者一个程序生成多个 coredump 文件,那么这个文件将被覆盖,下面介绍了一些转意符,在生成文件的时候使用这些转意符可以区分不同时期生成的 coredump 文件。比如如果你想将生成的 coredump 文件放到 /tmp/[进程名]-[进程 id].coredump 这个文件中可以在启动的时候执行这条指令: echo /tmp/%e.%p.coredump > /proc/sys/kernel/core_pattern
    %% 单个%字符
    %p 所dump进程的进程ID
    %u 所dump进程的实际用户ID
    %g 所dump进程的实际组ID
    %s 导致本次core dump的信号
    %t core dump的时间 (由1970年1月1日计起的秒数)
    %h 主机名
    %e 程序文件名
配置 ZM8620 无线网卡
    1. Device Drivers --->
        USB support --->
            USB Serial Converter support --->
                USB Generic Serial Driver
                USB driver for GSM and CDMA modems
    2. Device Drivers --->
        Network device support --->
            PPP (point-to-point protocol) support
            PPP multilink support
            PPP filtering
            PPP support for async serial ports
            PPP support for sync tty ports
    3. Device Drivers --->
        Network device support --->
            USB Network Adapters --->
                Multi-purpose USB Networking Framework

    CONFIG_USB_SERIAL=y
    CONFIG_USB_SERIAL_GENERIC=y
    CONFIG_USB_SERIAL_OPTION=y
    CONFIG_PPP=y
    CONFIG_PPP_ MULTILINK=y
    CONFIG_PPP_FILTER=y
    CONFIG_PPP_ASYNC=y
    CONFIG_PPP_SYNC_TTY=y
    CONFIG_USB_NET_CDCETHER=y (For modem with ECM/NDIS interface)
编译内核的时候可能出现内核版本太老不支持 USBID 那么此时你应该找到无线网卡的 ID (你在使用其他 USB 的时候也是一样) lsusb 可以查询到插入设备的 ID。如下:
    # lsusb
    Bus 002 Device 001: ID 1d6b:0003 Linux Foundation 3.0 root hub
    ...
其中 1d6b:0003 就是 ID 你在内核地 driver/usb/serial/options.h 这个文件中要加入你添加的设备 ID,如中兴的 ZM8620 的 ID 可能是 19d2:0396 那么你在 option_ids 这个数组中应该在结尾添加上如下这行
    static const struct usb_device_id option_ids[] = {
        ...
        // or { USB_DEVICE_AND_INTERFACE_INFO(ZTE_VENDOR_ID, 0x0396, 0xff, 0xff, 0xff) }
        {USB_DEVICE( 0x19d2, 0x0396 )},
        {},
    }
然后将下面的这几个文件放到一个文件夹中, 编译出来的文件 pppoe-discovery, chat, pppd, pppstats, pppdump 需要自己编辑 zte_options, ppp-on, pppoe-discovery, disconnect
以下拿联通的举例:
        ppp-on

            #!/bin/sh
            set -e
            RELATIVE_DIR=`dirname $0`
            CUR_DIR=`cd ${RELATIVE_DIR} && pwd && cd -`
            PPPD=${CUR_DIR}/pppd
            CHAT=${CUR_DIR}/chat

            OPTION_FILE="zte_options"
            DIALER_SCRIPT="$(pwd)/zte_ppp_dialer"
            exec ${PPPD} file $OPTION_FILE connect "${CHAT} -v -f ${DIALER_SCRIPT}"

            disconnect

                #!/bin/sh
            killall pppd


        zte_options:

            /dev/ttyUSB2
            115200
            crtscts
            modem
            persist
            lock
            noauth
            noipdefault
            debug
            nodetach
            user Anyname
            password Anypassword
            ipcp-accept-local
            ipcp-accept-remote
            defaultroute
            usepeerdns
            noccp
            nobsdcomp
            novj
            dump

        zte_ppp_dialer

            ABORT       "NO CARRIER"
            ABORT       "ERROR"
            TIMEOUT     120
            ""          ATE
            SAY         "ATE"
            ECHO        ON
            OK          ATH
            OK          ATP
            OK          "AT+CGDCONT=1,\"IP\", \"APN\""
            OK          ATD*98#
            CONNECT
Linux 内核
// include/linux/platform_device.h
#define module_platform_driver(__platform_driver) \
    module_driver(__platform_driver, platform_driver_register, \
        platform_driver_unregister)
printk( KERN_DEBUG "hello, world!" );
    #define KERN_EMERG      "<0>"    /* 系统不可使用 */
    #define KERN_ALERT      "<1>"    /* 需要立即采取行动 */
    #define KERN_CRIT       "<2>"    /* 严重情况 */
    #define KERN_ERR        "<3>"    /* 错误情况 */
    #define KERN_WARNING    "<4>"    /* 警告情况 */
    #define KERN_NOTICE     "<5>"    /* 正常情况, 但是值得注意 */
    #define KERN_INFO       "<6>"    /* 信息型消息 */
    #define KERN_DEBUG      "<7>"    /* 调试级别的信息 */
    /* 使用默认内核日志级别 */
    #define KERN_DEFAULT    ""
    /*
    * 标注为一个“连续”的日志打印输出行(只能用于一个
    * 没有用 \n封闭的行之后). 只能用于启动初期的 core/arch 代码
    * (否则续行是非SMP的安全).
    */
    #define KERN_CONT       ""
sudo apt update; sudo apt upgrade -y; sudo apt install -y virtualbox-guest-additions-iso net-tools htop vim tree git gitk bc unzip python bison flex libncurses5-dev libncursesw5-dev device-tree-compiler expect cmake
make download V=s -- 下载所有依赖项Linux 音频架构
参考文档
参考文档
此内容由惯性聚合(RSS阅读器)自动聚合整理,仅供阅读参考。 原文来自 — 版权归原作者所有。