





作者:尹正杰
版权声明:原创作品,谢绝转载!否则将追究法律责任。
参考链接:
	https://www.elastic.co/guide/en/elasticsearch/reference/8.18/deb.html

	https://www.elastic.co/docs/deploy-manage/deploy/self-managed/install-elasticsearch-with-debian-package

[root@elk94 ~]# wget https://artifacts.elastic.co/downloads/elasticsearch/elasticsearch-9.2.0-amd64.deb
[root@elk94 ~]# ll elasticsearch-9.2.0-amd64.deb
-rw-r--r-- 1 root root 686588732 Nov  4 10:36 elasticsearch-9.2.0-amd64.deb
[root@elk94 ~]#
[root@elk94 ~]# dpkg -i elasticsearch-9.2.0-amd64.deb
...
--------------------------- Security autoconfiguration information ------------------------------

Authentication and authorization are enabled.
TLS for the transport and HTTP layers is enabled and configured.

The generated password for the elastic built-in superuser is : _1nGhU1tRMZl2G=PpgL+

If this node should join an existing cluster, you can reconfigure this with
'/usr/share/elasticsearch/bin/elasticsearch-reconfigure-node --enrollment-token <token-here>'
after creating an enrollment token on your existing cluster.

You can complete the following actions at any time:

Reset the password of the elastic built-in superuser with
'/usr/share/elasticsearch/bin/elasticsearch-reset-password -u elastic'.

Generate an enrollment token for Kibana instances with
 '/usr/share/elasticsearch/bin/elasticsearch-create-enrollment-token -s kibana'.

Generate an enrollment token for Elasticsearch nodes with
'/usr/share/elasticsearch/bin/elasticsearch-create-enrollment-token -s node'.

-------------------------------------------------------------------------------------------------
### NOT starting on installation, please execute the following statements to configure elasticsearch service to start automatically using systemd
 sudo systemctl daemon-reload
 sudo systemctl enable elasticsearch.service
### You can start elasticsearch service by executing
 sudo systemctl start elasticsearch.service
[root@elk94 ~]#
[root@elk94 ~]# grep network.host /etc/elasticsearch/elasticsearch.yml
#network.host: 192.168.0.1
[root@elk94 ~]#
[root@elk94 ~]# sed -i 's@#network.host: 192.168.0.1@network.host: 0.0.0.0@' /etc/elasticsearch/elasticsearch.yml
[root@elk94 ~]#
[root@elk94 ~]# grep network.host /etc/elasticsearch/elasticsearch.yml
network.host: 0.0.0.0
[root@elk94 ~]#
[root@elk94 ~]# systemctl enable --now elasticsearch.service
Created symlink /etc/systemd/system/multi-user.target.wants/elasticsearch.service → /lib/systemd/system/elasticsearch.service.
[root@elk94 ~]#
[root@elk94 ~]# ss -ntl | grep 9200
LISTEN 0      4096               *:9200            *:*
[root@elk94 ~]#
[root@elk95 ~]# curl -k https://10.0.0.94:9200 -u "elastic:_1nGhU1tRMZl2G=PpgL+"
{
  "name" : "elk94",
  "cluster_name" : "elasticsearch",
  "cluster_uuid" : "8wypk5pFSXyr3xwR7T92CQ",
  "version" : {
    "number" : "9.2.0",
    "build_flavor" : "default",
    "build_type" : "deb",
    "build_hash" : "25d88452371273dd27356c98598287b669a03eae",
    "build_date" : "2025-10-21T10:06:21.288851013Z",
    "build_snapshot" : false,
    "lucene_version" : "10.3.1",
    "minimum_wire_compatibility_version" : "8.19.0",
    "minimum_index_compatibility_version" : "8.0.0"
  },
  "tagline" : "You Know, for Search"
}
[root@elk95 ~]#
[root@elk95 ~]# curl -k https://10.0.0.94:9200/_cat/nodes -u "elastic:_1nGhU1tRMZl2G=PpgL+"
10.0.0.94 54 97 12 0.24 0.30 0.18 cdfhilmrstw * elk94
[root@elk95 ~]#
硬件: 2c,4G,50GB+
IP地址及主机名
	10.0.0.94 elk94
	10.0.0.95 elk95
	10.0.0.96 elk96
[root@elk94 ~]# systemctl disable --now elasticsearch.service
[root@elk94 ~]#
[root@elk94 ~]# ss -ntl | egrep "9200|9300"
[root@elk94 ~]#
[root@elk94 ~]# rm -rf /var/{log,lib}/elasticsearch/*
[root@elk94 ~]#
[root@elk94 ~]# scp elasticsearch-9.2.0-amd64.deb 10.0.0.95:~

[root@elk94 ~]# scp elasticsearch-9.2.0-amd64.deb 10.0.0.96:~
[root@elk95 ~]# dpkg -i elasticsearch-9.2.0-amd64.deb

[root@elk96 ~]# dpkg -i elasticsearch-9.2.0-amd64.deb
[root@elk94 ~]# egrep -v "^#|^$" /etc/elasticsearch/elasticsearch.yml
cluster.name: oldboyedu-linux100-es9-cluster
path.data: /var/lib/elasticsearch
path.logs: /var/log/elasticsearch
network.host: 0.0.0.0
discovery.seed_hosts: ["10.0.0.94"]
cluster.initial_master_nodes: ["10.0.0.94"]
xpack.security.enabled: true
xpack.security.enrollment.enabled: true
xpack.security.http.ssl:
  enabled: true
  keystore.path: certs/http.p12
xpack.security.transport.ssl:
  enabled: true
  verification_mode: certificate
  keystore.path: certs/transport.p12
  truststore.path: certs/transport.p12
cluster.initial_master_nodes: ["elk94"]
http.host: 0.0.0.0
[root@elk94 ~]#
[root@elk94 ~]# systemctl enable --now elasticsearch.service
[root@elk94 ~]# ss -ntl | egrep "9200|9300"
LISTEN 0      4096               *:9300            *:*
LISTEN 0      4096               *:9200            *:*
[root@elk94 ~]#
[root@elk95 ~]# curl -k https://10.0.0.94:9200/_cat/nodes -u "elastic:_1nGhU1tRMZl2G=PpgL+"
10.0.0.94 52 96 40 0.51 0.23 0.18 cdfhilmrstw * elk94
[root@elk95 ~]#
[root@elk94 ~]# /usr/share/elasticsearch/bin/elasticsearch-create-enrollment-token -s node  # ES9采用该脚本生成令牌
eyJ2ZXIiOiI4LjE0LjAiLCJhZHIiOlsiMTAuMC4wLjk0OjkyMDAiXSwiZmdyIjoiYmNhMjA4MzMxOTgzZGUzZWI2Nzg5MDNmZjZjMjliYzhlYmI4ZDZmNzdmMGZmYjk0MDU2ODQwMzdjNjFiOWRlOCIsImtleSI6IkZLYmJUSm9CNlNzT3c2UWhZY2xQOjIxR0tUQTZKdGo5UzNYOUdqUmc2dkEifQ==
[root@elk94 ~]#
语法格式:
		/usr/share/elasticsearch/bin/elasticsearch-reconfigure-node --enrollment-token  <TOKEN>

[root@elk95 ~]# /usr/share/elasticsearch/bin/elasticsearch-reconfigure-node --enrollment-token eyJ2ZXIiOiI4LjE0LjAiLCJhZHIiOlsiMTAuMC4wLjk0OjkyMDAiXSwiZmdyIjoiYmNhMjA4MzMxOTgzZGUzZWI2Nzg5MDNmZjZjMjliYzhlYmI4ZDZmNzdmMGZmYjk0MDU2ODQwMzdjNjFiOWRlOCIsImtleSI6IkZLYmJUSm9CNlNzT3c2UWhZY2xQOjIxR0tUQTZKdGo5UzNYOUdqUmc2dkEifQ==

This node will be reconfigured to join an existing cluster, using the enrollment token that you provided.
This operation will overwrite the existing configuration. Specifically:
  - Security auto configuration will be removed from elasticsearch.yml
  - The [certs] config directory will be removed
  - Security auto configuration related secure settings will be removed from the elasticsearch.keystore
Do you want to continue with the reconfiguration process [y/N]y
[root@elk95 ~]#
[root@elk95 ~]# egrep -v "^#|^$" /etc/elasticsearch/elasticsearch.yml
path.data: /var/lib/elasticsearch
path.logs: /var/log/elasticsearch
xpack.security.enabled: true
xpack.security.enrollment.enabled: true
xpack.security.http.ssl:
  enabled: true
  keystore.path: certs/http.p12
xpack.security.transport.ssl:
  enabled: true
  verification_mode: certificate
  keystore.path: certs/transport.p12
  truststore.path: certs/transport.p12
discovery.seed_hosts: ["10.0.0.94:9300"]
http.host: 0.0.0.0
transport.host: 0.0.0.0
[root@elk95 ~]#


 [root@elk96 ~]# /usr/share/elasticsearch/bin/elasticsearch-reconfigure-node --enrollment-token eyJ2ZXIiOiI4LjE0LjAiLCJhZHIiOlsiMTAuMC4wLjk0OjkyMDAiXSwiZmdyIjoiYmNhMjA4MzMxOTgzZGUzZWI2Nzg5MDNmZjZjMjliYzhlYmI4ZDZmNzdmMGZmYjk0MDU2ODQwMzdjNjFiOWRlOCIsImtleSI6IkZLYmJUSm9CNlNzT3c2UWhZY2xQOjIxR0tUQTZKdGo5UzNYOUdqUmc2dkEifQ==

This node will be reconfigured to join an existing cluster, using the enrollment token that you provided.
This operation will overwrite the existing configuration. Specifically:
  - Security auto configuration will be removed from elasticsearch.yml
  - The [certs] config directory will be removed
  - Security auto configuration related secure settings will be removed from the elasticsearch.keystore
Do you want to continue with the reconfiguration process [y/N]y
[root@elk96 ~]#
[root@elk96 ~]# egrep -v "^#|^$" /etc/elasticsearch/elasticsearch.yml
path.data: /var/lib/elasticsearch
path.logs: /var/log/elasticsearch
xpack.security.enabled: true
xpack.security.enrollment.enabled: true
xpack.security.http.ssl:
  enabled: true
  keystore.path: certs/http.p12
xpack.security.transport.ssl:
  enabled: true
  verification_mode: certificate
  keystore.path: certs/transport.p12
  truststore.path: certs/transport.p12
discovery.seed_hosts: ["10.0.0.94:9300"]
http.host: 0.0.0.0
transport.host: 0.0.0.0
[root@elk96 ~]#
[root@elk94 ~]# scp /etc/elasticsearch/elasticsearch.yml  10.0.0.95:/etc/elasticsearch/
[root@elk94 ~]#
[root@elk94 ~]# scp /etc/elasticsearch/elasticsearch.yml  10.0.0.96:/etc/elasticsearch/
[root@elk94 ~]#
[root@elk94 ~]# egrep -v "^#|^$" /etc/elasticsearch/elasticsearch.yml
cluster.name: oldboyedu-linux100-es9-cluster
path.data: /var/lib/elasticsearch
path.logs: /var/log/elasticsearch
network.host: 0.0.0.0
discovery.seed_hosts: ["10.0.0.94"]
cluster.initial_master_nodes: ["10.0.0.94"]
xpack.security.enabled: true
xpack.security.enrollment.enabled: true
xpack.security.http.ssl:
  enabled: true
  keystore.path: certs/http.p12
xpack.security.transport.ssl:
  enabled: true
  verification_mode: certificate
  keystore.path: certs/transport.p12
  truststore.path: certs/transport.p12
http.host: 0.0.0.0
[root@elk94 ~]#

[root@elk95 ~]# egrep -v "^#|^$" /etc/elasticsearch/elasticsearch.yml
cluster.name: oldboyedu-linux100-es9-cluster
path.data: /var/lib/elasticsearch
path.logs: /var/log/elasticsearch
network.host: 0.0.0.0
discovery.seed_hosts: ["10.0.0.94"]
cluster.initial_master_nodes: ["10.0.0.94"]
xpack.security.enabled: true
xpack.security.enrollment.enabled: true
xpack.security.http.ssl:
  enabled: true
  keystore.path: certs/http.p12
xpack.security.transport.ssl:
  enabled: true
  verification_mode: certificate
  keystore.path: certs/transport.p12
  truststore.path: certs/transport.p12
http.host: 0.0.0.0
[root@elk95 ~]#

[root@elk96 ~]# egrep -v "^#|^$" /etc/elasticsearch/elasticsearch.yml
cluster.name: oldboyedu-linux100-es9-cluster
path.data: /var/lib/elasticsearch
path.logs: /var/log/elasticsearch
network.host: 0.0.0.0
discovery.seed_hosts: ["10.0.0.94"]
cluster.initial_master_nodes: ["10.0.0.94"]
xpack.security.enabled: true
xpack.security.enrollment.enabled: true
xpack.security.http.ssl:
  enabled: true
  keystore.path: certs/http.p12
xpack.security.transport.ssl:
  enabled: true
  verification_mode: certificate
  keystore.path: certs/transport.p12
  truststore.path: certs/transport.p12
http.host: 0.0.0.0
[root@elk96 ~]#
[root@elk94 ~]# systemctl restart elasticsearch.service
[root@elk94 ~]#

[root@elk95 ~]# systemctl enable --now elasticsearch.service
[root@elk95 ~]#

[root@elk96 ~]# systemctl enable --now  elasticsearch.service
[root@elk96 ~]#
[root@elk95 ~]# curl -k https://10.0.0.94:9200/_cat/nodes -u "elastic:_1nGhU1tRMZl2G=PpgL+"
10.0.0.95 42 97 0 0.10 0.18 0.11 cdfhilmrstw - elk95
10.0.0.94 47 95 0 0.08 0.14 0.10 cdfhilmrstw * elk94
10.0.0.96 41 97 0 0.09 0.23 0.16 cdfhilmrstw - elk96
[root@elk95 ~]#
	Q1: ERROR: Failed to determine the health of the cluster., with exit code 69
root@elk81:~# /usr/share/elasticsearch/bin/elasticsearch-create-enrollment-token -s node

ERROR: Failed to determine the health of the cluster., with exit code 69
root@elk81:~#

问题分析:
	ES服务没有启动。


解决方案:
	先启动服务。


彩蛋: 卸载ES服务
	systemctl disable --now elasticsearch.service
	dpkg -P elasticsearch
	rm -rf /var/{lib,log}/elasticsearch/*
[root@elk94 ~]# /usr/share/elasticsearch/bin/elasticsearch-reset-password -u elastic
This tool will reset the password of the [elastic] user to an autogenerated value.
The password will be printed in the console.
Please confirm that you would like to continue [y/N]y  # 手动输入字母'y'


Password for the [elastic] user successfully reset.
New value: v1YLiqrPX_qCtTMz=w39
[root@elk94 ~]#
[root@elk95 ~]# curl -k https://10.0.0.94:9200/_cat/nodes -u "elastic:_1nGhU1tRMZl2G=PpgL+" ; echo
{"error":{"root_cause":[{"type":"security_exception","reason":"unable to authenticate user [elastic] for REST request [/_cat/nodes]","header":{"WWW-Authenticate":["Basic realm=\"security\", charset=\"UTF-8\"","Bearer realm=\"security\"","ApiKey"]}}],"type":"security_exception","reason":"unable to authenticate user [elastic] for REST request [/_cat/nodes]","header":{"WWW-Authenticate":["Basic realm=\"security\", charset=\"UTF-8\"","Bearer realm=\"security\"","ApiKey"]}},"status":401}
[root@elk95 ~]#
[root@elk95 ~]# curl -k https://10.0.0.94:9200/_cat/nodes -u "elastic:v1YLiqrPX_qCtTMz=w39"
10.0.0.95 44 97 0 0.01 0.11 0.09 cdfhilmrstw - elk95
10.0.0.94 49 95 2 0.06 0.11 0.09 cdfhilmrstw * elk94
10.0.0.96 42 97 0 0.01 0.14 0.13 cdfhilmrstw - elk96
[root@elk95 ~]#
ES集群数据写入机制为半数以上写入,因此要确保ES集群半数以上节点存活。

假设主分片数量为1,副本数量为1,则半数以上机制为2副本写入。

因此要确保ES集群最少有2台节点可用。


实操案例:

[root@elk94 ~]# systemctl stop elasticsearch.service
[root@elk94 ~]#
[root@elk94 ~]# ss -ntl | grep 9200
[root@elk94 ~]#
[root@elk95 ~]# curl -k https://10.0.0.95:9200/_cat/nodes -u "elastic:v1YLiqrPX_qCtTMz=w39"
10.0.0.96 27 96 2 0.21 0.05 0.02 cdfhilmrstw * elk96
10.0.0.95 25 97 1 0.00 0.00 0.00 cdfhilmrstw - elk95
[root@elk95 ~]#
[root@elk96 ~]# systemctl stop elasticsearch.service
[root@elk96 ~]#
[root@elk96 ~]# ss -ntl | grep 9200
[root@elk96 ~]#
[root@elk95 ~]# curl -k https://10.0.0.95:9200/_cat/nodes -u "elastic:v1YLiqrPX_qCtTMz=w39" ;echo
{"error":{"root_cause":[{"type":"master_not_discovered_exception","reason":null}],"type":"master_not_discovered_exception","reason":null},"status":503}
[root@elk95 ~]#
[root@elk94 ~]# systemctl start elasticsearch.service

[root@elk96 ~]# systemctl start elasticsearch.service
[root@elk95 ~]# curl -k https://10.0.0.95:9200/_cat/nodes -u "elastic:v1YLiqrPX_qCtTMz=w39"
10.0.0.94 41 96 56 0.61 0.16 0.05 cdfhilmrstw - elk94
10.0.0.96 41 97 73 0.56 0.14 0.04 cdfhilmrstw - elk96
10.0.0.95  6 97  1 0.30 0.07 0.02 cdfhilmrstw * elk95
[root@elk95 ~]#
[root@elk96 ~]# wget https://artifacts.elastic.co/downloads/kibana/kibana-9.2.0-amd64.deb
[root@elk96 ~]# dpkg -i kibana-9.2.0-amd64.deb
[root@elk96 ~]# vim /etc/kibana/kibana.yml
...
server.host: "0.0.0.0"
i18n.locale: "zh-CN"
[root@elk96 ~]# systemctl enable --now kibana.service
Created symlink /etc/systemd/system/multi-user.target.wants/kibana.service → /lib/systemd/system/kibana.service.
[root@elk96 ~]#
[root@elk96 ~]# ss -ntl | grep 5601
LISTEN 0      511          0.0.0.0:5601      0.0.0.0:*
[root@elk96 ~]#
[root@elk94 ~]# /usr/share/elasticsearch/bin/elasticsearch-create-enrollment-token -s kibana
eyJ2ZXIiOiI4LjE0LjAiLCJhZHIiOlsiMTAuMC4wLjk0OjkyMDAiXSwiZmdyIjoiYmNhMjA4MzMxOTgzZGUzZWI2Nzg5MDNmZjZjMjliYzhlYmI4ZDZmNzdmMGZmYjk0MDU2ODQwMzdjNjFiOWRlOCIsImtleSI6ImJSYV9UWm9CN2tKNGpTSmFrc1o3OlduYnR2WENFMFJWSi1tN3Bxd2FZQ1EifQ==
[root@elk94 ~]#
http://10.0.0.96:5601/

基于token进行认证配置即可。
[root@elk96 ~]# /usr/share/kibana/bin/kibana-verification-code
Your verification code is:  194 550
[root@elk96 ~]#
略,见视频。
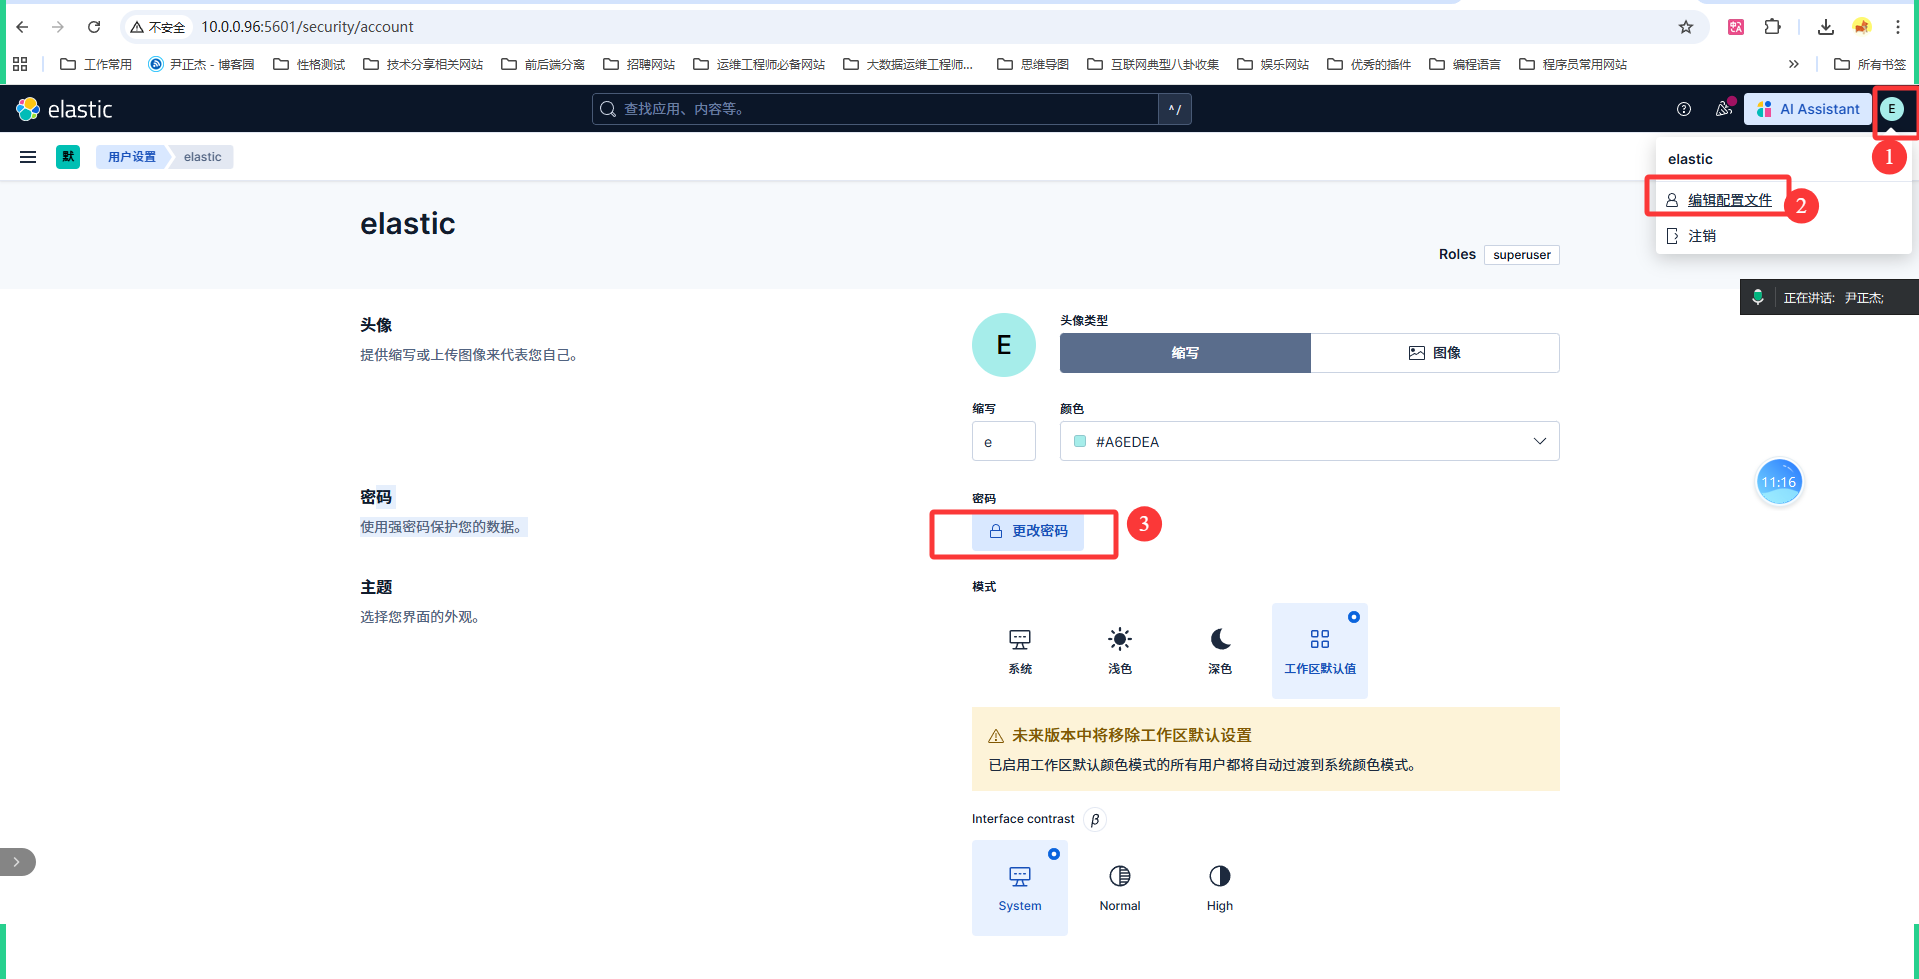
如上图所示,建议修改elastic密码为123456
[root@elk95 ~]# curl -k https://10.0.0.95:9200/_cat/nodes -u "elastic:123456"
10.0.0.94 58 97 3 0.06 0.16 0.13 cdfhilmrstw - elk94
10.0.0.96 13 95 3 0.11 0.23 0.16 cdfhilmrstw - elk96
10.0.0.95 35 97 1 0.02 0.07 0.03 cdfhilmrstw * elk95
[root@elk95 ~]#
	1.ES8默认启用了https,支持认证等功能;
	2.ES8新增'elasticsearch-reset-password'脚本,对于elastic用户重置密码更加简单;
	3.ES8新增'elasticsearch-create-enrollment-token'脚本,可以为组件创建token信息,比如kibana,node组件;
	4.ES8新增kibana新增'kibana-verification-code'用于生成校验码。
	5.kibana支持更多的语言:English (default) "en", Chinese "zh-CN", Japanese "ja-JP", French "fr-FR"
	6.kibana的webUI更加丰富,支持AI助手,手动创建索引等功能;
	7.kibana不用创建索引模式就可以直接查看数据,系统会生成一个临时的视图以供查看;
	8.ES8集群部署时,需要借助'elasticsearch-reconfigure-node'脚本来加入已存在的集群,默认就是单master节点的配置;
此内容由惯性聚合(RSS阅读器)自动聚合整理,仅供阅读参考。 原文来自 — 版权归原作者所有。