





一、安装PostgreSQL
1、安装PostgreSQL
解压PostgreSQL软件包
tar -zxvf postgresql.tar.gz配置并安装PostgreSQL
[postgres@localhost setup]$ tar -zxvf postgresql-10.23.tar.gz
进入解压后的目录,按照PostgreSQL的官方文档进行配置和安装。这通常涉及到创建数据目录、配置postgresql.conf和pg_hba.conf等文件。
[postgres@localhost setup]$ cd postgresql-10.23
[postgres@localhost postgresql-10.23]$ ./configure --prefix=/home/postgres/postgresql --with-libxml
[postgres@localhost postgresql-10.23]$ make
[postgres@localhost postgresql-10.23]$ make install
设置环境变量
[postgres@localhost postgresql-10.23]$ vim ~/.bash_profile
export PGDATA=/home/postgres/postgresql/data
export PGHOME=/home/postgres/postgresql
export PATH=$PGHOME/bin:$PATH
[postgres@localhost postgresql-10.23]$ source ~/.bash_profile
初始化数据库
使用initdb命令初始化数据库目录。
[postgres@localhost bin]$ pwd
/home/postgres/postgresql/bin
[postgres@localhost bin]$ initdb -D /home/postgres/postgresql/data
The files belonging to this database system will be owned by user "postgres".
This user must also own the server process.
The database cluster will be initialized with locale "en_US.UTF-8".
The default database encoding has accordingly been set to "UTF8".
The default text search configuration will be set to "english".
Data page checksums are disabled.
creating directory /home/postgres/postgresql/data ... ok
creating subdirectories ... ok
selecting default max_connections ... 100
selecting default shared_buffers ... 128MB
selecting default timezone ... Asia/Shanghai
selecting dynamic shared memory implementation ... posix
creating configuration files ... ok
running bootstrap script ... ok
performing post-bootstrap initialization ... ok
syncing data to disk ... ok
WARNING: enabling "trust" authentication for local connections
You can change this by editing pg_hba.conf or using the option -A, or
--auth-local and --auth-host, the next time you run initdb.
Success. You can now start the database server using:
pg_ctl -D /home/postgres/postgresql/data -l logfile start
[postgres@localhost bin]$
2、配置远程登录
1.编辑 pg_hba.conf 文件
[postgres@localhost postgresql-12.2]$ vi /home/postgres/postgresql/data/pg_hba.conf
#zkm 2024-12-03
host all all 0.0.0.0/0 md5
将 host all all 0.0.0.0/0 md5 添加到文件中,代表所有的用户通过任意 ip 都可以通过md5(密码)的方式登陆PostgreSQL。
如下图所示:
host all all 0.0.0.0/0 md5
2.编辑 postgresql.conf 文件
[postgres@localhost postgresql-12.2]$ vi /home/postgres/postgresql/data/postgresql.conf
[postgres@localhost postgresql-12.2]$ cat /home/postgres/postgresql/data/postgresql.conf|grep listen_addresses
#listen_addresses = 'localhost' # what IP address(es) to listen on;
[postgres@localhost postgresql-12.2]$ vi /home/postgres/postgresql/data/postgresql.conf
[postgres@localhost postgresql-12.2]$ cat /home/postgres/postgresql/data/postgresql.conf|grep listen_addresses
listen_addresses = '*' # what IP address(es) to listen on;
[postgres@localhost postgresql-12.2]$
增加sudo 权限
[root@localhost yum.repos.d]# whereis sudoers
sudoers: /etc/sudoers
[root@localhost yum.repos.d]# chmod -v u+w /etc/sudoers
mode of '/etc/sudoers' changed from 0440 (r--r-----) to 0640 (rw-r-----)
[root@localhost yum.repos.d]# echo -e "#zkm 2024-11-23\npostgres ALL=(ALL) ALL" >> /etc/sudoers
[root@localhost yum.repos.d]# chmod -v u-w /etc/sudoers
mode of '/etc/sudoers' changed from 0640 (rw-r-----) to 0440 (r--r-----)
[root@localhost yum.repos.d]#
8.配置系统服务
1.创建postgresql.service文件
[postgres@localhost bin]$ sudo vi /usr/lib/systemd/system/postgresql.service
[sudo] password for postgres:
[postgres@localhost bin]$ sudo cat /usr/lib/systemd/system/postgresql.service | grep -v ^# |grep -v ^$
[Unit]
Description=PostgreSQL database server
After=network.target
[Service]
Type=forking
User=postgres
Group=postgres
Environment=PGPORT=7001
Environment=PGDATA=/home/postgres/postgresql/data
OOMScoreAdjust=-1000
ExecStart=/home/postgres/postgresql/bin/pg_ctl start -D ${PGDATA} -s -o "-p ${PGPORT}" -w -t 300
ExecStop=/home/postgres/postgresql/bin/pg_ctl stop -D ${PGDATA} -s -m fast
ExecReload=/home/postgres/postgresql/bin/pg_ctl reload -D ${PGDATA} -s
TimeoutSec=300
[Install]
WantedBy=multi-user.target
[postgres@localhost bin]$
2.控制命令
sudo systemctl daemon-reload # 启用服务控制守护
sudo systemctl start postgresql # 启动
sudo systemctl stop postgresql # 停止
sudo systemctl restart postgresql # 重启
sudo systemctl enable postgresql # 开机自启
sudo systemctl status postgresql # 查看状态
9.设置数据库用户密码
# 直接用postgres超级用户登录,默认不需要密码,psql直接回车就以postgres用户进入了postgres数据库
[postgres@localhost tmp]$ psql -p 7001 -U postgres
psql (12.0, server 12.2)
Type "help" for help.
postgres=#
# 修改超级用户密码为:Postgres!2024
postgres=# ALTER USER postgres with encrypted password 'xxxxxx';
ALTER ROLE
postgres=#
\q
[postgres@localhost bin]$
10.远程连接测试
通过 Navicat 连接访问
192.168.0.3 7001
postgres
xxxxxx
成功连接如下
执行psql,默认进入postgres用户的postgres数据库
使用\du查看用户
使用\l查看用户的数据库列表(以下库为PostgreSQL默认装上,不建议删除)
使用\c查看路径
使用\d查看数据表,没有数据表显示为(没有找到任何关系)
利用`\h`显示命令的帮助,如`\h create database`,显示创建数据库命令的参数帮助
二、postgis安装
Postgis 安装依赖
Proj4 ( 4.9.0以上版本) 4.9.1
GEOS ( 3.5 以上版本) 3.8.0
LibXML2 (2.5以上版本)2.9.10
JSON-C (0.9以上版本)0.13.1
Gdal (1.8以上版本)2.2.3
[postgres@localhost setup]$ cd proj-4.9.1
[postgres@localhost proj-4.9.1]$ ./configure -prefix=/home/postgres/postgresql/plugin/proj
[postgres@localhost proj-4.9.1]$ make
[postgres@localhost proj-4.9.1]$ make install
GEOS ( 3.5 以上版本) 3.8.0
[postgres@localhost setup]$ tar -zxvf libxml2-2.9.10.tar.gz
[postgres@localhost setup]$ cd libxml2-2.9.10
[postgres@localhost libxml2-2.9.10]$ ./configure -prefix=/home/postgres/postgresql/plugin/libxml2
[postgres@localhost libxml2-2.9.10]$ make
[postgres@localhost libxml2-2.9.10]$ make install
JSON-C (0.9以上版本)0.13.1
[postgres@localhost setup]$ tar -zxvf json-c-0.13.1.tar.gz
[postgres@localhost setup]$ cd json-c-0.13.1
[postgres@localhost json-c-0.13.1]$ ./configure -prefix=/home/postgres/postgresql/plugin/json-c
[postgres@localhost json-c-0.13.1]$ make
[postgres@localhost json-c-0.13.1]$ make install
[postgres@localhost setup]$ tar -zxvf gdal-2.2.3.tar.gz
[postgres@localhost setup]$ cd gdal-2.2.3
[postgres@localhost gdal-2.2.3]$ ./configure -prefix=/home/postgres/postgresql/plugin/gdal --with-proj=/home/postgres/postgresql/plugin/proj --with-libjson-c=/home/postgres/postgresql/plugin/json-c --with-geos=/home/postgres/postgresql/plugin/geos/bin/geos-config
[postgres@localhost gdal-2.2.3]$ make
[postgres@localhost gdal-2.2.3]$ make install
gdal 错误信息1:
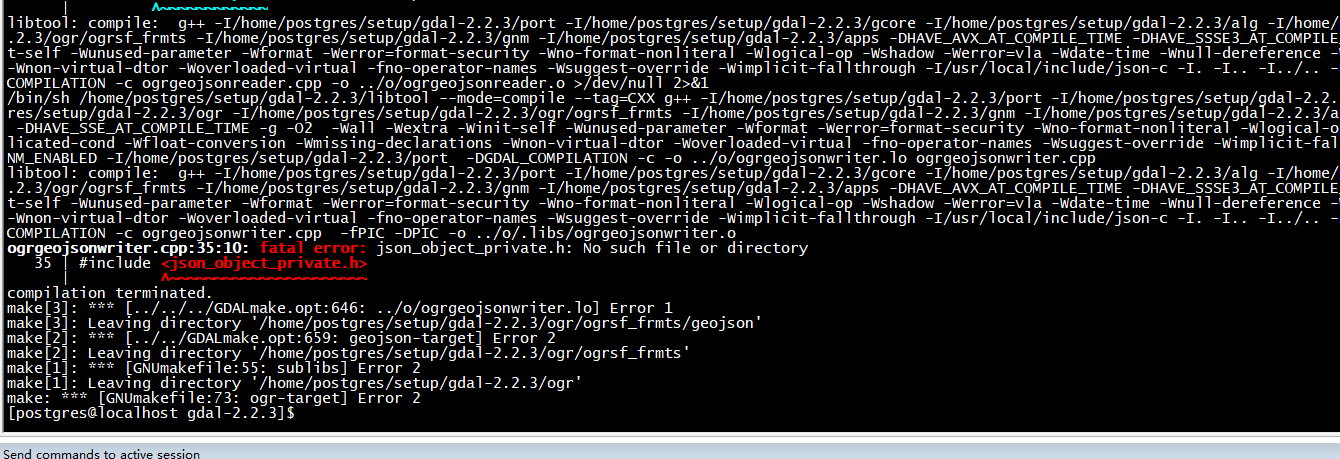
解决方案:复制json-c源码文件到安装目录下
[postgres@localhost setup]$ tar -zxvf postgis-2.5.0.tar.gz
[postgres@localhost setup]$ cd postgis-2.5.0
[postgres@localhost postgis-2.5.0]$ ./configure -prefix=/home/postgres/postgresql/plugin/postgis --with-pgconfig=/home/postgres/postgresql/bin/pg_config --with-libjson-c=/home/postgres/postgresql/plugin/json-c --with-geosconfig=/home/postgres/postgresql/plugin/geos/bin/geos-config --with-projdir=/home/postgres/postgresql/plugin/proj --with-gdalconfig=/home/postgres/postgresql/plugin/gdal/bin/gdal-config
[postgres@localhost postgis-2.5.0]$ make
cat address_standardizer.control.in \
| sed -e 's|@EXTVERSION@|2.5.0|g' \
> address_standardizer.control
cat address_standardizer_data_us.control.in \
| sed -e 's|@EXTVERSION@|2.5.0|g' \
> address_standardizer_data_us.control
make[2]: Leaving directory '/home/postgres/setup/postgis-2.5.0/extensions/address_standardizer'
make[1]: Leaving directory '/home/postgres/setup/postgis-2.5.0/extensions'
PostGIS was built successfully. Ready to install.
[postgres@localhost postgis-2.5.0]$
[postgres@localhost postgis-2.5.0]$ make install
/usr/bin/install -c -m 644 .//postgis_topology.control '/home/postgres/postgresql/share/extension/'
/usr/bin/install -c -m 644 postgis_topology.control sql/postgis_topology--2.5.0.sql sql/postgis_topology--unpackaged--2.5.0.sql '/home/postgres/postgresql/share/extension/'
make[2]: Leaving directory '/home/postgres/setup/postgis-2.5.0/extensions/postgis_topology'
---- Making install in address_standardizer
make[2]: Entering directory '/home/postgres/setup/postgis-2.5.0/extensions/address_standardizer'
/usr/bin/mkdir -p '/home/postgres/postgresql/lib'
/usr/bin/mkdir -p '/home/postgres/postgresql/share/extension'
/usr/bin/mkdir -p '/home/postgres/postgresql/share/extension'
/usr/bin/mkdir -p '/home/postgres/postgresql/share/doc/extension'
/usr/bin/install -c -m 755 address_standardizer.so '/home/postgres/postgresql/lib/address_standardizer.so'
/usr/bin/install -c -m 644 .//address_standardizer.control '/home/postgres/postgresql/share/extension/'
/usr/bin/install -c -m 644 .//sql/address_standardizer.sql .//sql/address_standardizer_data_us.sql .//sql/address_standardizer--1.0--2.5.0.sql .//sql/address_standardizer--2.5.0--2.5.0next.sql .//sql/address_standardizer--2.5.0next--2.5.0.sql .//sql/address_standardizer--2.5.0.sql .//sql/address_standardizer_data_us--2.5.0--2.5.0next.sql .//sql/address_standardizer_data_us--2.5.0next--2.5.0.sql .//sql/address_standardizer_data_us--2.5.0.sql address_standardizer.control address_standardizer_data_us.control '/home/postgres/postgresql/share/extension/'
/usr/bin/install -c -m 644 .//README.address_standardizer '/home/postgres/postgresql/share/doc/extension/'
make[2]: Leaving directory '/home/postgres/setup/postgis-2.5.0/extensions/address_standardizer'
make[1]: Leaving directory '/home/postgres/setup/postgis-2.5.0/extensions'
[postgres@localhost postgis-2.5.0]$
8.检查postgis组件是否安装
ls /home/postgres/postgresql/share/extension/postgis*
9.使用超级用户创建扩展,修改超级用户密码为:Postgres!2024
[postgres@localhost tmp]$ psql -p 7001 -U postgres
psql (12.0, server 12.2)
Type "help" for help.
postgres=# CREATE EXTENSION POSTGIS;
CREATE EXTENSION POSTGIS_TOPOLOGY;
CREATE EXTENSION FUZZYSTRMATCH;
CREATE EXTENSION POSTGIS_TIGER_GEOCODER;
检查postgis安装是否正确,连接数据库执行,用sql语句查询是否启用成功:
SELECT * FROM PG_AVAILABLE_EXTENSIONS WHERE NAME LIKE 'postgis%'
用sql语句查询版本号:
SELECT POSTGIS_VERSION();
SELECT ST_SETSRID(ST_POINT(-108,30.741),4326);
SELECT ST_ASGEOJSON(ST_GEOMFROMTEXT('POINT(-106.51 29.741)',4326))
错误信息2:
postgres-# create extension postgis;
ERROR: syntax error at or near "create"
LINE 2: create extension postgis;
^
postgres=# CREATE EXTENSION POSTGIS;
ERROR: could not load library "/home/postgres/postgresql/lib/rtpostgis-2.5.so": libgdal.so.20: cannot open shared object file: No such file or directory
postgres=# \q
解决方案:
cp /home/postgres/postgresql/plugin/gdal/lib/libgdal.so.20 /home/postgres/postgresql/lib
[postgres@localhost postgis-2.5.0]$ sudo systemctl restart postgresql
[sudo] password for postgres:
[postgres@localhost postgis-2.5.0]$ psql -p 7001 -U postgres
psql (10.23)
Type "help" for help.
postgres=# \du
List of roles
Role name | Attributes | Member of
-----------+------------------------------------------------------------+-----------
postgres | Superuser, Create role, Create DB, Replication, Bypass RLS | {}
大小写区别
postgres=# CREATE EXTENSION POSTGIS;
CREATE EXTENSION
postgres=#
此内容由惯性聚合(RSS阅读器)自动聚合整理,仅供阅读参考。 原文来自 — 版权归原作者所有。