来源:https://www.jb51.net/python/341146w3e.htm
1.7z压缩包
安装py7zr库
解压.7z文件
以下示例代码将一次性把"F:/Ticks/test.7z"压缩文件里面的所有文件一一按照原文件层次结构递归解压到"F:/Ticks/test"目录下。注意,如果xxx.7z里面包含有压缩文件,将不会解压。
|
1
2
3
4
5
6
7
8
9
10
11
|
import py7zr
def un_7z(file_7z_path):
save_dir = file_7z_path[:file_7z_path.rfind(".7z")]
archive = py7zr.SevenZipFile(file_7z_path, mode='r')
archive.extractall(path=save_dir)
archive.close()
if __name__ == "__main__":
filepath = "F:/Ticks/test.7z"
un_7z(filepath)
|
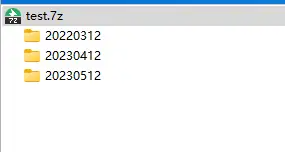
源文件夹目录结构
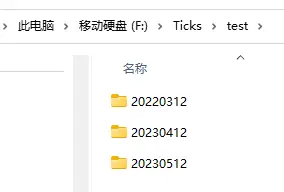
解压后是保持一致的
py7zr (v0.6及更高版本) 也提供了上下文管理,所以可以使用 with 代码块:
|
1
2
3
4
|
import py7zr
with py7zr.SevenZipFile('sample.7z', mode='r') as z:
z.extractall()
|
py7zr 还支持提取单个或通过 extract(targets=[‘file path’]) 选特定的多个文件进行解压。注意:如果只指定文件而不指定父目录,将会提取失败。
|
1
2
3
4
5
6
7
8
|
import py7zr
import re
filter_pattern = re.compile(r'<your/target/file_and_directories/regex/expression>')
with SevenZipFile('archive.7z', 'r') as archive:
allfiles = archive.getnames()
selective_files = [f for f in allfiles if filter_pattern.match(f)]
archive.extract(targets=selective_files)
|
py7zr(v0.6及更高版本)支持提取受密码保护的归档文件。
|
1
2
3
4
|
import py7zr
with py7zr.SevenZipFile('encrypted.7z', mode='r', password='secret') as z:
z.extractall()
|
压缩为.7z文件
下面是一段如何生成归档文件的示例代码
|
1
2
3
4
5
6
7
|
import py7zr
with py7zr.SevenZipFile('target.7z', 'w') as archive:
archive.writeall('/path/to/base_dir', 'base')
with py7zr.SevenZipFile('target.7z', 'w') as z:
z.writeall('./base_dir')
|
要创建加密存档,请传递密码
|
1
2
3
4
|
import py7zr
with py7zr.SevenZipFile('target.7z', 'w', password='secret') as archive:
archive.writeall('/path/to/base_dir', 'base')
|
要使用zstandard等算法创建存档,可以使用自定义过滤器调用。
|
1
2
3
4
5
6
|
import py7zr
my_filters = [{"id": py7zr.FILTER_ZSTD}]
another_filters = [{"id": py7zr.FILTER_ARM}, {"id": py7zr.FILTER_LZMA2, "preset": 7}]
with py7zr.SevenZipFile('target.7z', 'w', filters=my_filter) as archive:
archive.writeall('/path/to/base_dir', 'base')
|
7z压缩包分卷的解压缩
①分卷长什么样
正常情况下是把文件夹filename压缩为filename.7z压缩包,但7z也提供了用分卷的形式,比如11个分卷
filename.7z.001,filename.7z.002,filename.7z.003,filename.7z.004,.......,filename.7z.011
7z.001这类文件是7z格式文件简单分割出的
②如何手动解压分卷形式的压缩包
要将全部分卷放在同一个目录下,然后解压filename.7z.001即可,如果filename.7z.001所在目录下缺少部分分卷,则会无法解压或者解压失败
③如何将分卷压缩包合并为7z压缩包文件
linux环境下
进入分卷所在文件夹,使用指令
cat {文件名1} {文件名2} {文件名n} > {生成文件名}
下以文件名 shapeNetP2M.7z为例,执行如下命令:
|
1
|
cat ShapeNetP2M.7z-001.001 ShapeNetP2M.7z-002.002 ShapeNetP2M.7z-003.003 >ShapeNetP2M.7z
|
[root@localhost 7ztest]# ls
BondTick.7z.001 BondTick.7z.002 BondTick.7z.003 BondTick.7z.004 BondTick.7z.005 BondTick.7z.006 BondTick.7z.007 BondTick.7z.008 BondTick.7z.009 BondTick.7z.010 BondTick.7z.011
[root@localhost 7ztest]# cat * > BondTick.7z
windows环境下
1、在G:\Downloads\Test目录中有一批Test.7z.00x分卷压缩文件(后缀一般为001-00x)。
2、首先使用快捷键“Win+R”弹出运行命令框,输入:cmd,打开命令行窗口。
3、输入:cd /d G:\Downloads\Test,进入7z分卷文件目录中。
4、然后输入:copy /b test.7z.* test.7z。
5、成功后就会在当前目录看到一个test.7z文件(7z后缀)
2.tar和gz压缩包
安装相关包
Python自带的tarfile模块可以方便读取tar归档文件,牛b的是可以处理使用gzip和bz2压缩归档文件tar.gz和tar.bz2。
tarfile包常用函数
①tarfile.open
创建tar文件对象
|
1
|
tarfile.open(name=None,mode='r',fileobj=None,bufsize=10240,**kwargs)
|
mode的值有:
- 'r' or 'r:*' Open for reading with transparent compression (recommended).
- 'r:' Open for reading exclusively without compression.
- 'r:gz' Open for reading with gzip compression.
- 'r:bz2' Open for reading with bzip2 compression.
- 'a' or 'a:' Open for appending with no compression. The file is created if it does not exist.
- 'w' or 'w:' Open for uncompressed writing.
- 'w:gz' Open for gzip compressed writing.
- 'w:bz2' Open for bzip2 compressed writing.
②tar.close()
关闭文件对象
③tar.add(filepath)
将文件filepath添加到压缩包文件中
④tar.getnames()
获取压缩包里的全部目录和文件路径,返回列表,比如压缩包是linux环境下的某个压缩包,压缩时某个文件路径是"/home/tick/test/20230510/601669_snap.csv",则返回列表里的某个元素就是"/home/pjzy003/test/20230510/601669_snap.csv"
⑤tar.extract(file_name, target_dir)
将压缩包文件中的文件file_name解压到target_dir中,最终解压后的文件路径或者目录路径为target_dir+file_name
- 比如target_dir="D:\xxx\yyy",file_name="test\20230510",则新生成的文件夹为"D:\xxx\yyy\test\20230510"
- 比如target_dir="D:/xxx/yyy",file_name="/home/tick/test/20230510/601669_snap.csv",则新生成的文件为"D:/xxx/yyy/home/tick/test/20230510/601669_snap.csv"
注意:tar.extract函数的第一个参数必须传入tar.getnames()这个函数返回的列表里的元素
压缩为tar.gz文件
|
1
2
3
4
5
6
7
8
9
10
11
12
13
14
15
16
17
18
19
20
21
22
|
import os
import tarfile
if __name__ == "__main__":
dir_path = r"D:\PythonTest\20220510"
tar_gz_path = f"{dir_path}.tar.gz"
tar = tarfile.open(tar_gz_path, "w:gz")
for root, dirs, files in os.walk(dir_path):
tar.add(root)
for file in files:
fullpath = os.path.join(root, file)
tar.add(fullpath)
tar.close()
|
解压tar.gz文件
用法示例
|
1
2
3
4
5
6
7
8
9
10
11
12
13
14
15
16
17
18
19
20
21
22
23
24
25
26
27
28
29
30
31
32
33
34
|
import os
import tarfile
if __name__ == "__main__":
tar_gz_path = r"D:\PythonTest\test\20220510.tar.gz"
tar_gz_path = tar_gz_path.replace("\\", "/")
tar_gz_dir = tar_gz_path[:tar_gz_path.rfind("/")]
tar_gz_name = tar_gz_path[tar_gz_path.rfind("/")+1:]
dir_name = tar_gz_name[:-7]
tar = tarfile.open(tar_gz_path, "r:gz")
file_names = tar.getnames()
print(file_names)
for file_name in file_names:
print("=============")
print("file_name:", file_name)
pre_name = file_name[:file_name.rfind(dir_name)-1]
print("pre_name:", pre_name)
save_dir = tar_gz_dir[:tar_gz_dir.rfind(pre_name)]
print("save_dir:", save_dir)
tar.extract(file_name, save_dir)
tar.close()
|
将其封装为函数。与示例相比,这里的函数处理了文件路径的细节问题,比如压缩的路径"D:\data\20230510.tar.gz",压缩包里面的文件路径是"/home/tick/test/20230510/601669_snap.csv",则解压后的文件路径是"D:/data/20230510/home/tick/test/20230510/601669_snap.csv",但是我们想要的是"D:/data/20230510/601669_snap.csv"这种效果,因此需要处理,具体见下方代码。
|
1
2
3
4
5
6
7
8
9
10
11
12
13
14
15
16
17
18
19
20
21
22
23
24
25
26
27
28
29
30
31
32
33
34
35
36
37
38
39
40
41
42
43
44
45
46
47
48
49
50
51
52
53
54
55
56
57
58
59
60
61
62
63
64
65
66
|
import os
import shutil
import tarfile
def un_tar_gz(gz_file_path):
if gz_file_path[-7:] != ".tar.gz":
print(f"{gz_file_path} not tar.gz type")
return None
if not os.path.exists(gz_file_path):
print(f"{gz_file_path} not exists")
return None
tar_gz_path = gz_file_path.replace("\\", "/")
tar_gz_dir = tar_gz_path[:tar_gz_path.rfind("/")]
tar_gz_name = tar_gz_path[tar_gz_path.rfind("/") + 1:]
tar_gz_name_pre = tar_gz_name[:-7]
save_dir = tar_gz_dir + "/" + tar_gz_name_pre
save_dir_temp = save_dir + "_temp"
tar = tarfile.open(tar_gz_path, "r:gz")
file_names = tar.getnames()
for file_name in file_names:
tar.extract(file_name, save_dir_temp)
tar.close()
if not os.path.exists(save_dir):
os.mkdir(save_dir)
for file_name in file_names:
temp_file_path = save_dir_temp+"/"+file_name
start_index = file_name.rfind(tar_gz_name_pre) + len(tar_gz_name_pre)
final_file_path = save_dir+"/"+file_name[start_index:]
if not os.path.exists(final_file_path):
if os.path.isdir(temp_file_path):
os.mkdir(final_file_path)
else:
shutil.move(temp_file_path, final_file_path)
if os.path.exists(save_dir_temp):
shutil.rmtree(save_dir_temp)
if __name__ == "__main__":
gz_path = r"D:\PythonTest\test\20220510.tar.gz"
un_tar_gz(gz_path)
|
将tar.gz解压tar文件
|
1
2
3
4
5
6
7
8
9
|
import gzip
def ungz(filename):
filename = filename[:-3]
gz_file = gzip.GzipFile(filename)
with open(filename, "w+") as file:
file.write(gz_file.read())
return filename
|
解压tar文件
|
1
2
3
4
5
6
7
8
9
10
11
|
import tarfile
def untar(filename):
tar = tarfile.open(filename)
names = tar.getnames()
if not os.path.isdir(filename + "_dir"):
os.mkdir(filename + "_dir")
for name in names:
tar.extract(name, filename + "_dir/")
tar.close()
|
3.zip类压缩包
使用zipfile模块
|
1
2
3
4
5
6
7
8
9
10
|
import zipfile
def unzip(filename):
zip_file = zipfile.ZipFile(filename)
if not os.path.isdir(filename + "_dir"):
os.mkdir(filename + "_dir")
for names in zip_file.namelist():
zip_file.extract(names, filename + "_dir/")
zip_file.close()
|
4.处理.rar文件
使用rarfile包
|
1
2
3
4
5
6
7
8
9
10
|
import rarfile
import os
def unrar(filename):
rar = rarfile.RarFile(filename)
if not os.path.isdir(filename + "_dir"):
os.mkdir(filename + "_dir")
os.chdir(filename + "_dir")
rar.extractall()
rar.close()
|
以上就是python处理常见格式压缩包文件的全指南的详细内容,更多关于python处理压缩包文件的资料请关注脚本之家其它相关文章!



