


惯性聚合 高效追踪和阅读你感兴趣的博客、新闻、科技资讯
阅读原文 在惯性聚合中打开

推荐订阅源

美团技术团队
T
The Blog of Author Tim Ferriss
月光博客
月光博客
阮一峰的网络日志
阮一峰的网络日志
Engineering at Meta
Engineering at Meta
量子位
I
InfoQ
Jina AI
Jina AI
Microsoft Security Blog
H
Help Net Security
H
Hackread – Cybersecurity News, Data Breaches, AI and More
G
Google Developers Blog
J
Java Code Geeks
Recent Announcements
aimingoo的专栏
aimingoo的专栏
小众软件
小众软件
V
V2EX
腾讯CDC
P
Proofpoint News Feed
A
About on SuperTechFans
爱范儿
爱范儿
U
Unit 42
OSCHINA 社区最新新闻
OSCHINA 社区最新新闻
Last Week in AI
Last Week in AI

博客园 - Ants

我用 AI 辅助开发了一系列小工具(2):图片压缩工具 我用 AI 辅助开发了一系列小工具(1):文件提取工具 Spring Cloud中,Eureka常见问题总结 部署Spring Boot应用 C# FTP 命令无法获取ServerU目录列表问题 redis参数优化 memcached在windows下多实例并存 开源一个windows下的定时任务框架,简单粗暴好用。 WebRequest 访问 https Python定时任务框架APScheduler 3.0.3 Cron示例 Eclipse安装python注意事项 C# 计算文件MD5 C# 为私有方法添加单元测试(反射) .net 操作sftp服务器 在ASP.NET MVC中使用Unity进行依赖注入的三种方式 ASP.NET Web API 安全筛选器 IIS中查看W3P.exe进程对应的应用程序池的方法 WCF自定义Header sqlserver 用 RowNumber 分组
Token Based Authentication in Web API 2
Ants · 2015-01-30 · via 博客园 - Ants

原文地址:http://www.c-sharpcorner.com/uploadfile/736ca4/token-based-authentication-in-web-api-2/

Introduction
This article explains the OWIN OAuth 2.0 Authorization and how to implement an OAuth 2.0 Authorization server using the OWIN OAuth middleware.
The OAuth 2.0 Authorization framwork is defined in RFC 6749. It enables third-party applications to obtain limited access to HTTP services, either on behalf of a resource owner by producing a desired effect on approval interaction between the resource owner and the HTTP service or by allowing the third-party application to obtain access on its own behalf.
Now let us talk about how OAuth 2.0 works. It supports the following two (2) different authentication variants:

  1. Three-Legged 
  2. Two-Legged

Three-Legged Approach: In this approach, a resource owner (user) can assure a third-party client (mobile applicant) about the identity, using a content provider (OAuthServer) without sharing any credentials to the third-party client.

Two-Legged Approach: This approach is known as a typical client-server approach where the client can directly authenticate the user with the content provider.

Multiple classes are in OAuth Authorization

OAuth Authorization can be done using the following two classes:

  • IOAuthorizationServerProvider 
  • OAuthorizationServerOptions

IOAuthorizationServerProvider

It extends the abstract AuthenticationOptions from Microsoft.Owin.Security and is used by the core server options such as:

  • Enforcing HTTPS 
  • Error detail level 
  • Token expiry 
  • Endpoint paths

We can use the IOAuthorizationServerProvider class to control the security of the data contained in the access tokens and authorization codes. System.Web will use machine key data protection, whereas HttpListener will rely on the Data Protection Application Programming Interface (DPAPI). We can see the various methods in this class.
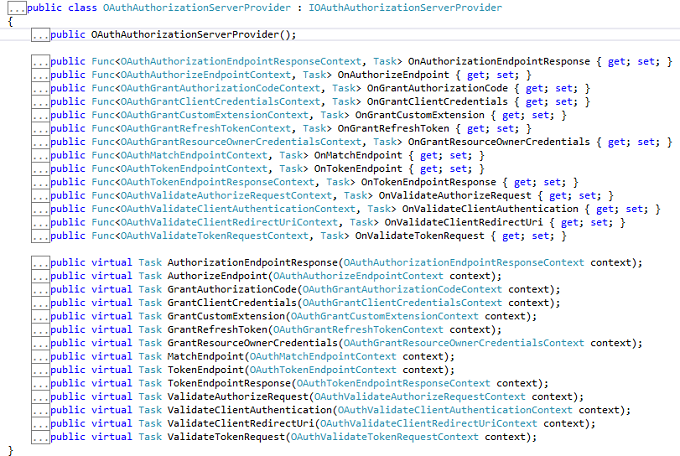
IOAuthAuthorizationServerProvider

OAuthorizationServerOptions

IOAuthAuthorizationServerProvider is responsible for processing events raised by the authorization server. Katana ships with a default implementation of IOAuthAuthorizationServerProvider called OAuthAuthorizationServerProvider. It is a very simple starting point for configuring the authorization server, since it allows us to either attach individual event handlers or to inherit from the class and override the relevant method directly.We can see the various methods in this class.
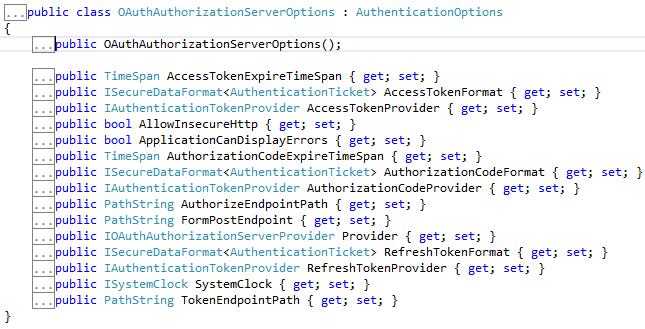
OAuthAuthorizationServerOptions

From now we can start to learn how to build an application having token-based authentication.

Step 1
Open the Visual Studio 2013 and click New Project.
Step 2
Select the Console based application and provide a nice name for the project.
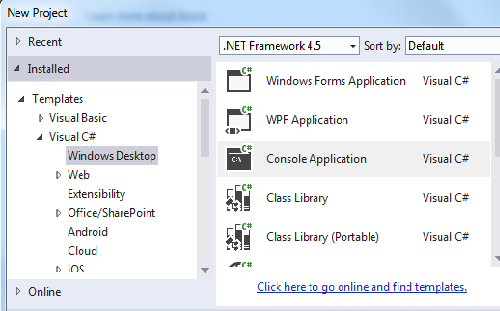
NewProject 

Step 3
Create a Token class and Add some Property.

  1. public class Token  
  2.    {  
  3.        [JsonProperty("access_token")]  
  4.        public string AccessToken { get; set; }  
  5.   
  6.        [JsonProperty("token_type")]  
  7.        public string TokenType { get; set; }  
  8.   
  9.        [JsonProperty("expires_in")]  
  10.        public int ExpiresIn { get; set; }  
  11.   
  12.        [JsonProperty("refresh_token")]  
  13.        public string RefreshToken { get; set; }  
  14.    }  

Step 4

Create a startup class and use the IOAuthorizationServerProvider class as well as the OAuthorizationServerOptions class and set the dummy password and username. I have also set the default TokenEndpoint and TokenExpire time.

  1. public class Startup  
  2.     {  
  3.         public void Configuration(IAppBuilder app)  
  4.         {  
  5.             var oauthProvider = new OAuthAuthorizationServerProvider  
  6.             {  
  7.                 OnGrantResourceOwnerCredentials = async context =>  
  8.                 {  
  9.                     if (context.UserName == "rranjan" && context.Password == "password@123")  
  10.                     {  
  11.                         var claimsIdentity = new ClaimsIdentity(context.Options.AuthenticationType);  
  12.                         claimsIdentity.AddClaim(new Claim("user", context.UserName));  
  13.                         context.Validated(claimsIdentity);  
  14.                         return;  
  15.                     }  
  16.                     context.Rejected();  
  17.                 },  
  18.                 OnValidateClientAuthentication = async context =>  
  19.                 {  
  20.                     string clientId;  
  21.                     string clientSecret;  
  22.                     if (context.TryGetBasicCredentials(out clientId, out clientSecret))  
  23.                     {  
  24.                         if (clientId == "rajeev" && clientSecret == "secretKey")  
  25.                         {  
  26.                             context.Validated();  
  27.                         }  
  28.                     }  
  29.                 }  
  30.             };  
  31.             var oauthOptions = new OAuthAuthorizationServerOptions  
  32.             {  
  33.                 AllowInsecureHttp = true,  
  34.                 TokenEndpointPath = new PathString("/accesstoken"),  
  35.                 Provider = oauthProvider,  
  36.                 AuthorizationCodeExpireTimeSpan= TimeSpan.FromMinutes(1),  
  37.                 AccessTokenExpireTimeSpan=TimeSpan.FromMinutes(3),  
  38.                 SystemClock= new SystemClock()  
  39.   
  40.             };  
  41.             app.UseOAuthAuthorizationServer(oauthOptions);  
  42.             app.UseOAuthBearerAuthentication(new OAuthBearerAuthenticationOptions());  
  43.   
  44.             var config = new HttpConfiguration();  
  45.             config.MapHttpAttributeRoutes();  
  46.             app.UseWebApi(config);  
  47.         }  
  48.     }  

Step 5 

Add a controller inherited from API controller. 

  1. [Authorize]   
  2.    public class TestController : ApiController  
  3.    {  
  4.        [Route("test")]  
  5.        public HttpResponseMessage Get()  
  6.        {  
  7.            return Request.CreateResponse(HttpStatusCode.OK, "hello from a secured resource!");  
  8.        }  
  9.    }  

Step 6 

Now check the authorization on the basis of the token, so in the Program class validate it.  

  1. static void Main()  
  2.        {  
  3.            string baseAddress = "http://localhost:9000/";  
  4.   
  5.            
  6.            using (WebApp.Start<Startup>(url: baseAddress))  
  7.            {  
  8.                var client = new HttpClient();  
  9.                var response = client.GetAsync(baseAddress + "test").Result;  
  10.                Console.WriteLine(response);  
  11.   
  12.                Console.WriteLine();  
  13.   
  14.                var authorizationHeader = Convert.ToBase64String(Encoding.UTF8.GetBytes("rajeev:secretKey"));  
  15.                client.DefaultRequestHeaders.Authorization = new AuthenticationHeaderValue("Basic", authorizationHeader);  
  16.   
  17.                var form = new Dictionary<string, string>  
  18.                {  
  19.                    {"grant_type", "password"},  
  20.                    {"username", "rranjan"},  
  21.                    {"password", "password@123"},  
  22.                };  
  23.   
  24.                var tokenResponse = client.PostAsync(baseAddress + "accesstoken", new FormUrlEncodedContent(form)).Result;  
  25.                var token = tokenResponse.Content.ReadAsAsync<Token>(new[] { new JsonMediaTypeFormatter() }).Result;  
  26.   
  27.                Console.WriteLine("Token issued is: {0}", token.AccessToken);  
  28.   
  29.                Console.WriteLine();  
  30.   
  31.                client.DefaultRequestHeaders.Authorization = new AuthenticationHeaderValue("Bearer", token.AccessToken);  
  32.                var authorizedResponse = client.GetAsync(baseAddress + "test").Result;  
  33.                Console.WriteLine(authorizedResponse);  
  34.                Console.WriteLine(authorizedResponse.Content.ReadAsStringAsync().Result);  
  35.            }  
  36.   
  37.            Console.ReadLine();  
  38.        }  

Output
When all the authentication of username and password is not correct then it doesn't generate the token.  
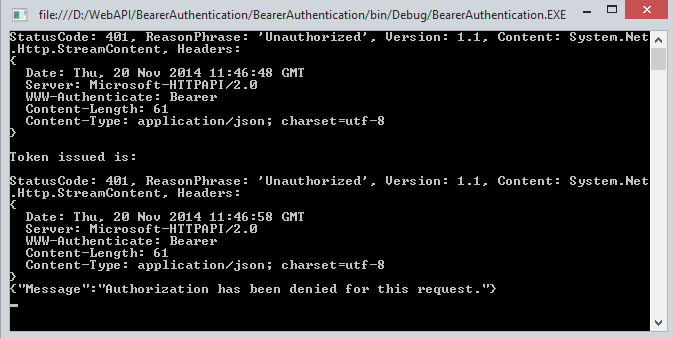
authorizationWebAPI

When the Authentication is passed we get success and we get a token.
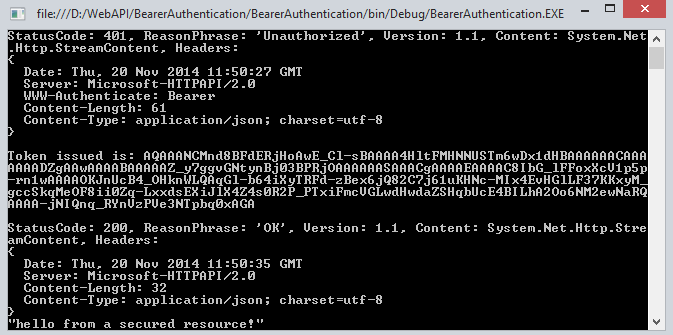
successTokenWebAPI
Summary
In this article we have understand the token-based authentication in Web API 2. I hope you will like it.