





对比了各大厂主流算力云平台以及AutoML等之后,发现一小众算力云平台 恒源云,经过详细评测,性比价最高,而且易用性也不错,以下是整个使用过程,评测不易,可以点击邀请链接进行注册,将直接获得60元的算力资源:
一、注册 恒源云
https://gpushare.com/auth/register?user=15*****3732&fromId=875503116d07&source=link
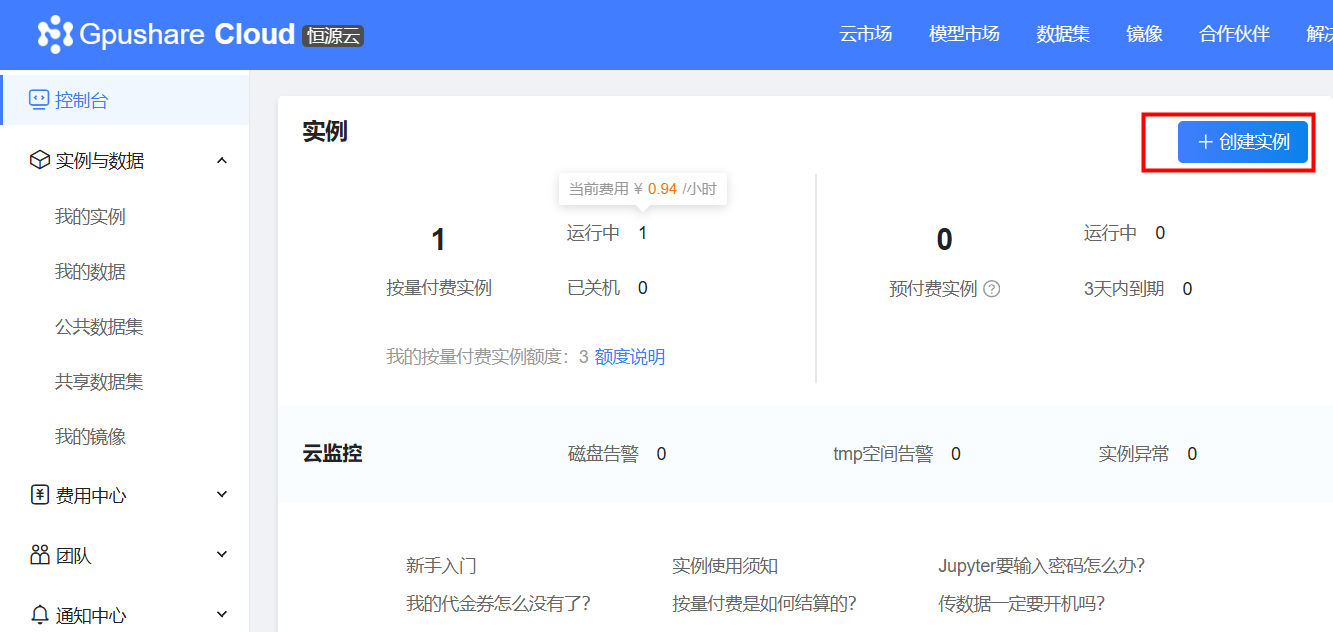
二,点击右上角 “控制台” 进入控制台,点击创建实例按钮
三、选择3090-24G,这个跑7B模型不在话下,价格当前为0.89/小时,目前为同类平台最低,创建时镜像选择pytorch 2.0.0就行。
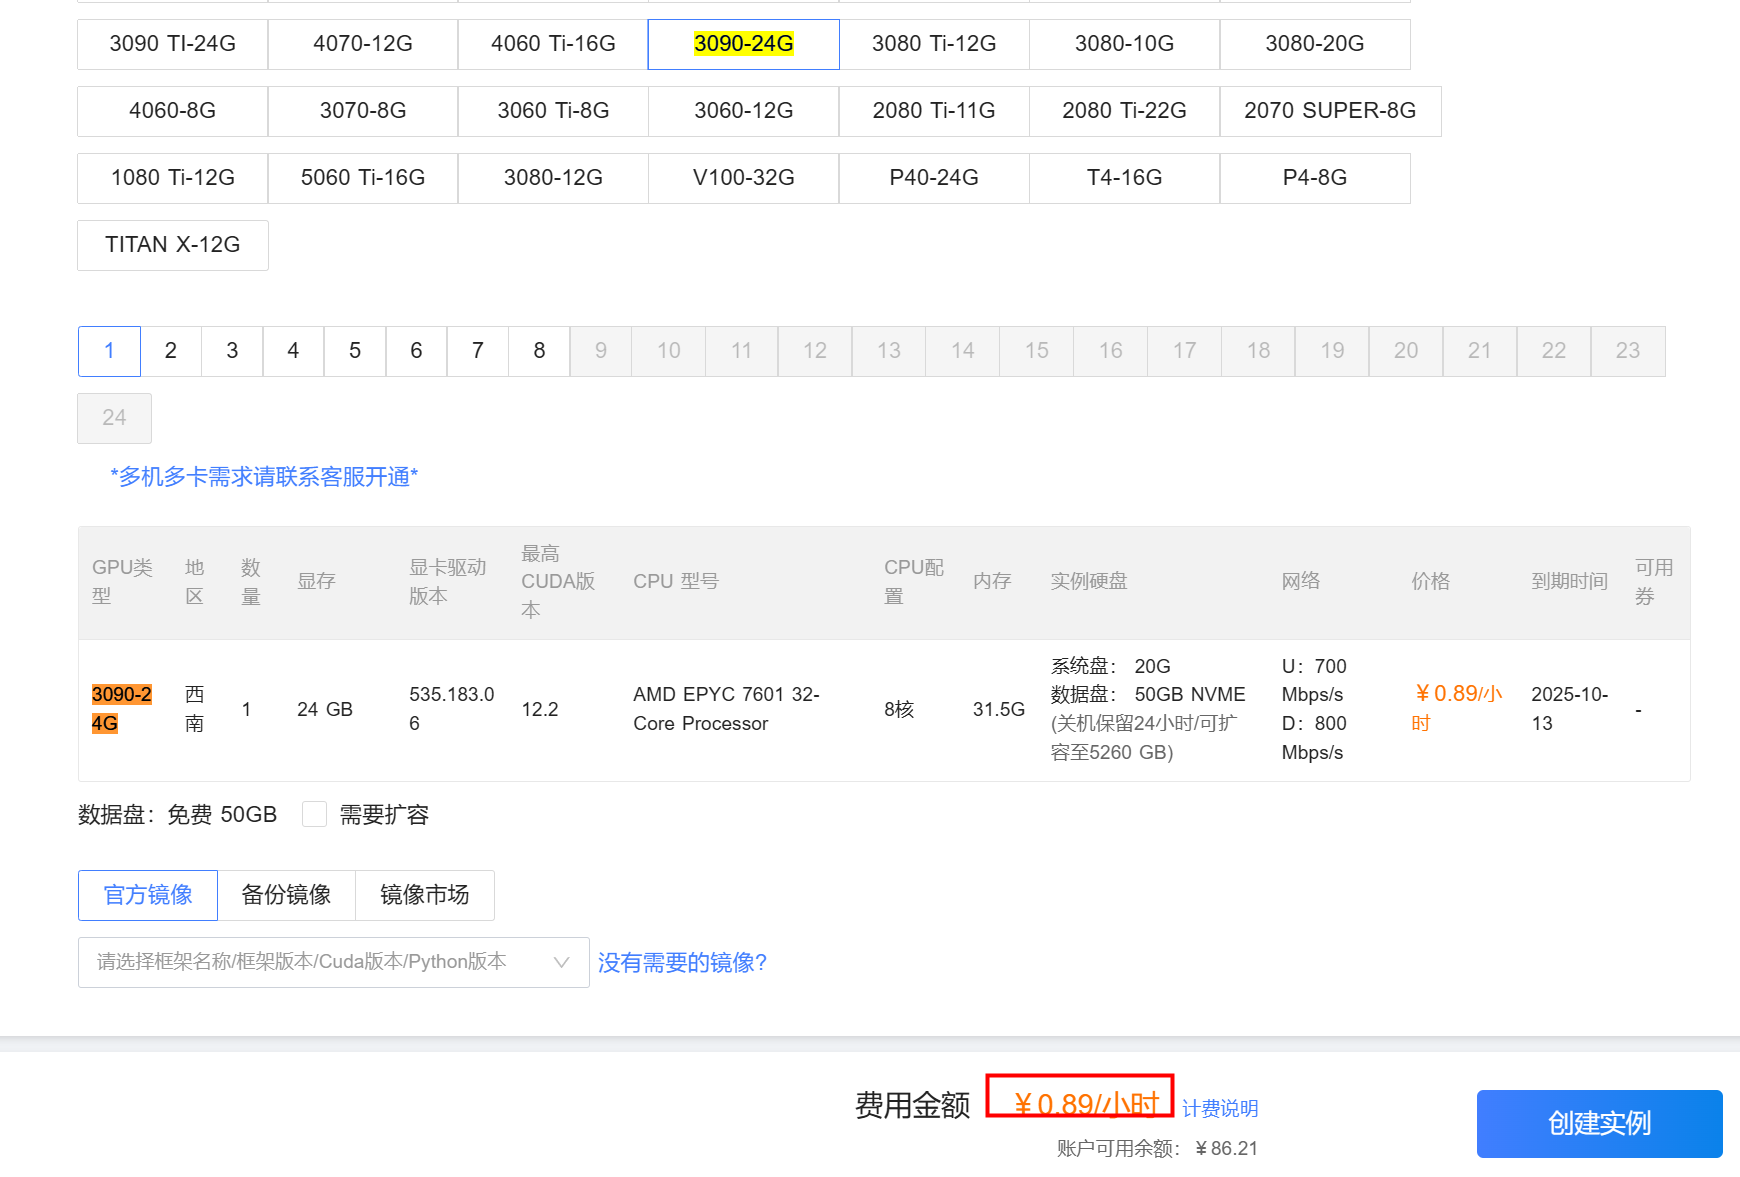
四、大约只要几分钟,就创建好了,下面就是登录使用,官方提供JupyterLab,不过我还是习惯xShell,点击查看登录方式,使用XShell登录即可
五、推荐使用vllm方式调用大模型,因为它的效率比ollama等要高一点,vllm库的占用大约20G,注意一定要装在数据目录,/hy-tmp,因为这个目录下的数据是不随实例而迁移的,简单的说就是可以换实例平台以及显卡,但仍然可以使用上一次安装的软件和数据,以下是安装脚本,默认使用conda方式,以及国内镜像下载Hugging Face上的大模型:
注,在安装依赖时,首先要设置国内镜像源,建议使用 cnpip 自动测速 切换,由于阿里云用 的人太多,建议选择南方科技大学镜像 sustech
https://github.com/caoergou/cnpip
install_vllm_conda.sh
#!/bin/bash

# 使用 conda 安装 vLLM 到指定目录

echo "=== 使用 conda 安装 vLLM ==="

# 设置安装目录
INSTALL_DIR="/hy-tmp/vllm"
CONDA_ENV_NAME="vllm"

echo "安装目录: $INSTALL_DIR"
echo "Conda 环境名: $CONDA_ENV_NAME"

# 创建安装目录
mkdir -p $INSTALL_DIR
# 在 Windows/Git Bash 中不需要 chown

# 创建 conda 环境
echo "1. 创建 conda 环境..."
conda create -p $INSTALL_DIR/conda_env python=3.10 -y

# 激活环境
echo "2. 激活 conda 环境..."
source activate $INSTALL_DIR/conda_env

# 安装 PyTorch
echo "3. 安装 PyTorch..."
# 使用 pip 安装 PyTorch,更稳定
pip install torch torchvision torchaudio --index-url https://download.pytorch.org/whl/cu118

# 安装 vLLM
echo "4. 安装 vLLM..."
pip install vllm

# 安装其他依赖
echo "5. 安装其他依赖..."
pip install transformers accelerate

# 创建启动脚本
echo "6. 创建启动脚本..."
cat > $INSTALL_DIR/start_vllm.sh << EOF
#!/bin/bash
# vLLM 启动脚本

# 激活 conda 环境
source activate $INSTALL_DIR/conda_env

# 设置环境变量
export HF_ENDPOINT=https://hf-mirror.com
export HF_HUB_ENABLE_HF_TRANSFER=1

# 启动 vLLM
vllm serve Qwen/Qwen2.5-VL-7B-Instruct \\
  --host 0.0.0.0 --port 8000 \\
  --dtype float16 \\
  --gpu-memory-utilization 0.90 \\
  --max-model-len 4096 \\
  --max-num-seqs 32 \\
  --trust-remote-code
EOF

chmod +x $INSTALL_DIR/start_vllm.sh

# 创建环境配置文件
echo "7. 创建环境配置..."
cat > $INSTALL_DIR/vllm_env.sh << EOF
#!/bin/bash
# vLLM 环境配置

# 激活 conda 环境
source activate $INSTALL_DIR/conda_env

# 设置环境变量
export HF_ENDPOINT=https://hf-mirror.com
export HF_HUB_ENABLE_HF_TRANSFER=1

echo "vLLM 环境已配置"
echo "Conda 环境: $INSTALL_DIR/conda_env"
echo "HF_ENDPOINT: \$HF_ENDPOINT"
EOF

chmod +x $INSTALL_DIR/vllm_env.sh

echo ""
echo "=== 安装完成 ==="
echo "安装目录: $INSTALL_DIR"
echo "Conda 环境: $INSTALL_DIR/conda_env"
echo "启动脚本: $INSTALL_DIR/start_vllm.sh"
echo "环境配置: $INSTALL_DIR/vllm_env.sh"
echo ""
echo "=== 使用方法 ==="
echo "1. 加载环境:"
echo "   source $INSTALL_DIR/vllm_env.sh"
echo ""
echo "2. 启动服务:"
echo "   $INSTALL_DIR/start_vllm.sh"
echo ""
echo "3. 或者直接运行:"
echo "   conda activate $INSTALL_DIR/conda_env"
echo "   vllm serve Qwen/Qwen2.5-VL-7B-Instruct --dtype float16"
六、然后激活conda引入vllm环境变量
# 激活 conda 环境
source activate /hy-tmp/vllm/conda_env
# 设置环境变量
export HF_ENDPOINT=https://hf-mirror.com
export HF_HUB_ENABLE_HF_TRANSFER=1
七、下载启动大模型
安装hf传输包
使用镜像下载模型download_qwen_vl_complete.py
#!/usr/bin/env python3
"""
下载完整的 Qwen2.5-VL-7B-Instruct 模型
包括图像处理器配置文件
"""

import os
import sys
import json
import time
from pathlib import Path
from huggingface_hub import snapshot_download, hf_hub_download
from transformers import AutoConfig, AutoTokenizer, AutoProcessor

class QwenVLCompleteDownloader:
    def __init__(self):
        self.model_name = "Qwen/Qwen2.5-VL-7B-Instruct"
        self.local_dir = "./models/Qwen2.5-VL-7B-Instruct"

    def check_network_connection(self):
        """检查网络连接"""
        print("=== 检查网络连接 ===")

        # 设置镜像源
        os.environ['HF_ENDPOINT'] = 'https://hf-mirror.com'

        try:
            import requests
            response = requests.get("https://hf-mirror.com", timeout=10)
            print(f"✅ 镜像源连接正常: {response.status_code}")
            return True
        except Exception as e:
            print(f"❌ 镜像源连接失败: {e}")
            return False

    def download_essential_files(self):
        """下载必要的配置文件"""
        print("\n=== 下载必要的配置文件 ===")

        # 设置镜像源
        os.environ['HF_ENDPOINT'] = 'https://hf-mirror.com'

        # 创建本地目录
        os.makedirs(self.local_dir, exist_ok=True)

        # 必要的配置文件列表
        essential_files = [
            "config.json",
            "tokenizer.json",
            "tokenizer_config.json",
            "special_tokens_map.json",
            "vocab.txt",
            "merges.txt",
            "generation_config.json",
            "preprocessor_config.json",  # 图像处理器配置
            "modeling_qwen2_vl.py",
            "tokenization_qwen2_vl.py",
            "configuration_qwen2_vl.py",
            "processing_qwen2_vl.py"  # 图像处理文件
        ]

        downloaded_files = []
        failed_files = []

        for filename in essential_files:
            try:
                print(f"下载 {filename}...")
                file_path = hf_hub_download(
                    repo_id=self.model_name,
                    filename=filename,
                    local_dir=self.local_dir,
                    local_dir_use_symlinks=False
                )
                downloaded_files.append(filename)
                print(f"✅ {filename} 下载成功")
            except Exception as e:
                failed_files.append(filename)
                print(f"⚠️  {filename} 下载失败: {e}")

        print(f"\n下载成功: {len(downloaded_files)} 个文件")
        print(f"下载失败: {len(failed_files)} 个文件")

        if failed_files:
            print("失败的文件:")
            for file in failed_files:
                print(f"  - {file}")

        return downloaded_files, failed_files

    def download_model_weights(self):
        """下载模型权重文件"""
        print("\n=== 下载模型权重文件 ===")

        try:
            # 下载 safetensors 格式的模型文件
            model_files = [
                "model-00001-of-00001.safetensors",
                "model.safetensors.index.json"
            ]

            for filename in model_files:
                try:
                    print(f"下载 {filename}...")
                    file_path = hf_hub_download(
                        repo_id=self.model_name,
                        filename=filename,
                        local_dir=self.local_dir,
                        local_dir_use_symlinks=False
                    )
                    print(f"✅ {filename} 下载成功")
                except Exception as e:
                    print(f"⚠️  {filename} 下载失败: {e}")

        except Exception as e:
            print(f"❌ 模型权重下载失败: {e}")

    def download_complete_model(self):
        """下载完整模型"""
        print("\n=== 下载完整模型 ===")

        try:
            # 设置镜像源
            os.environ['HF_ENDPOINT'] = 'https://hf-mirror.com'

            # 创建本地目录
            os.makedirs(self.local_dir, exist_ok=True)

            print("开始下载完整模型...")
            snapshot_download(
                repo_id=self.model_name,
                local_dir=self.local_dir,
                local_dir_use_symlinks=False,
                resume_download=True
            )

            print("✅ 完整模型下载完成")
            return True

        except Exception as e:
            print(f"❌ 完整模型下载失败: {e}")
            return False

    def test_model_loading(self):
        """测试模型加载"""
        print(f"\n=== 测试模型加载 ===")
        print(f"模型路径: {self.local_dir}")

        try:
            # 测试配置文件加载
            print("加载配置文件...")
            config = AutoConfig.from_pretrained(self.local_dir, trust_remote_code=True)
            print("✅ 配置文件加载成功")

            # 测试 tokenizer 加载
            print("加载 Tokenizer...")
            tokenizer = AutoTokenizer.from_pretrained(self.local_dir, trust_remote_code=True)
            print("✅ Tokenizer 加载成功")

            # 测试图像处理器加载
            print("加载图像处理器...")
            processor = AutoProcessor.from_pretrained(self.local_dir, trust_remote_code=True)
            print("✅ 图像处理器加载成功")

            # 测试文本编码
            print("测试文本编码...")
            test_text = "你好,请介绍一下自己"
            tokens = tokenizer.encode(test_text)
            print(f"✅ 文本编码测试成功,token 数量: {len(tokens)}")

            # 测试文本解码
            print("测试文本解码...")
            decoded_text = tokenizer.decode(tokens)
            print(f"✅ 文本解码测试成功: {decoded_text}")

            return True

        except Exception as e:
            print(f"❌ 模型加载测试失败: {e}")
            return False

    def create_model_info(self):
        """创建模型信息文件"""
        print(f"\n=== 创建模型信息文件 ===")

        model_info = {
            "model_name": self.model_name,
            "local_path": os.path.abspath(self.local_dir),
            "config_file": os.path.join(self.local_dir, "config.json"),
            "tokenizer_file": os.path.join(self.local_dir, "tokenizer.json"),
            "preprocessor_file": os.path.join(self.local_dir, "preprocessor_config.json"),
            "status": "ready",
            "download_time": time.strftime("%Y-%m-%d %H:%M:%S"),
            "files": []
        }

        # 列出所有文件
        for file_path in Path(self.local_dir).rglob("*"):
            if file_path.is_file():
                model_info["files"].append({
                    "name": file_path.name,
                    "path": str(file_path.relative_to(self.local_dir)),
                    "size": file_path.stat().st_size
                })

        info_file = os.path.join(self.local_dir, "model_info.json")
        with open(info_file, 'w', encoding='utf-8') as f:
            json.dump(model_info, f, indent=2, ensure_ascii=False)

        print(f"✅ 模型信息文件已创建: {info_file}")
        return model_info

    def create_startup_scripts(self):
        """创建启动脚本"""
        print(f"\n=== 创建启动脚本 ===")

        # 创建本地启动脚本
        local_script = f"""#!/bin/bash
# 使用本地模型启动 vLLM

export HF_ENDPOINT=https://hf-mirror.com
export HF_HUB_ENABLE_HF_TRANSFER=1

echo "启动 vLLM 服务..."
echo "模型路径: {self.local_dir}"
echo "服务地址: http://localhost:8000"

vllm serve {self.local_dir} \\
  --host 0.0.0.0 --port 8000 \\
  --dtype float16 \\
  --gpu-memory-utilization 0.90 \\
  --max-model-len 4096 \\
  --max-num-seqs 32 \\
  --trust-remote-code
"""

        with open("start_vllm_local.sh", "w") as f:
            f.write(local_script)

        # 创建 Docker 启动脚本
        docker_script = f"""#!/bin/bash
# 使用本地模型启动 Docker vLLM

echo "启动 Docker vLLM 服务..."
echo "模型路径: {self.local_dir}"
echo "服务地址: http://localhost:8000"

docker run --gpus all --rm -p 8000:8000 \\
  -e HF_ENDPOINT=https://hf-mirror.com \\
  -e HF_HUB_ENABLE_HF_TRANSFER=1 \\
  -v $(pwd)/{self.local_dir}:/models \\
  vllm/vllm-openai:latest \\
  --model /models \\
  --dtype float16 \\
  --gpu-memory-utilization 0.90 \\
  --max-model-len 4096 \\
  --max-num-seqs 32 \\
  --trust-remote-code
"""

        with open("start_vllm_docker_local.sh", "w") as f:
            f.write(docker_script)

        # 设置执行权限
        os.chmod("start_vllm_local.sh", 0o755)
        os.chmod("start_vllm_docker_local.sh", 0o755)

        print("✅ 启动脚本已创建:")
        print("  - start_vllm_local.sh")
        print("  - start_vllm_docker_local.sh")

    def run_download(self):
        """运行下载流程"""
        print("=== Qwen2.5-VL-7B-Instruct 完整模型下载 ===")
        print(f"模型名称: {self.model_name}")
        print(f"本地目录: {self.local_dir}")
        print()

        # 1. 检查网络连接
        if not self.check_network_connection():
            print("❌ 网络连接问题,请检查网络或使用代理")
            return False

        # 2. 检查是否已存在
        if os.path.exists(self.local_dir):
            print(f"模型目录已存在: {self.local_dir}")
            choice = input("是否重新下载? (y/N): ").strip().lower()
            if choice != 'y':
                if self.test_model_loading():
                    print("✅ 现有模型可以正常加载")
                    self.create_startup_scripts()
                    return True
                else:
                    print("❌ 现有模型无法正常加载,需要重新下载")

        # 3. 下载完整模型
        if not self.download_complete_model():
            print("❌ 完整模型下载失败,尝试下载必要文件...")
            downloaded_files, failed_files = self.download_essential_files()
            if "preprocessor_config.json" in failed_files:
                print("❌ 图像处理器配置文件下载失败")
                return False

        # 4. 测试模型加载
        if not self.test_model_loading():
            print("❌ 模型加载测试失败")
            return False

        # 5. 创建模型信息
        model_info = self.create_model_info()

        # 6. 创建启动脚本
        self.create_startup_scripts()

        print("\n=== 下载完成 ===")
        print(f"模型路径: {model_info['local_path']}")
        print(f"文件数量: {len(model_info['files'])}")
        print()
        print("=== 使用方法 ===")
        print("1. 本地启动:")
        print("   ./start_vllm_local.sh")
        print()
        print("2. Docker 启动:")
        print("   ./start_vllm_docker_local.sh")
        print()
        print("3. 测试服务:")
        print("   curl http://localhost:8000/v1/models")

        return True

def main():
    downloader = QwenVLCompleteDownloader()
    success = downloader.run_download()

    if not success:
        print("\n❌ 下载失败,请检查错误信息")
        sys.exit(1)
    else:
        print("\n✅ 下载成功!")

if __name__ == "__main__":
    main()
# 启动 vLLM
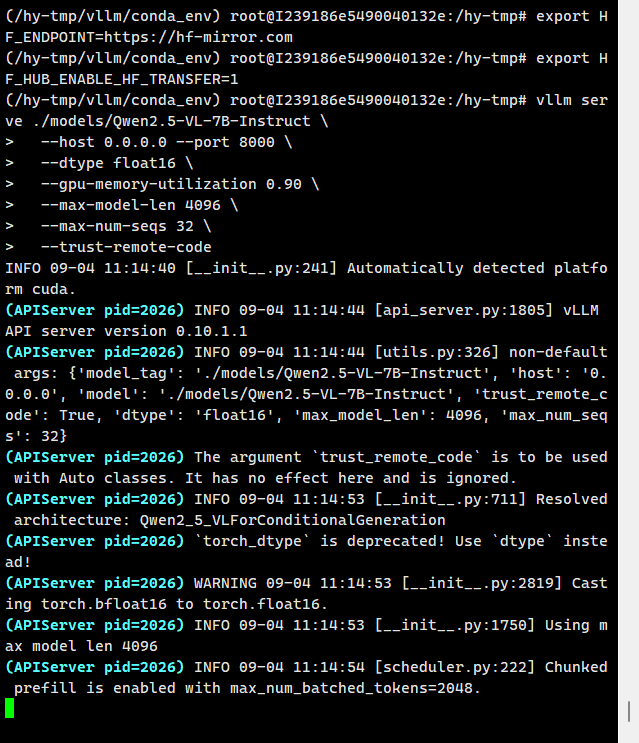
vllm serve ./models/Qwen2.5-VL-7B-Instruct \
  --host 0.0.0.0 --port 8000 \
  --dtype float16 \
  --gpu-memory-utilization 0.90 \
  --max-model-len 4096 \
  --max-num-seqs 32 \
  --trust-remote-code
八、测试
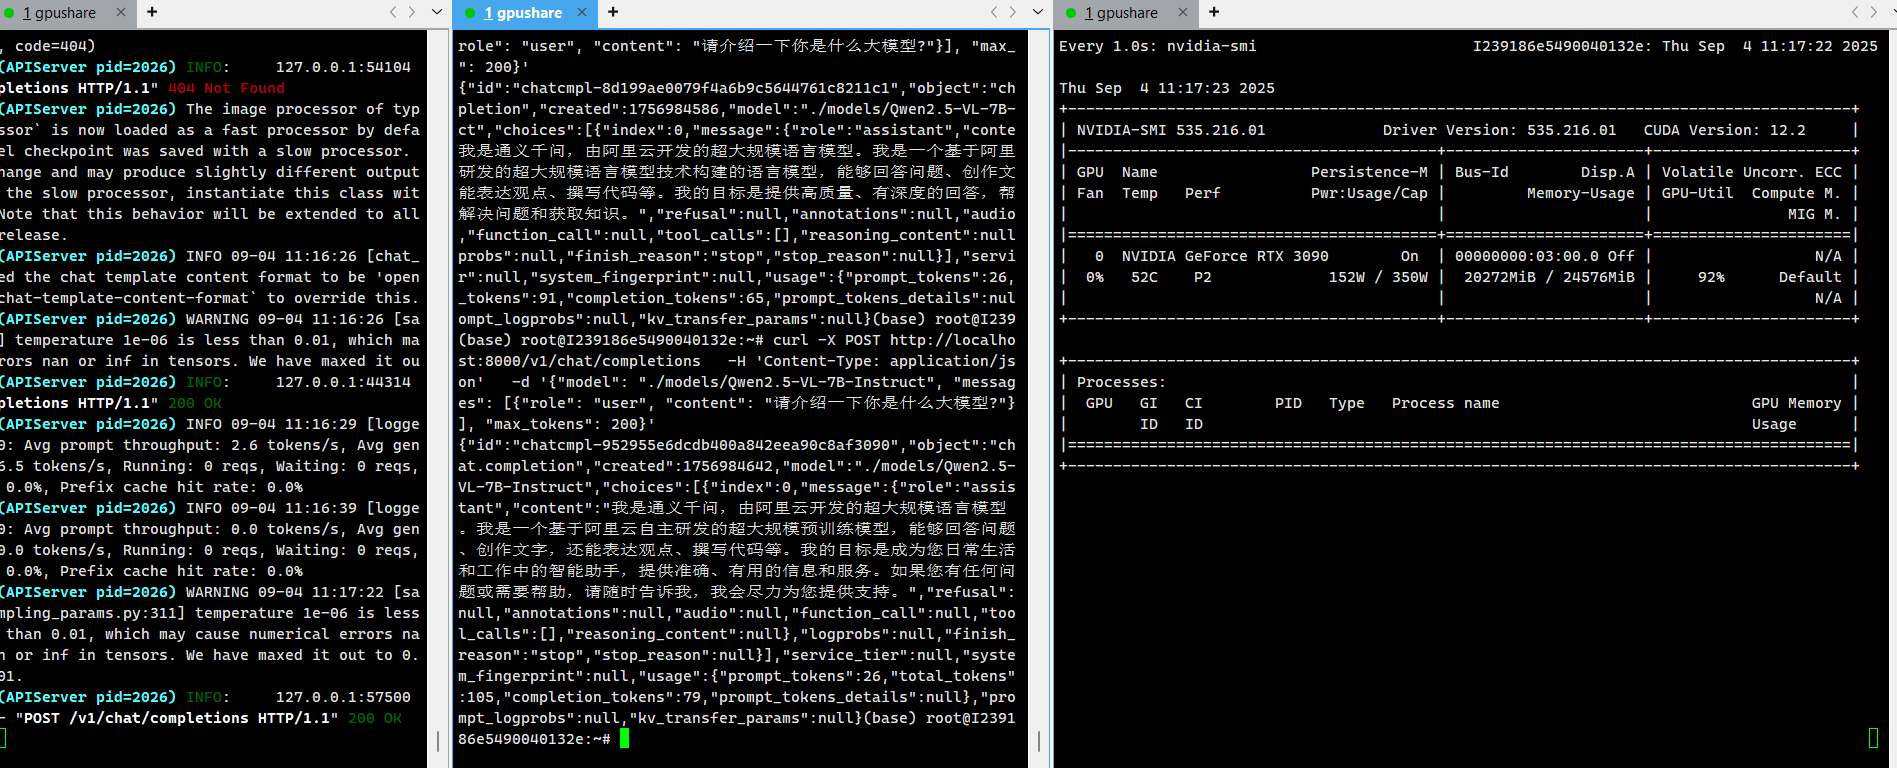
curl -X POST http://localhost:8000/v1/chat/completions \
  -H 'Content-Type: application/json' \
  -d '{"model": "./models/Qwen2.5-VL-7B-Instruct", "messages": [{"role": "user", "content": "请介绍一下你是什么大模型?"}], "max_tokens": 200}'
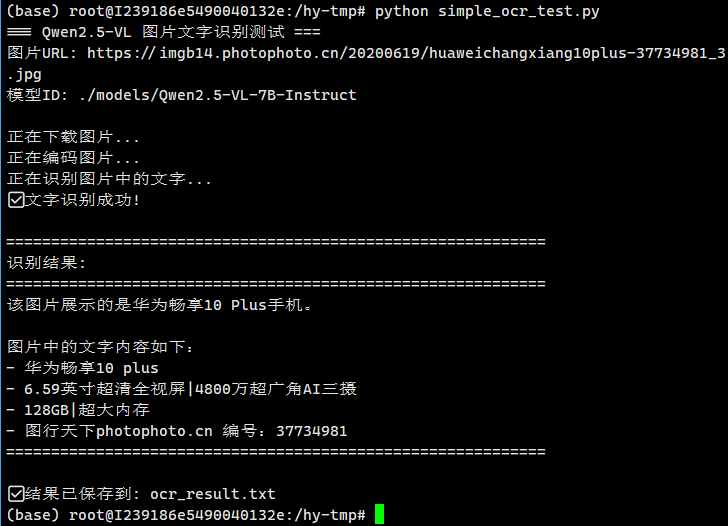
九、使用该模型进行图片理解的示例

#!/usr/bin/env python3
"""
简化的Qwen2.5-VL OCR测试脚本
专门用于测试指定图片的文字识别
"""

import requests
import base64
import json

def test_image_ocr():
    """测试图片OCR识别"""

    # 配置
    base_url = "http://localhost:8000"
    model_id = "./models/Qwen2.5-VL-7B-Instruct"
    image_url = "https://imgb14.photophoto.cn/20200619/huaweichangxiang10plus-37734981_3.jpg"

    print("=== Qwen2.5-VL 图片文字识别测试 ===")
    print(f"图片URL: {image_url}")
    print(f"模型ID: {model_id}")
    print()

    try:
        # 1. 下载图片
        print("正在下载图片...")
        response = requests.get(image_url, timeout=30)
        response.raise_for_status()

        # 2. 编码为base64
        print("正在编码图片...")
        image_base64 = base64.b64encode(response.content).decode('utf-8')

        # 3. 构建请求
        payload = {
            "model": model_id,
            "messages": [
                {
                    "role": "user",
                    "content": [
                        {
                            "type": "text",
                            "text": "请问该图片是什么产品,同时请识别图片中的所有文字内容。"
                        },
                        {
                            "type": "image_url",
                            "image_url": {
                                "url": f"data:image/jpeg;base64,{image_base64}"
                            }
                        }
                    ]
                }
            ],
            "max_tokens": 1000,
            "temperature": 0.1
        }

        # 4. 发送请求
        print("正在识别图片中的文字...")
        response = requests.post(
            f"{base_url}/v1/chat/completions",
            json=payload,
            timeout=60
        )

        # 5. 处理响应
        if response.status_code == 200:
            result = response.json()
            content = result["choices"][0]["message"]["content"]

            print("✅ 文字识别成功!")
            print("\n" + "="*60)
            print("识别结果:")
            print("="*60)
            print(content)
            print("="*60)

            # 保存结果到文件
            with open("ocr_result.txt", "w", encoding="utf-8") as f:
                f.write(f"图片URL: {image_url}\n")
                f.write(f"识别时间: {response.headers.get('Date', 'Unknown')}\n")
                f.write(f"识别结果:\n{content}\n")

            print(f"\n✅ 结果已保存到: ocr_result.txt")

        else:
            print(f"❌ 识别失败: HTTP {response.status_code}")
            print(f"错误信息: {response.text}")

    except requests.exceptions.RequestException as e:
        print(f"❌ 网络请求失败: {e}")
    except Exception as e:
        print(f"❌ 识别过程出错: {e}")

if __name__ == "__main__":
    test_image_ocr()
执行结果:
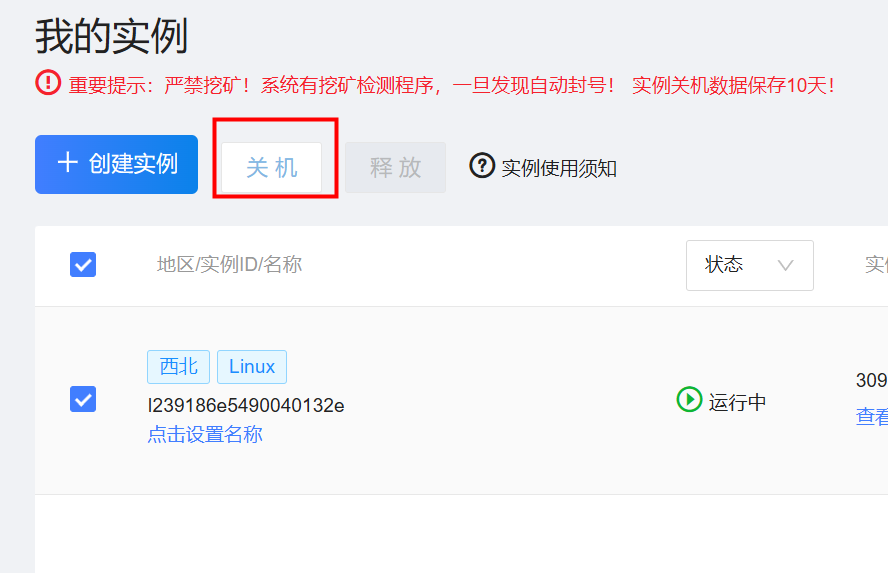
十、用完记得关机,否则会持续扣费。
十一、备份
sudo apt-get install nano
备份脚本
#!/bin/bash
set -e

cd /
file="hytmp-$(date "+%Y%m%d-%H%M%S").zip"
zip -q -r "${file}" hy-tmp
oss cp "${file}" oss://backup/
rm -f "${file}"
shutdown
此内容由惯性聚合(RSS阅读器)自动聚合整理,仅供阅读参考。 原文来自 — 版权归原作者所有。