









John Malone //


Information is power. This sentiment also holds true when discussing the creation of a supporting archive. A supporting archive is something that we put together to help inform our customers of our test findings and provide them the most relevant information. It should be a resource that contains evidence and artifacts from a penetration test that allows the tester to draw on information to further their attack strategy while simultaneously providing benefit to a customer so they may better enhance their security posture.
Ideally, the security tester — you — will want to interact with the data and supporting archive in your terminal. Doing so will allow for rapid logging and interaction with content through the command line, which can prove exceptionally powerful when dealing with and searching through vast quantities of information.
In this post, we will briefly discuss how we may best manage our data and create a strong supporting archive.

When working through a penetration test, you will want to first ensure that you have a place within your file system that is only for the data that will help you construct your supporting archive. Nothing else should be saved there with the exception of information that is directly relevant to your penetration test. For example, consider the following directory path:
/home/tester/testing
This file path points to the “home” directory of the user “tester” and a subdirectory simply named “testing” or the name of a customer.
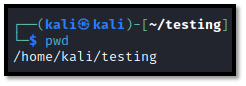
While it may seem like a mundane concept, dedicating a space to your testing data will help minimize the chances of contamination by irrelevant data and maximize the likelihood of your final product being easy to find and simple to navigate.
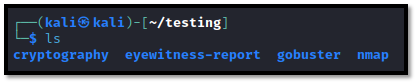
After creating your dedicated folder, consider splitting it into additional subdirectories that further separate the contents based on what tools you will be using. You can certainly feel free to add more during your test, but laying things out and making them a standard part of any testing environment you use will save you time and will allow you to implement some time-saving scripting practices which will be discussed later. For example, we may have the following directories in our space:
/home/tester/testing/nmap
/home/tester/testing/gobuster
/home/tester/testing/cryptography
/home/tester/testing/eyewitness
/home/tester/testing/impacket
/home/tester/testing/recon
/home/tester/testing/crackmapexec
An example is shown in the screenshot below.
My preferred naming convention for tests is:
/home/malone/[CLIENT-NAME]/testing
Feel free to use whatever naming convention you prefer.
With that established, we can carry this information with us to our next tip, which emphasizes the importance of understanding your tools so that you are able to extract the highest quality of information for your data.
When working with testing tools, it is common to see tools that support outputting results to a specific file. For example, we can configure Nmap to run with the switches -oN for “normal output” or -oX for “XML output”. While these methods often have their own unique case uses, for the intent of a thorough supporting archive, we would want to rely on -oN. The reason for this is that normal output is a simple text file that contains our information. Simplicity is a good thing and can allow us to use equally simple commands to extract meaningful information. Additionally, you could utilize the –oA switch, depending on what you are looking for. This switch will provide you with normal, XML, and greppable output all at once! For this example, we will stick with –oN.
Below is an example command that makes use of this feature.
nmap -vvv -Pn -T4 -sV 192.168.1.1 -oN /home/tester/nmap/192.168.1.1.txt
This command instructs Nmap to provide very, very verbose output (-vvv), to treat all hosts as being alive (-Pn), to scan quickly (T4), to target an IP address, and to save the output of that IP address as normal output (-oN). By doing this, we are able to generate a text file that contains simple output and, most importantly, that is saved to our supporting archive at the designated location for this tool.
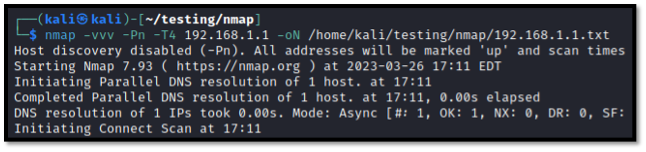
It is worth noting that some tools, either by choice or by design oversight, may not always include tools for outputting their information. In this case, we can make use of the following command:
tee -a /home/tester/testing/[TOOL]/[FILENAME]
This command, tee -a, allows us to append information to an arbitrary location within our computer system — or our supporting archive. This command is relatively useless in this format on its own but becomes a powerful logging tool when we combine it with our previous command. Even though Nmap supports logging, for the sake of this example, we can pretend that it does not and obtain the same result with the following command:
nmap -vvv -Pn -T4 -sV 192.168.1.1 | tee -a /home/tester/testing/192.168.1.1-nmap.txt
This command will perform the same scan as the above Nmap command, but will now output the content directly to the desired file. We can utilize “tee” in this manner to ensure that we capture information quickly.

When testing in a real-life environment, you may find yourself needing to engage in all sorts of activities which, when performed manually, would result in excessive amounts of consumed time. These activities, be they host discovery, enumeration, or even exploitation, can be made exceptionally easier with the use of BASH scripting in your terminal.
When combined with the above tips, you can quickly weave together scripts which will not only perform your desired operation with the tool of your choice but will also construct a clean and complete area of your supporting archive. In my opinion, the best way to do this is with the use of “for loops”.
For this example, we will utilize the same Nmap command as above, but will this time apply it to an entire range of hosts. We will also break the below command down into its individual components to ensure maximum clarity. Also, kindly take note of the bolded text.
for IP in $(cat /home/tester/testing/targets.txt); do nmap -vvv -Pn -T4 -sV $IP -oN /home/tester/testing/nmap/$IP.txt; done
This command, known as a “for loop”, is named for the first word within the command — which is “for”. Let’s break this down into three parts.
Our command begins with:
for IP in $(cat /home/tester/testing/targets.txt);
Here, we are saying, “Hey computer, for each IP that we find on each line when we read targets.txt….”. This snippet is an argument that we are setting for the rest of our command, which comes after our semicolon. (More on that later.) Some who are savvy with Nmap may realize that a similar approach could be to simply feed Nmap a wordlist with the -iL switch and forgo the “for loop” altogether. However, doing it this way will produce a single log file containing all scans. Using a “for loop” will instead generate multiple log files for all IPs. This, as we will cover later, will allow you to extract data in a way that allows you to rapidly parse information belonging to each host.
Before we go on, it is important to note that IP is an arbitrary value. We could name this thing — which is a variable — whatever we want! We could call it “i” or “blahblahblah” or “whatever,” and our results would be the same, provided we also reflect that on all other bolded text within our command.
Our semicolon then tells our script that we will be providing another argument. This argument is:
do nmap -vvv -Pn -T4 -sV $IP -oN /home/tester/testing/nmap/$IP.txt;
What we are now saying is, “Hey computer, for each IP that we find on each line when we read targets.txt, please DO this Nmap command and insert the value of the IP you are reading into each instance of $IP in our command.” Our semicolon once again prepares the script for the last argument, which is simply:
done
This tells our loop to terminate after reading through our list in targets.txt. To bring the entire command full circle, you have now said, “Hey computer, for each IP that we find on each line when we read targets.txt, please DO this Nmap command and insert the value of the IP you are reading into each instance of $IP in our command. Then quit!”
To bring this all together, say our list of targets is:
And say we run the following script in our terminal:
for IP in $(cat /home/tester/testing/targets.txt); do nmap -vvv -Pn -T4 -sV $IP -oN /home/tester/testing/nmap/$IP.txt; done
This will perform the same instructions as the following three commands:
nmap -vvv -Pn -T4 -sV 10.0.1.5 -oN /home/tester/nmap/10.0.1.5.txt
nmap -vvv -Pn -T4 -sV 10.0.1.7 -oN /home/tester/nmap/10.0.1.7.txt
nmap -vvv -Pn -T4 -sV 10.0.1.9 -oN /home/tester/nmap/10.0.1.9.txt
Going by what we have explored already, you can see that our BASH script will generate thorough logs for all targets within your targets.txt. However, we are saving ourselves a great deal of time, as our “for loop” needs to only be entered once, leaving Nmap to scan our three, or our three hundred, or three thousand, hosts for us. This saves us time and ensures that our supporting archive contains the maximum amount of information.
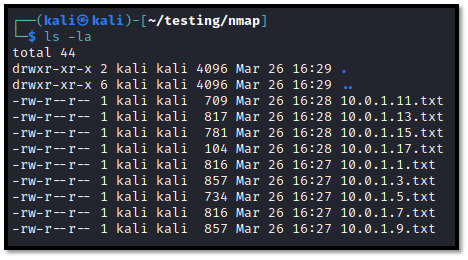
When turned into a habit, this practice will help ensure maximum efficiency and logging accuracy!

Not to turn this into a programming class, but the data you will collect while testing becomes a rather powerful testing tool, provided you treat it with love and care and keep it organized! With that said, your archive can grow off of itself as long as you implement a clever scripting plan that allows it to do so.
By combining all of our previous tips, we now have:
By all means, we can completely end this article here and send you on your merry way, but we couldn’t call ourselves hackers if we didn’t think of clever ways to utilize the information we gain, could we?
With the above bullet points in mind, we can now use our archive in a way that allows it to further build on itself, thereby saving us even more time. This time, due to the nature of our work, can instead be put towards polishing that beautiful penetration test report or engaging in manual testing while your tools chug away and your archive builds itself.
For this example, I have drafted a script that follows the following steps:
As a challenge, consider the above tips while you review the code to look for the rhyme and rhythm behind what the tool is doing.
Also, small disclaimer: This script is nowhere near perfect. However, I do feel that it illustrates the concepts discussed in this posting well enough and is applicable to help build out a starting point for an archive. Feel free to steal this and use/modify it to your heart’s content. And most importantly — be creative in your own scripting efforts!
#/bin/bash
#Make sure we have our IP ranges stored in CIDR format in /home/tester/testing/range.txt before we launch this script or it won’t work!#
#Build our Archive#
mkdir /home/tester/testing
mkdir /home/tester/testing/nmap
mkdir /home/tester/testing/eyewitness
mkdir /home/tester/testing/cryptography
#Generate a list of living hosts from text file containing CIDR ranges in our pen test scope and save to archive#
for i in $(cat /home/tester/testing/range.txt); do fping -g $i | tee -a /home/tester/testing/fping-sweep.txt; done
###Trimming our list of living hosts into a usable list of targets and outputting it to targets.txt in our archive###
cat fping-sweep.txt | grep alive | cut -d ” ” -f 1 > /home/tester/testing/targets.txt
####Now use targets.txt for our Nmap scans to build out Nmap section of Supporting Archive and prepare for additional enumeration####
echo “beginning Nmap scan”
for i in $(cat /home/tester/testing/targets.txt); do echo “testing $i…”; nmap -p- -vvv -sV -T4 -Pn $i -oN $i.txt; done
echo “Doing it again, but in one XML file so we can build out an EyeWitness section for the Archive”
nmap -p- -vvv -T4 -Pn -iL /home/tester/testing/targets.txt -oX /home/tester/testing/eyewitness-targets.xml
echo “nmap complete…”
###Now use our Nmap .XML file to build our EyeWitness Report and save it to our Archive###
/home/tester/testing/EyeWitness/Python/EyeWitness.py -x /home/tester/testing/eyewitness-targets.xml –web –timeout 60 –user-agent “Mozilla/5.0 (X11; Linux x86_64; rv:91.0) Gecko/20100101 Firefox/91.0” -d /home/tester/testing/eyewitness-report
echo “EyeWitness Complete”
###Visit testing directory, parse a list of hosts and ports for Cryptographic Analysis###
cd /home/tester/testing/nmap/ports
ag http | grep .txt | cut -d “:” -f 1,3 | cut -d ‘/’ -f 1 | sed ‘s/.txt//g’ > /home/tester/testing/crypto-targets.txt
###Using our crypto-targets.txt file with testssl.sh to generate Cryptography section for Supporting Archive – we won’t need tee -a for this one…###
echo “Starting testssl.sh and evaluating the cryptography of our webservers.”
for i in $(cat /home/tester/testing/crypto-targets.txt); do testssl –warnings batch –log “$i”; done
echo “We’re done here!”
After creating a script like this and saving it to a file, you can simply “chmod +x scriptname.sh” in your terminal and then run the script.
./scriptname.sh
This script follows a chain that puts into practice all of the tips we have discussed so far.
After coming this far and adhering to these principles, you should have a significant amount of information for your supporting archive. Granted, this is simply a method I use to gather low-hanging fruit during an assessment. Feel free to design your own scripts, but ensure they adhere to a philosophy of generating strong logs and building evidence for your archive!

ag is a fantastic searching tool within Kali and has helped do everything from refreshing my memory mid-test to creating screenshots that I feel share quite a bit of good information.
ag is a search tool that can be invoked with:
ag
This command, provided you have been making use of BASH “for loops” and have been outputting information to files, can be used to rapidly identify important information.
For example, if I wanted to search my Nmap scan results for open ports, I could cd into my Nmap directory and simply issue:
ag open
This command will pull a list of files containing the word “open.” Seeing how Nmap uses the word “open” to describe port status, this can be used to rapidly pull down neatly trimmed information about open ports on each host.
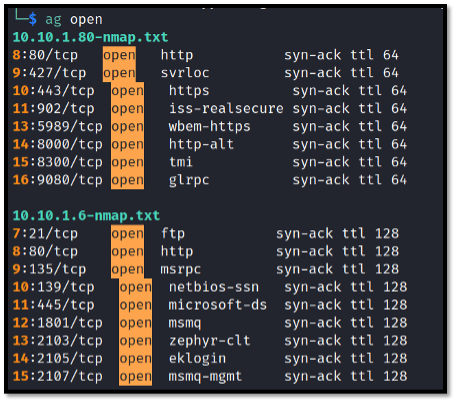
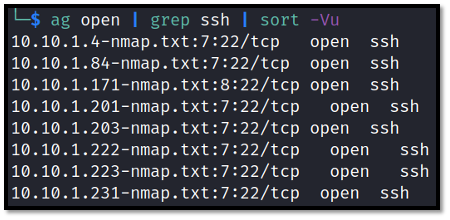
This is great, because it not only allows you to rapidly look at the crucial information about open ports but the data can be trimmed even further with something like the below command, which will rapidly produce a list of hosts running SSH:
ag open | grep ssh | sort -Vu
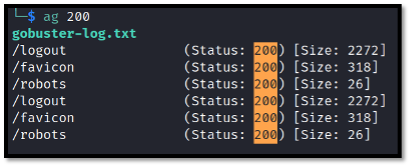
Similarly, you can use this to investigate directory enumeration results to immediately pull up valid directory names that returned a certain HTTP status code:
ag 200
Additionally, you can even look up information related to cryptographic vulnerabilities:
ag sweet | grep VULNERABLE

With a well-managed supporting archive and a bit of creativity, ag can provide you with immense levels of power and flexibility that allow for the rapid retrieval of information.
I hope I’ve sold you on it! However, it’s worth noting that this tool does dig recursively. Thus, it is best to use it within a directory from which you wish to perform your search. You can also specify the level to which it searches recursively with the –depth switch. Using it in a directory that is higher-level, such as “/”, will return many results outside of what you were probably looking for. However, ag is also a great way to scrape mounted shares for information about stored passwords 😉.
You could utilize “ag password=” or a similar variation to search an entire mounted share for potential credentials, but that is a conversation for a different time.

Don’t worry, we’re done with the technical stuff. It’s worth remembering that no two penetration tests are ever the same. Thus, it is never appropriate to simply fire a script and assume your archive is finished. If you have a steady baseline approach that allows you to obtain precious information on your targets, like the above script, feel free to use it, but prepare to also add additional information to your archive while you are testing. Similarly, you should also be prepared to exclude things from your supporting archive, especially if they consist of information that may be very sensitive, such as usernames and hashes from an NTDS.DIT dump from a domain controller during an internal test, or personal information like plaintext social security numbers. That is information you really, really do not want getting into the wrong hands.
While you are testing, you should consider everything that you see as something that you can potentially add to an archive, especially if it is something you find manually. Remember, your customer is going to be getting your archive along with a report. Consider going the extra mile and copying something interesting from a Metasploit module or Recon-NG directly into a text file.
If you’ve followed these steps and are on a test, it is likely that you now have a fairly detailed supporting archive that is organized, contains relevant information about the test, and tells a story that is helpful for you and the client. As the saying goes, it’s fine to hack for show, but you’re going to want to report well for the dough. With the supporting archive being a quintessential piece of the reporting experience, it is important that it receives your full attention and care when being built.
Until next time!
Ready to learn more?
Level up your skills with affordable classes from Antisyphon!
Available live/virtual and on-demand

此内容由惯性聚合(RSS阅读器)自动聚合整理,仅供阅读参考。 原文来自 — 版权归原作者所有。