


This is part one of a multipart blog series on researching a new generation of hardware implants and how using solutions from the world of IoT can unleash new capabilities.
Back in April 2023, I took a deep dive into the state of cybersecurity in space systems. One of the initial goals of the effort was to learn as much as I could and then build something that others could play with, hands on, to get their first taste of how things in space work. That goal was actualized at Wild West Hacking Fest in October of 2023, where two 1u CubeSats1 were deployed for attendees to work through a guided lab that mimicked real world threats to space systems.
Why am I telling you this? Well, as part of the development process for the CubeSat labs, I knew fundamentally the success or failure of the effort was dependent on having a solid bi-directional communication system that allowed for not only being able to receive telemetry data from the CubeSats but, most importantly, also allowed for telecommands to be issued remotely without physically being connected to the CubeSat.
Ultimately, I settled on an implementation that leveraged LoRa (Long Range)2 modulation because it was relatively affordable, operated in a US ISM Band of 915Mhz (thus not requiring any specialized RF circuitry or license to operate) and avoided the grossly over-crowded 2.4GHz portion of the spectrum.
For the CubeSats themselves, I used a commercially available breakout board that used a RFM95 LoRa module, and it worked well. However, for the ground station side of the equation, I could not just plug one of the breakout boards into a computer, so I ended up developing a custom PCB that utilized the same RFM95 LoRa module as the commercial option but also included a Raspberry Pi Pico W to control the module and interface with a computer.
It all worked, the labs were a success but, again, why is this important? Well, let’s dive in…
Right before the 2023 holiday season, I conversed with a friend regarding possible practical applications of the CubeSat research. Thinking about the various details of the CubeSat project, it did not take very long before I really homed in on the foundational element that made it possible – communications. Specifically, command and control of a remote system over LoRa. That was it; that was the key. I knew there would be a way to pivot from CubeSats to figuring out how to use the communication channel for offensive purposes.
Like most projects I start, I just dove in headfirst, without even as much as a quick Google search to see if anyone else had done or was doing what I was thinking about. YOLO dev, am I right??
For the rest of this post, I am going to focus on the hardware only. I may mention some software aspects, but I will not be going into detail about any software specifics beyond functionality and capabilities. Do not fret though, part two of this series will be focused on the software and implementations, so stayed tuned.
If you remember, in the background section, I ended up creating a custom PCB to facilitate PC to LoRa module communication. Well, that was the result, but it started here. It actually started on a breadboard, but this was what came next: a PCB with a Raspberry Pi Pico W and Adafruit RFM95 LoRa module soldered using through-hole header pins to the PCB.
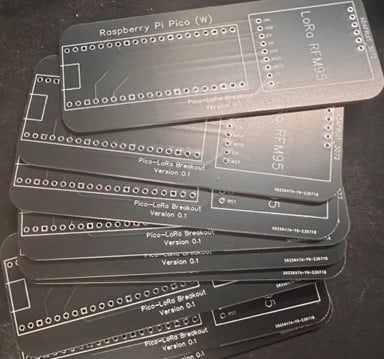
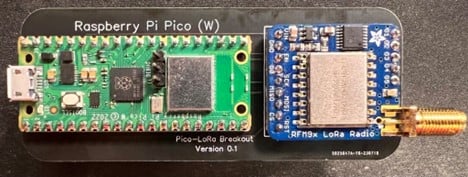
This setup worked well for my testing purposes and there really was nothing wrong with it other than the cost was higher than I wanted it to be, with it being about ~$32 USD, give or take, per board.
Eventually, after multiple failed PCB designs, I ended up with a PCB that used surface mount components and reduced the cost to about ~$14 USD per board, and I got to learn all about PCB design and fabrication; win-win.
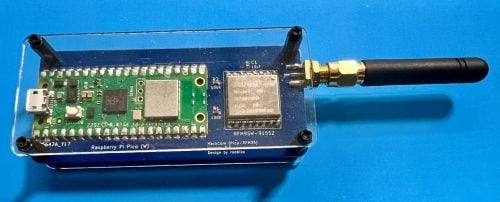
Cool, so we have hardware now what? I am so glad you asked.
First, we need a little primer on LoRa.
“LoRa (short for long range) is a spread spectrum modulation technique derived from chirp spread spectrum (CSS) technology. Semtech’s LoRa is a long range, low power wireless platform that has become the de facto wireless platform of Internet of Things (IoT).” – https://www.semtech.com/lora/what-is-lora
I am not going to bore you with the details of chirps and what not, but what you really need to know is that LoRa is a low-bandwidth communication that can traverse much greater distances than, say, traditional Wi-Fi in the 2.4 or 5.8GHz bands of the spectrum. (NOTE: 802.11ah Halow is the exception here. Range should be more or less the same given the same output power.)
Now, imagine bolting on the ability to communicate with a device over LoRa, instead of using the more ubiquitous Wi-Fi options typically used when it comes to physical implant devices. Are you with me?
I am not going to name any specific physical implant devices, but you know the type of devices I am talking about. Those that will emulate keyboards and mouse inputs, automatically run commands and scripts (as well as other attacks) most automagically upon the device being connected to a host computer.
This class of physical implant device works well, but there are some limitations you must account for when using them. The biggest limitation is around control of the device itself. With most of the common implant devices out there, there are basically a couple of options for being able to control the implant device. The first method would be to have a device to use the host computer’s internet connection and traverse that to a web service where control commands can be issued and sent back to the device. This often can work, but there is no guarantee. Then, there is a similar option of having the device join an open Wi-Fi network and backhauling command and control traffic via that network. Again, this works, but is reliant on the presence of an open network. There is also the option of using Bluetooth to be able to connect to the device as a C2 channel, but Bluetooth is limited range and, in some cases, the presence of a new Bluetooth device in the environment can be an instant indicator that something is afoot. The same thing could be said for using the device to host a wireless network that, as an operator, you would connect to in order to initiate control of the device, but it suffers the same issues as Bluetooth in terms of limited range and potential detection.
LoRa enters from stage left…
By utilizing LoRa-based communication for command-and-control capabilities of a physical implant device, many of the limitations and potential points of detection are eliminated. For instance, many mature organizations have robust wireless intrusion preventions solutions that can detect a rogue access point or even rogue Bluetooth device. How many people have even thought about detecting LoRa, much less actually implemented a method for doing so? Unlike other IoT protocols — like Zigbee and X-bee that primarily operate in the 2.4GHz spectrum, which is heavily populated and, in some cases, monitored — the 915 MHz band used by LoRa is largely unmonitored, especially from a rogue device perspective. By simply augmenting the existing communication options with current day physical implants with a LoRa-based solution, the likelihood of detection on the airwaves goes down considerably.
You may be asking yourself, “Couldn’t you just monitor the airwaves for LoRa devices?” and that would be a great question to ask. The answer is yes, you can, BUT it is not as simple as that. First, LoRa is a proprietary modulation scheme that requires physical hardware to be able to use it. That also means you need to have physical hardware that understands the modulation of LoRa to listen to it.
You can use software-defined radio devices, like the RTL-SDR or HackRF, to pick up on the potential presence of LoRa communications by looking for the characteristic chirps, but that is about it. You will not be able to demodulate it (as of now) and really will not have any more context to what is happening other than that something is happening. Here is the kicker though: Remember how LoRa “has become the de facto wireless platform of Internet of Things (IoT)?” Well, that is a very true statement, and there is very likely a device using LoRa within range of where you are reading this from. Everything from power and gas meters to proliferation of “smart devices” are using LoRa to communicate. There are entire global-wide area networks (WANs) built using LoRa and subsequent LoRaWAN protocols to carry data to and from the internet from IoT devices.
Even if you are able to detect the presence of a rogue LoRa device within your environment, you are going to have an uphill battle of isolating, communication, and being able to see what data is being sent over this out-of-band channel. Assuming you can identify the traffic, you would need to configure a LoRa radio module to the exact settings, such as spreading factor (SF), coding rate (CR), and bandwidth to see the content of the data stream. Then, you would also need to brute force your way to determining the node address that data is being sent to — luckily, there are only 255 options. Lastly, if you are able to fine tune your radio with all these parameters, you probably are going to be faced with encrypted data. Again, good luck.
You will be better off just trying to find the rogue device than trying to see the data stream. Time to go fox hunting. (https://en.wikipedia.org/wiki/Transmitter_hunting)
Needless to say, it can be very difficult to detect if a device is using LoRa, much less a rogue device connected to one of your organization’s assets. Got it, hard to detect with current tooling. But why else should LoRa be used? Again, another fantastic question my reader friend!
The short but long (pun) answer is range. I will not bore you with the physics of radio signal propagation in relationship to frequency, but the ability to plant a device and then control it remotely without the need to be in close proximity to said device is kind of important. Don’t want to get caught hanging outside the secretary’s office trying to run an attack, right?
This is where LoRa can shine. In July 2023, a new world record distance a LoRa communication traveled and was received was 830 miles. https://www.thethingsnetwork.org/article/new-lora-world-record-1336-km-830-mi
Understand, that is far from the norm, but that is ~4.3x increase of the world record Wi-Fi connection. Using increase of ~4.3x when compared to Wi-Fi is probably a little high for real world everyday experience, but in my testing, a 3x improvement of distance was pretty standard. Now, I did not in any way perform very scientific experiments to determine this but rather the ‘crude drive down the road to see when the signal drops out’ method. Your mileage will vary, but in most normal cases, the small LoRa modules with even a basic wire antenna is strong enough to have its signal escape out of the building, into the parking lot, and beyond.
With a device indoors, I have been able control an implant device from close to 500 meters away. Yay physics!
Let’s recap: physical implant device modified with LoRa module produces a long(er) range convert communication channel for controlling said implant. Sweet.
It’s been around 1000 words since I was talking about hardware, so let’s circle back to that. The original testing used the PCBs I designed for the CubeSat lab, which worked great for testing purposes and could reasonably be used in the field, but due to the technical limitations of the Raspberry Pi Pico W, such as lack of mass storage capability and not easily reprogrammed over-the-air, I felt the need for a complimentary device with more capabilities and just a little more ‘oomph’ if you will.
So, here enters the next iteration of hardware implant.
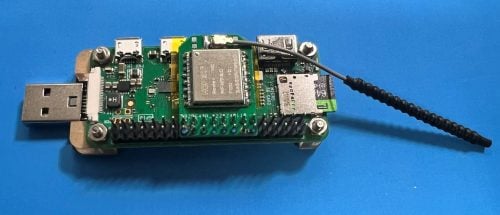
What you see above is a pretty simple setup, all based around a Raspberry Pi Zero W. These tiny single board computers have been around for a long time now, and there have been some incredible projects built using them for physical implants, such as P4wnP1 – https://github.com/RoganDawes/P4wnP1
Along with the Raspberry Pi Zero W, there is an USB On-the-go (OTG) breakout board that allows you to mount the Pi Zero to it and, in turn, you get a full-size USB type A port that allows you to plug the entire device into a PC USB port to power the device and use the host connected to perform attacks such as keystroke and mouse click injection attacks (and more). Essentially, it becomes a USB stick computer. Here is the one I used for most of my testing: https://www.amazon.com/dp/B098JP79ZX?psc=1&ref=ppx_yo2ov_dt_b_product_details
I am a little embarrassed to say that I did not know these sorts of thing existed prior to jumping down this rabbit hole. But they are incredibly simple PCB that use pogo pins or SMD spring contacts to contact the test points on the bottom of the Pi Zero. So brilliant!
The last, and frankly more crucial piece of the puzzle, is adding the LoRa module to the device. Luckily for us, I stumbled across a design someone had made for… let me check my notes… yep, you guessed it: a Raspberry Pi Zero and a LoRa RMF95 module!! The details for the LoRaPi breakout board can be found here: https://digitalconcepts.net.au/pcbs/index.php?op=lorapi
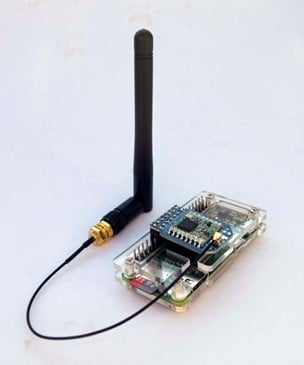
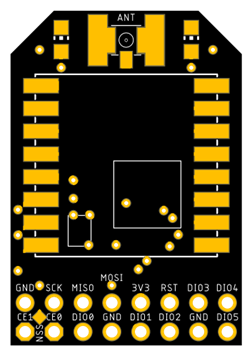
I immediately downloaded the design files and sent an order for 10 PCBs and waited for them to arrive. Once they finally arrived from China, I whipped out the tape of RFM 95 modules sitting on my desk and started assembling a couple.
In the assembly instructions, there is a basic configuration that is mentioned, and, if you plan to replicate this setup, that is all you need. PCB, LoRa Module, 2×8 header, and an antenna connector (SMA or u.fl). Pretty simple stuff.
After soldering up the first set of boards and connecting them to a Pi Zero, I couldn’t get them to work. The radio would just never configure itself over SPI, and it errored out indicating there could be a wiring issue. This was the same as the second one I tried. UGH.
A little troubleshooting later, I determined that I needed to use the CE1 chip selection pin instead of CE0 for some reason on the Pi Zero. Simple enough, I just need to desolder the solder jumper on the LoRaPi breakout board from CE0 and resolder the chip select (NSS) jumper pad to the CE1 pin on the header. Once I did this, everything worked just as expected.
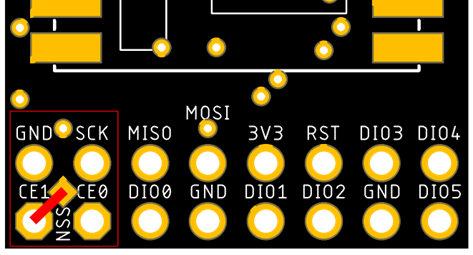
Here is a completed LoRaPi module with 2×8 pin header to connect to Pi.

Here is an example of the LoRaPi module connected to a Pi Zero W with 5dBI antenna attached.

If you build one of these devices to play around with, I do recommend that you use a 2×8 pin header so that you can easily remove the module from your Pi if you want to repurpose the Pi. Otherwise, if you are looking to make a more permanent version, you can solder the module directly to the header pins of the Pi. I found that the black plastic portion on the header was just tall enough to provide clearance for the LoRaPi module to sit flush with it and not touch the second Micro USB port on the Pi Zero W. I did put a layer of Kapton tape on the bottom of the PCB just in case, but it really is not needed.

So, there you have it, a Pi Zero W with USB OTG and LoRa RFM95 module for out-of-band communication!
Stayed tuned for the next blog in this series focusing on the software for configuring and using the RFM95 LoRa Module.

此内容由惯性聚合(RSS阅读器)自动聚合整理,仅供阅读参考。 原文来自 — 版权归原作者所有。