



This was meant to be an OpenSSH how-to blog, but since I had time, I decided to read the man pages (manual pages that you can access on a Linux terminal by typing man ssh) and had fun chasing every possible rabbit hole while at it. While going through the man pages, I learned that it was possible to use SSH to set up VPN networks and decided to give it a try. Although I just learned this and haven’t used it on a test yet, I think it could be a nice to have resource, especially in cases where the tool in use does not support SOCKS proxies or the protocol is not supported by Proxychains.
Port forwarding with SSH is a very well-documented subject, but here is a quick recap in case you’re new to it. (You can also find a video explanation by Ralph May here: https://www.youtube.com/watch?v=zG4jYmHoEr8&t=348s)
SSH can be used for local, remote, and dynamic port forwarding. Local port forwarding basically opens a port on your local machine (the one that you’re SSHing from) and forwards its traffic to a remote port on the machine or the network you are connecting to. This can be useful once you obtain shell access to a system and find services listening on the loopback or an internal interface. Local port forwarding will allow you to forward that service to a port on your local machine.
The syntax for the command is the following:
ssh –N -L local_port:remote_service_ip:remote_service_portOptionally, you can specify on which interface you want the port to listen by adding the IP address before the port.
ssh –N -L local_ip:local_port:remote_service_ip:remote_service_portAs an example, let’s say you have access to a system (192.168.136.120) and after running netstat, you found that there is a service running on port 8080 of the loopback interface.
For demonstration purposes, we are going to use the Python’s http.server module to set a web server listening in the loopback interface of our target host, which will be hosting a simple text file.
On the target host, we run the following commands to create the file and start the server:
echo "This is a local service" > file.txt
python3 -m http.server --bind 127.0.0.1 8080

You can forward that port to your local machine with the following command:
ssh -N -L 8081:127.0.0.1:8080 [email protected]This will open port 8081 on your local machine and forward all its traffic to 127.0.0.1:8080 on the remote machine 192.168.136.120.
Now if we request the file at http://127.0.0.1:8081/file.txt on the testing machine, we should be able to access the file hosted at 127.0.0.1:8080 on the target machine.

Remote port forwarding behaves in the opposite way. It opens a port on the remote machine and forwards all the traffic to that port from the remote network to a local port on the local machine or network. This can be useful when you want to forward a local port to listen on a remote machine.
The syntax for remote port forwarding is similar; this time the -R flag is used, and the remote ip and port are specified first.
ssh -N -R [remote_service_ip]:remote_port:local_ip:local_portGoing back to the previous example, let’s say you find yourself in the same situation — having access to the system (192.168.136.120) and finding a service listening at 127.0.0.1:8080, but this time ingress traffic is blocked on port 22 of the target machine so local port forwarding is not an option. In cases like this, you can use remote port forwarding to achieve the same result. You can use SSH from the target computer to connect to your testing machine and forward local port 8080 on the target to the remote port 8081 on your testing machine.
ssh -N -R 8081:127.0.0.1:8080 [email protected]
Once again, you can interact with the service on 127.0.0.1:8081 on your testing machine.

Dynamic port forwarding starts a SOCKS proxy on your local machine and forwards all the traffic going to that proxy to the remote machine where the connection will be routed based on the application protocol.
This can be useful when you are in a situation that requires access to multiple ports on the remote network. Dynamic port forward is specified by using the -D flag alongside the listening port on the local system.
ssh -D local_port user@host Let’s go back to the previous examples, but, this time, let’s say that instead of finding a service listening on the localhost, you found connections to other hosts and want to enumerate the internal network. In this case, you can use the following command for dynamic port forwarding. The following command will start a SOCKS proxy on port 1080 on the local machine.
ssh -D 1080 [email protected]This will create a local SOCKS proxy which will forward any incoming connection to local port 1080 to the remote system. To interact with the local SOCKS proxy, you can use tools such as BurpSuite, a web browser, Proxychains, or any other that supports SOCKS proxies.
As an example, we can use Proxychains and Nmap to run a connect scan on the internal network. Proxychains, by default, will attempt to connect to socks4 proxies on port 9050, as stated in its configuration file /etc/proxychains4.conf. We need to modify this configuration with the port where our proxy is listening. The following command can be used to change the configuration file:
sed -i 's/^socks4.*/socks5 127.0.0.1 1080/' /etc/proxychains4.confYour configuration file should look like this now.
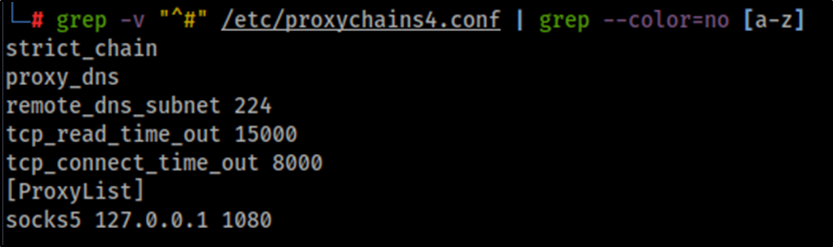
Now we can use Proxychains to run Nmap on the internal network, as shown in the following example where we scan the host 10.10.10.128.
proxychains4 -q nmap -sT -Pn 10.10.10.128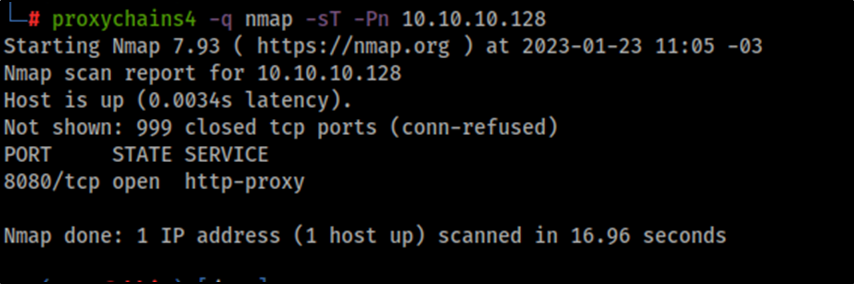
Although port forwarding is the most straightforward method and doesn’t require high privileges on the target to set up, we may run into limitations with tools not fully supporting SOCKS proxies. For instance, at the time of this writing, Proxychains only supports TCP, which limits the types of scans and attacks we can do in the remote network. If we try a UDP scan or SYN scan through Proxychains, it will fail, since UDP is not supported, and the SYN scan breaks the TCP handshake.
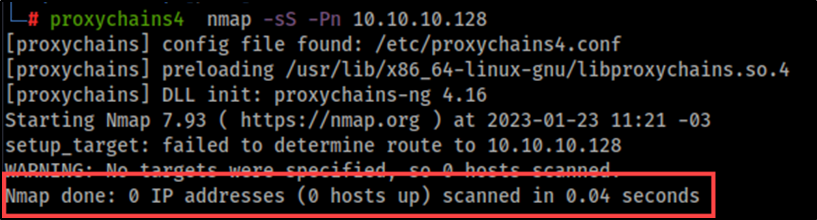
Here is where I think SSH VPNs can be useful, since it sets up a point-to-point connection at layer 3, which allows to overcome those limitations. Again, I’m not saying this is a replacement for port forwarding but can be a useful resource if you have root access on the target system. To achieve this, a series of configurations are needed both on the testing machine as well as the target machine.
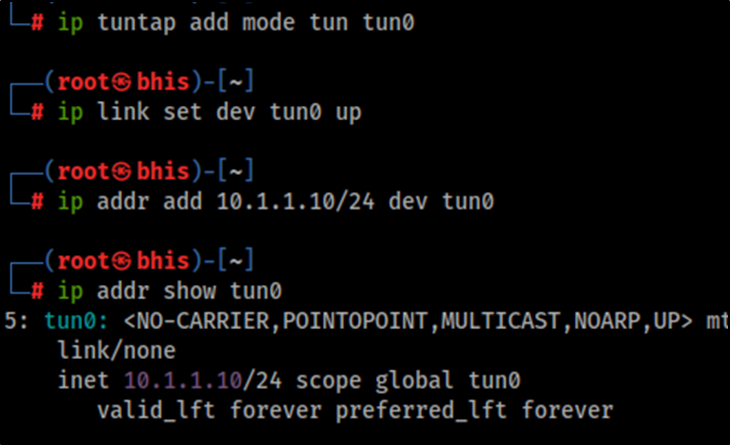
First, we need to add and configure a tun interface on the testing machine by running the following commands as root:
ip tuntap add mode tun tun0
ip link set dev tun0 up
ip addr add 10.1.1.10/24 dev tun0
Running the command ip addr show tun0 in the testing machine should show a new interface with the IP address 10.1.1.10.
Then we need to set up a route to the target’s internal network through the new tun0 interface.
ip route add 10.10.10.0/24 via 10.1.1.10Running the command ip route show on the testing machine should display the routing information containing the newly added route.
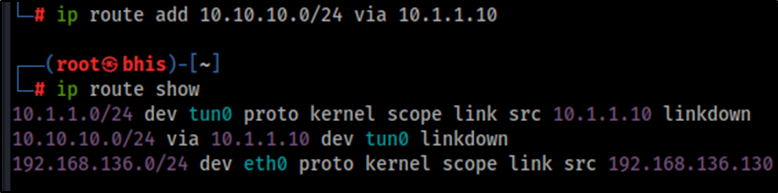
Now on the target machine, we need to enable tunneling on the SSH server by setting the PermitTunnel option to yes, then reload the service. You can use a text editor to add that option to the file /etc/ssh/sshd_config.
PermitTunnel yesThen reload the configuration, using systemctl reload sshd.
Now that SSH is allowing tunnels, we can set up the tun interface on the target system the same way we did in the testing machine.
ip tuntap add mode tun tun0
ip link set dev tun0 up
ip addr add 10.1.1.20/24 dev tun0
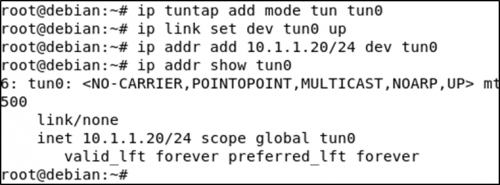
And add a route from the internal network to our SSH VPN.
ip route add 10.1.1.0/24 via 10.1.1.20Now, there are a few more configurations that need to be set up on the target system. First, IP forwarding needs to be enabled on both the newly created tun interface and the external interface which can be reached from our testing machine. Credits to Tim Fowler who helped me with the IP forwarding and NAT set up.
sysctl -w net.ipv4.conf.tun0.forwarding=1
sysctl -w net.ipv4.conf.ens36.forwarding=1
Also enable NAT on the target system so that incoming packets to the target system know where to go.
iptables -t nat -A POSTROUTING -o <interface> -j MASQUERADEWhere <interface> is the target system’s internal interface, which in my case is ens36.
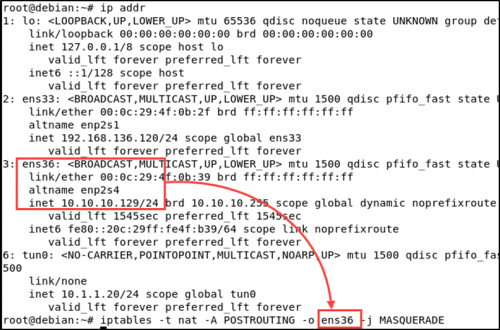
Finally, we can use SSH to tunnel both interfaces and access the internal network. The -f flag is used to background the process while the -w flag, with the argument 0:0,indicates the command to forward the tunnel device 0 on the local machine to the tunnel device 0 on the remote machine, and true is the command to be executed to fork the process to the background (this can be any command).
ssh -f -w 0:0 [email protected] trueWe should now have an established connection with port 22 of the target host that we can check with the command ss -at '( dport = :22 )'.

After the tunnel is established, we can interact directly with the internal network without having to use Proxychains, conduct SYN scans, and interact with other protocols, such as ICMP or UDP.
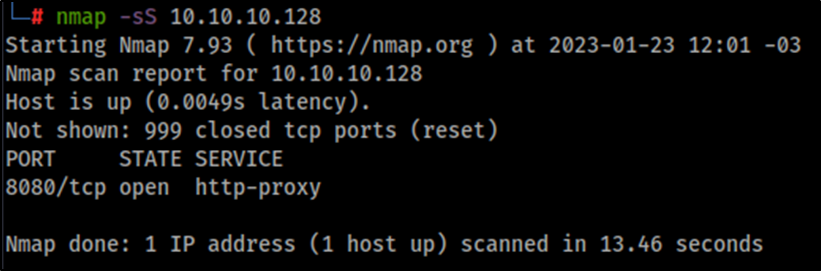
While a VPN setup can be an improvement over a SOCKS proxy under certain conditions, it requires more configuration and also root access. Moreover, I was only able to make it work on Linux-to-Linux connections at the time of writing this blog. Also, port forwarding may be a better option if your tools fully support SOCKS5 (and the only option if you don’t have root access).
Nonetheless, as penetration testers, we never know what kind of situations we are going to encounter, and having an extra resource can make a huge difference on a test.
Ready to learn more?
Level up your skills with affordable classes from Antisyphon!
Available live/virtual and on-demand

此内容由惯性聚合(RSS阅读器)自动聚合整理,仅供阅读参考。 原文来自 — 版权归原作者所有。